36
Recording and Playback: Basic Procedures
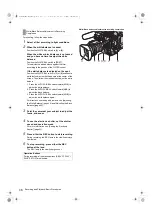
For shooting, follow the steps below.
1
Select a filter according to light conditions.
2
When the white balance is saved:
Position the WHITE BAL switch to [A] or [B].
When the white or black balance is not saved
and you have no time to adjust the white
balance:
Position the WHITE BAL switch to [PRST].
This adjusts the white balance against the filter
according to the position of the FILTER control.
If the white balance is adjusted on the spot:
Position the WHITE BAL switch to [A] or [B] and shoot a
white test subject so that it appears at the center of the
screen. Then, follow the steps below to adjust the white
balance.
1. Press the AUTO W/B BAL switch toward [AWB] to
adjust the white balance.
2. Press the AUTO W/B BAL switch toward [ABB] to
adjust the black balance.
3. Press the AUTO W/B BAL switch toward [AWB] to
adjust the white balance again.
For directions on making adjustments, see [Adjusting
the White Balance] (page 49) and [Adjusting the Black
Balance] (page 52).
3
Point the camera at your subject to adjust the
focus, and zoom.
4
To use the electronic shutter, set the shutter
speed and operation mode.
For more information, see [Setting the Electronic
Shutter] (page 53).
5
Press either the REC button to start recording.
During recording, the REC lamp in the viewfinder stays
illuminated.
6
To stop recording, press either the REC
button at the lens.
The REC lamp in the viewfinder goes out.
White/Black balance adjustment to recording completion
White/Black Balance Adjustment to Recording
Completion
Operation Buttons
During recording, all operation buttons (REW, FF, PLAY/
PAUSE, STOP) are disabled.
1
3
2
2
4 5, 6
AJ-HPX3100G(VQT3A79)_E.book 36 ページ 2010年9月17日 金曜日 午後9時21分


