1
Introduction
Top
ョヒ
ヱヰヸユン
ヴヵモンヵ
ヮユワヶ
ユヹリヵ
ヴユヵ
ヱビ
ヴヵヰンモヨユ
ョビ
ョピ
ヶヴャ
ㄆヴモヵモ
ュユヷリヤユ
ョヒ
ヱヰヸユン
ヴヵモンヵ
ヮユワヶ
ユヹリヵ
ヴユヵ
ヱビ
ヴヵヰンモヨユ
ョビ
ョピ
ヶヴャ
ㄆヴモヵモ
ュユヷリヤユ
7
8
9
10
12
13
14
15
11
ョヒ
ヱヰヸユン
ヴヵモンヵ
ヮユワヶ
ユヹリヵ
ヴユヵ
ヱビ
ヴヵヰンモヨユ
ョビ
ョピ
ヶヴャ
ㄆヴモヵモ
ュユヷリヤユ
ョヒ
ヱヰヸユン
ヴヵモンヵ
ヮユワヶ
ユヹリヵ
ヴユヵ
ヱビ
ヴヵヰンモヨユ
ョビ
ョピ
ヶヴャ
ㄆヴモヵモ
ュユヷリヤユ
7
8
9
10
12
13
14
15
11
7.
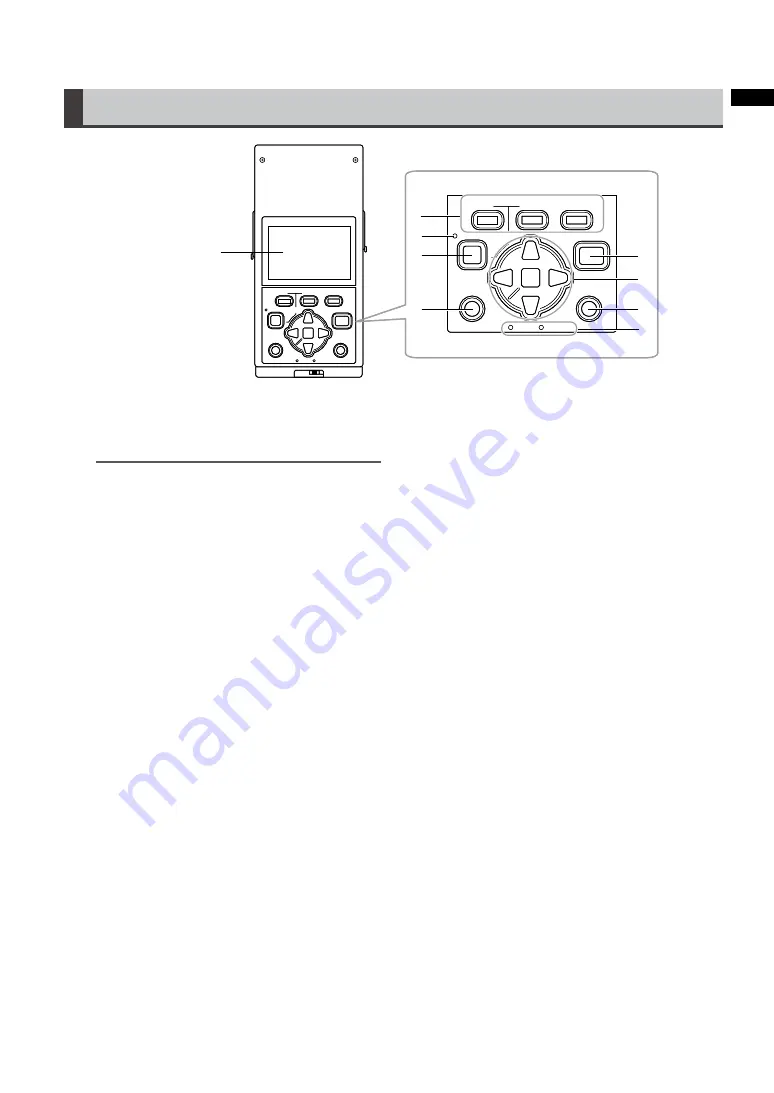
82 mm (3.2 inch) LCD monitor
Displays thumbnails as well as P2 card and
interface box operating status.
NOTE:
• Use the steps below to adjusts the brightness of
the backlight. Select [SETTING]
[LCD BACK-
LIGHT] from the menu.
For details, refer to “Menu list” (page 38).
• Use the steps below to have the LCD monitor
automatically turn off after a specified time (5 min)
of inactivity. Select [SETTING]
[LCD TIMEOUT]
from the menu.
For details, refer to “Menu list” (page 38).
8.
Function buttons (F1/F2/F3)
Press to use the functions displayed at the bot-
tom of the screen.
9.
POWER LED
Lights when the unit is ON.
The POWER LED flashes during shutdown.
10.
POWER button
Use to turn the power ON and OFF.
When the unit is OFF, hold down the POWER
button for 1 second to turn it ON.
When the unit is ON, hold down the POWER
button for 2 seconds to turn it OFF.
For details, refer to
“
Turning the unit on and
off
”
(page 18).
11.
EXIT button
Press this button in a clip thumbnail, Proper-
ties, or in the Explore screen on the storage
device or other screen to return to the previous
screen. You can also use [EXIT] in a menu and
press the SET button to the same effect.
12.
START button
Press to start copying a P2 card.
13.
Cursor (up/down/left/right) buttons/SET but-
ton
The four outer buttons are cursor buttons. Use
them to move the cursor in thumbnails, menus,
Explorer, etc.
The SET button at the center is used to select
menu items and clips.
For details, refer to “Cursor operations”
(page 30).
14.
MENU button
Press to open the menu. Press again to return
to the previous screen.
For details, refer to “Menu list” (page 38).
15.
Access LEDs
P2:
The LED is on when a P2 card is inserted and
flashes when it is accessed.
STORAGE:
The LED is on when the drive in the interface
box or an external storage unit is connected
for copying and flashes when any of the drives
are accessed.
For details, refer to “Connections” (page 37).


