


24
optics11.com
1.
Approaching the sample surface by 1-2 mm with the manual stage, using eyesight
and/or the on-board camera.
2.
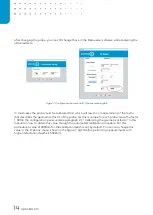
Safely using the ‘Find surface’ function of the Piuma Nano
indenter software.
Approaching the sample using the manual stage
To approach the sample and perform the experiment with the sample in focus, move the probe
completely up using the ‘Z up’ button in the software home screen. After this is completed, posit
ion
the sample on the Piuma’s sample stage and slowly lower the manual stage until the sample gets in
the focal plane as can be observed in the camera image in the Piuma software suite. After the
sample is in focus, use the motorized stage to lower the probe into the field of view of the camera
image, by taking ~100 µm steps or smaller, whichever feels most comfortable. During this process,
keep your eye on the probe, the probe mount, the clearance to the sample container and make
sure the probe does not touch the sample surface by monitoring the signal voltage level on the
interferometer. If the probe comes into the field of view, and you can assess by eye the probe is
about ~1 mm above the surface, proceed with the automated find-surface function.
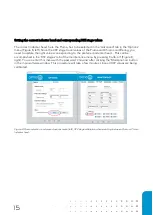
Using the automated find-surface function
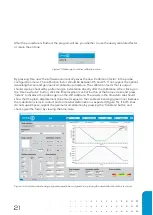
Before an indentation can be performed, it is required to safely approach the sample surface with
the previously aligned tip by using the automated find surface approach. In contrary to the find
surface approach, used during the calibration, this approach will stop a few µm above the sample
surface, adjustable in the ‘Advanced’ tab of the options menu.
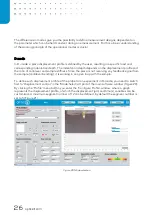
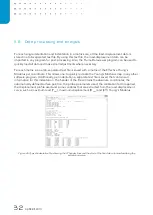
Figure 19:
Options menu with ‘Z above surface’ setting (left), stepsize adjustment (right, green), arrow key stage
movement activation (right, orange) and Sensitive mode deactivation (right, blue).
Содержание CHIARO NANOINDENTER
Страница 1: ...PIUMA NANOINDENTER USER MANUAL ...
Страница 63: ...63 Flowchart Calibration ...
Страница 65: ......