8 - 2
SUMMARY
OF
COPYING
SETTINGS
CHANGING COPY DEFAULT SETTINGS
Settings used frequently can be registered as default
settings. These are the settings that the unit is set to
after the power is turned on, or after a period of time
has elapsed between copying originals.
The factory default copying settings are as follows:
TAUX REPRO.
SEL. PAPIER
MODE LECTURE
A4
100%
1
TEXTE
21/08 ’99
SAM 15:30
PRET A COPIER
❏
In addition to the above default settings, the
default frame erase width is 2 mm, and the auto
sort feature is set to OFF.
If you want to change the above default settings, follow
the procedure below.
IMPLEMENTING COPY DEFAULT SETTINGS
The copy default settings are implemented when
you press the
Stop
or
Reset
button in copy mode
(but not while copying is in progress),
the autoclear feature is activated in copy mode, or
the registration/setting operation is complete.
SETTING COPY DEFAULT SETTINGS
To set the copy default settings, follow the steps below.
1. Press
Data Registration
.
2. Open all panels,
then use the search buttons (
▲ ▼
) to select one
of the following settings:
10 STD IMAGE QUAL/EXP
Set the default image quality and exposure for copying.
11 STD ZOOM RATIO
Set the default copying ratio.
12 STANDARD COPY QTY
Set the default quantity for copying.
13 FRAME ERASE WIDTH
Set the default frame erase width for copying.
14 AUTO SORT
Set the default setting for the auto sort feature (OFF or
ON).
Follow the appropriate instructions below depending on
the setting you selected.
If you selected 10 STD IMAGE QUAL/EXP in step 2:
3. Press
Set
.
STANDARD SCAN MODE
IMAGEQUALITY
LIGHT
AUTO EXPOSUR
DARK
TEXT
4. Press
F4
(IMAGE QUALITY) to select the image
quality setting you want to set as the default.
❏
You can select TEXT, TEXT/PHOTO, or
HALFTONE.
5. Use
F1
(LIGHT) or
F3
(DARK) to adjust the density
you want to set as the default.
❏
You can select from nine levels.
❏
You can also select AUTO EXPOSUR with
F2
.
By selecting AUTO EXPOSUR, the unit sets the
density level automatically and sets the image
quality to TEXT.
6. Press
Set
to register your setting.
7. To continue registering the next setting (11 STD
ZOOM RATIO), go to step 3 in the next procedure.
-or-
Press
Stop
to return to standby mode.
If you selected 11 STD ZOOM RATIO in step 2:
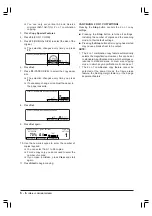
3. Press
Set
.
TAUX STANDARD
1 0 0
–
+
4. Use the numeric keypad to enter the ratio you want
to set as the default.
❏
You can also use
F2
(–) or
F3
(+) to select the
ratio you want to set as the default.
❏
You can select from 50% to 200% in one percent
increments.
5. Press
Set
to register your setting.
6. To continue registering the next setting (12
STANDARD COPY QTY), go to step 3 in the next
procedure.
-or-
To return to standby mode, press
Stop
.
Содержание Copia 9916
Страница 1: ......
Страница 12: ...2 6 SETTING UP YOUR UNIT BACK VIEW...


