background image

BASIC


COPYING


FEATURES

4 - 1

ENGLISH

BASIC COPYING FEATURES

SETTING AN ORIGINAL ON THE UNIT

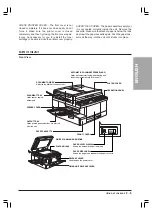
There are two ways to place originals on the unit for
copying. The method you choose depends on the size
and  type  of  original  you  want  to  copy,  and  the  copy
settings you have selected.

Platen glass

Use the platen glass when copying books, originals
on heavy or lightweight paper, and transparencies.

Automatic Document Feeder (ADF)

When  you  have  a  stack  of  originals  on  paper
suitable for automatic feeding, (

Appendix


B

) use

the Automatic Document Feeder (ADF).

COPYING AN ORIGINAL SET ON THE PLATEN
GLASS

NOTE:

A4-size  originals  can  be  placed  vertically  or
horizontally. Place the originals within the marked
sizes on the platen glass.

A3  originals  must  be  placed  horizontally  on  the
platen glass.

Follow the steps below to use the platen glass when
copying books, originals on heavy or lightweight paper,
transparencies,  and  any  other  media  that  cannot  be
fed through the Automatic Document Feeder (ADF).

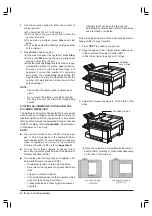
1. Press 

COPY

 to switch to copy mode.

2. Lift up the platen cover.

3. Set the original, face down, vertically or horizontally

on the platen glass.

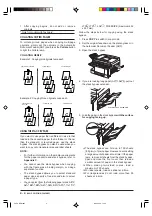
4. Align the top edge of your original with the arrow

mark on the top left corner of the platen glass.

 Place the original on the platen glass vertically

or  horizontally,  depending  on  the  size  of  the
original.

ORIGINAL

(FACE DOWN)

A4

A5

A3

A4

A4

A5

A3

A4 FAX

A4

A4

A5

A3

A4 FAX

A4 FAX

A4

ORIGINAL

(FACE DOWN)

A4

A5

A3

A4 FAX

A4

 When enlarging or reducing an original, select

the paper size  in accordance with the degree
of  enlargement  or  reduction.  The  direction  to
set the original also depends on the direction
the paper is set in. Determine the direction in
which to place the original by the markings on
the near edge of the platen glass. See “Direction
of  the  Original  According  to  its  Size  and
Magnification Ratio” when setting the original.

NOTE:

Make sure that the paper in the paper cassette is
loaded  in  the  same  direction  as  the  original  is
placed on the platen glass.

To make a same-size copy of an A4(

) original,

set the original to A4

. Setting A4

 slightly slows

the copy speed.

To make a same-size copy of an A5(

) original,

be sure to set A5

 paper in the stack bypass.

5. Gently lower the platen cover.

  Do not press down forcefully on the platen cover

when using the platen glass to copy thick books.
This  may  damage  the  platen  glass.  The
maximum load is 2 kg.

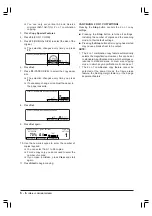
6. Press 

F2

 (PAPER SELECT) to select the paper size.

  The selection changes every time you press 

F2

.

COPY RATIO

100%

READY TO COPY

SCAN MODE

1

TEXT

21/08  '99

SAT 15:30

PAPER SELECT

COPY RATIO PAPER SELECT SCAN MODE

1

  A4

  If you have installed one of the optional paper

cassettes, the display sequence is as follows:

 paper size loaded in upper cassette, 

 paper

size 

loaded 

in 

lower 

cassette,

 Stack bypass.

  Make sure the paper in the paper cassette is

loaded in the same direction as the original is
placed on the platen glass.

7. Press 

Set

.

 If you do not press 

Set

 within three seconds of

selecting  the  paper  size  above,  the  paper  you
selected  will  be  automatically  set  without  you
having to press 

Set

.

If you have installed the optional paper cassette,
you  should  load  the  paper  size  you  use  most
frequently in the upper cassette.

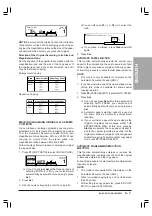
You can also make a reduced or enlarged copy
of your original.

You can also select one of the special copying
features except 2 on 1 combination. (Chapter 5)

VERTICAL POSITION

A5 

, A4 

HORIZONTAL POSITION

A5 

, A4 

, A3 

Содержание Copia 9916

Страница 1: ......

Страница 2: ...cteristics of the product incorrect electrical supply incorrect installation incorrect or improper use or in any case not in accordance with the warnings given in the User Manual supplied with the pro...

Страница 3: ...is classified as a Class 1 Laser Product under EN 60825 1 1994 220V 240V MODEL The label shown below is attached to the laser scan unit on the fax 220V 240V MODEL This unit has been classified under...

Страница 4: ...MATIC DOCUMENT FEEDER ADF 4 2 COLLATING COPIED PAGES 4 4 COLLATING ORDER 4 4 USING THE STACK BYPASS 4 4 SELECTING THE PAPER TYPE 4 6 REDUCING ENLARGING ORIGINALS TO THE DESIRED SIZE 4 6 REDUCING ENLAR...

Страница 5: ...LIST 7 4 SOLVING PROBLEMS 7 5 COPYING PROBLEMS 7 5 SUMMARY OF COPYING SETTINGS 8 1 HOW THE UNIT OPERATES WITH DEFAULT SETTINGS 8 1 COPY SETTINGS 8 1 ACCESSING THE COPY SETTINGS MENU 8 1 CHANGING COPY...

Страница 6: ...inal When copying directly from a book you can also erase the centre line and edges on the copy This feature works only when the document is copied using the platen glass Binding margin copy This feat...

Страница 7: ...anything to rest on the power cord and do not locate the unit where the cord will be walked on 7 If you use an extension cord with the unit make sure that the total of the ampere ratings on the produc...

Страница 8: ...conditioner personal computer electric type writer copier or other equipment that generates electrical noise Check the plug frequently and make sure that it is firmly plugged into the socket WHERE TO...

Страница 9: ...the plug itself Never pull on the cord The unit is equipped with a three prong grounding type plug the third pin is a grounding pin This plug will only fit into a grounding type outlet This is a safet...

Страница 10: ...the telephone cord to the jack marked on the back of the unit TURNING ON THE POWER Use the power switch on the right side of the unit to turn the power on The unit will take a few seconds to warm up W...

Страница 11: ...just to the width of the document DOCUMENT TRAY Holds sent or copied documents FEEDER COVER OUTPUT TRAY Holds printed pages after they are ejected from the unit OPERATION PANEL PAPER CASSETTE FRONT CO...

Страница 12: ...2 6 SETTING UP YOUR UNIT BACK VIEW...

Страница 13: ...o use the paper Store unused paper from opened packs in a cool dry location in the original packaging Let the paper run out before refilling the paper cas sette Avoid mixing new paper with paper remai...

Страница 14: ...Error Lamp Blinks red when the unit has run out of paper or toner or when there is a paper jam 5 Reset Button Returns to standard copy mode 6 Data Registration Button Lamp Accesses the different user...

Страница 15: ...erview of how to select and adjust settings using the Data Registration button These settings allow you to set up different features for the general operation of your unit as well as customise the cop...

Страница 16: ...r MM DD YY If you make a mistake press Clear and enter the date and time again You can also use F2 or F3 to move the cursor under the digit you want to correct and enter the correct digit ENERGY SAVER...

Страница 17: ...power mode when you set an original for copying in the Automatic Document Feeder ADF you open the platen cover or you press the Energy Saver button The Energy Saver button can only be used to return...

Страница 18: ...lso depends on the direction the paper is set in Determine the direction in which to place the original by the markings on the near edge of the platen glass See Direction of the Original According to...

Страница 19: ...t Feeder ADF For details refer to Appendix B Specifications of Originals You Can Copy NOTE You can set a stack of up to 50 A5 or A4 size pa ges or 20 A3 size pages in the Automatic Docu ment Feeder AD...

Страница 20: ...quality of the original 7 Press Start to begin copying If LOAD THE APPROPRIATE SIZE PAPER appears after you specified AUTO PAPER and pressed Start the correct size of paper for the original has not be...

Страница 21: ...annot use the stack bypass when copying with the frame erase binding margin or 2 page separation function The stack bypass allows you to select standard paper sizes specify a free size and also to sel...

Страница 22: ...SELECT SCAN MODE 100 1 TEXT 21 08 99 SAT 15 30 READY TO COPY A4 14 Press F2 PAPER SELECT to select the stack bypass The paper you selected above will appear next to the mark COPY RATIO 100 READY TO CO...

Страница 23: ...from a standard size original to a different standard size paper This mode is only available for originals in the Automatic Document Feeder ADF ZOOM 1 INC This mode reduces or enlarges originals to a...

Страница 24: ...n also use F3 or F4 to select the ratio ENTER THE COPY RATIO 5 0 2 0 0 1 3 7 If you make a mistake press Clear and start again 4 Press Set AUTOMATIC PAPER SELECTION This function automatically selects...

Страница 25: ...o the most appropriate level for the original MANUAL EXPOSURE 1 Press F3 SCAN MODE SET A SCAN MODE IMAGEQUALITY LIGHT AUTO EXPOSUR DARK TEXT 2 Use F1 LIGHT or F3 DARK to adjust the exposure 3 Press Se...

Страница 26: ...ing manual exposure control To adjust automatically the exposure of the copy and the quality of the original proceed as follows 1 Press F3 SCAN MODE 2 Press F2 AUTO EXPOSUR If you press F1 LIGHT or F3...

Страница 27: ...ppear when copying facing pages in a bound original onto a single copy sheet This mode is useful when copying from a book or magazine BINDING ERASE Erases the shadows that appear in copies from bindin...

Страница 28: ...of the optional paper cassettes you can use F2 PAPER SELECT to select a different paper size 7 Press Set If you do not press Set within three seconds of selecting the copy paper size your selection w...

Страница 29: ...the size of the original The selection changes every time you press F4 7 Press Set 8 Use the numeric keypad to enter the frame erase width You can also use F3 or F4 to select the width You can select...

Страница 30: ...th You can select a margin width from 1 to 10 mm If you make a mistake press Clear and start again 7 Press Set 8 Confirm that the paper in the paper cassette is the same size and in the same direction...

Страница 31: ...es you can use F2 PAPER SELECT to select a different paper size 9 Use the numeric keypad to enter the number of copies required You can select from 1 to 99 copies For one copy only you do not need to...

Страница 32: ...R SELECT A4 10 Use the numeric keypad to enter the number of copies required You can select from 1 to 99 copies For one copy only you do not need to enter the number of copies If you make a mistake pr...

Страница 33: ...ollows 1 Turn the power switch off and disconnect the power cord from the power source 2 Wipe the unit s exterior with a clean soft lint free cloth moistened with a small amount of diluted mild deterg...

Страница 34: ...le wrap or other suitable packing material TONER CARTRIDGE HANDLING CARTRIDGES Do not remove the toner cartridge from its protective bag until you are ready to install it Save the protective bag You m...

Страница 35: ...ting or to store the remainder of a document in memory Installing any other type of cartridge in this unit could damage the unit and void your warranty Leave the toner cartridge in its protective bag...

Страница 36: ...tly Rotating it violently may cause the toner to scatter To avoid pinching your fingers between the toner cartridge and the unit grip the toner cartridge with both hands as shown below 10 Align the ta...

Страница 37: ...y apply the tip of the brush to the anti static dispenser and gently move the brush back and forth from one side of the anti static dispenser to the other ROLLER When cleaning the anti static dispense...

Страница 38: ...lways open the Automatic Document Feeder ADF cover before you attempt to remove a jammed document Otherwise you might damage the unit and the document 4 Close theAutomatic Document Feeder ADF cover un...

Страница 39: ...and could cause burns or electric shock NOTE Remove any media from the stack bypass and close the stack bypass before performing any of the procedures on the following pages Not doing so may cause da...

Страница 40: ...wise indicated There are high temperature components inside the unit which may cause burns if tampered with 5 Remove the jammed paper by pulling it gently in the direction of the arrow shown below 6 R...

Страница 41: ...ady to print Wait until the message disappears from the LCD display PAPER SIZE SETTING IS WRONG There may be a mismatch between the paper size detection WRONG lever setting and the paper size actually...

Страница 42: ...ing have sent then try copying again ARE COPIED DOCUMENTS CUT AT THE MARGINS Is the document set in the correct direction Setthedocumentinthecorrectdirectionandcopyagain Isthesizeofthecopypaperyousele...

Страница 43: ...button on the numeric KEYPAD VOLUME keypad you will hear a beep The volume of this beep ca be adjusted or t can be turned off Energy Saver ENERGY SAVER Energy saver mode is off and will remain off un...

Страница 44: ...Set the default quantity for copying 13 FRAME ERASE WIDTH Set the default frame erase width for copying 14 AUTO SORT Set the default setting for the auto sort feature OFF or ON Follow the appropriate...

Страница 45: ...RAME ERASE WIDTH 0 2 m m 4 Use the numeric keypad to enter the width you want to set as the default You can also use F2 or F3 to select the width You can select a width from 01 mm to 20 mm 5 Press Set...

Страница 46: ...Trailing edge Approx 2 5 mm Left right side Approx 2 5 mm Scanning method Flat scanning using CCD image sensor Scanning line density Direct copy reading 400x600 dpi writing 1200x600 dpi Memory copy re...

Страница 47: ...re copying All the pages of an original for copying must be the same size and thickness SPECIFICATIONS FOR ORIGINALS YOU CAN SCAN Make sure your originals meet the following requirements Automatic Doc...

Страница 48: ...50 sheets NOTE To use paper that is thicker or thinner than standard plain paper be sure to use the stack bypass You can set the paper type We recommend using Olivetti original supplies for optimum pr...

Страница 49: ...etection lever to the size of the paper you are going to load Otherwise copies will not print correctly 5 Peel off the transparent plastic covering from the paper size plate and attach the appropriate...

Страница 50: ...ding Function PARTS AND THEIR FUNCTIONS LIFTING THE UNIT Before moving the machine remove the tray and refer to Lifting the Unit in Chapter 2 ATTACHING THE SHIFT TRAY Normally the tray should be attac...

Страница 51: ...m occurs while using the Shift Tray A1 the unit displays the message REC PAPER JAM and an error number 1 to 4 The Error light will also blink If the error number 1 appears remove the jammed paper usin...

Страница 52: ...ne MAIN SPECIFICATIONS Paper 20 24 lb 75 g m2 90 g m2 Tray capacity A4 250 sheets A3 20 lb 80 g m2 Power source DC24V DC5V From main unit Dimensions W x D x H 8 X 22 X 6 in W X D X H 200 X 550 X 160 m...

Отзывы: