background image

22

Chapter 2 Get to know the Océ TCS300 colour printing system hardware

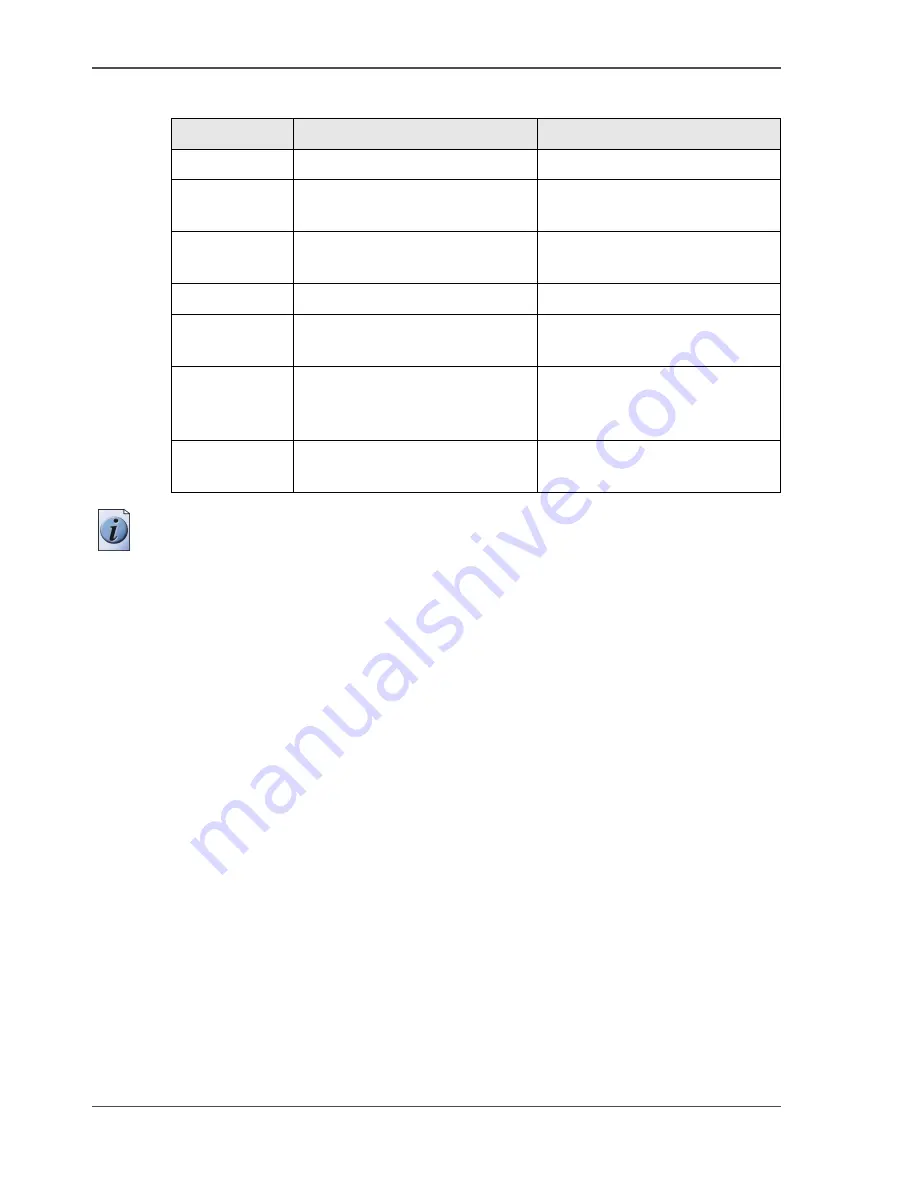
The Océ TCS300 printer

The main components of the Océ TCS300 printer

[8] 

Note: 

The copy receiving rack is an optional feature. The copy receiving rack is 

required for the 3 roll version (

see ‘The optional copy receiving rack’ on page 30

).

Number

Component

Function

1.

The printer operator panel

View the printer information.

2.

The top cover

Get access to the carriage with 
the printheads.

3.

The media rolls

Provide the media for your 
printed output.

4.

The integrated receiving tray

Receive the output (option).

5.

The ink tanks

Provide the ink for your printed 
output.

6.

The Océ Power Logic

®


controller door

Get acces to the optionally 
integrated Océ Power Logic

®


controller.

7.

The maintenance door

Get access to the maintenance 
cassette.

Содержание TCS300

Страница 1: ...Oc TCS300 Oc User manual User manual...

Страница 2: ...thout written permission from Oc Oc Technologies B V makes no representation or warranties with respect to the contents hereof and specifically disclaims any implied warranties of merchantability or f...

Страница 3: ...er are either registered trademarks or trademarks of Microsoft Corporation in the United States and or other countries AutoCAD is a registered trademark of Autodesk Inc Novell is a registered trademar...

Страница 4: ...4 Trademarks...

Страница 5: ...eiving rack 30 Chapter 3 Prepare the Oc TCS300 for use 35 Introduction 36 Turn on and off the Oc TCS300 37 Turn on and off the Oc TCS300 printer and the Oc Power Logic con troller 37 Set the timers 40...

Страница 6: ...e output and clean cut a roll of media 78 Chapter 6 Ensure the best output quality 81 Introduction how to ensure the best output quality 82 Define the output quality 83 The quality modes 83 Output typ...

Страница 7: ...d media not available 154 End of roll 155 Cover or door opened 156 Remove jammed media 157 Temperature or humidity out of range 159 Carriage away from home position too long 160 Clear the set memory 1...

Страница 8: ...8 Contents...

Страница 9: ...9 Chapter 1 Introduction...

Страница 10: ...of damage to your properties Note Attention and Caution The words Note Attention and Caution indicate these important parts The word Note comes before additional information about the correct operati...

Страница 11: ...Overview of available documentation Overview of the users of the printer 2 Get to know the system General system description Controller Printer Finishing options 3 Prepare the system for use Turn the...

Страница 12: ...12 Chapter 1 Introduction How to use this manual Appendix B General information Reader s comment sheet Appendix C General information Addresses of local Oc organisations Chapters Section Topics...

Страница 13: ...er Logic controller Oc TDS TCS connectivity manual CD ROM as a PDF file in English only On line Help Oc TCS300 Settings Editor application Embedded in the application as an on line help file in multip...

Страница 14: ...f user Common user The common user is a person who uses the system for print jobs The common user has no permission to change the system settings Therefore the common user is also referred to as an an...

Страница 15: ...it is advised to work with the system as a power user The power user has the combined rights of the key operator and the system administrator 5 Note The default password for the power user is PowUsr...

Страница 16: ...16 Chapter 1 Introduction The Oc TCS300 users...

Страница 17: ...17 Chapter 2 Get to know the Oc TCS300 colour printing system hardware...

Страница 18: ...can access the homepage of the controller application from any networked workstation The Oc TCS300 colour printing system consists of the following modules The Oc Power Logic controller The printer Th...

Страница 19: ...Logic controller to do the following define the default system settings receive jobs over the network process the print jobs manage licenses The location of the Oc Power Logic controller 6 6 The locat...

Страница 20: ...rences or an optimal tuning of the print job processing can be changed when necessary To be able to edit settings in the Settings Editor you must log in using one of three predefined user roles becaus...

Страница 21: ...gurations Each of the rolls can contain different types and sizes of media The size and type of the loaded media are indicated on the operator panel There are two finishing options available for the O...

Страница 22: ...age 30 Number Component Function 1 The printer operator panel View the printer information 2 The top cover Get access to the carriage with the printheads 3 The media rolls Provide the media for your p...

Страница 23: ...ter operator panel for easy viewing to both sides Use the printer operator panel to view system information when the system is in the on line mode and to do actions when the system is in the off line...

Страница 24: ...nate and you will hear an audio signal The printer has the following types of signals An attention signal A short interrupted audio signal The red LEDs flash two times A warning signal A short interru...

Страница 25: ...contains more information about the on line mode and the off line mode see The on line mode and the off line mode on page 26 5 The stop key Use the stop key to delete or to stop a job see Stop or dele...

Страница 26: ...stem information card When the printer is in the on line mode the green LED is on The screen of the printer operator panel displays the following 5 information cards 10 10 On line mode Information car...

Страница 27: ...wizard cards graphical representation of the wizards and through the wizard steps Back Next Use the lower softkeys to select a wizard card or an option within the wizards You can select the following...

Страница 28: ...printhead on page 142 Use this wizard to replace a defective printhead after the printer operator panel displays an error message and prompts you to replace the defective printheads Only replace the p...

Страница 29: ...of the component Integrated Receiving Tray This option is advised for a low production environment and a lot of same size output The Integrated Receiving Tray is not available for the 3 roll version 2...

Страница 30: ...ng rack is an option for the 1 roll configuration and the 2 roll configuration of the Oc TCS300 printer but is required when you have a 3 roll configuration Purpose Use the copy receiving rack to coll...

Страница 31: ...he tray Note The position of the leading edge stopper is not important in this situation How to adjust for productive print jobs with same media sizes Attention The copy receiving rack can collect a m...

Страница 32: ...jobs with different media sizes Attention The copy receiving rack can collect a maximum of 100 prints in this position 1 Place the rack with side II against the back of the printer 2 Secure the rack w...

Страница 33: ...dge stoppers at the tray 4 Adjust the rack with the guides into the position marked with one of the following figures 27 27 Rack adjustment for standard print jobs with humid prints 28 28 Rack adjustm...

Страница 34: ...34 Chapter 2 Get to know the Oc TCS300 colour printing system hardware The optional copy receiving rack...

Страница 35: ...35 Chapter 3 Prepare the Oc TCS300 for use...

Страница 36: ...repare your Oc TCS300 for use You can learn more about the following Turn on and off the Oc TCS300 Set the Oc TCS300 printer timers Define the display language of the Oc TCS300 Define the language of...

Страница 37: ...setting is set to either On or Off The Oc TCS300 printer and Oc Power Logic controller have 2 energy save modes that enable you to prevent unnecessary power consumption when the system remains turned...

Страница 38: ...c TCS300 printer and the Oc Power Logic controller 29 29 The power switch on the backside of the printer 30 30 The On off button of the Power Logic controller front Turn on the Oc Power Logic controll...

Страница 39: ...shut down process has finished Setting Synchronise controller power on off Action Set to On Press the On off button on the printer The Oc Power Logic controller and the printer both start up Set to O...

Страница 40: ...controller remain turned on You can define the following energy save mode settings in the Oc Setting Editor 16 Note By default the Energy save mode timer on off is enabled and the Energy save mode tim...

Страница 41: ...Oc Settings Editor Step Action 1 Access the home page of the Oc TCS300 Settings Editor in your browser application 2 Navigate to the energy save mode settings Preferences System defaults Sleep mode an...

Страница 42: ...turned off in the sleep mode The Oc Power Logic controller remains turned on You can define the following sleep mode settings in the Oc Setting Editor 18 Note By default the Sleep mode timer is enable...

Страница 43: ...EPA Energy Star sleep mode requirements for wide format printers 19 Change the Key Operator settings in the Oc Settings Editor Step Action 1 Access the home page of the Oc TCS300 Settings Editor in y...

Страница 44: ...nguages using the operator panel Before you begin Access the Oc Settings Editor This setting can be edited by the key operator and the power user How to define the default and the alternative display...

Страница 45: ...nguage and the second language 32 32 Press the lower right softkey to change the language How to change the display language on the off line screen of the printer operator panel Note Only the first la...

Страница 46: ...ke sure the General tab is selected 4 Click the Languages button in the lower part of the window Another window opens 5 Select the language of your choice A new language can be added to the list with...

Страница 47: ...rement unit the Oc Power Logic controller recalculates the values from mm to inches and vice versa If you repeatedly switch between this setting a slight calculation difference can occur due to roundi...

Страница 48: ...tem wizard You can perform the following actions in the Configure system wizard Enable DHCP Set the IP address Set the IP subnet mask Set the default gateway Configure the DNS settings Configure the p...

Страница 49: ...hen you select No Press the key for Undo to cancel your settings 9 After you select Yes press the key for Next The wizard will lead you through a series of dialogues where you can enable DHCP or defin...

Страница 50: ...r and to define the subnet mask After you finish an octet press the key for Next to go to the next octet 13 Press the key for Next after you finish the last octet The screen displays Set default gatew...

Страница 51: ...tings are received through DHCP When no indication appears you do not need to reboot the Oc Power Logic controller Note When Synchronise controller power on off is set to On you must turn the printer...

Страница 52: ...52 Chapter 3 Prepare the Oc TCS300 for use Configure the network settings of the Oc TCS300...

Страница 53: ...53 Chapter 4 Use the Oc Settings Editor to control your workflow...

Страница 54: ...ork with the Settings Editor you must log in using one of three predefined user roles because the settings are all password protected Configuration tab Editable for System administrator and Power user...

Страница 55: ...nistrator and Power user 22 Tab Groups Support About Gives information about the system version Media Gives an overview of the media profiles that are active on the system Manages media profiles Licen...

Страница 56: ...ys the different user roles and the authorisations that belong to the role 23 Role Authorisation Anonymous user You have not logged on You have read rights to all the settings You are not allowed to e...

Страница 57: ...the value of the setting you want to edit a log in window appears 2 You can select a user role from the drop down list Note The user role with the required authorisation is already selected 3 Enter th...

Страница 58: ...ration tab or the Preferences tab 2 Click View set in thetop right hand corner of the screen A secondary window is opened 3 Scroll through the list of settings The first column displays the setting an...

Страница 59: ...te to a location on the network and select the back up file 4 Click Ok to load the back up file or Cancel 5 Restart the Oc Power Logic controller Result If you have more than one Oc TCS300 you can use...

Страница 60: ...d license duration Check how long a demo license is valid View all options available for your Oc system The list of options depends on the type and version of the Oc system Make a list of new options...

Страница 61: ...License type This field displays one of the following license types Resale Demo Duration in days This field displays the time your license is valid License number This field displays a license number...

Страница 62: ...y those available in the Media sizes Before you begin Access the Settings Editor The setting is editable for the key operator and the power user How to define the media series in the Settings Editor 1...

Страница 63: ...given period When to do Enable the setting and define a suitable time out period that does not interfere with the print productivity To avoid the deletion of jobs disable this setting How to configur...

Страница 64: ...rieve the correct media profile on the corporate web site www oce com The Settings Editor allows you to manage the media profiles on the printer Before you begin This setting is editable for the Key o...

Страница 65: ...download a media profile from the Oc web site 1 Access the corporate web site in your internet browser www oce com 2 Click Support and Downloads Downloads Colour profiles Product choose Oc TCS300 3 Do...

Страница 66: ...le 1 Click Support Media 2 Click the check box of the media profile you want to update 3 Click the Update button in the toolbar above the media profiles list 4 Click Browse to navigate to the correct...

Страница 67: ...ing Overnight printing optimisation has the following options 26 Calibration is only possible when one of the following media types minimal media size is A0 is loaded on the system If you use another...

Страница 68: ...68 Chapter 4 Use the Oc Settings Editor to control your workflow Set up unattended overnight printing optimisation...

Страница 69: ...69 Chapter 5 Print jobs to the Oc TCS300...

Страница 70: ...the settings defined in the Oc Settings Editor Make sure that you define the correct quality mode for your job see The quality modes on page 83 Make sure that you define the correct media type for yo...

Страница 71: ...ault configuration of the Oc TCS300 includes the following options to send a print job Oc Windows printer driver Oc PostScript driver Oc HDI driver FTP LPR The jobs are sent directly to the printer No...

Страница 72: ...m With these drivers PC users can access the Oc TCS300 printer remotely from their applications to print their files Note More information about how to install configure and use the drivers is availab...

Страница 73: ...les through FTP is to drag and drop the files or to copy and paste the files into this Jobs folder on the FTP site of your Oc TCS300 controller The documents in the folder are printed on the Oc TCS300...

Страница 74: ...ately A dialogue box on the screen asks the user to Resume or Stop the job When you do not select an option the printer automatically continues the printing after 5 minutes 41 2 Use the lower softkeys...

Страница 75: ...tings in the job submission tools to set the Oc TCS300 for productive use or high output quality 28 Note The above procedure is based on DIN media sizes You can also use this procedure with ANSI media...

Страница 76: ...sizes and the same media types Note When roll 1 is empty the printer switches automatically to roll 2 You can load a new roll while the printing process continues When the output quality is the most...

Страница 77: ...Before you begin This setting can be edited by the system administrator or the power user How to change the default drying time 1 Access the home page of the Oc Settings Editor 2 Navigate to Support...

Страница 78: ...tic media cut is disabled in the Oc Settings Editor When Automatic media cut is enabled in the Oc Settings Editor the system automatically cuts the output How to use the Feed cut wizard to cut the out...

Страница 79: ...s the message Select roll for Feed cut When 1 roll is available on the system the wizard moves directly to the Cut screen 4 The screen displays the message Select roll for Feed cut Use the lower softk...

Страница 80: ...80 Chapter 5 Print jobs to the Oc TCS300 Cut the output and clean cut a roll of media 47 After the sheet is cut you automatically exit the wizard...

Страница 81: ...81 Chapter 6 Ensure the best output quality...

Страница 82: ...settings The Colour Management section of this chapter gives an overview of these Colour Management settings When to do Only do actions to optimise the output quality based on the information supplied...

Страница 83: ...on is visible on the printed output For these print jobs the output quality is good Release The print speed is very high This quality mode is best for drawings very good for images and provides a good...

Страница 84: ...e describes the relation between these parameters The relation between the output type and the quality parameters 32 32 The relation between the output quality parameters Colour mode Quality mode Prin...

Страница 85: ...quality modes Introduction The selection of the media and the quality modes depends on the application of the output The tables give you an idea of which media type and quality modes to use in a work...

Страница 86: ...aper Bond Translucent bond Check Release To release a drawing Draft paper Standard paper Tracing paper Premium coated paper Matt film Bond Translucent bond Deluxe bond Release To present a drawing Dra...

Страница 87: ...87 Recommended media types and quality modes CAD and GIS drawings Colour 49 49 Example 2D CAD colour drawing...

Страница 88: ...GIS map 34 34 CAD and GIS drawings Colour 1 2 When to use Recommended media type Recommended quality mode To check a drawing Draft paper Standard paper Tracing paper Bond Translucent bond Check To re...

Страница 89: ...ity 51 51 Example photo realistic impression To present a drawing Draft paper Standard paper Premium coated paper Matt film Bond Coated bond Release To archive a drawing Matt film Release 34 CAD and G...

Страница 90: ...mixed content 35 35 CAD and GIS drawings Colour high density When to use Recommended media type Recommended quality mode To release a drawing Premium coated paper High gloss photo paper Photo matt pap...

Страница 91: ...91 Recommended media types and quality modes Logo and Business graphics Colour 53 53 Example of logo...

Страница 92: ...ness graphics and 3D CAD Colour 36 Logo and Business graphics Colour When to use Recommended media type Recommended quality mode To release a document Premium coated paper High gloss photo paper Photo...

Страница 93: ...93 Recommended media types and quality modes 55 55 Example of business graphics...

Страница 94: ...ng with rendering 37 37 Business graphics and 3D CAD Colour When to use Recommended media type Recommended quality mode To release a document Premium coated paper High gloss photo paper Photo matt pap...

Страница 95: ...our 57 57 Example of a photo 38 38 Photos Colour When to use Recommended media type Recommended quality mode To release a photo High gloss photo paper Photo matt paper Release To present a photo High...

Страница 96: ...ou want to print in colour the priority of the colour settings is also illustrated in the table below 39 Stages in the process of making a colour print Priority Document The colour settings are alread...

Страница 97: ...printer the file type is not changed The file is sent to the printer the way in which it was saved in the application you used to Printer drivers The Oc Windows printer driver offers colour managemen...

Страница 98: ...annot be recognised the controller applies the default colour settings managed by the Oc Settings Editor The table below gives an overview of the relation between the job submission method the file ty...

Страница 99: ...files into PostScript PDF LPR FTP The documents are sent to the printer without being converted to another file type The controller recognises the following file types Vector HP GL HP GL 2 CalComp Ras...

Страница 100: ...istic colours Advised for photos or graphic art presentations If you select Oc enhanced colours you can also adjust the advanced Colour Management settings Enhanced colours RGB input data Enhanced col...

Страница 101: ...hanced colours RGB input data setting This setting specifies the source colour space for printing RGB images objects and text and allows the Oc TCS300 to select the best conversion from the source s R...

Страница 102: ...ses the default setting as defined in the Oc Settings Editor gives the best result Euroscale coated for Europe and Asia US web coated SWOP for the USA 43 Overview of the Enhanced colours CMYK input da...

Страница 103: ...finetune your output quality is to adjust the Colour Management settings If the Colour Management setting Colour feel is set to Oc enhanced colours you can define the Enhanced colours Rendering intent...

Страница 104: ...including rendering the source s white Note The slightly bluish cast of the monitor background might be noticeable as bluish white in the lightest tones of the printed output A slight yellow tone can...

Страница 105: ...do not have any colour information in the job ticket As individual job settings in the available Oc Windows printer driver during the creation of a print job The settings are stored in the job ticket...

Страница 106: ...2 HP RTL files 2 2 Basic setting Colour feel Advanced settings 46 Overview Colour Management settings for TIFF files Basic setting Colour feel Advanced settings Oc CAD colours Oc enhanced colours Enh...

Страница 107: ...f the final result 47 Overview Colour Management settings for PostScript PDF files Basic setting Colour feel Advanced settings Oc CAD colours Oc enhanced colours Enhanced colours RGB input data sRGB A...

Страница 108: ...ssibilities to check the quality of your printed output Make a quality check print Make a tone scale area print Make a demo print This section describes the problems you can analyse by making one of t...

Страница 109: ...ripes and Banding 48 48 Stripes and Banding problems 1 2 Graphical representation of the problem Description 58 Small stripes over the entire width of the print colour independent Perform an Optimise...

Страница 110: ...If these lines are unacceptable switch to a slower mode Release or Presentation Performan Optimise print quality test The test checks all printheads and the printer compensates for missing nozzles Ch...

Страница 111: ...system see Replace the media on page 132 If yes select a different media type When the printer applies a lot of ink the paper can cockle Use premium papers or coated papers because they have a better...

Страница 112: ...ur Management menu in the Oc Settings Editor or Oc Windows Printer Driver 63 Blue lines and areas appear purple Select the Oc CAD colours setting from the Colour Management menu in the Oc Settings Edi...

Страница 113: ...s on page 108 How to make a quality check print The system prints the Quality check print in the Presentation quality mode The system uses a minimum of media for the Quality check print You are recomm...

Страница 114: ...ow to make a tone scale area print The system prints the Tone scale area check print in the Presentation quality mode The system uses a minimum of media for the Tone scale area check print You are rec...

Страница 115: ...ms see Output quality problems on page 108 How to make a demo print The system prints the Demo print in the Release quality mode The demo print takes several minutes to print You are recommended to us...

Страница 116: ...Enhanced colours with the optimal rendering intents for posters images etc Make sure you define the correct software settings for example the correct pen settings Use the Release quality mode for draw...

Страница 117: ...e occurs in the Check mode when you print on high gloss photo paper Use the Release or Presentation quality mode Problems with the nozzles cause drop out Demo print Use the Optimise print quality wiza...

Страница 118: ...ion on page 67 is loaded before you enter the Optimise print quality wizard Note You can start the Optimise print quality wizard from the printer operator panel or you can automatically optimise your...

Страница 119: ...e system automatically uses the correct roll of media When calibration is possible with both rolls continue with step 5 5 Press the lower softkeys to select a media roll for the calibration 67 6 Press...

Страница 120: ...120 Chapter 6 Ensure the best output quality Use the Optimise print quality wizard...

Страница 121: ...121 Chapter 7 License management...

Страница 122: ...enses tab in the Oc settings Editor enables you to manage the licenses very easily This section describes the following The basic concept of the licences How to manage the licenses The Licenses tab in...

Страница 123: ...Oc system Oc needs the host id of your Oc system to create a new license file 3 Send the list of new options you need the list of license numbers and the host id to Oc Oc creates and delivers one or m...

Страница 124: ...enses you receive 2 license files What you see per situation What you see per situation depends on the license file you use 52 52 What you see depends on the situation 1 2 Situation What do you see Vi...

Страница 125: ...enses during the license activation job if you use the saved licenses of your back up file You see the following All demo licenses that where active at the time you created the back up file All resale...

Страница 126: ...on Check how long a demo license is valid View all options available for your Oc system The list of options depends on the type and version of the Oc system Make a list of new options you need Make a...

Страница 127: ...nses to display the license information page 2 Click the host id hyperlink to display the host id information 3 Send the host id information to your Oc representative together with a list of options t...

Страница 128: ...gged on already 3 Browse the network and select the license file 4 Click Ok to start the activation of the license file A message is displayed when the process is completed 5 Restart the system to act...

Страница 129: ...tion job When to do Save the current active licenses before you start a license activation job or to save the current license situation How to save the license information 1 Click Support Licenses to...

Страница 130: ...130 Chapter 7 License management Save the currently active licenses...

Страница 131: ...131 Chapter 8 Maintain the Oc TCS300 printer...

Страница 132: ...ned on the system When to do Change a roll when a job needs a media type or size that is not on one of the rolls Change the media type that is defined on the system when the defined media type and the...

Страница 133: ...133 Replace the media 70 70 Remove the roll 3 Both far ends of the roll contain flanges with handles Lift the handles to release the flanges 71 71 Release the flanges 4 Remove the flanges...

Страница 134: ...oth ends of the new media roll 2 Press the handles down to fasten the flanges 3 Put the saddles into position at the ends of the track 73 73 Saddles 4 Use both hands to place both flanges in the green...

Страница 135: ...for the new roll of media Attention After you load a new roll of media the screen of the printer operator panel displays a wizard Use the wizard to define the media type and the cut option for the new...

Страница 136: ...feed 50 cm before the printer cuts the media You can use this option when the media is damaged or polluted with for example tape residue Yes short strip Cut the media with the shortest possible strip...

Страница 137: ...screen When you do not want to load a new roll use the upper right softkey to continue the wizard at the introduction screen When you do want to load a new roll press the retract button to change the...

Страница 138: ...r Next to continue The screen displays the message Change media type of roll number Use the lower softkeys to select the correct media type for the media roll 80 80 Select the correct media type for t...

Страница 139: ...u must replace an ink tank when the ink level indicator on the printer operator panel shows 0 The indicator flashes when the ink tank is empty Note While you replace the ink tank the printer can conti...

Страница 140: ...ank 1 Press the dimpled recess in the ink tank inward and upward to release the ink tank 81 81 Push the tank inward and upward 2 Pull the ink tank straight out of the slot 82 82 Pull the tank out The...

Страница 141: ...in the ink tank Note Do not shake the ink tank or touch the opening of the ink tank 2 Slide the ink tank into the slot until you feel a resistance and stop Note The ink tank fits only in one way The i...

Страница 142: ...ote Only replace a defective printhead using the Replace printhead wizard Note A printhead is defective when the printhead has an electric defect or a major number of nozzles fail You can not continue...

Страница 143: ...ace printhead card 83 3 Press the softkey below the Replace printhead card to enter the wizard An introduction screen displays the message Use this wizard to replace printheads A roll is needed for ca...

Страница 144: ...ve printhead 84 The screen displays the message Replace printheads and the printheads that you must replace Find the correct printhead number on the printhead carriage 85 7 Press the front of the prin...

Страница 145: ...way 3 Close the printhead cover 4 After you replaced the defective printhead press the softkey for Next 5 The screen displays the message Make sure that all head covers are properly positioned Press...

Страница 146: ...e Replace printhead procedure remove the printhead clean the contact area with a lintfree cloth and re insert the printhead Note Also check the maintenance cassette after you replaced a printhead see...

Страница 147: ...ette in time a pop up message appears on the screen The pop up message displays the message Maintenance cassette full Press Continue to start the Replace cassette wizard The system produces a double a...

Страница 148: ...oftkeys to scroll to the Replace cassette card 90 3 Press the softkey below the Replace cassette card to enter the wizard An introduction screen displays the message Use this wizard to replace the mai...

Страница 149: ...store the old maintenance cassette in a horizontal position to prevent the spilling of ink Be careful with the ink on the maintenance cassette Note The packing of the new maintenance cassette also inc...

Страница 150: ...placed used or new 94 Attention Make sure that you select the correct option Never select New for a used cassette This can seriously damage your printheads 3 Press the key for Used or New Select Used...

Страница 151: ...151 Chapter 9 System messages and solutions...

Страница 152: ...of roll on page 155 Close maintenance door Close top cover A door or cover is open although you are not in a wizard see Cover or door opened on page 156 Remove media A media jam occurred see Remove ja...

Страница 153: ...y Remove and re insert the printhead at the original position Note If the problem persists you must replace the printhead 4571 4579 Head too hot during printing You can ignore this problem by pushing...

Страница 154: ...ower Logic controller tries to print on a type of media that is not available on the printer the printer operator panel displays a media request The system produces a short interrupted audio signal Th...

Страница 155: ...other roll does not contain the same media type the system produces a short interrupted audio signal The red LEDs on the printer operator panel flash two times If necessary the output is dried the pri...

Страница 156: ...r the maintenance door without accessing the wizard the system produces a warning signal The red LEDs on the printer operator panel remain illuminated When you open a door or cover during printing the...

Страница 157: ...gh a series of dialogue boxes Use the following procedure to remove the jammed media How to remove jammed media Attention Never use a knife to cut loose the jammed media When you use a knife to cut lo...

Страница 158: ...and solutions Remove jammed media 100 6 Insert the roll of media in the printer The printer is ready for use Note When you remove the media from the front of the printer there is a risk of ink pollut...

Страница 159: ...duces a short interrupted audio signal The red LEDs on the printer operator panel flash two times Press the key for OK The system information card on the on line screen of the printer operator panel d...

Страница 160: ...from home position too long Always replace the printheads or the maintenance cassette in one continuous action to prevent the drying of the printhead nozzles When you replace a printhead or the mainte...

Страница 161: ...set memory all jobs on the system are deleted Clear the set memory You can clear the system with the Configure system wizard on the printer Use this function if a damaged job blocks the workflow of t...

Страница 162: ...system can recover When a system error occurs an error code is displayed on the screen 103 2 When a system error occurs you must turn the printer off and on Note If the setting Synchronise controller...

Страница 163: ...l with permanent errors 1 A permanent error is an error that neither the system nor the operator can recover A permanent error does not recover when you restart the system When a permanent error occur...

Страница 164: ...164 Chapter 9 System messages and solutions Deal with permanent errors...

Страница 165: ...165 Appendix A Specifications of the Oc TCS300...

Страница 166: ...Network protocols TCP IP IPX SPX FTP LPD Novell Power consumption Controller 100 W Electrical requirements 100 120 230 V 50 60 Hz Applicable software Oc Power Logic controller software 58 Basic modul...

Страница 167: ...Oc and non Oc printers None managed by application Enhanced colours RGB input data sRGB Adobe RGB Enhanced colours CMYK input data Euroscale coated Euroscale uncoated US web coated SWOP US web uncoat...

Страница 168: ...rinter operator panel Out of ink signalling Print speed Greyscale check mode 1 A0 portrait per 41 seconds Colour check mode 1 A0 portrait per 1 minute and 3 seconds Maximum productivity Greyscale 60 A...

Страница 169: ...n Unattended printing in the overnight mode Dimensions 1461 mm x 743 mm x 1960 mm H x D x W Voltage 100 120 230 V Frequency 50 60 Hz Power consumption EPA Sleep mode printer and Oc Power Logic control...

Страница 170: ...orbing moisture Media types Europe The following preferred media types are available for the Oc TCS300 printer in Europe 61 Note Visit Oc on the internet at www oce com for the latest information Note...

Страница 171: ...from the Oc website for all media types Media types Japan The following preferred media types are available for the Oc TCS300 printer in Japan 62 Preferred media types USA IJM number Media name Media...

Страница 172: ...OMP file Oc Media Profiles file with the right IJM number from the Oc website for all media types Media sizes 64 63 Preferred media types Japan IJM number Media name Media name in Wizard IPE Recycled...

Страница 173: ...print greyscale in the Check quality mode the system decreases the drying time to 20 of the default value You can change the drying time for all the media types You can select a percentage of 0 999 o...

Страница 174: ...24 lbs 0 20 Premium coated paper Oc Premium Paper 90 g m2 0 20 Coated bond Oc Color Bond coated 24 lbs 0 20 Matt photo paper Oc Smart Matt Paper 100 170 g m2 0 50 High gloss photo paper Oc Smartfit P...

Страница 175: ...xed raster vector HP GL 2 printer driver that allows you to print from any application under Windows 2000 Windows XP or Windows Server 2003 to your Oc systems AutoCAD 2000 family Oc HDI Printer Driver...

Страница 176: ...176 Appendix A Specifications of the Oc TCS300 Specifications drivers and job submission software...

Страница 177: ...177 Appendix B Reader s comment sheet...

Страница 178: ...format of this manual convenient in size readability and arrangement page layout chapter order etc O Yes O No Could you find the information you were looking for O Always O Most of the times O Someti...

Страница 179: ...l in your occupation Name Occupation Company Phone Address City Country Please return this sheet to Oc Technologies B V For the attention of ITC User Documentation P O Box 101 5900 MA Venlo The Nether...

Страница 180: ...180 Appendix B Reader s comment sheet Reader s comment sheet...

Страница 181: ...181 Appendix C Addresses of local Oc organisations...

Страница 182: ...nc 4711 Yonge Street Suite 1100 Toronto Ontario M2N 6K8 Canada http www oce ca Oc Office Equipment Beijing Co Ltd Xu Mu Cheng Chaoyang District Beijing 100028 China http www oce com cn Oc Czech Republ...

Страница 183: ...Bhd 3 01 Level 3 Wisma Academy Lot 4A Jalan 19 1 46300 Petalig Jaya Selangor Darul Ehsan Malaysia http www ocemal com my Oc Mexico S A de C V Prolongaci n Reforma 1236 4to Piso Col Santa F Del Cuajim...

Страница 184: ...resses you need Oc Espa a SA Business Park Mas Blau Osona 2 08820 El Prat de Llobregat Barcelona Spain http www oce es Oc Svenska AB Sollentunav gen 84 191 27 Sollentuna Sweden http www oce se Oc Schw...

Страница 185: ...the Media request time out 63 Configure the regional settings of the Oc TCS300 47 Controller Hardware Specifications 166 Software Specifications 166 controller 21 Copy Receiving Rack 29 copy receivin...

Страница 186: ...tings that are stored in a back up file 58 How to configure the Meida request time out 63 How to configure the network settings in the Oc TCS300 Settings Editor 51 How to define the regional settings...

Страница 187: ...26 Operator panel printer operator panel overview 23 Optimise Output quality 116 Optimise print quality 118 Output quality 82 84 Optimise 116 Output quality problems Colours 112 Overview 108 solution...

Страница 188: ...84 Remove Jammed media 157 Maintenance cassette 148 Printheads 143 Remove media roll 132 Replace ink tank 139 Replace printheads 142 Repro operator 14 S Save Licenses 129 Save the currently active lic...

Страница 189: ...ser roles and authorisations 56 Users 14 Anonymous user 14 Common user 14 key operator 14 power user 15 system administrator 15 W Waves Cockle Output quality problems 111 Wizard Change the media type...

Страница 190: ...190 Index...

Отзывы: