background image

OnTime Clock 

Installation and User Guide 

Firmware Version 1 

All claims based on information publicly available at time of printing. All other product or service names mentioned  

in this document may be trademarks of the companies with which they are associated.  

© 2015 Novanex, Inc.  |  All rights reserved  | page  36 

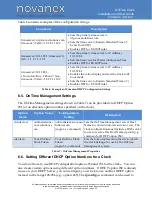
Condition 

Solution 

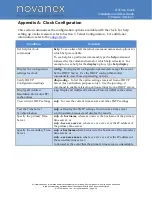
View or Configure Clock’s 

IP settings  

ipconfig

 - 

To view clock’s current IP settings

.   

ipconfig -d

 - Use DCHP to lease an IP address and retrieve 

network settings. (Disables static IP addressing) 

ipconfig -o  xxx

 - Use DHCP to lease an IP address and request a 

configuration string where 

xxx

 is the DHCP option number.  The 

factory default is 230. 

ipconfig  -o

  - Disable the configuration portion of the DHCP 

process.  

ipconfig -h  hostname

 - To change the hostname of the clock,  

where 

hostname 

is the new hostname.  

ipconfig -b [ on | off 

] - Set whether to show IP information at 

clock bootup.  

ipconfig -x 

- Show all Interface data. 


ipconfig 

v  [ v4 | v6 ]

 - Set the IP version for the clock to use.  

Specify either “v4” or “v6”; the default is v4.


v4 - IPv6 disabled, only use IPv4 addresses. 
v6 - IPv6 enabled, only use static IPv6 addressing. (Disables 
IPv4) 

 
  The following options are ignored if DHCP is enabled: 

ipconfig -a IP

 - Use the specified fixed IP address. (Disables 

DHCP) 

ipconfig -m mask

 - Set the subnet mask. 

ipconfig -g gateway

 - Set the gateway address. 

ipconfig -a xxx.xxx.xxx.xxx -m yyy.yyy.yyy.yyy -g zzz.zzz.zzz.zzz 

- To configure a static IP address, where 

xxx.xxx.xxx.xxx

 is the IP 

address, 

yyy.yyy.yyy.yyy

 is the subnet mask, and 

zzz.zzz.zzz.zzz

 is 

the gateway address. (All the information is ignored if DHCP is 
later  enabled.) 

ipconfig -n domainname

 - Set domain name.   

ipconfig -p IP

 - Set primary DNS address. 

ipconfig -s IP

 - Set secondary DNS address. 

ipconfig -t dnstimeout 

- Set DNS timeout (0 is valid). 

Содержание Inova OnTime

Страница 1: ...Inova OnTime Clock Installation and User Guide Firmware version 1...

Страница 2: ...Number 715412 NOTICE OF TRADEMARK Inova OnTime is a registered trademark of Novanex Inc Microsoft Microsoft Windows and PowerPoint are registered trademarks of Microsoft Corporation While reasonable e...

Страница 3: ...alog Clock 7 4 5 Mounting the Double Sided Analog Clock 8 4 6 Surface Mounting the Digital Clock 9 4 7 Pendant Mounting the Digital Clock Single or Double 11 4 8 Cantilever Mounting the Digital Clock...

Страница 4: ...tion to the Clock 24 7 2 Configuring an IP Address 25 7 2 1 DHCP 25 7 2 2 Assigned Static IPv4 Address 25 7 2 3 Auto Configured IPv6 Address 25 8 Specifying a Time Server 27 8 1 Setting the Time Zone...

Страница 5: ...nternet Protocol VoIP phones Delivering both data and power over one set of wires simplifies installation saves space and eliminates the need for electrical outlets at the clock mounting locations Add...

Страница 6: ...hich model you have If you believe that you have an OnTime Clock Firmware Version 2 please refer to the support site for the version 2 manual Firmware Version 2 Firmware Version 1 Production Years Mid...

Страница 7: ...ladders etc when installing this product Never install wiring during a lightning storm Never install data jacks or electrical wiring in wet locations unless the equipment is specifically designed for...

Страница 8: ...d Stainless Steel Brushed stainless steel Accuracy 1 Second 0 200 milliseconds 0 200 milliseconds Power Consumption PoE IEEE 802 3af compliant Single sided 3W Double sided 4W PoE IEEE 802 3af complian...

Страница 9: ...bling Plan The OnTime Clocks require connection to PoE enabled network equipment that can source power in compliance with IEEE 802 3af PoE power is commonly used to power devices such as wireless Acce...

Страница 10: ...rom a single piece of network equipment it may be useful to verify that that piece of equipment can deliver the necessary power Some PoE enabled switches cannot deliver the full IEEE 802 3af power of...

Страница 11: ...es or Mid Span power injectors Consult with your IT Group to make sure that the required PoE equipment is in place 4 4 Surface Mounting the Analog Clock The following is a recommended procedure for su...

Страница 12: ...slot located on the rear of the clock over the fastener head 8 Pull the clock slightly downward until the unit is seated securely 4 5 Mounting the Double Sided Analog Clock 1 Determine mounting locati...

Страница 13: ...t with the nuts provided item 4 in Figure 4 7 For ceiling mount applications the orientation of the clocks can be corrected by removing the screws that secure the clocks to the housing and rotating th...

Страница 14: ...ct or service names mentioned in this document may be trademarks of the companies with which they are associated 2015 Novanex Inc All rights reserved page 10 Figure 5 Mounting Template for 4 Digit Clo...

Страница 15: ...T6KIT and some additional hardware Figure 7 Digital Clock Pendant Mounting 1 Determine the clock mounting location Note The illustration above suggests a recommended mounting means for a pendant mount...

Страница 16: ...unted making sure the center is located over the data cable outlet 3 Join the Ethernet Clock Mount and the Ethernet Clock Cantilever Wall Mount using a 2 Phillips screwdriver and a 3 8 wrench Make sur...

Страница 17: ...wiring The following is the recommended procedure for flush mounting 1 Ensure that the location that is chosen for mounting is pre wired with a data network feed 2 Cut an appropriately sized opening...

Страница 18: ...served page 14 Figure 11 Template for 6 Digit Clocks 3 Using the template provided locate the holes for the customer supplied hardware 4 Drill two 5 16 holes 5 Once holes for the bolts have been made...

Страница 19: ...Inc All rights reserved page 15 8 Place the clock flush mount assembly in the hole and re install the screws as seen in Figure 13 Figure 13 Clock Flush Mount Assembly 4 10 Power Up and Verification On...

Страница 20: ...aims based on information publicly available at time of printing All other product or service names mentioned in this document may be trademarks of the companies with which they are associated 2015 No...

Страница 21: ...our IT Group should specify one or two local SNTP or NTP time servers or routers to be the primary and optional secondary time servers with which to synchronize the clock 5 2 Introduction to the OnTim...

Страница 22: ...cks are factory set with DHCP enabled Using this method the DHCP Server is set up with a clock configuration string Clocks will automatically request the configuration string when they request an IP a...

Страница 23: ...ecific purposes The OnTime Clock takes advantage of the DHCP option slots to enable plug and play installation of clocks The OnTime Clock is preset to request its local configuration from the DHCP ser...

Страница 24: ...practice is to load the configuration string into the DHCP Server and then try it with one clock by re booting the clock Once you are confident that the one clock is properly configured using these se...

Страница 25: ...aving Time rule none Disable the Daylight Saving Time adjustment Other values are parsed based on the DST rule format The format is 8 numbers in the order startDOW startDay startMonth startTime endDOW...

Страница 26: ...nables DST for US 2007 rules Table 6 Examples of Common DHCP Configuration Strings 6 5 OnTime Management Settings The OnTime Management settings shown in Table 7 can be provided via DHCP Option 231 or...

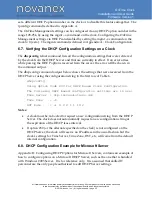
Страница 27: ...erver the error will be shown in the command output The dhcpconfig command output below shows the settings that were received from the DHCP Server using the configuration string in the first row of Ta...

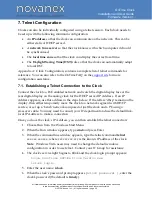
Страница 28: ...ect the clock to a PoE enabled network and watch the digital display face or the rear digital display on the analog clock for the DHCP served IP Address If an IP Address appears use this address in th...

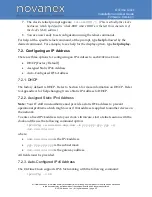
Страница 29: ...r configuring an IP Address to each OnTime Clock DHCP Factory Default Assigned Static IPv4 Address Auto Configured IPv6 Address 7 2 1 DHCP The factory default is DHCP Refer to Section 6 for more infor...

Страница 30: ...Time Clock to perform name resolution Time Servers must be specified as either literal IPv6 addresses or hostnames with a registered AAAA record Telnet connections can only be made via the OnTime Cloc...

Страница 31: ...red as well If the clock s IP addressing is via DHCP the DNS servers are typically already automatically configured do not over configure The process for specifying a time server on the clock is the s...

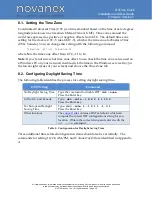
Страница 32: ...e not sure what time zone offset to use check the time zone value used on a Windows PC on your network double click the time in the Windows service tray in the lower right corner of your screen and ch...

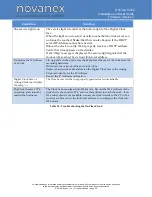
Страница 33: ...ay is dark verify that the network port has proper PoE power The clock shows incorrect time If the minutes past the hour are correct verify the Time Zone and Daylight Saving Time settings For Digital...

Страница 34: ...signals that the clock can be reached by its fixed link local address Determine the IP Address of a Clock Lift up gently on the unit to free the keyholes at the rear of the clock from the mounting ha...

Страница 35: ...surges misuse damage neglect or if repairs modifications have been made or attempted by anyone other than personnel authorized by Novanex This Warranty does not apply if the clock is installed in an...

Страница 36: ...is document may be trademarks of the companies with which they are associated 2015 Novanex Inc All rights reserved page 32 Novanex will not be responsible for dismounting and remounting of the OnTime...

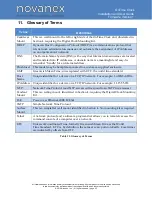
Страница 37: ...dle for an Internet address Flush Inset This model may be backplate mounted to a customer supplied enclosure GMT Greenwich Mean Time since replaced with UTC the world time standard Host Name Unique id...

Страница 38: ...except those sent by the DHCP Server Use the DHCP config dhcpconfig command to view these superseding options Verify DHCP Configuration settings dhcpconfig To list the option settings received from a...

Страница 39: ...s time zone setting don t use a sign for positive values where N the desired time zone offset in the range 11 to 12 For example to set the time zone for UTC 5 Eastern Time US Canada you would use time...

Страница 40: ...k where hostname is the new hostname ipconfig b on off Set whether to show IP information at clock bootup ipconfig x Show all Interface data ipconfig v v4 v6 Set the IP version for the clock to use Sp...

Страница 41: ...of one or more web status servers up to five may be specified separated by semi colons This setting will override values from DHCP option 72 mgmt c To clear the active Novanex management server setti...

Страница 42: ...printing All other product or service names mentioned in this document may be trademarks of the companies with which they are associated 2015 Novanex Inc All rights reserved page 38 Condition Solution...

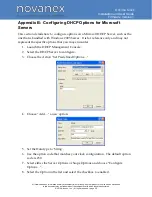
Страница 43: ...options on a Microsoft DHCP Server such as the one that is bundled with Windows 2003 Server It is for reference only and may not represent the specific options that you may encounter 1 Launch the DHC...

Страница 44: ...le at time of printing All other product or service names mentioned in this document may be trademarks of the companies with which they are associated 2015 Novanex Inc All rights reserved page 40 9 En...

Страница 45: ...8 1 5 This Clock Network Information Packet is transmitted at power up and whenever the IP Address of the clock is changed regardless of whether DHCP or Static IP Addressing is used The transmission i...

Отзывы: