


January 2007
RAID operations
703t Server Maintenance and Diagnostics
186
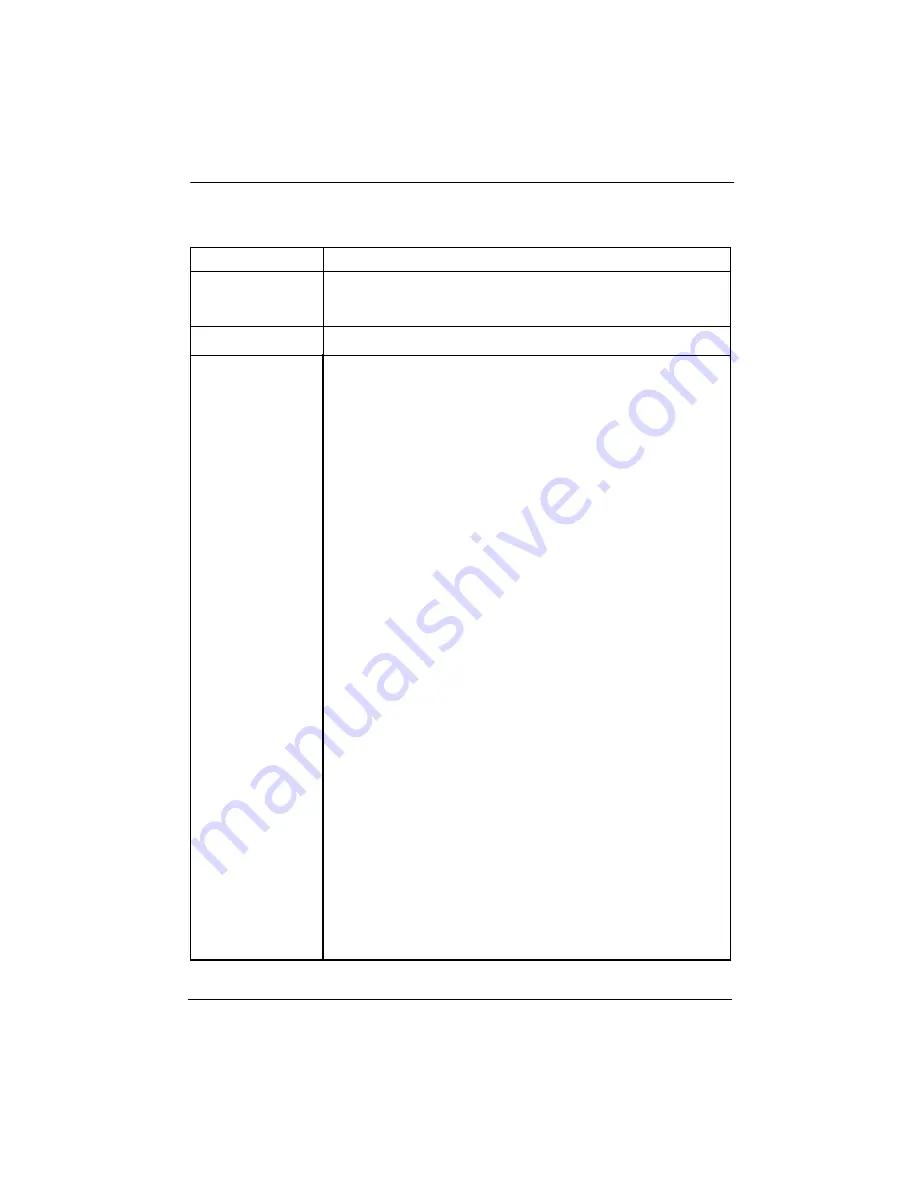
Task summary for configuring RAID
Note:
Use this summary only after reviewing the more detailed procedures and warnings in this chapter.
What to do
How to do it
Verify the BIOS and
firmware revisions
Firmware: 111U
Use the Windows MegaRAID console and choose Adapter
➝
Properties. Or turn on
the server and press Ctrl+M. Select Objects menu
➝
Adapter
➝
Other Adapter
Information.
Upgrade or downgrade
firmware and BIOS
Use the CallPilot 4.0 tower 703t Image CD-ROM 1 of 3 and select Utilities, RAID 703t
F/W upgrade.
Configure RAID using
LSI 1600 controller using
the Ctrl+M menu at
server boot-up
Note:
The Ctrl+M utility
can take up to 1 minute
to launch with 111U
firmware. The system
may appear frozen. Do
not reset.
1
Start the server and press Ctrl+M. Select Objects menu
➝
Adapter
➝
Factory
Default, and select Yes to confirm the selection. Press Ctrl+Alt+Delete when prompted
to restart system and re-enter Ctrl+M utility.
2
Select Objects
➝
Adapter, then ensure the following values are set as following:
Flex RAID Power Fail:
Enabled
Fast Initialization:
On
Disk Spin up Timing:
1 disk every 6 secs
Cache Flush Timings:
Every 4 seconds
Rebuild Rate:
30%
Alarm Control:
Enabled
Other Adapter Settings:
— Emulation:
Mass Storage
— Auto Rebuild:
Disabled
— Initiator ID:
7
— Cluster Mode:
Disabled
— Multiple PCI Delayed Transactions:
Disabled
— Force Boot:
Off
— Coercion Algorithm:
GigaByte Way
— Cc Restoration:
Enabled
3
Select Objects
➝
Channel, then ensure that the following values are set as follows:
Termination State:
Enabled
SCSI Transfer Rate:
160M
4
In the Configure menu, select New Configuration. Press Yes to proceed. The
system should display both SCSI channels, each having one drive. SCSI ID
'
s should
be 0 for each channel. All disk drives should be in READY state.
Note:
Do not use the Load command on the Configure menu. This command is not for
RAID operations.
5
Create the first logical drive by selecting Channel-1 ID 0 (A01-01), and pressing the
Spacebar. The display will change to ONLIN A01-01. Select Channel-2 ID-0 (A01-02)
and again press the Spacebar.
After selection, the drives will blink, press Enter or F10
to create first logical drive.
6
Press the Space bar to Select Configuration Array.
Span-1
appears in the box
opened for the A01 logical drive.
7
Configure the logical drives by pressing F10. The system prompts for each of the
logical drives to consecutively select
RAID 1;
Size: accept the size displayed;
Advanced Menu
Accept
SPAN = NO
Change the last value to NOSPAN if required.
Accept these new values by pressing Enter. The system will prompt you to save the
configuration. Highlight Yes and press Enter. Exit the submenu by pressing Esc.
8
In the main menu enter the Initialize submenu. Select the logical drive by pressing
F2. Press F10 and consecutively select
YES
to initialize the drive pack. When done,
press any key to return to the main menu.
9
Exit the utility by pressing Esc. Save the configuration when prompted. Press
Ctrl+Alt+Delete as indicated by the menu to reboot.
Содержание 703t
Страница 6: ...Standard 1 06 6 CallPilot...
Страница 8: ...8 CallPilot Publication history Standard 1 06...
Страница 12: ...Task List Standard 1 06 12 CallPilot...
Страница 16: ...Contents Standard 1 06 16 CallPilot...
Страница 64: ...Using Windows online diagnostic tools Standard 1 06 64 CallPilot...
Страница 76: ...Using serial port diagnostic tools Standard 1 06 76 CallPilot...
Страница 118: ...Using CallPilot system utilities Standard 1 06 118 CallPilot Figure 13 Legend Help tab...
Страница 144: ...Replacing basic chassis components Standard 1 06 144 CallPilot...
Страница 150: ...Replacing media drives Standard 1 06 150 CallPilot Figure 25 Hard drive installation overview G101771...
Страница 170: ...Replacing media drives Standard 1 06 170 CallPilot...
Страница 188: ...RAID operations Standard 1 06 188 CallPilot...
Страница 196: ...Replacing or adding voice processing boards Standard 1 06 196 CallPilot...
Страница 247: ......


