background image

Manage Device Security 

338

Insight Managed 28-Port Gigabit Ethernet Smart Cloud Switch with 2 SFP 1G & 2 SFP+ 10G Fiber Ports 

4. 

Enter the switch’s password in the 

password

 field.

The default password is 

password

. If you added the switch to a network on the Insight 

app before and you did not yet change the password through the local browser interface, 
enter your Insight network password.

The System Information page displays.

5. 

Select 

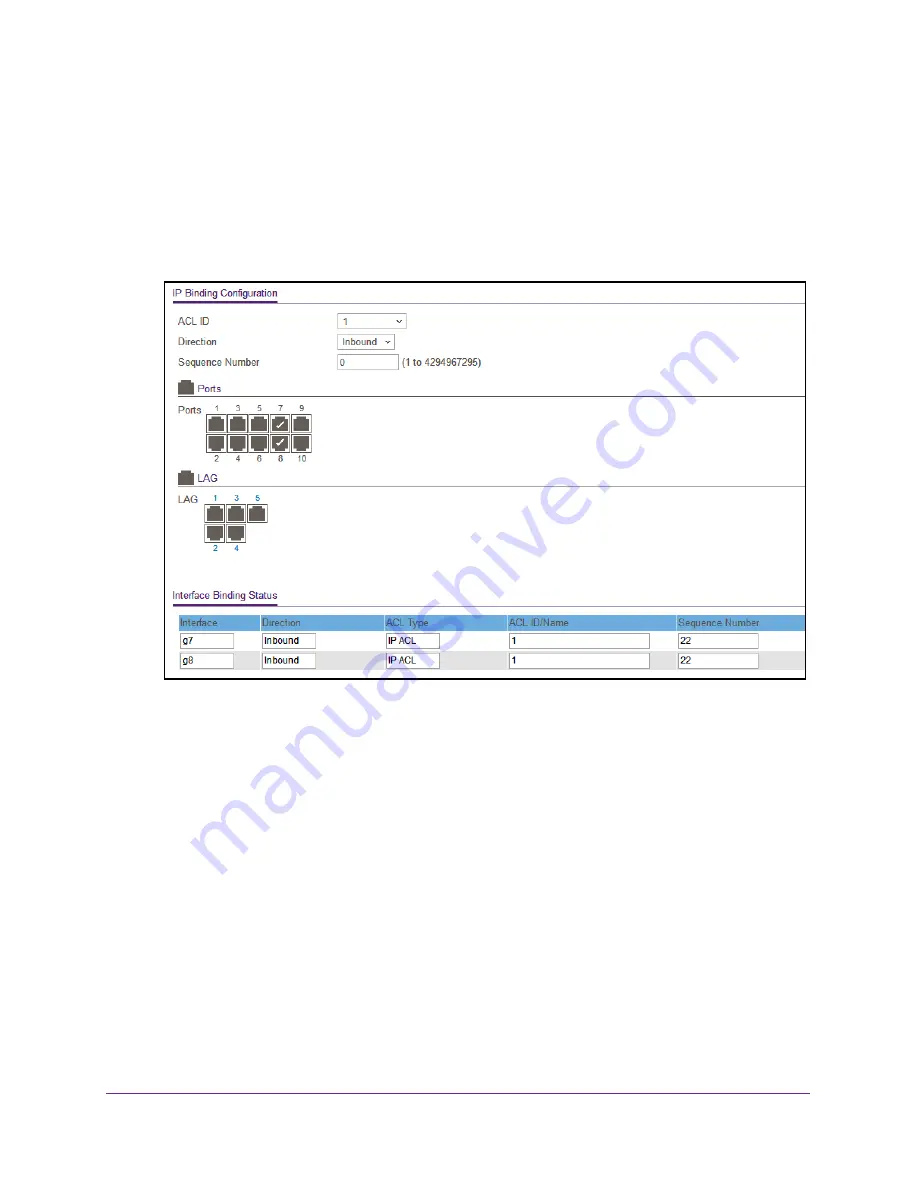
Security > ACL > Advanced > IP Binding Configuration

.

6. 

From the 

ACL ID

 menu, select an existing IP ACL for you which you want to add an IP ACL 

interface binding.

The fixed selection from the 

Direction

 menu is 

Inbound

, which means that MAC ACL 

rules are applied to traffic entering the interface.

7. 

In the 

Sequence Number

 field, optionally specify a number to indicate the order of the 

access list relative to other access lists already assigned to this interface and direction. 

A low number indicates high precedence order. If a sequence number is already in use 

for this interface and direction, the specified access list replaces the currently attached 
access list using that sequence number. If you do not specify the sequence number 
(meaning that the value is 0), a sequence number that is one number greater than the 
highest sequence number currently in use for this interface and direction is used. The 
valid range is 1–4294967295.

8. 

To add the selected ACL to a port or LAG, in the Ports table or LAG table, click the port or 
LAG so that a check mark displays.

You can add the ACL to several ports and LAGs.

Содержание GC728X

Страница 1: ...0 East Plumeria Drive San Jose CA 95134 USA December 2017 202 11770 01 Insight Managed 28 Port Gigabit Ethernet Smart Cloud Switch with 2 SFP 1G 2 SFP 10G Fiber Ports Models GC728X and GC728XP User Manual ...

Страница 2: ...ort resources Conformity For the current EU Declaration of Conformity visit http kb netgear com app answers detail a_id 11621 Compliance For regulatory compliance information visit http www netgear com about regulatory See the regulatory compliance document before connecting the power supply Trademarks NETGEAR Inc NETGEAR and the NETGEAR Logo are trademarks of NETGEAR Inc Any non NETGEAR trademark...

Страница 3: ... System Information View and Configure the Switch Management Settings 30 View or Define System Information 30 View the Switch CPU Status 35 Configure the CPU Thresholds 37 Configure the IPv4 Address for the Network Interface and Management VLAN 38 Configure the IPv6 Address for the Network Interface 39 View the IPv6 Network Neighbor 41 Configure the Time Settings 42 Configure Denial of Service Set...

Страница 4: ...y Settings 112 Configure VLANs 113 Manage Basic VLANs 114 Configure VLAN Trunking 116 Configure VLAN Membership 118 View the VLAN Status 120 Configure Port PVID Settings 121 Configure a MAC Based VLAN 123 Configure Protocol Based VLAN Groups 124 Configure Protocol Based VLAN Group Membership 126 Configure a Voice VLAN 127 Configure Auto VoIP 128 Configure Protocol Based Port Settings 128 Configure...

Страница 5: ...Global Routing Settings 188 View the IPv6 Route Table 189 Configure IPv6 VLAN Interface Settings 190 Manage IPv6 Prefix es for Advertisement on an IPv6 VLAN 193 View IPv6 Statistics 196 View the IPv6 Neighbor Table 200 Manage Static IPv6 Routes 202 View the IPv6 Route Table 204 Configure IPv6 Route Preferences 205 Configure Routing VLANs 206 Configure VLAN Routing With the VLAN Routing Wizard 207 ...

Страница 6: ...ement Access 270 Configure HTTP Settings 270 HTTPS Configuration 271 Manage Certificates 272 Download Certificates 273 Access Control 275 Configure Access Rule Settings 276 Configure Port Authentication 277 Configure Global 802 1X Settings 278 Manage Port Authentication 279 View the Port Summary 283 View the Client Summary 284 Set Up Traffic Control 286 Manage MAC Filtering 286 View the MAC Filter...

Страница 7: ...oubleshooting Tasks 355 Send an IPv4 Ping 355 Send an IPv6 Ping 356 Send an IPv4 Traceroute 358 Send an IPv6 Traceroute 359 Enable Remote Diagnostics 361 Chapter 8 Manage Power over Ethernet PoE Overview 363 Device Class Power Requirements 363 Power Allocation and Power Budget 364 Configure the Global PoE Settings 365 Manage and View the PoE Port Configuration 367 Reset One or More PoE or PoE Port...

Страница 8: ...Configuration Examples Virtual Local Area Networks VLANs 404 VLAN Configuration Examples 405 Access Control Lists ACLs 406 MAC ACL Sample Configuration 406 Standard IP ACL Sample Configuration 407 Differentiated Services DiffServ 408 Class 409 DiffServ Traffic Classes 409 Creating Policies 410 DiffServ Example Configuration 411 802 1X 412 802 1X Example Configuration 414 Multiple Spanning Tree Pro...

Страница 9: ...onventions Access the Switch Change the Management Mode of the Switch Register the Switch How to Configure Interface Settings Local Browser Interface Device View In this manual we refer to all switch models as the switch Unless noted otherwise all information applies to all switch models For more information about the topics covered in this manual visit the support website at netgear com support F...

Страница 10: ...the serial number of the switch For more information visit netgear com insight and see the NETGEAR knowledge base articles at netgear com support Insight Cloud portal Using the NETGEAR Insight Cloud portal you can set up the switch in the network perform advanced remote setup configuration and management monitor the switch analyze the switch and network usage and if necessary troubleshoot the swit...

Страница 11: ...des are available at downloadcenter netgear com Installation Guide Hardware Installation Guide For information about the NETGEAR Insight app visit netgear com insight and see the NETGEAR knowledge base articles at netgear com support Web Browser Requirements and Supported Browsers To access the switch by using a web browser the browser must meet the following software requirements HTML version 4 0...

Страница 12: ... the logical interfaces by using the software The following table describes the naming convention for all interfaces available on the switch Table 1 Disallowed characters in user defined fields Character Definition Character Definition Backslash Less than Forward slash Greater than Asterisk Pipe Question mark Table 2 Naming conventions for interfaces Interface Description Example Physical The phys...

Страница 13: ...itch On Network from a Windows Based Computer on page 13 Use a Mac See Access the Switch On Network from a Mac Using Bonjour on page 14 or Determine the Switch IP Address Through the NETGEAR Switch Discovery Tool and Access the Switch On Network on page 16 Use the NETGEAR Switch Discovery Tool See Determine the Switch IP Address Through the NETGEAR Switch Discovery Tool and Access the Switch On Ne...

Страница 14: ...nformation page 12 Write down the IP address for future use 13 Select the Direct Connect Web browser Interface radio button 14 Click the Apply button Your settings are saved The System Information page closes any current Insight manageable device settings are saved to the cloud server and the login window displays again 15 When prompted enter the password The default password is password If you ad...

Страница 15: ...s password If you added the switch to a network on the Insight app before and you did not yet change the password through the local browser interface enter your Insight network password 11 Click the Login button A notification displays 12 Click the OK button to close the notification The System Information page displays The IP address of the switch displays on the System Information page 13 Write ...

Страница 16: ...NetgearSDT V1 1 115_Win_x64_Setup exe and install the program on your computer Depending on your computer setup the installation process might add the NETGEAR Switch Discovery Tool icon to the Dock of your Mac or the desktop of your Windows based computer 4 Reenable the security services on your computer 5 Power on the switch The DHCP server assigns the switch an IP address 6 Connect your computer...

Страница 17: ...n window displays again 17 When prompted enter the password The default password is password If you added the switch to a network on the Insight app before and you did not yet change the password through the local browser interface enter your Insight network password The System Information page displays and the full local browser interface is now available Determine the Switch IP Address From the ...

Страница 18: ... the password The default password is password If you added the switch to a network on the Insight app before and you did not yet change the password through the local browser interface enter your Insight network password The System Information page displays and the full local browser interface is now available Determine the Switch IP Address Using the NETGEAR Insight App and Access the Switch On ...

Страница 19: ...of your web browser enter the IP address of the switch The login window opens 11 When prompted enter the password The default password is password Because you added the switch to a network on the Insight app before and you did not yet change the password through the local browser interface enter your Insight network password 12 Click the Login button A notification displays 13 Click the OK button ...

Страница 20: ...nter the IP address of the switch The login window opens 8 When prompted enter the password The default password is password If you added the switch to a network on the Insight app before and you did not yet change the password through the local browser interface enter your Insight network password 9 Click the Login button A notification displays 10 Click the OK button to close the notification Th...

Страница 21: ...ect the Ethernet cable to any Ethernet port on the switch 3 Open a web browser and enter http 192 168 0 239 This is the default address of the switch 4 When prompted enter the password The default password is password If you added the switch to a network on the Insight app before and you did not yet change the password through the local browser interface enter your Insight network password 5 Click...

Страница 22: ...anagement mode becomes disabled and the current Insight manageable device settings are saved to the cloud server Any changes that you make using the Direct Connect Web browser Interface management mode are not saved to the cloud server Changing back to NETGEAR Insight Mobile App and Insight Cloud Portal If you added the switch to a network on the Insight app before all Insight manageable device se...

Страница 23: ...network password The System Information page displays and the full local browser interface is now available Change the Management Mode Back to NETGEAR Insight Mobile App and Insight Cloud Portal To change the management mode of the switch back to NETGEAR Insight Mobile App and Insight Cloud Portal 1 Connect your computer to the same network as the switch You can use a WiFi or wired connection to c...

Страница 24: ...ETGEAR Insight app the switch is automatically registered to your MyNETGEAR account This registration process is also referred to as claiming For information about the NETGEAR Insight app see the NETGEAR knowledge base articles at netgear com support If you do not claim register the device and add it to an Insight network using the Insight app you can manually register the switch using the local b...

Страница 25: ...ts are not displayed To display all ports and LAGs click the All link The procedures in this section describe how to select the ports and LAGs to configure The procedures assume that you are already logged in to the switch If you do not know how to log in to the switch see Access the Switch on page 13 To configure a single port or LAG 1 Click the All link to display the all ports and LAGs 2 Do one...

Страница 26: ...ll ports and LAGs are highlighted 3 Configure the desired settings 4 Click the Apply button Your settings are saved Local Browser Interface Device View The Device View page displays the ports on the switch This graphic provides an alternate way to navigate to configuration and monitoring options The graphic also provides information about device ports current configuration and status tables and fe...

Страница 27: ...port is not connected This is the default state Solid green The port is operating at its maximum speed Blinking green The port is transmitting or receiving traffic at its maximum speed Solid amber The port is operating at below its maximum speed Blinking amber The port is transmitting or receiving traffic below its maximum speed The right port LED indicates the PoE status this does not apply to mo...

Страница 28: ...e Fan LED Solid green The fan is operating normally Solid amber A problem occurred with the fan 6 To see a menu that displays statistics and configuration options click a port The previous figure shows the Device View page for model GC728XP 7 To display the main menu that contains the same options as the navigation menu at the top of the page right click the graphic without clicking a specific por...

Страница 29: ...Configure the Switch Management Settings Manage the Bonjour Settings and View Bonjour Information Control the LEDs Use the Device View Configure Power over Ethernet Configure SNMP Configure Link Layer Discovery Protocol Configure DHCP L2 Relay and DHCP Snooping Set Up PoE Timer Schedules ...

Страница 30: ...ial of Service Settings on page 56 Configure DNS Settings on page 59 Configure Green Ethernet Settings on page 62 View or Define System Information When you log in the System Information page displays You can configure and view general device information To view or define system information 1 Connect your computer to the same network as the switch You can use a WiFi or wired network connection or ...

Страница 31: ...55 alphanumeric characters 6 Click the Apply button Your settings are saved The following table describes the status information that the System Information page displays Table 3 System Information Field Description Product Name The product name of this switch Serial Number The serial number of the switch Date Time The current date and time System Up Time The time in days hours and minutes since t...

Страница 32: ... of the switch If you do not know the IP address of the switch see Access the Switch on page 13 The login window opens 4 Enter the switch s password in the password field The default password is password If you added the switch to a network on the Insight app before and you did not yet change the password through the local browser interface enter your Insight network password The System Informatio...

Страница 33: ...in the password field The default password is password If you added the switch to a network on the Insight app before and you did not yet change the password through the local browser interface enter your Insight network password The System Information page displays 5 Scroll down to the Fans section The fan information displays 6 To refresh the page click the Refresh button The following table des...

Страница 34: ...mation page displays 5 Scroll down to the Power supplies section 6 To refresh the page click the Refresh button The following table describes the nonconfigurable Power supplies information View the Software Versions You can view the software versions that are running on the switch To view the software versions 1 Connect your computer to the same network as the switch You can use a WiFi or wired ne...

Страница 35: ... to assess the performance load and stability parameters of the switch To view the switch CPU status 1 Connect your computer to the same network as the switch You can use a WiFi or wired network connection or connect directly to a switch that is off network using an Ethernet cable 2 Launch a web browser 3 In the address field of your web browser enter the IP address of the switch If you do not kno...

Страница 36: ... CPU Status System CPU Status The CPU Utilization section shows the memory information task related information and percentage of CPU utilization per task The following table describes CPU Memory Status information Table 8 CPU Memory Status information Field Description Total System Memory The total memory of the switch in KBytes Available Memory The available memory space for the switch in KBytes...

Страница 37: ...ystem Information page displays 5 Select System Management System CPU Status CPU Threshold The CPU Threshold page displays 6 Specify the thresholds Rising Threshold Notification is generated when the total CPU utilization exceeds this threshold value over the configured time period The range is 1 to 100 Rising Interval This utilization monitoring time period can be configured from 5 to 86400 secon...

Страница 38: ...gin window opens 4 Enter the switch s password in the password field The default password is password If you added the switch to a network on the Insight app before and you did not yet change the password through the local browser interface enter your Insight network password The System Information page displays 5 Select System Management IP Configuration The IP Configuration page displays 6 Selec...

Страница 39: ...on about creating VLANs and configuring the PVID for a port see Configure VLANs on page 113 The following requirements apply to the management VLAN Only one management VLAN can be active at a time When a new management VLAN is configured connectivity through the existing management VLAN is lost The management station must be reconnected to the port in the new management VLAN 9 Click the Apply butt...

Страница 40: ...cted 7 Determine how the switch acquires an IPv6 address IPv6 Address Auto Configuration Mode When this mode is enabled the network interface can acquire an IPv6 address through IPv6 Neighbor Discovery Protocol NDP and through the use of router advertisement messages When this mode is disabled the network interface does not use the native IPv6 address autoconfiguration feature to acquire an IPv6 a...

Страница 41: ... web browser enter the IP address of the switch If you do not know the IP address of the switch see Access the Switch on page 13 The login window opens 4 Enter the switch s password in the password field The default password is password If you added the switch to a network on the Insight app before and you did not yet change the password through the local browser interface enter your Insight netwo...

Страница 42: ...f the switch see Access the Switch on page 13 The login window opens 4 Enter the switch s password in the password field The default password is password If you added the switch to a network on the Insight app before and you did not yet change the password through the local browser interface enter your Insight network password The System Information page displays 5 Select System Management Time Ti...

Страница 43: ...added the switch to a network on the Insight app before and you did not yet change the password through the local browser interface enter your Insight network password The System Information page displays 5 Select System Management Time Time Configuration The Time Configuration page displays 6 Select the Clock Source SNTP radio button The page refreshes and displays the SNTP Global Configuration s...

Страница 44: ...as a power of 2 Broadcasts received prior to the expiry of this interval are discarded The allowed range is 6 to 10 The default value is 6 12 In the Unicast Poll Timeout field specify the number of seconds to wait for an SNTP response to a unicast poll request The allowed range is 1 to 30 The default value is 5 13 In the Unicast Poll Retry field specify the number of times to retry a unicast poll ...

Страница 45: ...ge the password through the local browser interface enter your Insight network password The System Information page displays 5 Select System Management Time Time Configuration The Time Configuration page displays If the clock source is SNTP the SNTP Global Configuration section displays below the Time Configuration section 6 Select a Client mode radio button to specify the mode of operation of the...

Страница 46: ...t Poll Retry field specify the number of times to retry a unicast poll request to an SNTP server after the first time out before the switch attempts to use the next configured server The allowed range is 0 to 10 The default value is 1 12 In the Time Zone Name field specify a time zone You can also specify the number of hours and number of minutes that the time zone is different from the Coordinate...

Страница 47: ...rd in the password field The default password is password If you added the switch to a network on the Insight app before and you did not yet change the password through the local browser interface enter your Insight network password The System Information page displays 5 Select System Management Time Time Configuration The Time Configuration page displays If the clock source is SNTP the SNTP Globa...

Страница 48: ... SNTP server is not valid Version Not Supported The SNTP version supported by the server is not compatible with the version supported by the client Server Unsynchronized The SNTP server is not synchronized with its peers This is indicated by the leap indicator field in the SNTP message Server Kiss Of Death The SNTP server indicated that no further queries were to be sent to this server This is ind...

Страница 49: ...ing for unicast information is used for polling a server for which the IP address is known SNTP servers that were configured on the device are the only ones that are polled for synchronization information T1 through T4 are used to determine server time This is the preferred method for synchronizing device time because it is the most secure method If this method is selected SNTP information is acce...

Страница 50: ...hen that host name is resolved into an IP address each time an SNTP request is sent to it 8 If the UDP port on the SNTP server to which SNTP requests are sent is not the standard port 123 specify the port number in the Port field The valid range is 1 to 65535 The default value is 123 9 In Priority field specify the priority order which to query the servers The SNTP client on the device continues s...

Страница 51: ...erver was used to update the system clock Last Attempt Time The local date and time UTC that the SNTP server was last queried Last Attempt Status The status of the last SNTP request or unsolicited message for both unicast and broadcast modes If no message was received from a server a status of Other is displayed These values are appropriate for all operational modes Other The status of the last re...

Страница 52: ...eb browser 3 In the address field of your web browser enter the IP address of the switch If you do not know the IP address of the switch see Access the Switch on page 13 The login window opens 4 Enter the switch s password in the password field The default password is password If you added the switch to a network on the Insight app before and you did not yet change the password through the local b...

Страница 53: ...g time occurs at the same time every year The start and end times and dates for the time shift must be manually configured Recurring EU The system clock uses the standard recurring summer time settings used in countries in the European Union When this option is selected the rest of the applicable fields on the page are automatically populated and cannot be edited Recurring USA The system clock use...

Страница 54: ...onfigure the end week Day Configure the end day Month Configure the end month Hours Configure the end hour Minutes Configure the end minutes Offset Configure recurring offset in minutes The valid range is 1 1440 minutes Zone Configure the time zone Field Description Begins At These fields are used to configure the start values of the date and time Month Configure the start month Date Configure the...

Страница 55: ... The DayLight Saving DST Configuration page displays 6 To refresh the page click the Refresh button The following table displays the nonconfigurable daylight saving status information Table 12 Daylight Saving DST Status information Field Description Daylight Saving DST The Daylight Saving value which is one of the following Disable Recurring Recurring EU Recurring USA Non Recurring Begins At The s...

Страница 56: ... a switch that is off network using an Ethernet cable 2 Launch a web browser 3 In the address field of your web browser enter the IP address of the switch If you do not know the IP address of the switch see Access the Switch on page 13 The login window opens 4 Enter the switch s password in the password field The default password is password If you added the switch to a network on the Insight app ...

Страница 57: ...ial of Service Configuration page displays 6 Select the types of DoS attacks for the switch to monitor and block and configure any associated values Denial of Service Min TCP Header Size Specify the minimum TCP header size allowed If DoS TCP Fragment is enabled the switch drops packets with a TCP header smaller than the configured value Denial of Service ICMPv4 Enabling ICMPv4 DoS prevention cause...

Страница 58: ...S prevention causes the switch to drop packets with TCP control flags set to 0 and TCP sequence number set to 0 Denial of Service TCP Fragment Enabling TCP Fragment DoS prevention causes the switch to drop packets with a TCP payload for which the IP payload length minus the IP header size is less than the minimum allowed TCP header size Denial of Service TCP Offset Enabling TCP Offset DoS preventi...

Страница 59: ... password through the local browser interface enter your Insight network password The System Information page displays 5 Select System Management DNS DNS Configuration The DNS Configuration page displays 6 Select the Disable or Enable radio button to specify whether to disable or enable the administrative status of the DNS client Enable Allow the switch to send DNS queries to a DNS server to resol...

Страница 60: ...ng an Ethernet cable 2 Launch a web browser 3 In the address field of your web browser enter the IP address of the switch If you do not know the IP address of the switch see Access the Switch on page 13 The login window opens 4 Enter the switch s password in the password field The default password is password If you added the switch to a network on the Insight app before and you did not yet change...

Страница 61: ...o a network on the Insight app before and you did not yet change the password through the local browser interface enter your Insight network password The System Information page displays 5 Select System Management DNS Host Configuration The DNS Host Configuration page displays 6 Select the check box next to the entry to remove 7 Click the Delete button Change the Host Name or IP Address in an Entr...

Страница 62: ... describes the dynamic host fields Configure Green Ethernet Settings You can configure the green Ethernet features to reduce power consumption To configure the Green Ethernet settings 1 Connect your computer to the same network as the switch You can use a WiFi or wired connection to connect your computer to the network or connect directly to a switch that is off network using an Ethernet cable 2 L...

Страница 63: ...z standard Lower power mode enables both the send and receive sides of the link to disable some functionality for power savings when lightly loaded Transition to low power mode does not change the link status Frames in transit are not dropped or corrupted in transition to and from low power mode Transition time is transparent to upper layer protocols and applications 8 Click the Apply button Your ...

Страница 64: ...mbines the MAC with a family of physical layers that support operation in a low power mode It is defined by the IEEE 802 3az standard Lower power mode enables both the send and receive sides of the link to disable some functionality for power savings when lightly loaded Transition to low power mode does not change the link status Frames in transit are not dropped or corrupted in transition to and ...

Страница 65: ...ate after it receives a packet for transmission The range is 8 to 65535 The default value is 17 10 Click the Apply button Your settings are saved 11 To refresh the page click the Refresh button 12 To clear the configuration resetting all statistics for the selected interface to default values click the Clear button The following table describes the nonconfigurable fields Table 15 Green Ethernet Lo...

Страница 66: ...Transmit Tw_sys that was used by the local system to compute the Tw_sys that it wants to request from the remote system Tw_sys_rx uSec Integer that indicates the value of Tw_sys that the local system requests from the remote system Tw_sys_rx Echo uSec Integer that indicates the remote system s Receive Tw_sys that was used by the local system to compute the Tw_sys that it can support Fallback Tw_sy...

Страница 67: ...know the IP address of the switch see Access the Switch on page 13 The login window opens 4 Enter the switch s password in the password field The default password is password If you added the switch to a network on the Insight app before and you did not yet change the password through the local browser interface enter your Insight network password The System Information page displays Table 16 Gree...

Страница 68: ...e switch in mWatts Percentage Power Saving Estimated percentage of power saved on all ports of the switch if the green modes are enabled Cumulative Energy Saving W H Estimated cumulative energy saved on the switch in watts multiplied by hours if all green modes are enabled Unit The unit ID Green Features supported on this unit List of green features supported on the given unit which could be one o...

Страница 69: ...The default value is 3600 8 In the Max Samples to keep field enter the maximum number of samples to keep This is a global setting and is applied to all interfaces The range is 1 to 168 The default value is 168 9 Click the Apply button Your settings are saved The Percentage LPI time field shows the time spent in LPI mode the since EEE counters were last cleared The following table describes the non...

Страница 70: ...to the same network as the switch You can use a WiFi or wired connection to connect your computer to the network or connect directly to a switch that is off network using an Ethernet cable 2 Launch a web browser 3 In the address field of your web browser enter the IP address of the switch If you do not know the IP address of the switch see Access the Switch on page 13 The login window opens 4 Ente...

Страница 71: ...ord in the password field The default password is password If you added the switch to a network on the Insight app before and you did not yet change the password through the local browser interface enter your Insight network password The System Information page displays 5 Select System Management Bonjour Bonjour Details The Bonjour Information page displays The page also shows the Published Servic...

Страница 72: ... the Switch on page 13 The login window opens 4 Enter the switch s password in the password field The default password is password If you added the switch to a network on the Insight app before and you did not yet change the password through the local browser interface enter your Insight network password The System Information page displays 5 Select System Management LED Control 6 Select the Syste...

Страница 73: ...onfigure SNMP Configure the SNMPv1 v2 Community on page 73 Configure SNMPv1 v2 Trap Settings on page 76 Configure SNMPv1 v2 Trap Flags on page 78 View the Supported MIBs on page 79 Configure Authentication and Encryption for the SNMPv3 Admin Profile on page 79 Configure the SNMPv1 v2 Community Only the communities that you define can access to the switch using the SNMP V1 and SNMP V2 protocols Onl...

Страница 74: ...r example if the management station IP address is 192 168 1 0 and the management station IP mask is 255 255 255 0 any client whose address is in the 192 168 1 0 192 168 1 255 range is allowed access To allow access from only one station use that station s IP address as the management station IP address and use a management station IP mask value of 255 255 255 255 8 In the Community String field sp...

Страница 75: ... your computer to the same network as the switch You can use a WiFi or wired connection to connect your computer to the network or connect directly to a switch that is off network using an Ethernet cable 2 Launch a web browser 3 In the address field of your web browser enter the IP address of the switch If you do not know the IP address of the switch see Access the Switch on page 13 The login wind...

Страница 76: ...efault password is password If you added the switch to a network on the Insight app before and you did not yet change the password through the local browser interface enter your Insight network password The System Information page displays 5 Select System SNMP SNMPv1 v2 Trap Configuration The Trap Configuration page displays 6 In the Recipients IP field enter the IPv4 address in the x x x x format...

Страница 77: ...ser interface enter your Insight network password The System Information page displays 5 Select System SNMP SNMPv1 v2 Trap Configuration The Trap Configuration page displays 6 Select the check box for the recipient 7 Update the fields as needed 8 Click the Apply button Your settings are saved Delete an SNMP Trap Recipient To delete an SNMP trap recipient 1 Connect your computer to the same network...

Страница 78: ... the switch If you do not know the IP address of the switch see Access the Switch on page 13 The login window opens 4 Enter the switch s password in the password field The default password is password If you added the switch to a network on the Insight app before and you did not yet change the password through the local browser interface enter your Insight network password The System Information p...

Страница 79: ...he switch If you do not know the IP address of the switch see Access the Switch on page 13 The login window opens 4 Enter the switch s password in the password field The default password is password If you added the switch to a network on the Insight app before and you did not yet change the password through the local browser interface enter your Insight network password The System Information pag...

Страница 80: ...ion The User Configuration page displays The SNMPv3 Access Mode field is a read only field that shows the access privileges for the user account Access for the admin account is always Read Write Access for all other accounts is Read Only 6 To enable authentication select an Authentication Protocol radio button You can select the MD5 radio button or the SHA radio button With either of these options...

Страница 81: ...ate of the port The Link Layer Discovery Protocol Media Endpoint Discovery LLDP MED is an enhancement to LLDP with the following features Autodiscovery of LAN policies such as VLAN Layer 2 priority and DiffServ settings enabling plug and play networking Device location discovery for creation of location databases Extended and automated power management of Power over Ethernet endpoints Inventory ma...

Страница 82: ... on a port after the LLDP operating mode on the port changes Transmit Delay The number of seconds that the switch waits between transmissions of remote data change notifications to one or more SNMP trap receivers configured on the switch 7 To configure a nondefault value for LLDP MED enter a value in the Fast Start Duration field This value sets the number of LLDP packets sent when the LLDP MED fa...

Страница 83: ... LLDP PDUs on the selected ports Rx Only Enable only receiving LLDP PDUs on the selected ports Tx and Rx Enable both transmitting and receiving LLDP PDUs on the selected ports Disabled Do not transmit or receive LLDP PDUs on the selected ports The default is Tx and Rx Management IP Address Choose whether to advertise the management IP address from the interface The possible field values are as fol...

Страница 84: ...address of the switch If you do not know the IP address of the switch see Access the Switch on page 13 The login window opens 4 Enter the switch s password in the password field The default password is password If you added the switch to a network on the Insight app before and you did not yet change the password through the local browser interface enter your Insight network password The System Inf...

Страница 85: ...nter the switch s password in the password field The default password is password If you added the switch to a network on the Insight app before and you did not yet change the password through the local browser interface enter your Insight network password The System Information page displays Table 21 LLDP MED network policy information Field Description Network Policy Number The policy number App...

Страница 86: ...tended MDI PSE is enabled the port transmits the extended PSE TLV in LLDP frames 8 Click the Apply button Your settings are saved LLDP MED Neighbors Information You can display the LLDP MED neighbor or remote device information for an interface To view LLDP MED Neighbor Information 1 Connect your computer to the same network as the switch You can use a WiFi or wired connection to connect your comp...

Страница 87: ...received in the LLDP frames on this port Media Application Type Specifies the application type unknown voicesignaling guestvoice guestvoicesignalling softphonevoice videoconferencing streamingvideo or videosignaling Information for each application type includes the VLAN ID priority DSCP tagged bit status and unknown bit status A port can receive information about one or many of such application t...

Страница 88: ...ation Information Specifies the location information as a string for a given type of location ID Extended PoE This section of the page specifies if the remote device is a PoE device Device Type Specifies the remote device s PoE device type connected to this port Extended PoE PSE This section of the page specifies if extended PSE TLV is received in LLDP frame on this port Device Type Specifies the ...

Страница 89: ...g table describes the LLDP device information and port summary information 6 To view additional details about a port click the name of the port in the Interface column of the Port Information table Field Description Device Information Chassis ID Subtype The type of information used to identify the switch in the Chassis ID field Chassis ID The hardware platform identifier for the switch System Name...

Страница 90: ...ed or False disabled Auto Negotiation Advertised Capabilities The port speed autonegotiation capabilities such as 1000BASE T half duplex mode or 100BASE TX full duplex mode Operational MAU Type The Medium Attachment Unit MAU type The MAU performs physical layer functions including digital data conversion from the Ethernet interface collision detection and bit injection into the network MED Details...

Страница 91: ... interface enter your Insight network password The System Information page displays 5 Select System Advanced LLDP Neighbor Information The Neighbor Information page displays If no information was received from a neighbor device or if the link partner is not LLDP enabled no information displays The following table describes the information that displays for all LLDP neighbors that were discovered 6...

Страница 92: ...d with the remote device System Description The description of the selected port associated with the remote system System Capabilities The system capabilities of the remote system Managed Addresses Address SubType The type of the management address Address The advertised management address of the remote system Interface SubType The port subtype Interface Number The port on the remote device that s...

Страница 93: ...y the remote device Firmware Revision The firmware version advertised by the remote device Software Revision The software version advertised by the remote device Serial Number The serial number advertised by the remote device Model Name The model name advertised by the remote device Asset ID The asset ID advertised by the remote device Location Information Civic The physical location such as the s...

Страница 94: ...ces and are referred to as Layer 3 relay agents In some network configurations a need might exist for Layer 2 devices to append the Relay Agent Information option as they are closer to the end hosts These Layer 2 devices typically operate only as bridges for the network and might not include an IPv4 address on the network Lacking a valid IPv4 source address they cannot relay packets directly to a ...

Страница 95: ...To configure the DHCP L2 relay settings for a VLAN 1 Connect your computer to the same network as the switch You can use a WiFi or wired connection to connect your computer to the network or connect directly to a switch that is off network using an Ethernet cable 2 Launch a web browser 3 In the address field of your web browser enter the IP address of the switch If you do not know the IP address o...

Страница 96: ...the IP address of the switch If you do not know the IP address of the switch see Access the Switch on page 13 The login window opens 4 Enter the switch s password in the password field The default password is password If you added the switch to a network on the Insight app before and you did not yet change the password through the local browser interface enter your Insight network password The Sys...

Страница 97: ...e switch If you do not know the IP address of the switch see Access the Switch on page 13 The login window opens 4 Enter the switch s password in the password field The default password is password If you added the switch to a network on the Insight app before and you did not yet change the password through the local browser interface enter your Insight network password The System Information page...

Страница 98: ... acts like a firewall between untrusted hosts and DHCP servers It also provides way to differentiate between untrusted interfaces connected to the end user and trusted interfaces connected to the DHCP server or another switch Enable the Global DHCP Snooping Settings You can view and configure the global settings for DHCP snooping To enable the global DHCP snooping settings 1 Connect your computer ...

Страница 99: ...t match the device drops the packet 8 Click the Apply button Your settings are saved Enable DHCP for All Interfaces in a VLAN To enable DHCP snooping for all interfaces that are members of a VLAN 1 Connect your computer to the same network as the switch You can use a WiFi or wired connection to connect your computer to the network or connect directly to a switch that is off network using an Ethern...

Страница 100: ...u added the switch to a network on the Insight app before and you did not yet change the password through the local browser interface enter your Insight network password The System Information page displays 5 Select System Services DHCP Snooping Interface Configuration The DHCP Snooping Interface Configuration page displays 6 To display information for all ports and LAGs click the All link 7 Selec...

Страница 101: ...cable and rate limiting is disabled 11 In the Burst Interval secs field specify the burst interval value for rate limiting purposes on this interface If the rate limit is N A then the burst interval is also nonapplicable and the field displays N A 12 Click the Apply button Your settings are saved Configure Static DHCP Bindings You can view add and remove static bindings in the DHCP snooping bindin...

Страница 102: ...of the DHCP snooping bindings database The bindings database can be stored locally on the device or on a remote system somewhere else in the network The device must be able to reach the IP address of the remote system to send bindings to a remote database To configure the persistent location of the DHCP snooping bindings database 1 Connect your computer to the same network as the switch You can us...

Страница 103: ...he time to wait between writing bindings information to persistent storage The delay allows the device to collect as many entries as possible new and removed before writing them to the persistent file 8 Click the Apply button Your settings are saved View or Clear the DHCP Snooping Statistics You can view and clear per interface statistics about the DHCP messages filtered by the DHCP snooping featu...

Страница 104: ...t Table 23 DHCP Snooping Statistics information Field Description Interface The interface associated with the rest of the data in the row MAC Verify Failures The number of DHCP messages that were dropped because the source MAC address and client hardware address did not match MAC address verification is performed only if it is globally enabled Client Ifc Mismatch The number of packets that were dr...

Страница 105: ...ng topics Configure Port Settings Configure Link Aggregation Groups Configure VLANs Configure a Voice VLAN Configure Auto VoIP Configure Spanning Tree Protocol Configure Multicast View Search and Configure the MAC Address Table Configure Layer 2 Loop Protection ...

Страница 106: ...terface enter your Insight network password The System Information page displays 5 Select Switching Ports Port Configuration The Port Configuration page displays 6 To display information for all ports and LAGs click the All link 7 Select one or more interfaces ports LAGs or both by taking one of the following actions To configure a single interface select the check box associated with the port or ...

Страница 107: ...s take effect 12 From the Duplex Mode menu select the duplex mode for the selected port Possible values are as follows Auto Indicates that speed is set by the auto negotiation process Full Indicates that the interface supports transmission between the devices in both directions simultaneously Half Indicates that the interface supports transmission between the devices in only one direction at a tim...

Страница 108: ...tton Your settings are saved The following table describes the nonconfigurable data that is displayed Configure Link Aggregation Groups Link aggregation groups LAGs which are also known as port channels allow you to combine multiple full duplex Ethernet links into a single logical link Network devices treat the aggregation as if it were a single link which increases fault tolerance and provides lo...

Страница 109: ... IP address of the switch If you do not know the IP address of the switch see Access the Switch on page 13 The login window opens 4 Enter the switch s password in the password field The default password is password If you added the switch to a network on the Insight app before and you did not yet change the password through the local browser interface enter your Insight network password The System...

Страница 110: ...links in the channel over which packets must be transmitted The switch selects the link by creating a binary pattern from selected fields in a packet and associating that pattern with a particular link 10 From the STP Mode menu select the Spanning Tree Protocol STP administrative mode associated with the LAG The possible values are as follows Disable Spanning tree is disabled for this LAG Enable S...

Страница 111: ...e switch see Access the Switch on page 13 The login window opens 4 Enter the switch s password in the password field The default password is password If you added the switch to a network on the Insight app before and you did not yet change the password through the local browser interface enter your Insight network password The System Information page displays 5 Select Switching LAG Basic LAG Membe...

Страница 112: ...ystem Information page displays 5 Select Switching LAG Advanced LACP Configuration The LACP Configuration page displays 6 In the LACP System Priority field specify the device s link aggregation priority relative to the devices at the other ends of the links on which link aggregation is enabled A higher value indicates a lower priority You can change the value of the parameter globally by specifyin...

Страница 113: ...ve to the devices at the other ends of the links on which link aggregation is enabled A higher value indicates a lower priority The range is 1 to 65535 The default value is 128 8 In the Timeout field configure the administrative LACP time out value Long Specifies a long time out value This is the default setting Short Specifies a short time out value 9 Click the Apply button Your settings are save...

Страница 114: ...g an Ethernet cable 2 Launch a web browser 3 In the address field of your web browser enter the IP address of the switch If you do not know the IP address of the switch see Access the Switch on page 13 The login window opens 4 Enter the switch s password in the password field The default password is password If you added the switch to a network on the Insight app before and you did not yet change ...

Страница 115: ...assword in the password field The default password is password If you added the switch to a network on the Insight app before and you did not yet change the password through the local browser interface enter your Insight network password The System Information page displays 5 Select Switching VLAN Basic VLAN Configuration The VLAN Configuration page displays 6 In the VLAN ID field specify the VLAN...

Страница 116: ...ports are assigned to the default VLAN of 1 All ports are configured with a PVID of 1 All ports are configured to an Acceptable Frame Types value of Admit All Frames All ports are configured with ingress filtering disabled All ports are configured to transmit only untagged frames All VLANs except for the default VLAN are deleted Configure VLAN Trunking You can configure switchport mode settings on...

Страница 117: ...ect one of the following modes Access Access mode is suitable for ports connected to end stations or end users Access ports participate in only one VLAN They accept both tagged and untagged packets but always transmit untagged packets General General mode enables a custom configuration of a port You can configure the general port VLAN attributes such as the membership PVID tagging ingress filter a...

Страница 118: ...thernet cable 2 Launch a web browser 3 In the address field of your web browser enter the IP address of the switch If you do not know the IP address of the switch see Access the Switch on page 13 The login window opens 4 Enter the switch s password in the password field The default password is password If you added the switch to a network on the Insight app before and you did not yet change the pa...

Страница 119: ...l frames transmitted for this VLAN are tagged The ports that are selected are included in the VLAN U Untagged Select the ports on which all frames transmitted for this VLAN are untagged The ports that are selected are included in the VLAN By default the selection is blank which means that the port is excluded from the VLAN 9 In the LAG table click each LAG once twice or three times to configure on...

Страница 120: ...the password field The default password is password If you added the switch to a network on the Insight app before and you did not yet change the password through the local browser interface enter your Insight network password The System Information page displays 5 Select Switching VLAN Advanced VLAN Status The VLAN Status page displays The following table describes the nonconfigurable information...

Страница 121: ... the Switch on page 13 The login window opens 4 Enter the switch s password in the password field The default password is password If you added the switch to a network on the Insight app before and you did not yet change the password through the local browser interface enter your Insight network password The System Information page displays 5 Select Switching VLAN Advanced Port PVID Configuration ...

Страница 122: ...pes of frames that can be received on this port Admit All Untagged frames or priority tagged frames received on this port are accepted and assigned the value of the port VLAN ID for this port With either option VLAN tagged frames are forwarded in accordance to the 802 1Q VLAN specification VLAN only Untagged frames or priority tagged frames received on this port are discarded Admit Untagged Only U...

Страница 123: ...ues Otherwise the packet is dropped This implies that the user is allowed to configure a MAC address mapping to a VLAN that was not created on the system Add a MAC Based VLAN To add a MAC based VLAN 1 Connect your computer to the same network as the switch You can use a WiFi or wired connection to connect your computer to the network or connect directly to a switch that is off network using an Eth...

Страница 124: ... browser 3 In the address field of your web browser enter the IP address of the switch If you do not know the IP address of the switch see Access the Switch on page 13 The login window opens 4 Enter the switch s password in the password field The default password is password If you added the switch to a network on the Insight app before and you did not yet change the password through the local bro...

Страница 125: ...k as the switch You can use a WiFi or wired connection to connect your computer to the network or connect directly to a switch that is off network using an Ethernet cable 2 Launch a web browser 3 In the address field of your web browser enter the IP address of the switch If you do not know the IP address of the switch see Access the Switch on page 13 The login window opens 4 Enter the switch s pas...

Страница 126: ...nter the IP address of the switch If you do not know the IP address of the switch see Access the Switch on page 13 The login window opens 4 Enter the switch s password in the password field The default password is password If you added the switch to a network on the Insight app before and you did not yet change the password through the local browser interface enter your Insight network password Th...

Страница 127: ...he switch to a network on the Insight app before and you did not yet change the password through the local browser interface enter your Insight network password The System Information page displays 5 Select Switching VLAN Advanced Voice VLAN Configuration The page that displays shows the Voice VLAN Global Admin section and Voice VLAN Configuration section 6 Select the Admin Mode Disable or Enable ...

Страница 128: ...authorized through dot1x Note Authentication through dot1x is possible only if dot1x is enabled 12 In the DSCP Value field configure the Voice VLAN DSCP value for the port The valid range is 0 to 64 The default value is 0 The Operational State field displays the operational status of the voice VLAN on the interface 13 Click the Apply button Your settings are saved Configure Auto VoIP Voice over In...

Страница 129: ...password The System Information page displays 5 Select Switching Auto VoIP Protocol based Port Settings The page displays the Protocol Based Global Settings section and the Protocol Based Port Settings section 6 From the Prioritization Type menu select Traffic Class or Remark This specifies the type of prioritization 7 From the Class Value menu specify the CoS tag value to be reassigned for packet...

Страница 130: ...P address of the switch If you do not know the IP address of the switch see Access the Switch on page 13 The login window opens 4 Enter the switch s password in the password field The default password is password If you added the switch to a network on the Insight app before and you did not yet change the password through the local browser interface enter your Insight network password The System I...

Страница 131: ... a network on the Insight app before and you did not yet change the password through the local browser interface enter your Insight network password The System Information page displays 5 Select Switching Auto VoIP OUI based Port Settings The OUI Port Settings page displays 6 To display information for all ports and LAGs click the All link 7 Select one or more interfaces by taking one of the follo...

Страница 132: ...he IP phones on the network Configure the OUI Table To configure the OUI Table 1 Connect your computer to the same network as the switch You can use a WiFi or wired connection to connect your computer to the network or connect directly to a switch that is off network using an Ethernet cable 2 Launch a web browser 3 In the address field of your web browser enter the IP address of the switch If you ...

Страница 133: ...e one or more OUI prefixes from the OUI table 1 Connect your computer to the same network as the switch You can use a WiFi or wired connection to connect your computer to the network or connect directly to a switch that is off network using an Ethernet cable 2 Launch a web browser 3 In the address field of your web browser enter the IP address of the switch If you do not know the IP address of the...

Страница 134: ...ded the switch to a network on the Insight app before and you did not yet change the password through the local browser interface enter your Insight network password The System Information page displays 5 Select Switching Auto VoIP Auto VoIP Status The Auto VoIP Status page displays 6 To refresh the page with the latest information about the switch click the Refresh button The following table desc...

Страница 135: ...d STP It behaves in a way that is appropriate for STP and RSTP bridges An MSTP bridge can be configured to behave entirely as an RSTP bridge or an STP bridge Note For two bridges to be in the same region the force version must be 802 1s and their configuration names digest keys and revision levels must match For additional information about regions and their effect on network topology refer to the...

Страница 136: ...wing table describes the nonconfigurable STP Status fields displayed on the page Table 32 STP configuration status Field Description Configuration Digest Key Identifier used to identify the configuration currently being used STP Status Bridge Identifier The bridge identifier for the CST It is made up using the bridge priority and the base MAC address of the bridge Time Since Topology Change The ti...

Страница 137: ...ST Configuration The CST Configuration page displays 6 Specify the CST options Bridge Priority When switches or bridges are running STP each is assigned a priority After exchanging BPDUs the switch with the lowest priority value becomes the root bridge Specify the bridge priority value for the Common and Internal Spanning Tree CST The valid range is 0 61440 The bridge priority is a multiple of 409...

Страница 138: ...discarded The valid range is 6 40 The default is 20 hops 7 Click the Apply button Your settings are saved The following table describes the MSTP Status information that is displayed Configure CST Port Settings You can configure a common spanning tree CST and internal spanning tree on a specific port on the switch A port can become diagnostically disabled if as error condition occurs such as severe...

Страница 139: ...e check box in the heading row 8 From the STP Status menu select the option to enable or disable the spanning tree administrative mode associated with the port or port channel The possible values are Enable and Disable The default value is Disable 9 From the Fast Link menu select whether the specified port is an edge port within the CST The possible values are Enable and Disable The default value ...

Страница 140: ...d internal spanning tree for a specific port on the switch To view the CST port status 1 Connect your computer to the same network as the switch You can use a WiFi or wired connection to connect your computer to the network or connect directly to a switch that is off network using an Ethernet cable 2 Launch a web browser 3 In the address field of your web browser enter the IP address of the switch...

Страница 141: ... using the bridge priority and the base MAC address of the bridge Designated Cost Path cost offered to the LAN by the designated port Designated Bridge Bridge identifier of the bridge with the designated port It is made up using the bridge priority and the base MAC address of the bridge Designated Port Port identifier on the designated bridge that offers the lowest cost to the LAN It is made up fr...

Страница 142: ...o a network on the Insight app before and you did not yet change the password through the local browser interface enter your Insight network password The System Information page displays 5 Select Switching STP Advanced RSTP The Rapid STP page displays 6 To refresh the page with the latest information about the switch click the Refresh button The following table describes the Rapid STP Status infor...

Страница 143: ... password The System Information page displays 5 Select Switching STP Advanced MST Configuration The MST Configuration page displays 6 Configure the MST values MST ID Specify the ID of the MST to create The valid values for this are 1 to 4094 This is visible only when the select option of the MST ID select box is selected Priority The bridge priority value for the MST When switches or bridges are ...

Страница 144: ...work password The System Information page displays 5 Select Switching STP Advanced MST Configuration The MST Configuration page displays 6 Select the check box next to the instance You can select multiple check boxes to apply the same setting to all selected ports Table 37 MST configuration Field Description Bridge Identifier The bridge identifier for the selected MST instance It is made up using ...

Страница 145: ...d not yet change the password through the local browser interface enter your Insight network password The System Information page displays 5 Select Switching STP Advanced MST Configuration The MST Configuration page displays 6 Select the check box for the instance 7 Click the Delete button The MST instance is removed Configure MST Port Settings You can configure and display the Multiple Spanning T...

Страница 146: ...e of the following actions To configure a single interface select the check box associated with the port or type the port number in the Go To Interface field and click the Go button To configure multiple interfaces with the same settings select the check box associated with each interface To configure all interfaces with the same settings select the check box in the heading row 9 Configure the MST...

Страница 147: ...le port states are as follows Disabled STP is currently disabled on the port The port forwards traffic while learning MAC addresses Blocking The port is currently blocked and cannot be used to forward traffic or learn MAC addresses Listening The port is currently in the listening mode The port cannot forward traffic nor can it learn MAC addresses Learning The port is currently in the learning mode...

Страница 148: ...sword If you added the switch to a network on the Insight app before and you did not yet change the password through the local browser interface enter your Insight network password The System Information page displays 5 Select Switching STP Advanced STP Statistics The STP Statistics page displays 6 To refresh the page with the latest information about the switch click the Refresh button The follow...

Страница 149: ... directly to a switch that is off network using an Ethernet cable 2 Launch a web browser 3 In the address field of your web browser enter the IP address of the switch If you do not know the IP address of the switch see Access the Switch on page 13 The login window opens 4 Enter the switch s password in the password field The default password is password If you added the switch to a network on the ...

Страница 150: ...5 Select Switching Multicast MFDB MFDB Statistics The MFDB Statistics page displays 6 To refresh the page with the latest information about the switch click the Refresh button Table 40 MFDB table information Field Description MAC Address The multicast MAC address for which you requested data VLAN ID The VLAN ID to which the multicast MAC address is related Component The component that is responsib...

Страница 151: ...e Insight app before and you did not yet change the password through the local browser interface enter your Insight network password The System Information page displays 5 Select Switching Multicast Auto Video The Auto Video Configuration page displays 6 Select one of the following radio buttons Select the Disable radio button to globally disable the Auto Video mode for the switch Select the Enabl...

Страница 152: ...s intended for only a small number of nodes Packets are flooded into network segments where no node is receptive to the packet While nodes rarely incur any processing overhead to filter packets addressed to unrequested group addresses they cannot transmit new packets onto the shared media for the period of time that the multicast packet is flooded The problem of wasting bandwidth is even worse whe...

Страница 153: ...the local browser interface enter your Insight network password The System Information page displays 5 Select Switching Multicast IGMP Snooping IGMP Snooping Configuration The IGMP Snooping Configuration page displays 6 Select the IGMP Snooping Status Enable or Disable radio button This specifies whether IGMP snooping is enabled for the switch The default is Enable 7 Select the Validate IGMP IP he...

Страница 154: ...onfiguration The IGMP Snooping Interface Configuration page displays 6 To display information for all ports and LAGs click the All link 7 Select one or more interfaces by taking one of the following actions To configure a single interface select the check box associated with the port or type the port number in the Go To Interface field and click the Go button To configure multiple interfaces with ...

Страница 155: ...le and Disable The default is Disable 13 Click the Apply button Your settings are saved View the IGMP Snooping Table You can view all of the entries in the Multicast Forwarding Database that were created for IGMP snooping To view the entries in the IGMP snooping table 1 Connect your computer to the same network as the switch You can use a WiFi or wired connection to connect your computer to the ne...

Страница 156: ... page 13 The login window opens 4 Enter the switch s password in the password field The default password is password If you added the switch to a network on the Insight app before and you did not yet change the password through the local browser interface enter your Insight network password The System Information page displays 5 Select Switching Multicast IGMP Snooping IGMP Snooping VLAN Configura...

Страница 157: ...sion mode for the specified VLAN ID IGMP snooping report suppression allows the suppression of the IGMP reports sent by the multicast hosts by building a Layer 3 membership table The results is that only the most essential reports are sent to the IGMP routers so that the routers can continue to receive the multicast traffic The default is Disable Querier Mode Enable or disable the IGMP querier mod...

Страница 158: ...your web browser enter the IP address of the switch If you do not know the IP address of the switch see Access the Switch on page 13 The login window opens 4 Enter the switch s password in the password field The default password is password If you added the switch to a network on the Insight app before and you did not yet change the password through the local browser interface enter your Insight n...

Страница 159: ...ing Multicast Router Configuration The Multicast Router Configuration page displays 6 To display information for all ports and LAGs click the All link 7 Select one or more interfaces by taking one of the following actions To configure a single interface select the check box associated with the port or type the port number in the Go To Interface field and click the Go button To configure multiple i...

Страница 160: ...Router VLAN Configuration The Multicast Router VLAN Configuration page displays 6 From the Interface menu select the interface 7 In the VLAN ID field enter the VLAN ID 8 From the Multicast Router menu select Enable or Disable 9 Click the Apply button Your settings are saved Configure an IGMP Snooping Querier An IGMP snooping querier is a device that queries devices on the network for multicast mem...

Страница 161: ...lect Switching Multicast IGMP Snooping Querier Querier Configuration The Querier Configuration page displays 6 Configure the following settings Querier Admin Mode Enable or disable IGMP snooping for the switch The default is Enable Snooping Querier Address Enter the snooping querier IP address to be used as the source address in periodic IGMP queries This address is used when no address is configu...

Страница 162: ...a network on the Insight app before and you did not yet change the password through the local browser interface enter your Insight network password The System Information page displays 5 Select Switching Multicast IGMP Snooping Querier Querier VLAN Configuration The Querier VLAN Configuration page displays 6 From the VLAN ID menu select New Entry 7 Configure the following settings VLAN ID The VLAN...

Страница 163: ...assword The System Information page displays 5 Select Switching Multicast IGMP Snooping Querier Querier VLAN Configuration The Querier VLAN Configuration page displays 6 From the VLAN ID menu select the VLAN ID 7 Click the Delete button Your settings are saved The IGMP snooping querier is no longer supported on the VLAN The VLAN itself is not deleted Display the IGMP Snooping Querier Status for VL...

Страница 164: ...ched links and to discover which multicast packets are of interest to neighboring Table 44 Querier VLAN Status information Field Description VLAN ID The VLAN ID on which IGMP snooping querier is enabled Operational State The operational state of the IGMP snooping querier on a VLAN It can be in any of the following states Querier The snooping switch is the querier in the VLAN The snooping switch se...

Страница 165: ...hich multicast routers are attached However by default the multicast router expiration time is zero that is the multicast router does not expire A statically configured router that is connected to an interface or VLAN on the switch is automatically added to the list with learned multicast routers The interface must be active or must be both active and a member of the VLAN Enable MLD Snooping You c...

Страница 166: ...change the password through the local browser interface enter your Insight network password The System Information page displays 5 Select Switching Multicast MLD Snooping Interface Configuration The MLD Snooping Interface Configuration page displays 6 To display information for all ports and LAGs click the All link 7 Select one or more interfaces by taking one of the following actions To configure...

Страница 167: ...membership interval 11 In the Expiration Time field specify the time that the switch must wait to receive a query on an interface before removing the interface from the list of interfaces with multicast routers attached Enter a value between 0 and 3600 seconds The default is 0 seconds A value of zero indicates an infinite time out that is no expiration 12 From the Fast Leave menu select to enable ...

Страница 168: ...cified VLAN ID The valid range is 1 to Group Membership Interval 1 This value must be less than the group membership interval value 10 In the Multicast Router Expiry Time field set the value for the multicast router expiry time of MLD snooping for the specified VLAN ID The valid range is 0 to 3600 11 Click the Add button MLD snooping is enabled on the specified VLAN Remove MLD Snooping From a VLAN...

Страница 169: ...ss the Switch on page 13 The login window opens 4 Enter the switch s password in the password field The default password is password If you added the switch to a network on the Insight app before and you did not yet change the password through the local browser interface enter your Insight network password The System Information page displays 5 Select Switching Multicast MLD Snooping Multicast Rou...

Страница 170: ...nsight network password The System Information page displays 5 Select Switching Multicast MLD Snooping Multicast Router VLAN Configuration The Multicast Router VLAN Configuration page displays 6 From the Interface menu select the interface for which you want the multicast router to be enabled 7 In the VLAN ID field specify the VLAN ID 8 From the Multicast Router menu select to enable or disable th...

Страница 171: ...onfigurable Query Interval secs Specify the interval in seconds between periodic queries sent by the snooping querier The query interval must be a value in the range of 1 to 1800 The default value is 60 Querier Expiry Interval secs Specify the interval in seconds after which the last querier information is removed The querier expiry interval must be a value in the range of 60 to 300 The default va...

Страница 172: ...on the specified VLAN 9 Click the Add button Your settings are saved and the MLD snooping querier is added on the VLAN The following table describes the nonconfigurable information displayed on the page Table 46 MLD Snooping Querier VLAN Configuration information Field Description Operational State The operational state of the MLD snooping querier on a VLAN It can be in any of the following states...

Страница 173: ...nter the IP address of the switch If you do not know the IP address of the switch see Access the Switch on page 13 The login window opens 4 Enter the switch s password in the password field The default password is password If you added the switch to a network on the Insight app before and you did not yet change the password through the local browser interface enter your Insight network password Th...

Страница 174: ...itch see Access the Switch on page 13 The login window opens 4 Enter the switch s password in the password field The default password is password If you added the switch to a network on the Insight app before and you did not yet change the password through the local browser interface enter your Insight network password The System Information page displays 5 Select Switching Address Table Basic Add...

Страница 175: ...ight app before and you did not yet change the password through the local browser interface enter your Insight network password The System Information page displays 5 Select Switching Address Table Advanced Dynamic Address The Dynamic Address page displays 6 In the Address Aging Timeout seconds field specify the time out period in seconds for aging out dynamically learned forwarding information Ta...

Страница 176: ... your web browser enter the IP address of the switch If you do not know the IP address of the switch see Access the Switch on page 13 The login window opens 4 Enter the switch s password in the password field The default password is password If you added the switch to a network on the Insight app before and you did not yet change the password through the local browser interface enter your Insight ...

Страница 177: ...hing Address Table Advanced Static MAC Address The page displays the Port List section and the Static MAC ADdress Table section 6 From the Interface menu select the interface 7 Select the check box for the static MAC address You can select multiple MAC addresses 8 Click the Delete button The static MAC address is removed from the MAC address table Configure Layer 2 Loop Protection Loops inside a n...

Страница 178: ...tween Ethernet ports on a device You must enable loop protection globally before you can enable and configure it at the interface level Loop protection is supported on physical interfaces and static LAG interfaces but not on dynamic LAG interfaces Configure Global Layer 2 Loop Protection To configure global Layer 2 loop protection 1 Connect your computer to the same network as the switch You can u...

Страница 179: ... Your settings are saved Configure Layer 2 Loop Protection on a Port To configure Layer 2 loop protection on a port 1 Connect your computer to the same network as the switch You can use a WiFi or wired connection to connect your computer to the network or connect directly to a switch that is off network using an Ethernet cable 2 Launch a web browser 3 In the address field of your web browser enter...

Страница 180: ...select the port for which data is to be displayed or configured 8 From the Keep Alive menu select Enable or Disable to specify whether keep alives are enabled on an interface The default is Disable 9 From the RX Action menu select the action that occurs when the switch detects a loop on an interface Log The switch logs a message Disable The switch disables the interface This is the default action ...

Страница 181: ...face Information Field Description Loop Detected Shows whether a loop is detected on the interface If the interface is disabled and then reenabled the status changes back to No Loop Count The number of packets that were received after the loop was detected Time Since Last Loop The time that elapsed since the loop was detected Port Status The status of the interface Enabled Disabled or D Disabled w...

Страница 182: ...Configure Switching 182 Insight Managed 28 Port Gigabit Ethernet Smart Cloud Switch with 2 SFP 1G 2 SFP 10G Fiber Ports ...

Страница 183: ...outing This chapter covers the following topics How the Switch Handles Routing Enable the Routing Mode View the IP Statistics Configure IPv6 Routing Configure Router Discovery Configure Routes and View Routes Configure ARP ...

Страница 184: ...ing Mode By default the routing mode is disabled on the switch You can enable the routing mode to let the switch route traffic through its interfaces You can also enable routing for a VLAN interface see Configure Routing VLANs on page 206 and use the VLAN routing wizard to create a VLAN routing interface see Configure VLAN Routing With the VLAN Routing Wizard on page 207 To enable routing on the s...

Страница 185: ... enter the IP address of the switch If you do not know the IP address of the switch see Access the Switch on page 13 The login window opens 4 Enter the switch s password in the password field The default password is password If you added the switch to a network on the Insight app before and you did not yet change the password through the local browser interface enter your Insight network password ...

Страница 186: ...nownProtos The number of locally addressed datagrams received successfully but discarded because of an unknown or unsupported protocol IpInDiscards The number of input IP datagrams for which no problems were encountered to prevent their continued processing but which were discarded for example for lack of buffer space This counter does not include any datagrams discarded while awaiting reassembly ...

Страница 187: ...bad ICMP checksums bad length and so on IcmpInDestUnreachs The number of ICMP Destination Unreachable messages received IcmpInTimeExcds The number of ICMP Time Exceeded messages received IcmpInParmProbs The number of ICMP Parameter Problem messages received IcmpInSrcQuenchs The number of ICMP Source Quench messages received IcmpInRedirects The number of ICMP Redirect messages received IcmpInEchos ...

Страница 188: ...itch on page 13 The login window opens 4 Enter the switch s password in the password field The default password is password If you added the switch to a network on the Insight app before and you did not yet change the password through the local browser interface enter your Insight network password The System Information page displays IcmpOutParmProbs The number of ICMP Parameter Problem messages s...

Страница 189: ...l must be in the range from 0 to 2147483647 mseconds 9 In the ICMPv6 Rate Limit Burst Size field enter the number of ICMP error packets that are allowed per burst interval This value controls the ICMP error packets The default burst size is 100 packets The valid burst size is 1 to 200 Do not enter 0 10 Click the Apply button Your settings are saved View the IPv6 Route Table To view the IPv6 Route ...

Страница 190: ...uting Settings on page 188 Configure Routing VLANs on page 206 IPv6 is supported on VLAN interfaces only not on physical ports Configure IPv6 VLAN interface settings 1 Connect your computer to the same network as the switch You can use a WiFi or wired connection to connect your computer to the network or connect directly to a switch that is off network using an Ethernet cable 2 Launch a web browse...

Страница 191: ... a global address In this case an EUI 64 based link local address is used The default value is Disable 8 From the DHCPv6 Client Mode menu select to enable or disable the DHCPv6 client mode on an interface Only one interface can function as a client The default value is Disable 9 From the Stateless Address AutoConfig Mode menu select to enable or disable the stateless address autoconfiguration mode...

Страница 192: ...from the interface The range of the maximum advertisement interval is 4 to 1800 The default value is 600 17 From the Adv Managed Config Flag menu specify the setting for the router advertisement managed address configuration flag When the selection is Enable end nodes use DHCPv6 When the selection is Disable end nodes autoconfigure addresses The default value is Disable 18 From the Adv Other Confi...

Страница 193: ...ee Access the Switch on page 13 The login window opens 4 Enter the switch s password in the password field The default password is password If you added the switch to a network on the Insight app before and you did not yet change the password through the local browser interface enter your Insight network password The System Information page displays 5 Select Routing IPv6 Advanced Prefix Configurat...

Страница 194: ...Current State field displays the state of the IPV6 address The state is TENT if routing is disabled or DAD fails The state is Active if the interface is active and DAD is successful 14 Click the Add button The IPv6 address prefix is added to the interface Change the Settings for an IPv6 Prefix for Advertisement on an IPv6 VLAN You can change the settings for a prefix for advertisement on an IPv6 V...

Страница 195: ...a WiFi or wired connection to connect your computer to the network or connect directly to a switch that is off network using an Ethernet cable 2 Launch a web browser 3 In the address field of your web browser enter the IP address of the switch If you do not know the IP address of the switch see Access the Switch on page 13 The login window opens 4 Enter the switch s password in the password field ...

Страница 196: ...nu select the interface When the selection is changed the page refreshes causing all fields to be updated for the newly selected interface 7 To refresh the page with the latest information about the switch click the Update button The following table describes the nonconfigurable information displayed on the page Table 53 IPv6 Statistics information Field Description Total Datagrams Received The to...

Страница 197: ...equired The number of IPv6 fragments received that needed to be reassembled at this interface This counter is incremented at the interface to which these fragments were addressed which might not be the input interface for some of the fragments Datagrams Successfully Reassembled The number of IPv6 datagrams successfully reassembled This counter is incremented at the interface to which these datagra...

Страница 198: ...pecific errors bad ICMP checksums bad length and so on ICMPv6 Destination Unreachable Messages Received The number of ICMP Destination Unreachable messages received by the interface ICMPv6 Messages Prohibited Administratively Received The number of ICMP destination unreachable communication administratively prohibited messages received by the interface ICMPv6 Time Exceeded Messages Received The nu...

Страница 199: ...ns there might be no types of error that contribute to this counter s value ICMPv6 Destination Unreachable Messages Transmitted The number of ICMP Destination Unreachable messages sent by the interface ICMPv6 Messages Prohibited Administratively Transmitted Number of ICMP Destination Unreachable Communication Administratively Prohibited messages sent ICMPv6 Time Exceeded Messages Transmitted The n...

Страница 200: ...word The System Information page displays 5 Select Routing IPv6 Advanced Neighbor Table The IPv6 Neighbor Table page displays 6 Use the Search menu and field to search for IPv6 routes by IPv6 address or interface number Search by IPv6 address Select IPv6 Address from the Search menu Enter the 128 byte hexadecimal IPv6 address in four digit groups separated by colons for example 2001 231F 1 Then cl...

Страница 201: ...eighbor discovery cache Incmp Address resolution is being performed on the entry A neighbor solicitation message was sent to the solicited node multicast address of the target but the corresponding neighbor advertisement message is not yet received Reach Positive confirmation was received within the last Reachable Time milliseconds that the forward path to the neighbor was functioning properly Whi...

Страница 202: ...routes by specifying a route preference value A static route with a lower preference value is a more preferred static route On a VLAN routing interface for example vlan 10 you can enable IPv4 routing and IPv6 routing independently Add a Static IPV6 Route To add a static IPv6 route 1 Connect your computer to the same network as the switch You can use a WiFi or wired connection to connect your compu...

Страница 203: ...router preference 12 Click the Add button The route is added Change the Preference for a Static IPv6 Route To change the preference for a static IPv6 route 1 Connect your computer to the same network as the switch You can use a WiFi or wired connection to connect your computer to the network or connect directly to a switch that is off network using an Ethernet cable 2 Launch a web browser 3 In the...

Страница 204: ...t network password The System Information page displays 5 Select Routing IPv6 Advanced Static Route Configuration The Configure Routes page displays 6 Select one or more check boxes for static IPv6 routes 7 Click the Delete button The route or routes are removed from the switch View the IPv6 Route Table To view the IPv6 Route Table 1 Connect your computer to the same network as the switch You can ...

Страница 205: ...ion exist the preference values are used to determine the preferred route If these preference values routes are equal the route with the best route metric is chosen To avoid problems with mismatched metrics you must configure different preference values for each of the protocols Configure the IPv6 route preferences 1 Connect your computer to the same network as the switch You can use a WiFi or wir...

Страница 206: ...d as if the VLAN were a router port When a port is enabled for bridging default rather than routing all normal bridge processing is performed for an inbound packet which is then associated with a VLAN Its MAC Destination Address MAC DA and VLAN ID are used to search the MAC address table If routing is enabled for the VLAN and the MAC DA of an inbound unicast packet is that of the internal bridge r...

Страница 207: ...not selected from the VLAN Enable routing on the VLAN using the IP address and subnet mask entered To configure VLAN routing using the VLAN routing wizard 1 Connect your computer to the same network as the switch You can use a WiFi or wired connection to connect your computer to the network or connect directly to a switch that is off network using an Ethernet cable 2 Launch a web browser 3 In the ...

Страница 208: ...rts that are selected are included in the VLAN U Untagged Select the ports on which all frames transmitted for this VLAN are untagged The ports that are selected are included in the VLAN By default the selection is blank which means that the port is excluded from the VLAN 10 In the LAG table click each LAG once twice or three times to configure one of the following modes or reset the LAG to the de...

Страница 209: ...in window opens 4 Enter the switch s password in the password field The default password is password If you added the switch to a network on the Insight app before and you did not yet change the password through the local browser interface enter your Insight network password The System Information page displays 5 Select Routing VLAN VLAN Routing Configuration The VLAN Routing Configuration page di...

Страница 210: ... added the switch to a network on the Insight app before and you did not yet change the password through the local browser interface enter your Insight network password The System Information page displays 5 Select Routing VLAN VLAN Routing Configuration The VLAN Routing Configuration page displays 6 From the VLAN list select the VLAN 7 Change the settings as needed 8 Click the Apply button Your s...

Страница 211: ...rational routers or routing interfaces on the subnet Router discovery messages can be of two types router advertisements and router solicitations The protocol requires each router to periodically advertise the IP addresses that it is associated with Hosts listen for these advertisements and discover the IP addresses of neighboring routers To configure the router discovery parameters 1 Connect your...

Страница 212: ...50 seconds 11 In the Advertise Lifetime field specify the value in seconds to be used as the lifetime field in router advertisements sent from the interface This is the maximum length of time that the advertised addresses are to be considered as valid router addresses by hosts The default is 1800 seconds 12 In the Preference Level field specify the preference level of the router as a default route...

Страница 213: ... the subnet mask Also referred to as the network mask the mask indicates the portion of the IP address that identifies the attached network 9 In the Next Hop IP Address field specify the next hop IP address This is the outgoing router IP address to use when forwarding traffic to the next router if any in the path towards the destination The next router is always one of the adjacent neighbors or th...

Страница 214: ...owser interface enter your Insight network password The System Information page displays 5 Select Routing Routing Table Route Configuration The Configure Routes page displays The page also shows the Route Status section 6 Select the check box next to each route to remove Table 58 Routing table information Field Description Network Address The IP route prefix for the destination Subnet Mask Also re...

Страница 215: ...hether it is an ARP request or response In this way when an ARP request is broadcast to all stations on a LAN segment or virtual LAN VLAN each recipient can store the sender s IP address and MAC address in its ARP cache The ARP response which is a unicast reply is normally detected only by the device that sends the ARP request That device stores the sender s information in its ARP cache Newer info...

Страница 216: ...et change the password through the local browser interface enter your Insight network password The System Information page displays 5 Select Routing ARP Basic ARP Cache The Management VLAN ARP Cache page displays The page also shows the Routing VLANs ARP Cache section The following table provides information included in the management VLAN ARP cache section The following table provides information...

Страница 217: ...our Insight network password The System Information page displays 5 Select Routing ARP Advanced ARP Create The Static ARP Configuration page displays The page also shows the Routing VLANs ARP Cache section 6 In the IP Address field specify the IP address to add The address must be the IP address of a device on a subnet attached to one of the switch s existing routing interfaces 7 In the MAC Addres...

Страница 218: ...ch on page 13 The login window opens 4 Enter the switch s password in the password field The default password is password If you added the switch to a network on the Insight app before and you did not yet change the password through the local browser interface enter your Insight network password The System Information page displays 5 Select Routing ARP Advanced Global ARP Configuration The Global ...

Страница 219: ...he login window opens 4 Enter the switch s password in the password field The default password is password If you added the switch to a network on the Insight app before and you did not yet change the password through the local browser interface enter your Insight network password The System Information page displays 5 Select Routing ARP Advanced ARP Entry Management The ARP Entry Management page ...

Страница 220: ...uler authorizes the queue for transmission As queues become full packets can no longer be held for transmission and are dropped by the switch Quality of Service QoS is a means of providing consistent predictable data delivery by distinguishing packets with strict timing requirements from those that are more tolerant of delay Packets with strict timing requirements are given special treatment in a ...

Страница 221: ... field must exist in the packet for the mapping table to be of any use If this is not the case default actions are performed These actions involve directing the packet to a specific CoS level configured for the ingress port as a whole based on the existing port default priority as mapped to a traffic class by the current 802 1p mapping table Alternatively when a port is configured as untrusted it ...

Страница 222: ...h Untrusted Do not trust any CoS packet marking at ingress 802 1p The eight priority tags that are specified in IEEE 802 1p are p0 to p7 The QoS setting lets you map each of the eight priority levels to one of seven internal hardware priority queues The default mode is 802 1p DSCP The six most significant bits of the DiffServ field are called the Differentiated Services Code Point DSCP bits To con...

Страница 223: ... the IP address of the switch If you do not know the IP address of the switch see Access the Switch on page 13 The login window opens 4 Enter the switch s password in the password field The default password is password If you added the switch to a network on the Insight app before and you did not yet change the password through the local browser interface enter your Insight network password 5 Sele...

Страница 224: ... value is 0 which means that the maximum is unlimited You can enter values from 0 to 100 in increments of 1 10 Click the Apply button Your settings are saved Configure CoS Queue Settings for an Interface You can define what a particular queue does by configuring switch egress queues User configurable parameters control the amount of bandwidth used by the queue the queue depth during times of conge...

Страница 225: ...ings select the check box in the heading row 8 From the Queue ID menu select the queue to be configured 9 In the Minimum Bandwidth field specify the minimum guaranteed bandwidth allotted to the queue Setting this value higher than its corresponding maximum bandwidth automatically increases the maximum to the same value The default value is 0 The valid range is 0 to 100 in increments of 1 The value...

Страница 226: ...ddress of the switch If you do not know the IP address of the switch see Access the Switch on page 13 The login window opens 4 Enter the switch s password in the password field The default password is password If you added the switch to a network on the Insight app before and you did not yet change the password through the local browser interface enter your Insight network password The System Info...

Страница 227: ... can use a WiFi or wired connection to connect your computer to the network or connect directly to a switch that is off network using an Ethernet cable 2 Launch a web browser 3 In the address field of your web browser enter the IP address of the switch If you do not know the IP address of the switch see Access the Switch on page 13 The login window opens 4 Enter the switch s password in the passwo...

Страница 228: ...rd IP based networks are designed to provide best effort data delivery service Best effort service implies that the network delivers the data in a timely fashion although it is not guaranteed During times of congestion packets might be delayed sent sporadically or dropped For typical Internet applications such as email and file transfer a slight degradation in service is acceptable and in many cas...

Страница 229: ...n which they were added to the policy A policy is applied to a packet when a class match within that policy is found Configure the Global DiffServ Mode You can display DiffServ general status group information which includes the current administrative mode setting as well as the current and maximum number of rows in each of the main DiffServ private MIB tables To configure the global DiffServ mode...

Страница 230: ... class As packets are received these DiffServ classes are used to prioritize packets You can set up multiple match criteria in a class The Table 61 DiffServ Status information Field Description Class Table The number of configured DiffServ classes out of the total allowed on the switch Class Rule table The number of configured class rules out of the total allowed on the switch Policy table The num...

Страница 231: ... password If you added the switch to a network on the Insight app before and you did not yet change the password through the local browser interface enter your Insight network password The System Information page displays 5 Select QoS DiffServ Advanced Class Configuration 6 In the Class Name field enter a class name The Class Name field also lists all the existing DiffServ class names from which y...

Страница 232: ...n be referenced are displayed Select the class to reference A class can reference at most one other class of the same type Class of Service Select this radio button to require the Class of Service CoS value in an Ethernet frame header to match the specified CoS value This option lists all the values for the Class of Service match criterion in the range 0 to 7 from which one can be selected VLAN Se...

Страница 233: ...nfigure the MAC mask An F means that the bit is checked and a zero in a bit position means that the data is not significant For example if the MAC address is aa bb cc dd ee ff and the mask is ff ff 00 00 00 00 all MAC addresses with aa bb xx xx xx xx result in a match where x is any hexadecimal number Note that this is not a wildcard mask which ACLs use Protocol Type Select this radio button to re...

Страница 234: ...e The IP ToS field in a packet is defined as all 8 bits of the service type octet in the IP header After you select the radio button use the following fields to configure the ToS match criteria Bits Value Enter a two digit hexadecimal number octet value in the range from 00 to ff to match the bits in a packet s ToS field Bit Mask Specify the bit positions that are used for comparison against the I...

Страница 235: ...er to the same network as the switch You can use a WiFi or wired connection to connect your computer to the network or connect directly to a switch that is off network using an Ethernet cable 2 Launch a web browser 3 In the address field of your web browser enter the IP address of the switch If you do not know the IP address of the switch see Access the Switch on page 13 The login window opens 4 E...

Страница 236: ... class is removed Configure DiffServ IPv6 Class Settings The IPv6 class configuration feature extends the existing QoS ACL and DiffServ functionality by providing support for IPv6 packet classification An Ethernet IPv6 packet is distinguished from an IPv4 packet by its unique Ethertype value so all IPv6 classifiers include the Ethertype field An IPv6 access list serves the same purpose as its IPv4...

Страница 237: ...address of the switch If you do not know the IP address of the switch see Access the Switch on page 13 The login window opens 4 Enter the switch s password in the password field The default password is password If you added the switch to a network on the Insight app before and you did not yet change the password through the local browser interface enter your Insight network password The System Inf...

Страница 238: ...lasses that can be referenced are displayed Select the class to reference A class can reference at most one other class of the same type Protocol Type Select this radio button to require a packet s Layer 4 protocol to match the specified protocol which you must select from the menu The menu includes Other as a selection which lets you enter a protocol number from 0 to 255 Source Prefix Length Sele...

Страница 239: ... Select this radio button to require the packet s IP DiffServ Code Point DSCP value to match the specified IP DSCP keyword code which you must select from the menu The menu includes Other as a selection which lets you enter an IP DSCP value from 0 to 63 The DSCP value is defined as the high order 6 bits of the Service Type octet in the IP header 11 Click the Apply button Your settings are saved Th...

Страница 240: ...k as the switch You can use a WiFi or wired connection to connect your computer to the network or connect directly to a switch that is off network using an Ethernet cable 2 Launch a web browser 3 In the address field of your web browser enter the IP address of the switch If you do not know the IP address of the switch see Access the Switch on page 13 The login window opens 4 Enter the switch s pas...

Страница 241: ... did not yet change the password through the local browser interface enter your Insight network password The System Information page displays 5 Select QoS DiffServ Advanced IPv6 Class Configuration The Class Name page displays 6 Select the check box next to the class name 7 Click the Delete button The class is removed Configure a DiffServ Policy You can associate a collection of classes with one o...

Страница 242: ...em Information page displays 5 Select QoS DiffServ Advanced Policy Configuration 6 Enter a policy name in the Policy Name field You cannot specify the policy type By default the policy type is In indicating that the policy applies to ingress packets 7 From the Member Class menu optionally select an existing class that you want to associate with the new policy 8 Click the Add button The new policy ...

Страница 243: ...IP Precedence Select this radio button to require packets to be marked with an IP precedence value before being forwarded You must select an IP precedence value from 0 to 7 from the menu Mirror Select this radio button to require packets to be mirrored to an interface or LAG one of which you must select from the menu Redirect Select this radio button to require packets to be redirected to an inter...

Страница 244: ...in the range from 1 to 4294967295 Kbps Committed Burst Size Enter the committed burst size that is applied to conforming packets by specifying a value in the range from 1 to 128 Kbps 13 Select the conforming and violating actions The Conform Action section and Violate Action section list the actions to be taken on conforming packets according to the policing metrics By default both conforming pack...

Страница 245: ...now the IP address of the switch see Access the Switch on page 13 The login window opens 4 Enter the switch s password in the password field The default password is password If you added the switch to a network on the Insight app before and you did not yet change the password through the local browser interface enter your Insight network password The System Information page displays 5 Select QoS D...

Страница 246: ...before and you did not yet change the password through the local browser interface enter your Insight network password The System Information page displays 5 Select QoS DiffServ Advanced Policy Configuration The Policy Configuration page displays 6 Click the policy name which is a hyperlink The page on which you can change the policy attributes displays 7 Change the policy attributes as needed 8 C...

Страница 247: ...computer to the same network as the switch You can use a WiFi or wired connection to connect your computer to the network or connect directly to a switch that is off network using an Ethernet cable 2 Launch a web browser 3 In the address field of your web browser enter the IP address of the switch If you do not know the IP address of the switch see Access the Switch on page 13 The login window ope...

Страница 248: ... switch s password in the password field The default password is password If you added the switch to a network on the Insight app before and you did not yet change the password through the local browser interface enter your Insight network password The System Information page displays 5 Select QoS DiffServ Advanced Service Configuration 6 To display information for all ports and LAGs click the All...

Страница 249: ...witch on page 13 The login window opens 4 Enter the switch s password in the password field The default password is password If you added the switch to a network on the Insight app before and you did not yet change the password through the local browser interface enter your Insight network password The System Information page displays 5 Select QoS DiffServ Advanced Service Configuration The Servic...

Страница 250: ... password If you added the switch to a network on the Insight app before and you did not yet change the password through the local browser interface enter your Insight network password The System Information page displays 5 Select QoS DiffServ Advanced Service Statistics 6 To refresh the page with the latest information about the switch click the Refresh button The following table describes the in...

Страница 251: ... DiffServ treatment This is the overall count per interface per direction The discarded packets are supported in the inbound direction but not in the outbound direction Member Classes All DiffServ classes that are defined as members of the selected policy name Select a member class name to display its statistics If no class is associated with the selected policy then the list is empty Table 66 Dif...

Страница 252: ... 6 Manage Device Security This chapter covers the following topics Management Security Settings Configure Management Access Configure Port Authentication Set Up Traffic Control Configure Access Control Lists ...

Страница 253: ...3 The login window opens 4 Enter the switch s password in the password field The default password is password If you added the switch to a network on the Insight app before and you did not yet change the password through the local browser interface enter your Insight network password The System Information page displays 5 Select Security Management Security User Configuration Change Password The C...

Страница 254: ... all switch settings including the password are reset to the factory default values To reset the password to the default password 1 Connect your computer to the same network as the switch You can use a WiFi or wired connection to connect your computer to the network or connect directly to a switch that is off network using an Ethernet cable 2 Launch a web browser 3 In the address field of your web...

Страница 255: ...ication equals the retransmit time x time out period for all configured servers If the RADIUS request was generated by a user login attempt all user interfaces are blocked until the RADIUS application returns a response To configure the global RADIUS server settings 1 Connect your computer to the same network as the switch You can use a WiFi or wired connection to connect your computer to the netw...

Страница 256: ...eout Duration field specify the time out value in seconds for request retransmissions The valid range is from 1 to 30 The default value is 5 Consider the maximum delay time when you are configuring RADIUS maximum retransmit and RADIUS time out values If multiple RADIUS servers are configured the maximum retransmit period on each server runs out before the next server is attempted A retransmit does...

Страница 257: ...added the switch to a network on the Insight app before and you did not yet change the password through the local browser interface enter your Insight network password The System Information page displays 5 Select Security Management Security RADIUS Server Configuration The Server Configuration page displays 6 In the Server Address field specify the IP address of the RADIUS server 7 In the Authent...

Страница 258: ...ss Requests The number of RADIUS access request packets sent to this server This number does not include retransmissions Access Retransmissions The number of RADIUS access request packets retransmitted to this server Access Accepts The number of RADIUS access accept packets including both valid and invalid packets that were received from this server Access Rejects The number of RADIUS access rejec...

Страница 259: ...ace enter your Insight network password The System Information page displays 5 Select Security Management Security RADIUS Server Configuration The Server Configuration page displays 6 Select the check box next to the server IP address 7 Modify the configuration for the selected server 8 Click the Apply button Your settings are saved Remove a RADIUS Authentication Server From the Switch To a remove...

Страница 260: ...ounting Server Configuration page to view and configure various settings for a RADIUS accounting servers on the network Add a RADIUS Accounting Server to the Switch To add a RADIUS accounting server to the switch and view the RADIUS accounting server statistics 1 Connect your computer to the same network as the switch You can use a WiFi or wired connection to connect your computer to the network o...

Страница 261: ...g server and RADIUS statistics to their default values click the Clear Counters button Table 69 RADIUS accounting server statistics information Field Description Accounting Server Address The accounting server associated with the statistics Round Trip Time secs The time interval in hundredths of a second between the most recent accounting response and the accounting request that matched it from th...

Страница 262: ...e outs to this server Unknown Types The number of RADIUS packets of unknown type that were received from this server on the accounting port Packets Dropped The number of RADIUS packets that were received from this server on the accounting port and dropped for some other reason Table 69 RADIUS accounting server statistics information continued Field Description ...

Страница 263: ...stem Information page displays 5 Select Security Management Security RADIUS Accounting Server Configuration The Accounting Server Configuration page displays 6 Select the check box next to the server IP address 7 Modify the configuration for the selected accounting server 8 Click the Apply button Your settings are saved Remove a RADIUS Accounting Server From the Switch To a remove a RADIUS account...

Страница 264: ...er privileges The TACACS protocol ensures network security through encrypted protocol exchanges between the device and TACACS server Configure the Global TACACS Settings You can configure the TACACS settings for communication between the switch and the TACACS server that you set up To configure the global TACACS settings 1 Connect your computer to the same network as the switch You can use a WiFi ...

Страница 265: ... a switch that is off network using an Ethernet cable 2 Launch a web browser 3 In the address field of your web browser enter the IP address of the switch If you do not know the IP address of the switch see Access the Switch on page 13 The login window opens 4 Enter the switch s password in the password field The default password is password If you added the switch to a network on the Insight app ...

Страница 266: ...ltList and that you cannot delete Configure an HTTP Authentication List You can configure the default HTTP login list To change the HTTP authentication method for the default list 1 Connect your computer to the same network as the switch You can use a WiFi or wired connection to connect your computer to the network or connect directly to a switch that is off network using an Ethernet cable 2 Launc...

Страница 267: ...Method 2 None The authentication method is unspecified This option is available only for Method 2 and Method 3 8 From the menu in the 2 column select the authentication method if any that must be used second in the selected authentication login list This is the method that is used if the first method times out If you select a method that does not time out as the second method the third method is n...

Страница 268: ...thod does not time out if you select this option as the first method no other method is tried even if you specified more than one method Radius The user s ID and password are authenticated using the RADIUS server If you select Radius as the first method and an error occurs during the authentication the switch uses Method 2 to authenticate the user Tacacs The user s ID and password are authenticate...

Страница 269: ...h on page 13 The login window opens 4 Enter the switch s password in the password field The default password is password If you added the switch to a network on the Insight app before and you did not yet change the password through the local browser interface enter your Insight network password The System Information page displays 5 Select Security Management Security Authentication List Dot1x Aut...

Страница 270: ...p before and you did not yet change the password through the local browser interface enter your Insight network password The System Information page displays 5 Select Security Access HTTP HTTP Configuration The HTTP Configuration page displays 6 In the HTTP Session Soft Timeout field specify the number of minutes an HTTP session can be idle before a time out occurs The value must be in the range o...

Страница 271: ...e password field The default password is password If you added the switch to a network on the Insight app before and you did not yet change the password through the local browser interface enter your Insight network password The System Information page displays 5 Select Security Access HTTPS HTTPS Configuration The HTTPS Configuration page displays 6 Select the HTTPS Admin Mode Enable or Disable r...

Страница 272: ...e number of HTTPS sessions The value must be in the range of 0 to 4 The default value is 4 13 Click the Apply button Your settings are saved Manage Certificates You can manage certificates Generate an SSL Certificate To generate an SSL certificate 1 Connect your computer to the same network as the switch You can use a WiFi or wired connection to connect your computer to the network or connect dire...

Страница 273: ...he login window opens 4 Enter the switch s password in the password field The default password is password If you added the switch to a network on the Insight app before and you did not yet change the password through the local browser interface enter your Insight network password The System Information page displays 5 Select Security Access HTTPS Certificate Management The Certificate Management ...

Страница 274: ...ficate Download page displays 6 From the File Type menu select the type of SSL certificate to download which can be one of the following SSL Trusted Root Certificate PEM File SSL Trusted Root Certificate file PEM Encoded SSL Server Certificate PEM File SSL Server Certificate File PEM Encoded SSL DH Weak Encryption Parameter PEM File SSL Diffie Hellman Weak Encryption Parameter file PEM Encoded SSL...

Страница 275: ...e switch If you do not know the IP address of the switch see Access the Switch on page 13 The login window opens 4 Enter the switch s password in the password field The default password is password If you added the switch to a network on the Insight app before and you did not yet change the password through the local browser interface enter your Insight network password The System Information page...

Страница 276: ...ield The default password is password If you added the switch to a network on the Insight app before and you did not yet change the password through the local browser interface enter your Insight network password The System Information page displays 5 Select Security Access Access Control Access Rule Configuration Table 70 Access profile configuration profile summary Field Description Rule Type Th...

Страница 277: ...es the action is performed and subsequent rules are ignored For example if a source IP 10 10 10 10 is configured with priority 1 to permit and source IP 10 10 10 10 is configured with priority 2 to deny access is permitted if the profile is active and the second rule is ignored 11 Click the Add button The access rule is added Configure Port Authentication With port based authentication when 802 1X...

Страница 278: ...1X Configuration The 802 1X Configuration page displays 6 Next to Port Based Authentication State select the Enable radio button This enables or disables 802 1X administrative mode on the switch Note If 802 1X is enabled authentication is performed by a RADIUS server This means that the primary authentication method must be RADIUS To set the method select Security Management Security Authenticatio...

Страница 279: ...ettings for a Port To configure 802 1X settings for a port 1 Connect your computer to the same network as the switch You can use a WiFi or wired connection to connect your computer to the network or connect directly to a switch that is off network using an Ethernet cable 2 Launch a web browser 3 In the address field of your web browser enter the IP address of the switch If you do not know the IP a...

Страница 280: ...N ID on the interface The guest VLAN allows the port to provide a distinguished service to unauthenticated users This feature provides a mechanism to allow users access to hosts on the guest VLAN Guest VLAN Period Specify the number of seconds that the selected port remains in the quiet state following a failed authentication exchange The guest VLAN time out must be a value in the range of 1 300 T...

Страница 281: ...iption Control Direction The control direction for the specified port which is always Both The control direction dictates the degree to which protocol exchanges take place between supplicant and authenticator The unauthorized controlled port exerts control over communication in both directions disabling both incoming and outgoing frames Protocol Version The protocol version associated with the sel...

Страница 282: ...s 6 Select the check box associated with the port to initialize 7 Click the Initialize button 802 1X on the selected interface is reset to the initialization state Traffic sent to and from the port is blocked during the authentication process This button is available only if the control mode is auto When you click this button the action is immediate You do not need to click the Apply button for th...

Страница 283: ...nformation about the port based authentication settings for each port To view the port summary 1 Connect your computer to the same network as the switch You can use a WiFi or wired connection to connect your computer to the network or connect directly to a switch that is off network using an Ethernet cable 2 Launch a web browser 3 In the address field of your web browser enter the IP address of th...

Страница 284: ...licant authenticator and the authentication server Force Unauthorized The switch denies the interface access by moving the interface into the unauthorized state The switch cannot provide authentication services to the client through the interface Force Authorized The switch places the interface in an authorized state without the need for authentication The interface sends and receives normal traff...

Страница 285: ...Summary information Field Description Port The port to be displayed User Name The name the client uses to identify itself as a supplicant to the authentication server Supplicant Mac Address The MAC address of the supplicant that is connected to the port Session Time The time in seconds since the supplicant was granted access Filter ID The policy filter ID assigned by the authenticator to the suppl...

Страница 286: ...address of the switch see Access the Switch on page 13 The login window opens 4 Enter the switch s password in the password field The default password is password If you added the switch to a network on the Insight app before and you did not yet change the password through the local browser interface enter your Insight network password The System Information page displays 5 Select Security Traffic...

Страница 287: ...ngs are saved Delete a MAC FIlter To delete a MAC filter 1 Connect your computer to the same network as the switch You can use a WiFi or wired connection to connect your computer to the network or connect directly to a switch that is off network using an Ethernet cable 2 Launch a web browser 3 In the address field of your web browser enter the IP address of the switch If you do not know the IP add...

Страница 288: ...rmation page displays 5 Select Security Traffic Control MAC Filter MAC Filter Summary The MAC Filter Summary page displays The following table describes the information displayed on the page Configure Storm Control A broadcast storm is the result of an excessive number of broadcast messages simultaneously transmitted across a network by a single port Forwarded message responses can overload networ...

Страница 289: ...rol Disabled Storm control is disabled This is the default setting Unknown Unicast If the rate of incoming unknown Layer 2 unicast traffic that is traffic for which a destination lookup failure occurs increases beyond the configured threshold on an interface the traffic is dropped Multicast If the rate of incoming Layer 2 multicast traffic increases beyond the configured threshold on an interface ...

Страница 290: ...le from the Status menu in the table heading c In the Port Settings section in the Threshold field in the table heading specify the maximum rate at which unknown packets are forwarded The range is a percent of the total threshold between 0 100 The default is 5 d In the Port Settings section from the Control Action mode menu in the table heading select one of the following options None This is the ...

Страница 291: ...s that are enabled for port security The following table describes the fields in the Port Security Violations table Configure a Port Security Interface A MAC address can be defined as allowable by one of two methods dynamically or statically Both methods are used concurrently when a port is locked Dynamic locking implements a first arrival mechanism for port security You specify how many addresses...

Страница 292: ...e All link 7 Select one or more interfaces by taking one of the following actions To configure a single interface select the check box associated with the port or type the port number in the Go To Interface field and click the Go button To configure multiple interfaces with the same settings select the check box associated with each interface To configure all interfaces with the same settings sele...

Страница 293: ...app before and you did not yet change the password through the local browser interface enter your Insight network password The System Information page displays 5 Select Security Traffic Control Port Security Port Security Configuration The Port Security Configuration page displays 6 Make sure that port security is globally enabled For more information see Configure the Global Port Security Mode on...

Страница 294: ...ected ports To configure protected ports 1 Connect your computer to the same network as the switch You can use a WiFi or wired connection to connect your computer to the network or connect directly to a switch that is off network using an Ethernet cable 2 Launch a web browser 3 In the address field of your web browser enter the IP address of the switch If you do not know the IP address of the swit...

Страница 295: ...r web browser enter the IP address of the switch If you do not know the IP address of the switch see Access the Switch on page 13 The login window opens 4 Enter the switch s password in the password field The default password is password If you added the switch to a network on the Insight app before and you did not yet change the password through the local browser interface enter your Insight netw...

Страница 296: ...face enter your Insight network password The System Information page displays 5 Select Security Traffic Control Private VLAN Private Vlan Association Configuration The Private VLAN Association page displays 6 From the Primary VLAN menu select the primary VLAN ID of the domain 7 In the Secondary VLAN s field enter the VLAN that you want to associate with the primary VLAN 8 Click the Apply button Yo...

Страница 297: ...the port or type the port number in the Go To Interface field and click the Go button To configure multiple interfaces with the same settings select the check box associated with each interface To configure all interfaces with the same settings select the check box in the heading row 8 From the Port VLAN Mode menu select the switch port mode General Sets the interfaces in general mode which is the...

Страница 298: ...es with the same settings select the check box associated with each interface To configure all interfaces with the same settings select the check box in the heading row 8 In the Host Primary VLAN field enter the primary VLAN ID for the host association mode The range of the VLAN ID is 2 4093 9 In the Host Secondary VLAN field enter the secondary VLAN ID for host association mode The range of the V...

Страница 299: ...us Primary VLAN field enter the primary VLAN ID for the promiscuous association mode The range of the VLAN ID is 2 4093 9 In the Promiscuous Secondary VLAN s field enter the secondary VLAN ID for promiscuous association mode This field can accept single a VLAN ID a range of VLAN IDs or a combination of both in sequence separated by a comma You can specify an individual VLAN ID such as 10 You can s...

Страница 300: ...n ACL see Modify an ACL Rule on page 304 Note The steps in the following procedure describe how you can create an ACL based on the destination MAC address If you select a different type of ACL for example an ACL based on a source IPv4 the page displays different information Use the ACL Wizard to create an ACL To use the ACL Wizard to create an ACL 1 Connect your computer to the same network as the...

Страница 301: ... an ACL based on the destination IPv4 address and IPv4 address mask ACL Based on Source IPv4 Creates an ACL based on the source IPv4 address and IPv4 address mask ACL Based on Destination IPv6 Creates an ACL based on the destination IPv6 prefix and IPv6 prefix length ACL Based on Source IPv6 Creates an ACL based on the source IPv6 prefix and IPv6 prefix length ACL Based on Destination IPv4 L4 Port...

Страница 302: ...iguration depend on the selected ACL type For information about the possible match criteria fields see the following table ACL Based On Fields Destination MAC Destination MAC Specify the destination MAC address to compare against an Ethernet frame The valid format is xx xx xx xx xx xx The BPDU keyword might be specified using a destination MAC address of 01 80 C2 xx xx xx Destination MAC Mask Spec...

Страница 303: ...nding Configuration section from the Direction menu select the packet filtering direction for the ACL Only the inbound direction is valid e In the Ports and LAG tables in the Binding Configuration section select the ports and LAGs to which the ACL must be applied f Click the Add button The rule is added to the ACL and is based on the destination MAC 12 Click the Apply button Your settings are save...

Страница 304: ...Insight network password The System Information page displays 5 Select Security ACL ACL Wizard The ACL Wizard page displays 6 Select check box that is associated with the rule 7 Update the match criteria as needed 8 Click the Apply button Your settings are saved Delete an ACL Rule To delete an ACL rule 1 Connect your computer to the same network as the switch You can use a WiFi or wired connection...

Страница 305: ...AG 1 Only the Inbound option is valid Packets that include a source address in the 192 168 3 0 16 network are permitted to be forwarded by the interfaces All other packets are dropped because every ACL includes an implicit deny all rule as the last rule For information about the ACL Wizard see Use the ACL Wizard to Create a Simple ACL on page 300 Configure a Basic MAC ACL A MAC ACL consists of a s...

Страница 306: ...ogin window opens 4 Enter the switch s password in the password field The default password is password If you added the switch to a network on the Insight app before and you did not yet change the password through the local browser interface enter your Insight network password The System Information page displays 5 Select Security ACL Basic MAC ACL The MAC ACL page displays The MAC ACL Table displ...

Страница 307: ...enter your Insight network password The System Information page displays 5 Select Security ACL Basic MAC ACL The MAC ACL page displays 6 Select check box that is associated with the rule 7 In the Name field specify the new name 8 Click the Apply button Your settings are saved Delete a MAC ACL To delete a MAC ACL 1 Connect your computer to the same network as the switch You can use a WiFi or wired ...

Страница 308: ... same network as the switch You can use a WiFi or wired connection to connect your computer to the network or connect directly to a switch that is off network using an Ethernet cable 2 Launch a web browser 3 In the address field of your web browser enter the IP address of the switch If you do not know the IP address of the switch see Access the Switch on page 13 The login window opens 4 Enter the ...

Страница 309: ...y menu select whether each Layer 2 MAC packet must be matched against the rule True Each packet must match the selected ACL rule False Not all packets need to match the selected ACL rule 13 In the CoS field specify the 802 1p user priority that must be compared against the information in an Ethernet frame The valid range of values is 0 to 7 14 In the Destination MAC field specify the destination M...

Страница 310: ...net frame The valid format is xx xx xx xx xx xx 19 In the Source MAC Mask field specify the source MAC address mask that must be compared against the information in an Ethernet frame The valid format is xx xx xx xx xx xx The MAC mask specifies which bits in the MAC address must be compared against an Ethernet frame You can use Fs and zeros in the MAC mask which is in a wildcard format An F means t...

Страница 311: ...hernet cable 2 Launch a web browser 3 In the address field of your web browser enter the IP address of the switch If you do not know the IP address of the switch see Access the Switch on page 13 The login window opens 4 Enter the switch s password in the password field The default password is password If you added the switch to a network on the Insight app before and you did not yet change the pas...

Страница 312: ... an interface all the rules that are defined are applied to the selected interface You can assign MAC ACL lists to ACL priorities and interfaces To configure MAC bindings 1 Connect your computer to the same network as the switch You can use a WiFi or wired connection to connect your computer to the network or connect directly to a switch that is off network using an Ethernet cable 2 Launch a web b...

Страница 313: ...already in use for the interface and direction the specified access list replaces the currently attached access list using that sequence number If you do not specify the sequence number a sequence number that is one number greater than the highest sequence number currently in use for this interface and direction is used The valid range is 1 4294967295 8 To add the selected ACL to a port or LAG in ...

Страница 314: ...sword in the password field The default password is password If you added the switch to a network on the Insight app before and you did not yet change the password through the local browser interface enter your Insight network password The System Information page displays 5 Select Security ACL Basic MAC Binding Table The MAC Binding Table displays 6 To delete a MAC ACL to interface binding do the ...

Страница 315: ... the IP address of the switch see Access the Switch on page 13 The login window opens 4 Enter the switch s password in the password field The default password is password If you added the switch to a network on the Insight app before and you did not yet change the password through the local browser interface enter your Insight network password The System Information page displays 5 Select Security...

Страница 316: ... character Each configured ACL displays the following information Rules The number of rules currently configured for the IP ACL Type Identifies the ACL as a basic IP ACL with an ID from 1 to 99 extended IP ACL with an ID from 100 to 199 or a named IP ACL 7 Click the Add button The IP ACL is added to the switch configuration Delete an IP ACL To delete an IP ACL 1 Connect your computer to the same n...

Страница 317: ...pplies and the packet is dropped Add a Rule for a Basic IP ACL To add a rule for a basic IP ACL 1 Connect your computer to the same network as the switch You can use a WiFi or wired connection to connect your computer to the network or connect directly to a switch that is off network using an Ethernet cable 2 Launch a web browser 3 In the address field of your web browser enter the IP address of t...

Страница 318: ...teria Deny Drop packets that meet the ACL criteria Egress Queue If the selection form the Action menu is Permit you can specify the hardware egress queue identifier that is used to handle all packets matching this IP ACL rule The range of queue IDs is 0 to 7 Logging If the selection form the Action menu is Deny you can enable logging for the ACL by selecting the Enable radio button Logging is subj...

Страница 319: ... an ACL functions differently from a subnet mask A wildcard mask is in essence the inverse of a subnet mask For example to apply the rule to all hosts in the 192 168 1 0 24 subnet enter 0 0 0 255 in the Source IP Mask field A wildcard mask of 255 255 255 255 indicates that no bit is important A wildcard mask of 0 0 0 0 indicates that all of the bits are important 9 Click the Apply button Your sett...

Страница 320: ... on page 13 The login window opens 4 Enter the switch s password in the password field The default password is password If you added the switch to a network on the Insight app before and you did not yet change the password through the local browser interface enter your Insight network password The System Information page displays 5 Select Security ACL Advanced IP Rules The IP Rules page displays 6...

Страница 321: ...The login window opens 4 Enter the switch s password in the password field The default password is password If you added the switch to a network on the Insight app before and you did not yet change the password through the local browser interface enter your Insight network password The System Information page displays 5 Select Security ACL Advanced IP Extended Rules The previous figure does not sh...

Страница 322: ...p packets that meet the ACL criteria Egress Queue If the selection from the Action menu is Permit select the hardware egress queue identifier that is used to handle all packets matching this IP ACL rule The range of queue IDs is 0 to 7 Logging If the selection form the Action menu is Deny you can enable logging for the ACL by selecting the Enable radio button Logging is subject to resource availab...

Страница 323: ...to be compared to a packet s source IP address as a match criterion for the selected IP ACL rule If you select the IP Address radio button enter an IP address or an IP address range You can enter a relevant wildcard mask to apply this criteria If this field is left empty it means any If you select the Host radio button the wildcard mask is configured as 0 0 0 0 If this field is left empty it means...

Страница 324: ... destination IP TCP port protocols are domain echo ftp ftpdata www http smtp telnet pop2 pop3 and bgp The destination IP UDP port protocols are domain echo snmp ntp rip time who and tftp Each of these values translates into its equivalent port number which is used as both the start and end of the port range Select Other from the menu to enter a port number If you select Other from the menu but lea...

Страница 325: ...cified port number or port protocol Not Equal The IP ACL rule matches only if the Layer 4 destination port number is not equal to the specified port number or port protocol Less Than The IP ACL rule matches if the Layer 4 destination port number is less than the specified port number Greater Than The IP ACL rule matches if the Layer 4 destination port number is greater than the specified port numb...

Страница 326: ...code within the ICMP type The IPv4 ICMP message types are echo echo reply host redirect mobile redirect net redirect net unreachable redirect packet too big port unreachable source quench router solicitation router advertisement ttl exceeded time exceeded and unreachable Fragments Either select the Enable radio button to allow initial fragments that is the fragment bit is asserted or leave the def...

Страница 327: ...g extended IP ACL rule 1 Connect your computer to the same network as the switch You can use a WiFi or wired connection to connect your computer to the network or connect directly to a switch that is off network using an Ethernet cable 2 Launch a web browser 3 In the address field of your web browser enter the IP address of the switch If you do not know the IP address of the switch see Access the ...

Страница 328: ...password The System Information page displays 5 Select Security ACL Advanced IP Extended Rules The IP Rules page displays 6 From the ACL ID menu select the ACL that includes the rule that you want to delete 7 In the Extended ACL Rule Table select the check box that is associated with the rule 8 Click the Delete button The rule is removed Configure an IPv6 ACL An IP or IPv6 ACL consists of a set of...

Страница 329: ...lete an IPv6 ACL 1 Connect your computer to the same network as the switch You can use a WiFi or wired connection to connect your computer to the network or connect directly to a switch that is off network using an Ethernet cable 2 Launch a web browser 3 In the address field of your web browser enter the IP address of the switch If you do not know the IP address of the switch see Access the Switch...

Страница 330: ...final implicit deny all rule applies and the packet is dropped Add a Rule for an IPv6 ACL Add a rule for an ACL IPv6 1 Connect your computer to the same network as the switch You can use a WiFi or wired connection to connect your computer to the network or connect directly to a switch that is off network using an Ethernet cable 2 Launch a web browser 3 In the address field of your web browser ente...

Страница 331: ...ed for this ACL If one or more rules exist for the ACL the rules display in the IPv6 ACL Rule Table 6 From the ACL Name menu select the IPv6 ACL for which you want to add a rule 7 Click the Add button The previous figure does not show the rightmost fields 8 Configure the following match criteria for the rule Sequence Number Enter a whole number in the range of 1 to 2147483647 that is used to ident...

Страница 332: ...ct Interface radio button and use the menu to specify the egress interface to which the matching traffic stream is forced bypassing any forwarding decision normally performed by the device Match Every Select whether all packet must match the selected IPv6 ACL rule Disable Not all packets need to match the selected IPv6 ACL rule You can configure other match criteria on the page Enable All packets ...

Страница 333: ...to the specified port number or port protocol Not Equal The IPv6 ACL rule matches only if the Layer 4 source port number is not equal to the specified port number or port protocol Less Than The IPv6 ACL rule matches if the Layer 4 source port number is less than the specified port number Greater Than The IPv6 ACL rule matches if the Layer 4 source port number is greater than the specified port num...

Страница 334: ...rt protocols are domain echo ftp ftpdata www http smtp telnet pop2 pop3 and bgp The destination IP UDP port protocols are domain echo snmp ntp rip time who and tftp Each of these values translates into its equivalent port number which is used as both the start and end of the port range Select Other from the menu to enter a port number If you select Other from the menu but leave the field blank it ...

Страница 335: ...255 If these fields are left empty it means any Message radio button If you select the Message radio button select the type of the ICMPv6 message to match with the selected IPv6 ACL rule Specifying a type of message implies that both the ICMPv6 type and ICMPv6 code are specified The ICMPv6 message is decoded into the corresponding ICMPv6 type and ICMPv6 code within the ICMP type The ICMPv6 message...

Страница 336: ...tch You can use a WiFi or wired connection to connect your computer to the network or connect directly to a switch that is off network using an Ethernet cable 2 Launch a web browser 3 In the address field of your web browser enter the IP address of the switch If you do not know the IP address of the switch see Access the Switch on page 13 The login window opens 4 Enter the switch s password in the...

Страница 337: ... Security ACL Advanced IPv6 Rules The IPv6 Rules page displays 6 From the ACL Name menu select the ACL that includes the rule that you want to delete 7 In the IPv6 ACL Rule Table select the check box that is associated with the rule 8 Click the Delete button The rule is removed Configure IP ACL Interface Bindings When an ACL is bound to an interface all the rules that are defined are applied to th...

Страница 338: ...ACL rules are applied to traffic entering the interface 7 In the Sequence Number field optionally specify a number to indicate the order of the access list relative to other access lists already assigned to this interface and direction A low number indicates high precedence order If a sequence number is already in use for this interface and direction the specified access list replaces the currentl...

Страница 339: ...eb browser enter the IP address of the switch If you do not know the IP address of the switch see Access the Switch on page 13 The login window opens 4 Enter the switch s password in the password field The default password is password If you added the switch to a network on the Insight app before and you did not yet change the password through the local browser interface enter your Insight network...

Страница 340: ...the IP address of the switch If you do not know the IP address of the switch see Access the Switch on page 13 The login window opens 4 Enter the switch s password in the password field The default password is password If you added the switch to a network on the Insight app before and you did not yet change the password through the local browser interface enter your Insight network password The Sys...

Страница 341: ...ection A lower number indicates a higher precedence order If a sequence number is already in use for the VLAN ID and selected direction the specified access list replaces the currently attached ACL using that sequence number If you do not specify a sequence number the value is 0 a sequence number that is one greater than the highest sequence number currently in use for the VLAN ID and selected dir...

Страница 342: ...e Tasks This chapter covers the following topics Reboot the Switch Reset the Switch to Its Factory Default Settings Export a File From the Switch Download a File to the Switch Manage Software Images Perform Troubleshooting Tasks ...

Страница 343: ...itch see Access the Switch on page 13 The login window opens 4 Enter the switch s password in the password field The default password is password If you added the switch to a network on the Insight app before and you did not yet change the password through the local browser interface enter your Insight network password The System Information page displays 5 Select Maintenance Reset Device Reboot 6...

Страница 344: ...actory default settings To reset the switch to the factory default settings 1 Connect your computer to the same network as the switch You can use a WiFi or wired connection to connect your computer to the network or connect directly to a switch that is off network using an Ethernet cable 2 Launch a web browser 3 In the address field of your web browser enter the IP address of the switch If you do ...

Страница 345: ...nter the IP address of the switch If you do not know the IP address of the switch see Access the Switch on page 13 The login window opens 4 Enter the switch s password in the password field The default password is password If you added the switch to a network on the Insight app before and you did not yet change the password through the local browser interface enter your Insight network password Th...

Страница 346: ... accepted Leave this field blank to save the file to the root TFTP directory 10 In the Transfer File Name field specify a destination file name for the file to be uploaded You can enter up to 32 characters The transfer fails if you do not specify a file name For an archive transfer use a stk file extension 11 Select the Start File Transfer check box 12 Click the Apply button The file transfer begi...

Страница 347: ...re and configuration information that can assist in device and network troubleshooting Crash Logs Specify crash logs to retrieve them 7 Click the Apply button The file transfer begins The page displays information about the file transfer progress The page refreshes automatically when the file transfer completes or if it fails Download a File to the Switch You can download system files from a remot...

Страница 348: ...age1 and image2 The active image stores the active copy while the other image stores a second copy The device boots and runs from the active image If the active image is corrupted the system automatically boots from the nonactive image This is a safety feature for faults occurring during the boot upgrade process The default setting is Archive Text Configuration A text based configuration file enab...

Страница 349: ...e Name field specify the name of the file to download from the TFTP server You can enter up to 32 characters A file name with a space is not accepted 12 Select the Start File Transfer check box to initiate the file upload 13 Click the Apply button The file transfer begins The page displays information about the progress of the file transfer The page refreshes automatically when the file transfer c...

Страница 350: ...usage of text based configuration is to upload a working configuration from a device edit it offline to personalize it for another similar device for example change the device name serial number IP address and download it to that device SSL Trusted Root Certificate PEM File SSL Trusted Root Certificate File PEM Encoded SSL Server Certificate PEM File SSL Server Certificate File PEM Encoded SSL DH ...

Страница 351: ...grading the switch software A legacy software version can ignore that is might not load a configuration file that is created by a newer software version When a configuration file created by the newer software version is discovered by the system running an older version of the software the system displays an appropriate warning The following sections describe how you can manage the images Copy an I...

Страница 352: ... switch down time when you are upgrading or downgrading the software image Change the Image That Loads During the Boot Process To change the image that loads during the boot process 1 Connect your computer to the same network as the switch You can use a WiFi or wired connection to connect your computer to the network or connect directly to a switch that is off network using an Ethernet cable 2 Lau...

Страница 353: ... switch that is off network using an Ethernet cable 2 Launch a web browser 3 In the address field of your web browser enter the IP address of the switch If you do not know the IP address of the switch see Access the Switch on page 13 The login window opens 4 Enter the switch s password in the password field The default password is password If you added the switch to a network on the Insight app be...

Страница 354: ... Enter the switch s password in the password field The default password is password If you added the switch to a network on the Insight app before and you did not yet change the password through the local browser interface enter your Insight network password The System Information page displays 5 Select Maintenance File Management Dual Image Dual Image Status The Dual Image Status page displays Th...

Страница 355: ...TT 0 0 0 msec If a reply to the ping is received the following message displays Reply From a b c d icmp_seq 0 time xyz usec Reply From a b c d icmp_seq 1 time abc usec Reply From a b c d icmp_seq 2 time def usec Tx count Rx count Min Max Avg RTT xyz abc def msec To send an IPv4 ping 1 Connect your computer to the same network as the switch You can use a WiFi or wired connection to connect your com...

Страница 356: ...he source Interface The interface that must be used when echo request packets are sent With this selection the Interface menu displays and you must select an interface as the source 11 Click the Apply button The specified address is pinged The results are displayed below the configurable data in the Results field Send an IPv6 Ping This page is used to send a ping request to a specified host name o...

Страница 357: ...The maximum number of characters is 255 8 In the Count field enter the number of echo requests that must be sent The range is 1 to 15 The default value is 3 9 In the Interval field enter the time in seconds between ping packets The range is 1 to 60 The default value is 3 10 In the Datagram Size field enter the datagram size The valid range is 0 to 13000 The default value is 0 bytes 11 From the Sou...

Страница 358: ...In the address field of your web browser enter the IP address of the switch If you do not know the IP address of the switch see Access the Switch on page 13 The login window opens 4 Enter the switch s password in the password field The default password is password If you added the switch to a network on the Insight app before and you did not yet change the password through the local browser interf...

Страница 359: ...15 Click the Apply button A traceroute request is sent to the specified IP address or host name The results are displayed below the configurable data in the Results field Send an IPv6 Traceroute You can configure the switch to send a traceroute request to a specified IPv6 address or host name You can use this to discover the paths that packets take to a remote destination Once you click the Apply ...

Страница 360: ...r the maximum number of failures allowed in the session The default value is 5 The range is 1 to 255 11 In the Interval field enter the time between probes in seconds The default value is 3 The range is 1 to 60 12 In the Port field enter the UDP destination port for the probe packets The default value is 33434 The range is 1 65535 13 In the Size field enter the size of the probe packets The defaul...

Страница 361: ...rk using an Ethernet cable 2 Launch a web browser 3 In the address field of your web browser enter the IP address of the switch If you do not know the IP address of the switch see Access the Switch on page 13 The login window opens 4 Enter the switch s password in the password field The default password is password If you added the switch to a network on the Insight app before and you did not yet ...

Страница 362: ...ice Class Power Requirements Power Allocation and Power Budget Configure the Global PoE Settings Manage and View the PoE Port Configuration Reset One or More PoE or PoE Ports Set Up PoE Timer Schedules Note This chapter applies to model GC728XP Model GC728X does not support Power over Ethernet ...

Страница 363: ...orrectly report their PoE class to the switch Device Class Power Requirements PoE and PoE use Ethernet cables to supply power to PoE capable devices on the network such as WiFi access points IP cameras VoIP phones and switches The switch is compliant with the IEEE 802 3at standard PoE and backward compatible with the IEEE 802 3af standard PoE The switch can pass power through to any powered device...

Страница 364: ...ovides only the power that the PD consumes instead of the power that is required by the PD s power classification If some PoE ports are in use and deliver power you can calculate the available power budget for the other PoE ports by subtracting the consumed that is delivered power from the total available power budget For information about the total available power budget see PoE Overview on page ...

Страница 365: ...before and you did not yet change the password through the local browser interface enter your Insight network password The System Information page displays 5 Select System PoE Advanced PoE Port Configuration The previous figure does not show all columns on the page The delivered power is stated in the Output Power mW column which is not shown in the previous figure Configure the Global PoE Setting...

Страница 366: ...nfigured on the port Dynamic Specifies that the power consumption on each port is measured and calculated in real time 8 To active the PoE traps from the Traps menu select Enable Selecting Disable deactivates the PoE traps The default setting is Enabled 9 Click the Apply button Your setting are saved The following table describes the nonconfigurable fields on the page Table 85 PoE Configuration fi...

Страница 367: ...address of the switch If you do not know the IP address of the switch see Access the Switch on page 13 The login window opens 4 Enter the switch s password in the password field The default password is password If you added the switch to a network on the Insight app before and you did not yet change the password through the local browser interface enter your Insight network password The System Inf...

Страница 368: ...nt which is used by legacy PDs that require more than 15W to power up Pre 802 3at The port is initially powered in the IEEE 802 3af mode and before 75 msec pass is switched to the high power IEEE 802 3at mode Select this mode if the PD does not perform Layer 2 classification or if switch performs 2 event Layer 1 classification 802 3at The port is powered in the IEEE 802 3at mode This is the defaul...

Страница 369: ...emove a previously assigned timer schedule select None from the Timer Schedule menu Field Description High Power If a port supports High Power mode the field displays Yes Max Power W The maximum power in watts that the port can provide Class The class defines the range of power a powered device PD is drawing from the switch The class definitions are as follows 0 0 44 16 2W 1 0 44 4 2W 2 0 44 7 4W ...

Страница 370: ...ork on the Insight app before and you did not yet change the password through the local browser interface enter your Insight network password The System Information page displays 5 Select System PoE Advanced PoE Port Configuration The PoE Port Configuration page displays 6 Select the check boxes for the PoE or PoE ports that you want to reset or select the check box in the heading to reset all eig...

Страница 371: ...n add is 100 To create a PoE timer schedule 1 Connect your computer to the same network as the switch You can use a WiFi or wired connection to connect your computer to the network or connect directly to a switch that is off network using an Ethernet cable 2 Launch a web browser 3 In the address field of your web browser enter the IP address of the switch If you do not know the IP address of the s...

Страница 372: ...ight network password The System Information page displays 5 Select System Timer Schedule Advanced Timer Schedule Configuration The Timer Schedule Configuration page displays 6 In the Timer Schedule Selection section make your selections from the following menus a Timer Schedule Name Select the name of the timer schedule that you want to configure You can select only names of schedules that you cr...

Страница 373: ...ork or connect directly to a switch that is off network using an Ethernet cable 2 Launch a web browser 3 In the address field of your web browser enter the IP address of the switch If you do not know the IP address of the switch see Access the Switch on page 13 The login window opens 4 Enter the switch s password in the password field The default password is password If you added the switch to a n...

Страница 374: ...e Every Day s radio button and enter a number from 1 to 255 in the field In the latter case the schedule is triggered every specified number of days Weekly The timer schedule works with weekly recurrence The fields adjust In the Every Week s field enter a number from 1 to 255 to specify that the schedule must be triggered every specified number of weeks Select a single Week Day check box multiple ...

Страница 375: ...r Schedule Entry menu select the schedule entry 9 Make the changes to the schedule entry For more information see Specify the Settings for a Recurring PoE Timer Schedule on page 373 10 Click the Apply button Your settings are saved Delete a PoE Timer Schedule Entry You can delete a PoE timer schedule entry that you no longer need To delete a PoE timer schedule entry 1 Connect your computer to the ...

Страница 376: ... same network as the switch You can use a WiFi or wired connection to connect your computer to the network or connect directly to a switch that is off network using an Ethernet cable 2 Launch a web browser 3 In the address field of your web browser enter the IP address of the switch If you do not know the IP address of the switch see Access the Switch on page 13 The login window opens 4 Enter the ...

Страница 377: ...377 9 9 Monitor the System This chapter contains the following sections Monitor the Switch and the Ports Configure and View Logs Configure Port Mirroring ...

Страница 378: ...a WiFi or wired network connection or connect directly to a switch that is off network using an Ethernet cable 2 Launch a web browser 3 In the address field of your web browser enter the IP address of the switch If you do not know the IP address of the switch see Access the Switch on page 13 The login window opens 4 Enter the switch s password in the password field The default password is password...

Страница 379: ...ctets Transmitted The total number of octets transmitted from the interface including framing characters Packets Transmitted Without Errors The total number of packets transmitted from the interface Unicast Packets Transmitted The total number of packets that higher level protocols requested to be transmitted to a subnetwork unicast address including the packets that were discarded or not sent Mul...

Страница 380: ...nitoring Ports Port Statistics The Status page displays 6 Select whether to display physical interfaces link aggregation groups LAGs or both by clicking one of the following links above the table heading 1 or the unit ID of the switch Only physical interfaces are displayed This is the default setting LAGS Only link aggregation groups are displayed All Both physical interfaces and link aggregation ...

Страница 381: ...t network password The System Information page displays 5 Select Monitoring Ports Port Statistics The Status page displays 6 Select the check box in the heading of the table Table 87 Port statistics Field Description Interface The interface for which the statistics are displayed Total Packets Received Without Errors The total number of packets received that were without errors Packets Received Wit...

Страница 382: ... browser interface enter your Insight network password The System Information page displays 5 Select Monitoring Ports Port Statistics The Status page displays 6 Select the check box next to the interface for which you want to clear the counters You can also type the interface number using the respective naming convention for example g1 or l1 in the Go To Interface field above or below the table an...

Страница 383: ...t a different port select the port number from the Interface menu Table 88 Detailed port statistics Field Description ifIndex The interface index ifIndex for which the statistics are displayed Port Type For normal ports this field displays Normal Otherwise the possible values are as follows Mirrored This port is a participating in port mirroring as a mirrored port For more information see Configur...

Страница 384: ... and speed are set by the autonegotiation process Physical Status The port speed and duplex mode Link Status Indicates whether the link is up or down Link Trap Indicates whether or not the port sends a trap when link status changes Enable The switch sends a trap when the link status changes Disable The switch does not send a trap when the link status changes Packets RX and TX 64 Octets The total n...

Страница 385: ...ilization If greater precision is required sample the etherStatsPkts and etherStatsOctets objects before and after a common interval Packets Received 64 Octets The total number of packets including bad packets received that were 64 octets in length excluding framing bits but including FCS octets Packets Received 65 127 Octets The total number of packets including bad packets received that were bet...

Страница 386: ...n 10 3 1 4 10BASE2 These documents define jabber as the condition in which any packet exceeds 20 ms The allowed range to detect jabbers is between 20 ms and 150 ms Fragments Received The total number of packets received that were less than 64 octets in length with ERROR CRC excluding framing bits but including FCS octets Undersize Received The total number of packets received that were less than 6...

Страница 387: ...s Transmitted 1024 1518 Octets The total number of packets including bad packets received that were between 1024 and 1518 octets in length inclusive excluding framing bits but including FCS octets Packets Transmitted 1518 Octets The total number of packets transmitted that were longer than 1518 octets excluding framing bits but including FCS octets and were otherwise well formed This counter suppo...

Страница 388: ...umber of successfully transmitted frames for which transmission was inhibited by more than one collision Excessive Collision Frames The number of frames for which transmission failed because of excessive collisions Dropped Transmit Frames The number of transmit frames discarded STP BPDUs Received The number of STP BPDUs received STP BPDUs Transmitted The number of STP BPDUs transmitted RSTP BPDUs ...

Страница 389: ... button resets all statistics for all ports to default values The following table describes the EAP statistics displayed on the page Table 89 EAP statistics Field Description Ports The port number for which the EAP statistics are displayed EAPOL Frames Received The number of received valid EAPoL frames of any type EAPOL Frames Transmitted The number of transmitted EAPoL frames of any type EAPOL St...

Страница 390: ... local browser interface enter your Insight network password The System Information page displays 5 Select Monitoring Ports Cable Test The Cable Test page displays 6 Select the check boxes that are associated with the physical ports for which you want to test the cables 7 Click the Apply button A cable test is performed on all selected ports The cable test might take up to two seconds to complete ...

Страница 391: ...igure the memory log settings 1 Connect your computer to the same network as the switch You can use a WiFi or wired network connection or connect directly to a switch that is off network using an Ethernet cable 2 Launch a web browser 3 In the address field of your web browser enter the IP address of the switch Table 90 Cable Test information Field Description Cable Status Indicates the cable statu...

Страница 392: ...he oldest log messages are deleted as the system logs new messages Stop on Full When the buffer is full the system stops logging new messages and preserves all existing log messages 8 From the Severity Filter menu select one of the following severity levels Emergency 0 System is unusable Alert 1 Action must be taken immediately Critical 2 Critical conditions Error 3 Error conditions Warning 4 Warn...

Страница 393: ...5th message logged since the switch was last booted The message indicates that the administrator logged on to the HTTP management interface from a host with an IP address of 10 27 64 122 10 To refresh the page with the latest information about the switch click the Refresh button 11 To clear the messages from the buffered log in the memory click the Clear button Message Log Format This topic applie...

Страница 394: ...indow opens 4 Enter the switch s password in the password field The default password is password If you added the switch to a network on the Insight app before and you did not yet change the password through the local browser interface enter your Insight network password The System Information page displays 5 Select Monitoring Logs FLASH Log The FLASH Log Configuration page displays 6 Select one o...

Страница 395: ...mber of Messages field shows is the total number of persistent log messages that are stored on the switch The maximum number of persistent log messages displayed on the switch is 64 Description 15 2017 09 02 07 10 44 STK0 MSTP 2110 mspt_api c 318 237 Interface 12 transitioned to root state on message age timer expiry The previous log message example indicates a user level message 1 with severity 7...

Страница 396: ... Local UDP port values are 1 to 65535 The default port is 514 8 Click the Apply button Your settings are saved The Server Log Configuration section displays the following information Messages Received The number of messages received by the log process This includes messages that are dropped or ignored Messages Relayed The number of messages forwarded by the syslog function to a syslog host Message...

Страница 397: ...l is Alert 1 The severity can be one of the following levels Emergency 0 The highest warning level If the device is down or not functioning properly an emergency log is saved to the device Alert 1 The second highest warning level An alert log is saved if a serious device malfunction occurs such as all device features being down Critical 2 The third highest warning level A critical log is saved if ...

Страница 398: ...he Apply button Your settings are saved Delete the Settings for a Remote Syslog Server To delete the settings for a remote syslog server 1 Connect your computer to the same network as the switch You can use a WiFi or wired network connection or connect directly to a switch that is off network using an Ethernet cable 2 Launch a web browser 3 In the address field of your web browser enter the IP add...

Страница 399: ...password through the local browser interface enter your Insight network password The System Information page displays 5 Select Monitoring Logs Trap Logs The Trap Logs page displays 6 To clear all counters click the Clear button All statistics for the trap logs are reset to their default values The following table describes the trap logs information that is displayed on the page Table 91 Trap Logs ...

Страница 400: ... switch If you do not know the IP address of the switch see Access the Switch on page 13 The login window opens 4 Enter the switch s password in the password field The default password is password If you added the switch to a network on the Insight app before and you did not yet change the password through the local browser interface enter your Insight network password The System Information page ...

Страница 401: ...ore source ports 1 Connect your computer to the same network as the switch You can use a WiFi or wired network connection or connect directly to a switch that is off network using an Ethernet cable 2 Launch a web browser 3 In the address field of your web browser enter the IP address of the switch If you do not know the IP address of the switch see Access the Switch on page 13 The login window ope...

Страница 402: ...espective naming convention for example g1 or l1 in the Go To Interface field and clicking the Go button See Interface Naming Conventions on page 12 for more information The entry corresponding to the specified interface is selected Select one or more check boxes in the Interface column 10 From the Direction menu specify the direction of the traffic that must be mirrored from the selected source p...

Страница 403: ... contains information about how to configure the following features The appendix covers the following topics Virtual Local Area Networks VLANs Access Control Lists ACLs Differentiated Services DiffServ 802 1X Multiple Spanning Tree Protocol MSTP ...

Страница 404: ...ntation Users who communicate most frequently with each other can be grouped into common VLANs regardless of physical location Each group s traffic is contained largely within the VLAN reducing extraneous traffic and improving the efficiency of the whole network They are easy to manage The addition of nodes as well as moves and other changes can be dealt with quickly and conveniently from a manage...

Страница 405: ...gure VLAN Membership on page 118 specify the VLAN membership as follows For the default VLAN with VLAN ID 1 specify the following members port 7 U and port 8 U For the VLAN with VLAN ID 10 specify the following members port 1 U port 2 U and port 3 T For the VLAN with VLAN ID 20 specify the following members port 4 U port 5 T and port 6 U 3 On the Port PVID Configuration page see Configure Port PVI...

Страница 406: ...et that is processed by the switch or the router The forwarding or dropping of a packet is based on whether or not the packet matches the specified criteria Traffic filtering requires the following two basic steps 1 Create an access list definition The access list definition includes rules that specify whether traffic matching the criteria is forwarded normally or discarded Additionally you can as...

Страница 407: ...is the Sales department VLAN The CoS value of the frame must be 0 which is the default value for Ethernet frames Frames that match this criteria are permitted on interfaces 6 7 and 8 and are assigned to the hardware egress queue 0 which is the default queue All other traffic is explicitly denied on these interfaces To allow additional traffic to enter these ports you must add a new Permit rule wit...

Страница 408: ... designed to provide best effort data delivery service Best effort service implies that the network delivers the data in a timely fashion although there is no guarantee that it does During times of congestion packets might be delayed sent sporadically or dropped For typical Internet applications such as email and file transfer a slight degradation in service is acceptable and in many cases unnotic...

Страница 409: ... Type octet also known as ToS bits Precedence value DSCP value Layer 4 protocol such as TCP or UDP Layer 4 source destination ports Source destination IP address From a DiffServ point of view two types of classes exist DiffServ traffic classes DiffServ service levels forwarding classes DiffServ Traffic Classes With DiffServ you define which traffic classes to track on an ingress interface You can ...

Страница 410: ...ration using DiffServ especially when DiffServ and ACL cannot coexist on the same interface Marking IP DSCP or IP Precedence Marking re marking the DiffServ code point in a packet with the DSCP value representing the service level associated with a particular DiffServ traffic class Alternatively the IP precedence value of the packet can be marked re marked Marking CoS 802 1p Sets the 3 bit priorit...

Страница 411: ...ics on page 250 Assigning QoS queue Directs a traffic stream to the specified QoS queue This allows a traffic classifier to specify which one of the supported hardware queues are used for handling packets belonging to the class Redirecting Forces a classified traffic stream to a specified egress port physical or LAG This can occur in addition to any marking or policing action It can also be specif...

Страница 412: ...e address from the 192 12 1 0 network that include a Layer 4 Source port of 4567 and Destination port of 4568 from this switch on ports 7 and 8 are assigned to hardware queue 3 On this network traffic from streaming applications uses UDP port 4567 as the source and 4568 as the destination This real time traffic is time sensitive so it is assigned to a high priority hardware queue By default data t...

Страница 413: ...s by which it can offer services to other systems reachable through the LAN Port based network access control allows the operation of a switch s ports to be controlled to ensure that access to its services is permitted only by systems that are authorized to do so Port access control provides a means of preventing unauthorized access by supplicants to the services offered by a system Control over t...

Страница 414: ...N This example assumes that a VLAN was configured with a VLAN ID of 150 and VLAN name of Guest 1 On the Port Authentication page see Configure 802 1X Settings for a Port on page 279 select ports 1 0 5 1 0 6 1 0 7 and 1 0 8 2 From the Port Control menu select Unauthorized The selection from the Port Control menu for all other ports on which authentication is not needed must be Authorized When the s...

Страница 415: ...panning tree behaves in the manner specified in IEEE 802 1w Rapid Spanning Tree with slight modifications in the working but not the end effect chief among the effects is the rapid transitioning of the port to the forwarding state The difference between the RSTP and the traditional STP IEEE 802 1D is the ability to configure and recognize full duplex connectivity and ports that are connected to en...

Страница 416: ... bridges with the same MST configuration identifier using the same MSTIs and without any bridges attached that cannot receive and transmit MSTP BPDUs The MST configuration identifier includes the following components 1 Configuration identifier format selector 2 Configuration name 3 Configuration revision level 4 Configuration digest 16 byte signature of type HMAC MD5 created from the MST Configura...

Страница 417: ...he following procedures on each switch to configure MSTP 1 On the VLAN Configuration page for each switch create VLANs 300 and 500 see Add a VLAN on page 114 2 On the VLAN Membership page for each switch include ports 1 0 1 1 0 8 as tagged T or untagged U members of VLAN 300 and VLAN 500 see Configure VLAN Membership on page 118 3 On the Global Settings page for STP for each switch enable the Span...

Страница 418: ...nning tree information about each port 9 On the MST Configuration page for each switch see Manage MST Settings on page 143 create a MST instances with the following settings MST ID 1 Priority Use the default 32768 VLAN ID 300 10 Click the Add button 11 Create a second MST instance with the following settings MST ID 2 Priority 49152 VLAN ID 500 12 Click the Add button In this example assume that Sw...

Страница 419: ...419 B B Hardware Specifications and Default Values The appendix covers the following topics Switch Specifications Switch Features and Defaults ...

Страница 420: ...ormance Feature Value GC728X 24 10 100 1000Mbps ports Two 1G SFP ports Two 10G 1G SFP ports GC728XP 24 PoE 10 100 1000Mbps ports Two 1G SFP ports Two 10G 1G SFP ports Flash memory size 8 MB SPI 512 MB NAND SRAM size and type 256 MB DDR3 SDRAM Switching capacity Non Blocking Full WireSpeed on all packet sizes Forwarding method Store and Forward Packet forwarding rate 10M 14 880 pps 100M 148 810 pps...

Страница 421: ...Port Priority Low Power Mode GC728X None GC728XP 802 3at Power Limit Type User Power Limit mW 30000 mW Detection Type IEEE 802 Timer Schedule None Virtual LAN IEEE 802 1Q Default VLANs 1 Default All ports are members of the default VLAN 4089 Auto Video No ports are members of the Auto Video VLAN PVID 1 Acceptable Frame Types Admit All Ingress Filtering Disabled Port Priority 0 Jumbo Frames Maximum...

Страница 422: ...c Reauthentication Disabled Reauthentication Period 3600 Quiet Period 60 Resending EAP 30 Max EAP Requests 2 Supplicant Timeout 30 Server Timeout 30 STP RSTP MSTP Global Spanning Tree State Disabled STP Operation Mode RSTP Configuration Name MAC address Configuration Revision Level 0 Forward BPDU while STP Disabled Disabled CST Bridge Priority 32768 CST Bridge Max Age 20 CST Bridge Hello Time 2 CS...

Страница 423: ...bled CST Path Cost 0 CST Priority 128 CST External Path Cost 0 Link Aggregation Lag Name ch n where n is 1 to 5 Admin Mode Enabled STP Mode Enabled Link Trap Enabled LAG Type Static Local Link Discovery Protocol LLDP Global TLV Advertised Interval 30 Hold Multiplier 4 Reinitializing Delay 2 Transmit Delay 5 Fast Start Duration 3 Interface Admin Status Tx and Rx Management IP Address Auto Advertise...

Страница 424: ...de Disabled MAC Address Validation Enabled Interface Trust Mode Disabled Logging Invalid Packets Disabled Rate Limit N A Burst Interval N A Persistent Configuration Store Local Write Delay 300 Differentiated Services Admin Mode Disabled Class of Service CoS Global Trust Mode 802 1p Table 94 Feature Default Values and Default State continued Feature Name Parameter Default ...

Страница 425: ...0 000000 1 CS 1 001000 0 CS 2 010000 0 CS 3 011000 1 CS 4 100000 2 CS 5 101000 2 CS 6 110000 3 CS 7 111000 3 Assured Forwarding AF 11 001010 0 AF 12 001100 0 AF 13 001110 0 AF 21 010010 0 AF 22 010100 0 AF 23 010110 0 AF 31 011010 1 AF 32 011100 1 AF 33 011110 1 AF 41 100010 1 AF 42 100100 1 AF 43 100110 1 Expedited Forwarding EF 101110 2 Table 94 Feature Default Values and Default State continued...

Страница 426: ... 001011 0 13 001101 0 15 001111 0 17 010001 0 19 010011 0 21 010101 0 23 010111 0 25 011001 1 27 011011 1 29 011101 1 31 011111 1 33 100001 2 35 100011 2 37 100101 2 39 100111 2 41 101001 2 43 101011 2 45 101101 2 47 101111 2 49 110001 3 50 110010 3 51 110011 3 52 110100 3 53 110101 3 54 110110 3 55 110111 3 57 111011 3 58 111010 3 59 111011 3 60 111100 3 61 111101 3 62 111110 3 63 111111 3 Table ...

Страница 427: ... Class 3 Auto VoIP OUI based Admin Mode Disabled Auto VoIP VLAN 2 OUI based priority 7 Table 95 Port characteristics Feature Sets Supported Default Auto negotiating speed and full half duplex All ports Auto negotiation Auto MDI MDIX for cross over cables on all ports Enabled 802 3x flow control back pressure 1 per system Disabled Port mirroring TX RX Both 5 Disabled Port trunking aggregation 8 Pre...

Страница 428: ...ports Disabled Jumbo frame All ports Disabled Max 9216 bytes Table 97 Quality of service Feature Sets Supported Default Number of queues 7 N A 802 1p 1 Enabled DSCP 1 Disabled Rate limiting All ports Disabled Table 98 Security Feature Sets Supported Default 802 1X All ports Disabled MAC ACL 100 shared with IP and IPv6 ACLs All MAC addresses allowed IP ACL 100 shared with MAC and IPv6 ACLs All IP a...

Страница 429: ... 192 168 0 254 System name configuration 1 NULL Configuration save restore 1 N A Firmware upgrade 1 N A Restore defaults 1 web and front panel button N A Dual image support 1 Enabled Factory reset 1 N A Table 100 System management Feature Sets Supported Default Multi session web connections 4 Enabled Time control 1 Local or SNTP Local Time enabled LLDP LLDP MED All ports Enabled Logging 3 Memory F...

Страница 430: ...load 1 N A EAPoL flooding All ports Disabled BPDU flooding All ports Disabled Static multicast groups 8 Disabled Filter multicast control 1 Disabled Number of DHCP snooping bindings 8K N A Number of DHCP static entries 1024 N A MLD Snooping All ports Enabled on VLAN 1 Protocol and MAC based VLAN N A N A Table 101 Other features continued Feature Sets Supported Default ...

Отзывы: