background image

Hardware Overview and Setup 

12

AC1600 WiFi Cable Modem Router 

The following table describes the buttons on the right side panel.

Table 2.  Button descriptions


Button

Icon

Description

WiFi 
On/Off

By default, the 2.4 GHz and 5 GHz WiFi radios are enabled. Pressing this button for three 
seconds turns off both radios. Pressing the button again for three seconds turns on both 
radios.
If you turn off the radios, both WiFi LEDs on the front panel turn off too. If you turn on the 
radios, both WiFi LEDs on the front panel light solid green.

WPS

Pressing this button for three seconds activates WPS (Wi-Fi Protected Setup) for two 
minutes to let you add a WiFi device to the WiFi network without typing the WiFi 
password. 
While WPS is active, both WiFi LEDs on the front panel blink amber.
For more information about using WPS, see the following sections:

• 

Join the WiFi Network of the Modem Router 

on page


21

• 

Use the WPS Wizard to Add a Device to the WiFi Network 

on page


45

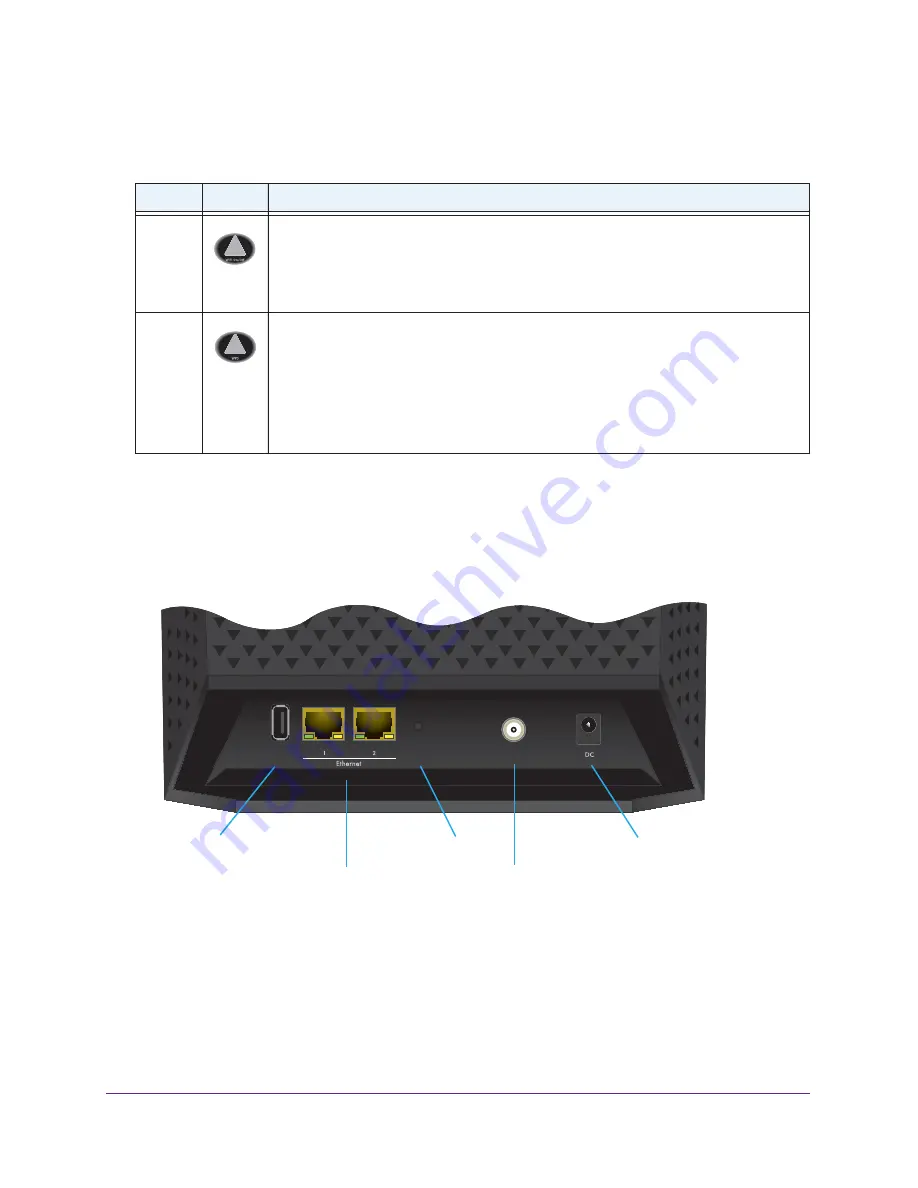
Back Panel

USB

Reset

Cable

Ethernet ports 1 and 2

Coaxial cable connector

USB port

Power adapter input

Reset button

The back panel contains ports, connectors, and a recessed button.

Figure 2. Back panel connections and button

The back panel includes the following components, viewed from left to right:

USB port

. One USB 2.0 port lets you connect a USB hard drive, flash drive, or printer to 

the modem router. 

Two 10/100/1000 Mbps Ethernet ports

. Use these ports to connect local computers to the 

Ethernet LAN of the modem router. 

Содержание C6250

Страница 1: ...350 East Plumeria Drive San Jose CA 95134 USA February 2016 202 11533 01 AC1600 WiFi Cable Modem Router Model C6250 User Manual WPS WiFi On O ff ...

Страница 2: ...ough the NETGEAR website For product updates and web support visit http support netgear com Phone US Canada only 1 888 NETGEAR Phone Other Countries Check the list of phone numbers at http support netgear com general contact default aspx Compliance For regulatory compliance information visit http www netgear com about regulatory See the regulatory compliance document before connecting the power su...

Страница 3: ...23 Access NETGEAR genie 23 Access the Modem Router with the NETGEAR genie App 25 Chapter 3 Customize the Internet Settings View the Cable Initialization of the Modem Router 27 Change the Cable Connection Starting Frequency 28 View or Manually Set Up the IPv4 Internet Settings 30 Manage the MTU Size 32 MTU Concepts 32 Change the MTU Size 34 Chapter 4 Manage the Basic WiFi Network Settings Manage th...

Страница 4: ... a Schedule 75 Change a Schedule 77 Remove a Schedule 77 Set Up Security Event Email Notification 78 Chapter 6 Manage the WAN and LAN Network Settings Manage the WAN Security Settings 81 Set Up a Default DMZ Server 82 Manage the SIP Application Level Gateway 83 Manage the Modem Router s LAN IP Address Settings 84 Manage IP Address Reservation 85 Reserve an IP Address 85 Change a Reserved IP Addres...

Страница 5: ...ice to the Modem Router 124 Access a Storage Device Connected to the Modem Router 125 Manage Access to a Storage Device 126 Enable FTP Access Within Your Network 128 View Network Folders on a Device 129 Add a Network Folder on a Storage Device 130 Change a Network Folder Including Read and Write Access on a USB Drive 132 Approve USB Devices 134 Safely Remove a USB Device 135 Enable the Media Serve...

Страница 6: ... Rule with a Custom Service or Application 167 Change a Port Forwarding Rule 169 Remove a Port Forwarding Rule 170 Application Example Make a Local Web Server Public 171 How the Modem Router Implements the Port Forwarding Rule 172 Manage Port Triggering for Services Applications and Games 172 Add a Port Triggering Rule 173 Change a Port Triggering Rule 175 Disable or Remove a Port Triggering Rule ...

Страница 7: ...Changes Are Not Saved 191 Troubleshoot the WiFi Connectivity 191 TCP IP Network Not Responding 192 Test the LAN Path to Your Modem Router 192 Test the Path from Your Computer to a Remote Device 192 Appendix A Factory Default Settings and Specifications Factory Default Settings 195 Technical and Environmental Specifications 197 ...

Страница 8: ...el Position Your Modem Router Install and Activate Your Cable Modem Cable the Modem Router to a Router and Use Bridge Mode Note For more information about the topics covered in this manual visit the support website at support netgear com Note In this user guide the terms wireless and WiFi mean the same thing Note In this user guide the terms cable Internet provider and cable service provider mean ...

Страница 9: ...5 GHz band for 802 11ac devices Both 2 4 GHz and 5 GHz bands can be active simultaneously For information about setting up your new modem router see the AC1600 WiFi Cable Modem Router Model C6250 Quick Start Guide that comes in the package This chapter provides supplemental information that might help you with the setup For optimal performance keep the modem router vertical in the stand and do not...

Страница 10: ...onnections The right side panel contains two buttons WPS WiFi On Off Power LED Downstream LED Upstream LED Internet LED 2 4 GHz WiFi LED 5 GHz WiFi LED Ethernet LED WiFi On off button WPS button Figure 1 Front panel LEDs and side panel buttons You can use the LEDs to verify status and connections The following table lists and describes each LED on the front panel ...

Страница 11: ... upstream channels Off No upstream channel is locked Internet Solid green The modem router is online Blinking green The modem router router is synchronizing with the cable provider s cable modem termination system CMTS Slow blinking amber and green The modem router reached the traffic meter limit For information about the traffic meter see Monitor and Meter Internet Traffic on page 116 Off The mod...

Страница 12: ...d a WiFi device to the WiFi network without typing the WiFi password While WPS is active both WiFi LEDs on the front panel blink amber For more information about using WPS see the following sections Join the WiFi Network of the Modem Router on page 21 Use the WPS Wizard to Add a Device to the WiFi Network on page 45 Back Panel USB Reset Cable Ethernet ports 1 and 2 Coaxial cable connector USB port...

Страница 13: ...ble to the cable service provider s connection Power input connector Attach the DC power adapter cable to this input Position Your Modem Router The modem router lets you access your network from anywhere within the operating range of your WiFi network However the operating distance or range of your WiFi connection can vary significantly depending on the physical placement of your modem router For ...

Страница 14: ...nt access points is five channels for example use Channels 1 and 6 or 6 and 11 Install and Activate Your Cable Modem The most common way to cable your modem router is the simplest without any other routers or gateways on the same network You can also cable the modem router to another router or gateway and log in to the modem router to specify this setting Cable the Modem Router The modem router co...

Страница 15: ...modem router comes online when the Internet LED stops blinking and lights solid green This process might take up to 10 minutes 5 Connect a computer or WiFi device to the modem router For more information see Connect to the Network on page 21 You can log in to the modem router to view or change its settings Activate Your Internet Service To activate your Internet service 1 Visit your cable Internet...

Страница 16: ...ou about your modem router If the modem router is not visible your cable Internet provider can give you instructions to verify why the modem router does not connect with your high speed Internet service If the modem router is visible to your cable Internet provider reboot the modem router Check your online status again Activate Your Internet Service with Comcast XFINITY If you use Comcast XFINITY ...

Страница 17: ...st XFINITY to confirm that your modem router is active c If you do not get an Internet connection with the modem router ask Comcast XFINITY to look for your modem router online and do one of the following depending on what Comcast XFINITY tells you about your modem router If the modem router is not visible Comcast XFINITY can give you instructions to verify why the modem router does not connect wi...

Страница 18: ...adapter to the modem router and plug the power adapter into an electrical outlet The Power LED lights green 3 On your computer or wireless device find and select the WiFi network The WiFi network name is on the product label 4 Join the WiFi network and enter the WiFi password The password is on the product label Your wireless device connects to the WiFi network 5 Launch an Internet browser 6 Type ...

Страница 19: ...d 12 Follow the instructions that came with your router or gateway to connect it to the modem router CAUTION When the modem router is in bridge mode you must connect only one device your other router to one of the Ethernet ports on the modem router In most cases an Internet service provider ISP provides only one public IP address and connecting multiple devices can cause conflicts and can cause yo...

Страница 20: ...ing sections Connect to the Network Types of Logins and Access Product Label Access NETGEAR genie Access the Modem Router with the NETGEAR genie App Note For information about installing the modem router see the AC1600 WiFi Cable Modem Router Model C6250 Quick Start Guide that comes in the product package You can also download this guide from downloadcenter netgear com ...

Страница 21: ... message might display on your computer screen to notify you that an Ethernet cable is connected Join the WiFi Network of the Modem Router Choose either the manual or the WPS method to add a WiFi device such as a computer iPhone iPad or gaming device to the WiFi network of the modem router Manual Method To connect a device manually to the WiFi network of the modem router 1 Make sure that the modem...

Страница 22: ... The WPS process automatically sets up the device with the network password and connects the device to the WiFi network of the modem router For more information see Use the WPS Wizard to Add a Device to the WiFi Network on page 45 Types of Logins and Access The modem router supports separate types of logins that serve different purposes It is important that you understand the difference so that yo...

Страница 23: ...sumes that you installed the modem router and that your computer or another device is connected with an Ethernet cable or over WiFi with the preset security settings that are listed on the product label To access NETGEAR genie to change the settings and monitor your modem router 1 Apply power to the modem router 2 Launch an Internet browser from a computer or WiFi device that is connected to the n...

Страница 24: ... log in to the modem router or your browser does not display the NETGEAR genie page check the following Make sure that the computer is connected to one of the two Ethernet LAN ports or over WiFi to the modem router Make sure that your browser does not cache the previous page by closing and reopening the browser If your computer is set to a static or fixed IP address this type of setting is uncommo...

Страница 25: ...Automatically repair common WiFi network problems Easily manage modem router features such as Live Parental Controls guest access speed test and more Share and stream music or videos To use the genie app to access the modem router 1 Visit the NETGEAR genie web page at netgear com genie 2 Follow the onscreen instructions to install the app on your smartphone tablet or computer 3 Launch the genie ap...

Страница 26: ...on about setting up your Internet connection with your cable service provider see the following sections The chapter contains the following sections View the Cable Initialization of the Modem Router Change the Cable Connection Starting Frequency View or Manually Set Up the IPv4 Internet Settings Manage the MTU Size ...

Страница 27: ...3 Connects to the Internet WARNING Do not change the starting frequency unless your cable service provider instructs you to do so Changing the starting frequency incorrectly causes serious connection and Internet problems If you must change the starting frequency see Change the Cable Connection Starting Frequency on page 28 To view the status of the modem router initialization 1 Launch an Internet...

Страница 28: ...d details about each channel Change the Cable Connection Starting Frequency The starting frequency for the cable connection is automatically generated For most Internet connections you do not need to change this information WARNING Do not change the starting frequency unless your cable Internet provider instructs you to do so Changing the starting frequency incorrectly causes serious connection an...

Страница 29: ...lays 5 Select Cable Connection 6 In the Starting Frequency field type a number as instructed by your cable Internet provider WARNING Do not change the starting frequency unless your cable Internet provider instructs you to do so Changing the starting frequency incorrectly causes serious connection and Internet problems 7 Click the Apply button Your settings are saved The scanning process starts an...

Страница 30: ...amic or static To view or change the Internet settings 1 Launch an Internet browser from a computer or WiFi device that is connected to the network 2 Type http www routerlogin net A login window opens 3 Type admin for the user name and type your password If you did not yet personalize your password type password for the password 4 Click the OK button The BASIC Home page displays 5 Select ADVANCED ...

Страница 31: ... automatically assigns these addresses Use Static IP Address Enter the IP address IP subnet mask and gateway IP address that your cable service provider assigned to you The gateway is the provider gateway to which your modem router connects Domain Name Server DNS Address The DNS server is used to look up site addresses based on their names Get Dynamically from ISP Your cable service provider uses ...

Страница 32: ...ese web based applications might require an MTU change A secure website that does not open or displays only part of a web page Yahoo email MSN portal America Online s DSL service You use VPN and experience severe performance problems You used a program to optimize MTU for performance reasons and now you are experiencing connectivity or performance problems If you suspect an MTU problem a common so...

Страница 33: ...Customize the Internet Settings 33 AC1600 WiFi Cable Modem Router 1436 Used in PPTP environments or with VPN 1400 Maximum size for AOL DSL Table 4 Common MTU sizes continued MTU Application ...

Страница 34: ...SP connection To change the MTU size 1 Launch an Internet browser from a computer or WiFi device that is connected to the network 2 Type http www routerlogin net A login window opens 3 Type admin for the user name and type your password If you did not yet personalize your password type password for the password 4 Click the OK button The BASIC Home page displays 5 Select ADVANCED Setup WAN Setup Th...

Страница 35: ... WPS wizard This chapter contains the following sections Manage the Basic WiFi Settings and WiFi Security of the Main Network Use the WPS Wizard to Add a Device to the WiFi Network Manage the Basic WiFi Settings and WiFi Security of the Guest Network Note For information about the managing the advanced WiFi settings see Chapter 11 Manage the Advanced WiFi Network Settings ...

Страница 36: ...ttings and store the note in a safe place where you can easily find it View or Change the Basic WiFi Settings You can view or change the basic WiFi settings and WiFi security The modem router simultaneously supports the 2 4 GHz band for 802 11b g n devices and the 5 GHz band for 802 11a n ac devices Tip If you decide to change the WiFi settings of the modem router s main network use a wired connec...

Страница 37: ...Region menu is fixed at United States and the menu is masked out Wireless Network 2 4GHz b g n Enable SSID Broadcast By default the modem router broadcasts its SSID so that WiFi stations can detect the WiFi name SSID in their scanned network lists To turn off the SSID broadcast clear the Enable SSID Broadcast check box Turning off the SSID broadcast provides additional WiFi security but users must...

Страница 38: ...le WiFi access points APs reduce interference by selecting different channels for adjacent APs NETGEAR recommends a channel spacing of four channels between adjacent APs for example use Channels 1 and 5 or 6 and 10 Mode From the Mode menu select one of the following modes Up to 54 Mbps Legacy mode This mode allows 802 11n 802 11g and 802 11b devices to join the network but limits 802 11n devices t...

Страница 39: ...t WPA2 and support only WPA If your network includes such older devices select WPA PSK TKIP WPA2 PSK AES security NETGEAR recommends that you do not change the default passphrase If you must change the passphrase in the Passphrase field enter a phrase of 8 to 63 characters To join the modem router s WiFi network a user must enter this passphrase WPA PSK TKIP WPA2 PSK AES This type of security enab...

Страница 40: ...urity settings WPA2 PSK AES If you must change the WiFi security select one of the following WiFi security options for the modem router s WiFi network None An open WiFi network that does not provide any security Any WiFi device can join the network NETGEAR recommends that you do not use an open WiFi network WPA2 PSK AES This type of security is the default setting and enables WiFi devices that sup...

Страница 41: ...method for centralized Authentication Authorization and Accounting AAA management To provide WPA WPA2 enterprise WiFi security the WiFi network that the modem router provides must be able to access a RADIUS server Note WPS and WPA WPA2 enterprise security cannot function together When you enable WPA WPA2 enterprise security WPS is disabled Tip If you want to change the WiFi settings of the modem r...

Страница 42: ... the number of the port on the modem router that is used to access the RADIUS server for authentication The default port number is 1812 RADIUS server Shared Secret Enter the shared secret RADIUS password that is used between the modem router and the RADIUS server during authentication of a WiFi user 8 Click the Apply button Your settings are saved 9 Make sure that you can reconnect over WiFi to th...

Страница 43: ...together When you enable WEP security WPS is disabled Tip If you want to change the WiFi settings of the modem router s main network use a wired connection to avoid being disconnected when the new WiFi settings take effect To configure WEP security for the main WiFi network 1 Launch an Internet browser from a computer or WiFi device that is connected to the network 2 Type http www routerlogin net ...

Страница 44: ...tandard WEP encryption using 104 128 bit encryption This selection provides stronger encryption security 10 In the Security Encryption WEP Key section generate the key automatically a In the Passphrase field enter a passphrase b Click the Generate button For 64 bit WEP four different WEP keys are generated and the four key fields are populated with different WEP keys For 128 bit WEP only one WEP k...

Страница 45: ... modem router network and generates a random passphrase You can view this passphrase see Manage the Basic WiFi Settings and WiFi Security of the Main Network on page 36 Use WPS with the Push Button Method For you to use the push button method to connect a WiFi device to the modem router s WiFi network the WiFi device that you are trying to connect must provide either a physical button or a softwar...

Страница 46: ...hat you want to join the modem router s main WiFi network During this time both WiFi LEDs on the front panel of the modem router blink amber 8 Within two minutes go to the WiFi device and press its WPS button to join the modem router s main WiFi network without entering a password After the modem router establishes a WPS connection the LED lights solid green and the Add WPS Client page displays a ...

Страница 47: ...k using WPS with the PIN method 1 Launch an Internet browser from a computer or WiFi device that is connected to the network 2 Type http www routerlogin net A login window opens 3 Type admin for the user name and type your password If you did not yet personalize your password type password for the password 4 Click the OK button The BASIC Home page displays 5 Select ADVANCED WPS Wizard 6 Click the ...

Страница 48: ...Fi device is connected to the modem router s main WiFi network select BASIC Attached Devices The WiFi device displays onscreen Manage the Basic WiFi Settings and WiFi Security of the Guest Network A guest network allows visitors to use the Internet without using your WiFi security key By default the guest WiFi network is disabled You can enable and configure the guest WiFi network for each WiFi ba...

Страница 49: ...mputer or WiFi device that is connected to the network 2 Type http www routerlogin net A login window opens 3 Type admin for the user name and type your password If you did not yet personalize your password type password for the password 4 Click the OK button The BASIC Home page displays 5 Select BASIC Guest Network 6 Enable the guest network and configure its WiFi settings ...

Страница 50: ... guest WiFi network WEP Wired Equivalent Privacy WEP security is a legacy authentication and data encryption mode that is superseded by WPA PSK and WPA2 PSK The WEP option displays only if you configure the WiFi mode for the main WiFi network as Up to 54 Mbps in the 2 4 GHz band see Manage the Basic WiFi Settings and WiFi Security of the Main Network on page 36 For information about configuring WE...

Страница 51: ...etwork select the Allow guests to see each other and access my local network check box Guest Wireless Network Name SSID The SSID is the 5 GHz WiFi band name If you did not change the SSID the default SSID displays which is NETGEAR 5G Guest If you want to change the SSID in the 5 GHz WiFi band for the guest WiFi network enter a 32 character maximum case sensitive name in this field Security Options...

Страница 52: ...WiFi network as Up to 54 Mbps For information about configuring the WiFi mode see Manage the Basic WiFi Settings and WiFi Security of the Main Network on page 36 To configure WEP security for the guest WiFi network 1 Launch an Internet browser from a computer or WiFi device that is connected to the network 2 Type http www routerlogin net A login window opens 3 Type admin for the user name and type...

Страница 53: ... 128 bit encryption This selection provides stronger encryption security 9 In the Security Encryption WEP Key section generate the key automatically a In the Passphrase field enter a passphrase b Click the Generate button For 64 bit WEP four different WEP keys are generated and the four key fields are populated with different WEP keys For 128 bit WEP only one WEP key is generated and the four key ...

Страница 54: ...devices are allowed access to the network This chapter includes the following sections Set Up Parental Controls Allow or Block Access to Your Network Block Keywords and Domains for HTTP Traffic Block Access to Services and Applications Schedule When Security Features Are Active Set Up Security Event Email Notification For information about more advanced ways to configure Internet security see Chap...

Страница 55: ...arental Controls 1 Launch an Internet browser from a computer or WiFi device that is connected to the network 2 Type http www routerlogin net A login window opens 3 Type admin for the user name and type your password If you did not yet personalize your password type password for the password 4 Click the OK button The BASIC Home page displays 5 Select Parental Controls The Parental Controls website...

Страница 56: ...te and click the Next button again Because Live Parental Controls uses free OpenDNS accounts you are prompted to log in or create a free account 10 Select a radio button as follows If you already own an OpenDNS account leave the Yes radio button selected If you did not yet create an OpenDNS account select the No radio button If you are creating an account the following page displays ...

Страница 57: ... AC1600 WiFi Cable Modem Router a Complete the fields b Click the Next button After you log on or create your account the filtering level page displays 11 Select a radio button for a filtering level and click the Next button ...

Страница 58: ...e Parental Controls click the Enable Live Parental Controls button Allow or Block Access to Your Network You can use access control to block or allow access of devices to your network You define access by selecting or specifying the MAC addresses of the wired and WiFi devices that can either access your entire network or are blocked from accessing your entire network ...

Страница 59: ...ter or WiFi device that is connected to the network 2 Type http www routerlogin net A login window opens 3 Type admin for the user name and type your password If you did not yet personalize your password type password for the password 4 Click the OK button The BASIC Home page displays 5 Select ADVANCED Security Access Control 6 Select the Turn on Access Control check box You must select this check...

Страница 60: ...w button To either continue to allow or to block other computers and devices that are currently connected select the check box next to the computer or device in the table and click either the Allow button or the Block button 10 Click the Apply button Your settings are saved Manage Network Access Control Lists You can use access control to block or allow access to your network An access control lis...

Страница 61: ...ed to the modem router To remove such a device you must wait until the device disconnects from the modem router To add a disconnected device to the allowed list or remove it from the allowed list 1 Launch an Internet browser from a computer or WiFi device that is connected to the network 2 Type http www routerlogin net A login window opens 3 Type admin for the user name and type your password If y...

Страница 62: ...d button The Add Allowed Device page displays b Enter the MAC address and device name for the device that you want to allow c Click the Add button on the Add Allowed Device page The device is added to the allowed list on the Access Control page 8 To remove a device from the allowed list do the following a Select the check box for the device b Click the Remove from the list button The device is rem...

Страница 63: ...a situation the device would be blocked from accessing your network when it attempts to reconnect To remove such a device you must wait until the device disconnects from the modem router To add a disconnected device to the blocked list or remove it from the blocked list 1 Launch an Internet browser from a computer or WiFi device that is connected to the network 2 Type http www routerlogin net A lo...

Страница 64: ...from blocked list do the following a Select the check box for the device b Click the Remove from the list button The device is removed from the blocked list 9 Click the Apply button Your settings are saved Change the Permission for a Device or Change the Device Name on a List For a device on the blocked list whether or not currently connected to the network you can change the permission and move t...

Страница 65: ...device that is not connected to the modem router and that is on the allowed list do the following a Click the View list of allowed devices not currently connected to the network link b Select its associated check box in the table that is the allowed list To select a device that is not connected to the modem router and that is on the blocked list do the following a Click the View list of blocked de...

Страница 66: ...p Blocking You can set up blocking of specific keywords and domains to occur continuously or according to a schedule To set up keyword and domain blocking 1 Launch an Internet browser from a computer or WiFi device that is connected to the network 2 Type http www routerlogin net A login window opens 3 Type admin for the user name and type your password If you did not yet personalize your password ...

Страница 67: ... is also referred to as the blocked list 9 To add more keywords or domains repeat Step 7 and Step 8 The keyword list supports up to 32 entries 10 Click the Apply button Your settings are saved Remove a Keyword or Domain from the Blocked List If you no longer need a keyword or domain on the blocked list you can remove the keyword or domain To remove a keyword or domain from the blocked list 1 Launc...

Страница 68: ...r password type password for the password 4 Click the OK button The BASIC Home page displays 5 Select ADVANCED Security Block Sites The Block Sites page displays 6 Click the Clear List button All keywords and domains are removed from the blocked list 7 Click the Apply button Your settings are saved Specify a Trusted Computer You can exempt one trusted device from blocking and logging The device th...

Страница 69: ...tings are saved Block Access to Services and Applications Services are functions that servers perform at the request of client devices For example web servers serve web pages time servers serve time and date information and game hosts serve data about the moves of the players When a device on the Internet sends a request for service to a server the requested service is identified by a service or p...

Страница 70: ...vices that you can select to block You can also add a new service for blocking but you first must find out which port number or range of numbers the application uses You can find port number information by contacting the publisher of the application by asking user groups or newsgroups or by searching the Internet Block a Default Service You can set up blocking of specific services to occur continu...

Страница 71: ...tional services or applications see Add and Block a Custom Service on page 72 9 Under Filter Services For select an IP address configuration Only This IP Address Complete the IP address for the device for which the application or service must be blocked IP Address Range Complete the IP address range for the devices for which the application or service must be blocked All IP Addresses The applicati...

Страница 72: ...rlogin net A login window opens 3 Type admin for the user name and type your password If you did not yet personalize your password type password for the password 4 Click the OK button The BASIC Home page displays 5 Select ADVANCED Security Block Services 6 Specify a keyword blocking option Per Schedule Use service blocking according to a schedule that you set and select a schedule from the menu Fo...

Страница 73: ...ice or application 10 Under Filter Services For select an IP address configuration Only This IP Address Complete the IP address for the device for which the application or service must be blocked IP Address Range Complete the IP address range for the devices for which the application or service must be blocked All IP Addresses The application or service is blocked for all IP addresses on your netw...

Страница 74: ...ation that you want to change 7 Click the Edit button The Block Services Setup page displays 8 Change the settings for the service or application For information about the settings see Add and Block a Custom Service on page 72 9 Click the Add button Your settings are saved in the table on the Block Services page However if you restart the modem router the changes are lost You must also apply the c...

Страница 75: ...ck the Apply button Your settings are saved Schedule When Security Features Are Active You can specify the days and time that you want a security feature to be active You can set up multiple schedules for example one for each feature or you can use the same schedule for a combination of different features You can apply schedules to the following features Keyword blocking see Block Keywords and Dom...

Страница 76: ... schedule 8 Set up the schedule for blocking Days to Block Select the check box for each day that you want to block access or specify that blocking occurs on every day by selecting the Every Day check box Time of Day to Block Select a start and end time for blocking in 24 hour format or select the All Day check box for 24 hour blocking The start time must be earlier than the end time For example y...

Страница 77: ... radio button next to the schedule that you want to change 7 Click the Edit button The Schedule page adjusts 8 Change the settings for the schedule 9 Click the Apply button Your settings are saved and the schedule is updated in the Schedule Table 10 To display the Schedule Table click the Cancel button Remove a Schedule If you no longer need a schedule you can remove it To remove a schedule 1 Laun...

Страница 78: ...acks and port scans WiFi access and other information provide your email information on the E mail page and specify how often you want to receive logs and alerts To set up email notifications 1 Launch an Internet browser from a computer or WiFi device that is connected to the network 2 Type http www routerlogin net A login window opens 3 Type admin for the user name and type your password If you d...

Страница 79: ... Complete the User Name and Password fields for the outgoing email server 10 If you want alerts to be sent immediately select the Send Alerts Immediately check box Email alerts are sent immediately when someone attempts to visit a blocked site 11 To set up a schedule for logs to be sent specify the following settings a Select an option from the Send logs according to this schedule menu When log is...

Страница 80: ...t Up a Default DMZ Server Manage the SIP Application Level Gateway Manage the Modem Router s LAN IP Address Settings Manage IP Address Reservation Manage the IPv6 LAN Settings Change the Modem Router s Device Name Manage the Built In DHCP Server Manage the DHCP Server Address Pool Manage Universal Plug and Play For information about managing the MTU size see Manage the MTU Size on page 32 ...

Страница 81: ...ond to a ping to its WAN Internet port This feature allows your modem router to be discovered Enable this feature only as a diagnostic tool or if a specific reason exists To change the default WAN security settings 1 Launch an Internet browser from a computer or WiFi device that is connected to the network 2 Type http www routerlogin net A login window opens 3 Type admin for the user name and type...

Страница 82: ...is cleared to prevent the modem router from responding to a ping from the Internet To enable the modem router to respond to a ping select the Respond to Ping on Internet Port check box 8 If you changed the settings click the Apply button Your settings are saved Set Up a Default DMZ Server The default DMZ server feature is helpful when you are using some online games and videoconferencing applicati...

Страница 83: ...he password 4 Click the OK button The BASIC Home page displays 5 Select ADVANCED Setup WAN Setup The WAN Setup page displays 6 Select the Default DMZ Server check box 7 Type the IP address for the DMZ server 8 Click the Apply button Your settings are saved and the modem router might restart Manage the SIP Application Level Gateway The application level gateway ALG for the Session Initiation Protoc...

Страница 84: ...t of the designated private address range for use in private networks and are suitable for most applications The IP address and subnet mask identify which addresses are local to a specific device and which must be reached through a gateway or modem router You might want to change these settings if you need a specific IP subnet that one or more devices on the network use or if competing subnets use...

Страница 85: ... to the modem router at its new LAN IP address Manage IP Address Reservation When you specify a reserved IP address for a device on the LAN that computer always receives the same IP address each time it accesses the modem router s DHCP server NETGEAR recommends that you assign a reserved IP address to a computer or server that requires permanent IP settings Reserve an IP Address You must know the ...

Страница 86: ... s LAN subnet such as 192 168 0 x Tip If the computer is already on your network you can select the corresponding radio button from the Address Reservation Table The computer s information is automatically copied into the IP Address MAC Address and Device Name fields 8 Type the MAC address of the device 9 Type a name for the device 10 Click the Add button The reserved address is entered into the A...

Страница 87: ...ess Reservation Table select the radio button next to the reserved address that you want to change 7 Click the Edit button The Address Reservation page displays 8 Change the settings 9 Click the Apply button The changes are entered into the Address Reservation Table on the LAN Setup page 10 On the LAN Setup page click the Apply button Your settings are saved Remove an IP Address Reservation You ca...

Страница 88: ...he modem router If the cable Internet provider assigns only an IPv4 Internet address to the modem router you can skip this section If the cable Internet provider assign an IPv6 IP address to the modem router you can specify how the modem router must assign IPv6 addresses to the devices on your home network the LAN and you can enable or disable the IPv6 firewall To manage the IPv6 LAN settings 1 La...

Страница 89: ...s on your home network the LAN through a DHCP server This method passes more information to LAN devices but some IPv6 systems might not support the DHCPv6 client function Auto Config The modem router configures the IPv6 addresses to the devices on your home network automatically This is the default setting 7 To disable the IPv6 firewall protection select the Disable IPv6 Firewall Protection check ...

Страница 90: ...up page displays 6 In the Device Name field enter a new name 7 Click the Apply button Your settings are saved Manage the Built In DHCP Server By default the modem router functions as a DHCP server The modem router assigns IP DNS server and default gateway addresses to all devices connected to the LAN The assigned default gateway address is the LAN address of the modem router You can use another de...

Страница 91: ...must be part of the same IP address subnet as the modem router s LAN IP address The default DHCP address pool is 192 168 0 10 192 168 0 254 with IP address 192 168 0 10 reserved for ReadySHARE The first IP address that the DHCP server can assign to an attached device is 192 168 0 11 The modem router delivers the following parameters to any LAN device that requests DHCP An IP address from the range...

Страница 92: ... the range of IP addresses This IP address must be in the same subnet as the modem router By default the ending IP address is 192 168 0 254 8 Click the Apply button Your settings are saved Manage Universal Plug and Play Universal Plug and Play UPnP enables devices such as Internet devices and computers to access the network and connect to other devices as needed UPnP devices can automatically disc...

Страница 93: ...nd which internal and external ports that device opened The UPnP Portmap Table also displays what type of port that is the protocol that is associated with the port is open and whether that port is still active for each IP address 6 To turn off UPnP clear the Turn UPnP On check box By default this check box is selected If you clear the Turn UPnP On check box the modem router does not allow any dev...

Страница 94: ... live for the advertisement is measured in hops steps for each UPnP packet sent Hops are the steps a packet takes between routers The number of hops can range from 1 to 255 The default value for the advertisement time to live is 4 hops which is fine for most home networks If you notice that some devices are not being updated or reached correctly it might be necessary to increase this value 9 Click...

Страница 95: ...g Change the Password Manage the Device Settings File of the Modem Router Return the Modem Router to Its Factory Default Settings Reboot the Modem Router Monitor and Meter Internet Traffic Manage the Modem Router Remotely For additional management information see the following sections For information about diagnostic tools see Perform Diagnostics on page 181 For information about the event log se...

Страница 96: ...atus The ADVANCED Home page displays cable information the Internet port status and WiFi settings for the radio of the main and guest networks To view information about the modem router Internet port and WiFi settings 1 Launch an Internet browser from a computer or WiFi device that is connected to the network 2 Type http www routerlogin net A login window opens 3 Type admin for the user name and t...

Страница 97: ...abled and secured A red X indicates that configuration problems exist for the cable connection or Internet connection or the connection is down For a WiFi network the network is disabled or down An amber exclamation mark indicates that the cable port or Internet port is configured but cannot get an Internet connection for example because the cable is disconnected that a WiFi network is enabled but...

Страница 98: ... Ethernet LAN port IP Address The IP address that the Ethernet LAN port uses The default IP address is 192 168 0 1 DHCP Displays whether the DHCP server of the modem router is enabled for devices that are attached to the LAN Internet Port The settings of Internet port For information about how to configure the Internet settings see View or Manually Set Up the IPv4 Internet Settings on page 30 MAC ...

Страница 99: ...iFi settings when you use WPS to connect a device to the 2 4 GHz band of the main network Configured The modem router keeps its existing WiFi settings This is the default setting Not configured The modem router generates a random SSID and passphrase and changes the security mode to WPA WPA2 PSK mixed mode For more information see Manage WPS Settings on page 161 Wireless Settings 5GHz The settings ...

Страница 100: ...s enabled The WiFi LED on the front of the modem router is not affected by the status of the guest network Broadcast Name Displays whether the 2 4 GHz band of the guest network broadcasts its SSID Allow guests to see each other and access my local network Displays whether users of the 2 4 GHz band of the guest network are allowed to access the main network Guest Network 5 GHz The settings of the W...

Страница 101: ...ssword for the password 4 Click the OK button The BASIC Home page displays 5 Select ADVANCED ADVANCED Home The ADVANCED Home page displays 6 In the Internet Port pane click the Show Statistics button If this pop up window does not display your web browser might be blocking pop ups If it is change the browser settings to allow pop ups The following table describes the fields and columns of the Show...

Страница 102: ...ght be blocking pop ups If it is change the browser settings to allow pop ups 7 Change the polling frequency or stop polling To change the polling frequency do the following a In the Poll Interval field enter a time in seconds b Click the Set Interval button To stop polling click the Stop button Status The link status of the port TxPkts The number of packets transmitted on this port since reset or...

Страница 103: ...indow opens 3 Type admin for the user name and type your password If you did not yet personalize your password type password for the password 4 Click the OK button The BASIC Home page displays 5 Select ADVANCED ADVANCED Home The ADVANCED Home page displays 6 In the Internet Port pane click the Connection Status button If this window does not display your web browser might be blocking pop ups If it...

Страница 104: ...curity of the Main Network on page 36 or set up access control to secure your network see Allow or Block Access to Your Network on page 58 To display the connected wired and WiFi devices 1 Launch an Internet browser from a computer or WiFi device that is connected to the network 2 Type http www routerlogin net A login window opens 3 Type admin for the user name and type your password If you did no...

Страница 105: ... router assigned to the device when it joined the network This address can change when a device is disconnected and rejoins the network MAC Address The unique MAC address of the device The MAC address does not change and is usu ally shown on the product label Device Name The device name if detected 6 To refresh the information onscreen click the Refresh button The information onscreen is updated V...

Страница 106: ... for the user name and type your password If you did not yet personalize your password type password for the password 4 Click the OK button The BASIC Home page displays 5 Select ADVANCED Administration Wireless Channel By default the 2 4GHz b g n radio button is selected and the page displays the active channels in the 2 4 GHz band The number above a bar indicates the number of WiFi networks that ...

Страница 107: ...ings and WiFi Security of the Main Network on page 36 View WiFi Networks in Your Environment You can view the WiFi networks that are being broadcast by access points APs in your environment These are access points other than the modem router For each WiFi network the security level and the signal strength are displayed To view the WiFi networks in your environment 1 Launch an Internet browser from...

Страница 108: ...ter operation DoS attacks and port scans WiFi access and other information Up to 256 entries can be stored in the log If you enabled email notification you receive these logs in an email message For more information see Set Up Security Event Email Notification on page 78 Note For information about the event log which is a log that records events that occur between the modem router and the cable se...

Страница 109: ... the OK button The BASIC Home page displays 5 Select ADVANCED Administration Logs The Logs page displays a table that shows for each event a description the number of times the events occurred the date and time of the last occurrence the target IP address and port and the source IP address and port 6 Scroll down The bottom of the page shows check boxes and buttons 7 To specify which types of event...

Страница 110: ...dem router is admin and its default password is password NETGEAR recommends that you set a more secure password A secure password contains no dictionary words from any language and contains uppercase and lowercase letters numbers and symbols The password must contain at least 4 characters and can contain a maximum of 15 characters Note This change of password is not the same as changing the passwo...

Страница 111: ... this file to your computer or restore it from a previously backed up file Back Up the Settings You can save a copy of the current settings To back up the modem router s settings 1 Launch an Internet browser from a computer or WiFi device that is connected to the network 2 Type http www routerlogin net A login window opens 3 Type admin for the user name and type your password If you did not yet pe...

Страница 112: ... Settings If you backed up the device settings file you can restore the settings from this file To restore settings that you backed up 1 Launch an Internet browser from a computer or WiFi device that is connected to the network 2 Type http www routerlogin net A login window opens 3 Type admin for the user name and type your password If you did not yet personalize your password type password for th...

Страница 113: ...mple do not close the browser click a link or load a new page Do not turn off the modem router Return the Modem Router to Its Factory Default Settings Under some circumstances for example if you lost track of the changes that you made to the modem router settings or you move the modem router to a different network you might want to erase the configuration and reset it to factory default settings I...

Страница 114: ...the back panel of the modem router look for the small hole in which the Reset button is located For more information about the location of the Reset button see Back Panel on page 12 2 Insert a straightened paper clip into the hole and press for at least eight seconds 3 Release the button The modem router resets and restarts This process takes about one minute WARNING To avoid the risk of corruptin...

Страница 115: ...ngs page displays When the restoration is complete the modem router reboots WARNING To avoid the risk of corrupting the firmware do not interrupt the restoration For example do not close the browser click a link or load a new page Do not turn off the modem router Reboot the Modem Router You can reboot the modem router from the web management interface To reboot the modem router from the web manage...

Страница 116: ...r Monitor and Meter Internet Traffic Traffic metering allows you to monitor the volume of Internet traffic that passes through the modem router Internet port With the traffic meter utility you can set limits for traffic volume set a monthly limit and get a live update of traffic usage Start the Traffic Meter Without Traffic Volume Restrictions You can monitor the traffic volume without setting a l...

Страница 117: ...connect The Internet Traffic Statistics section helps you to monitor the data traffic For more information see View the Traffic Statistics and Traffic Status on page 117 View the Traffic Statistics and Traffic Status If you enabled the traffic meter see Start the Traffic Meter Without Traffic Volume Restrictions on page 116 you can view the traffic statistics and traffic status To view the traffic...

Страница 118: ...e information onscreen is updated 8 To display more information about the data traffic and to change the polling interval click the Traffic Status button The Traffic Status pop up window displays Restrict Internet Traffic If traffic usage reaches a threshold the modem router can disconnect and disable the Internet connection to ensure that traffic usage does not exceed the threshold To restrict th...

Страница 119: ...er a value in Mbytes or minutes The modem router generates a warning message when the balance falls under the value that you enter This setting is optional By default the value is 0 and the modem router does not generate a warning message 12 Select one or more of the following actions to occur when the limit is reached Turn the Internet LED to flashing green amber This setting is optional When the...

Страница 120: ...e admin for the user name and type your password If you did not yet personalize your password type password for the password 4 Click the OK button The BASIC Home page displays 5 Select ADVANCED Advanced Setup Traffic Meter The Traffic Meter page displays 6 In the Traffic Control section clear the Disconnect and disable the Internet connection check box 7 Click the Apply button Your settings are sa...

Страница 121: ...t is assigned to the modem router and the secure port number both of which are required to log in to the modem router from a remote location 6 Select the Turn Remote Management On check box 7 Specify the external IP address or addresses from which the modem router can be managed remotely To specify access for a single IP address on the Internet do the following a Select the Only This Computer radi...

Страница 122: ... the remote web management interface Choose a number from 1024 to 65535 but do not use the number of any common service port The default port number is 8443 9 Click the Apply button Your settings are saved After a while the external IP address and port number display in the Remote Management Address field When you access your modem router from the Internet type your modem router s external WAN IP ...

Страница 123: ...o not connect a computer USB modem CD drive or DVD drive to the modem router USB port The chapter includes the following sections USB Device Requirements Connect a USB Device to the Modem Router Access a Storage Device Connected to the Modem Router Manage Access to a Storage Device Enable FTP Access Within Your Network View Network Folders on a Device Add a Network Folder on a Storage Device Chang...

Страница 124: ...he modem router supports the following file system types with read only access HFS HFS Connect a USB Device to the Modem Router ReadySHARE lets you access and share a USB device that is connected to a USB port on the modem router If your USB device uses special drivers it is not compatible The USB 2 0 port is on the back panel of the modem router To connect a USB device 1 Connect your USB storage ...

Страница 125: ...work select Go Connect to Server 4 In the Server Address field enter smb readyshare 5 When prompted select the Guest radio button 6 Click the Connect button A window automatically opens and displays the files and folders on the device To access the device from a Windows computer 1 Connect a USB storage device to the USB port on the modem router 2 If your USB device uses a power supply connect it Y...

Страница 126: ...onnected to the network 2 Type http www routerlogin net A login window opens 3 Type admin for the user name and type your password If you did not yet personalize your password type password for the password 4 Click the OK button The BASIC Home page displays 5 Select ADVANCED USB Storage Advanced Settings The previous figure shows a USB device attached to the modem router 6 In the Network Device Na...

Страница 127: ... default If you enable this feature remote users can type https public IP address shares to access the USB device over the Internet public IP address is the external or public IP address that is assigned to the modem router for example 1 1 10 102 This feature supports file uploading only The default port is number 443 which you can change FTP Enabled by default You can type ftp readyshare routerlo...

Страница 128: ...nternet To enable FTP access within your network 1 Launch an Internet browser from a computer or WiFi device that is connected to the network 2 Type http www routerlogin net A login window opens 3 Type admin for the user name and type your password If you did not yet personalize your password type password for the password 4 Click the OK button The BASIC Home page displays 5 Select ADVANCED USB St...

Страница 129: ...et browser from a computer or WiFi device that is connected to the network 2 Type http www routerlogin net A login window opens 3 Type admin for the user name and type your password If you did not yet personalize your password type password for the password 4 Click the OK button The BASIC Home page displays 5 Select ADVANCED USB Storage Advanced Settings The previous figure shows a USB device atta...

Страница 130: ...that you use to log in to the modem router Folder Name Full path of the network folder Volume Name Volume name from the storage device Total Space and Free Space The current utilization of the storage device Add a Network Folder on a Storage Device You can add network folders on a storage device that is connected to a USB port on the modem router To add a network folder 1 Launch an Internet browse...

Страница 131: ...ttached to the modem router 6 In the Available Network Folders table select a device If only one device is connected it is automatically selected Note NETGEAR recommends that you do not attach more than one drive to the USB port for example through a USB hub 7 Click the Create Network Folder button ...

Страница 132: ...n is the same one that you use to log in to the modem router 11 Click the Apply button The folder is added on the storage device 12 Click the Close Window button The USB Storage Advanced Settings page displays again Change a Network Folder Including Read and Write Access on a USB Drive You can edit network folders on storage devices connected to a USB port on the modem router To edit a network fol...

Страница 133: ... modem router 6 In the Available Network Folders table select a device If only one device is connected it is automatically selected Note NETGEAR recommends that you do not attach more than one drive to the USB port for example through a USB hub 7 Click the Edit button 8 Change the settings in the fields as needed ...

Страница 134: ... that you approve To allow only approved USB devices to connect to the modem router and specify which USB devices are approved 1 Make sure that the USB device that you want to approve is attached to the modem router 2 Launch an Internet browser from a computer or WiFi device that is connected to the network 3 Type http www routerlogin net A login window opens 4 Type admin for the user name and typ...

Страница 135: ...ox 13 Click the Apply button Your settings are saved To approve another USB device that is not connected to the USB port first remove the USB device that is connected see Safely Remove a USB Device on page 135 connect the other USB device and repeat this procedure Safely Remove a USB Device Before you physically disconnect a USB device from the USB port on the modem router log in to the modem rout...

Страница 136: ...Media Server The modem router can function as a ReadyDLNA media server which lets you view movies and photos on DLNA UPnP AV compliant media players such as Xbox360 Playstation and NETGEAR media players To enable the media server specify its settings and scan for media content 1 Launch an Internet browser from a computer or WiFi device that is connected to the network 2 Type http www routerlogin n...

Страница 137: ...lt the name is ReadyDLNA C6250 100NAS The suffix C6250 100NAS is added to any name that you specify That is if you specify the name as MyMedia the complete name of the media server becomes MyMedia C6250 100NAS Note By default the Automatic when new files added check box is selected to enable the modem router to scan for content when new files are added You cannot clear this radio button 8 Click th...

Страница 138: ...ng the Windows and Mac computers on your network The chapter includes the following sections Install the Printer Driver and Cable the Printer Download the ReadySHARE Printer Utility Install the ReadySHARE Printer Utility Use the Shared Printer View or Change the Status of a Printer Use the Scan Feature of a Multifunction USB Printer Change NETGEAR USB Control Center Settings ...

Страница 139: ...d the ReadySHARE Printer utility 1 Visit netgear com readyshare 2 Scroll down to the Print From the Comfort of Your Home Network section at the bottom of the page 3 Click one of the following links Download PC installer and get started This is the utility for Windows computers Download Mac installer and get started This is the utility for MAC computers Download the genie App and get started This i...

Страница 140: ...er 3 Follow the wizard instructions to install NETGEAR USB Control Center After the InstallShield Wizard completes the installation the NETGEAR USB Control Center prompts you to select a language 4 Select a language from the menu and click the OK button ...

Страница 141: ...utomatically whenever you log on to Windows and runs in the background To manually connect and print 1 Click the NETGEAR USB Control Center icon The main page displays 2 Click the Connect button The printer status changes to Manually connected by Mycomputer Now only the computer you are using can use this printer 3 Use the print feature in your application to print your document 4 To release the p...

Страница 142: ...puter can use the printer Waiting to Connect Your computer is not connected to the shared printer yet 2 To print from your computer when the status shows Manually connected by another computer click the Disconnect button The printer is released from the connection and the status changes to Available 3 To print from your computer when the status shows Waiting to Connect do the following a Click the...

Страница 143: ... for scanning For example the USB printer displayed in the Windows Printers and Faxes page is ready for print jobs To use the scan feature of a multifunction USB printer 1 Click the NETGEAR USB Control Center icon 2 Make sure that the printer status shows as Available 3 Click the Network Scanner button The scanner page displays so that you can use the USB printer for scanning ...

Страница 144: ...ally when you log in to Windows You can also change the language and specify the time out to release the printer connection To turn off automatic NETGEAR USB Control Center startup 1 Click the NETGEAR USB Control Center icon 2 Select Tools Configuration 3 Clear the Automatically execute when logging on Windows check box 4 Click the OK button Your settings are saved ...

Страница 145: ...uage 4 Click the OK button The next time NETGEAR USB Control Center starts the language changes Specify the Time Out To specify the time out 1 Click the NETGEAR USB Control Center icon The main page displays 2 Select Tools Configuration The Control Center Configuration page displays 3 In the Timeout field type the number of minutes The time out is the number of minutes that a computer holds its co...

Страница 146: ...r when you are not home If you know the IP address of the modem router and the IP address did not change you can also access the USB storage device by using the IP address This chapter includes the following sections Set Up and Manage Dynamic DNS Access Storage Devices Through the Internet Note For information about how to connect the device and specify its settings see Chapter 8 Share a Storage D...

Страница 147: ...your network when you are not home through Dynamic DNS To set up your FTP server you must register for a NETGEAR Dynamic DNS DDNS service account and specify the account settings see Set Up a New Dynamic DNS Account on page 148 To set up your personal account and use FTP 1 Get your NETGEAR Dynamic DNS domain name For more information see Set Up a New Dynamic DNS Account on page 148 2 Make sure tha...

Страница 148: ...Launch an Internet browser from a computer or WiFi device that is connected to the network 2 Type http www routerlogin net A login window opens 3 Type admin for the user name and type your password If you did not yet personalize your password type password for the password 4 Click the OK button The BASIC Home page displays 5 Select ADVANCED Advanced Setup Dynamic DNS 6 Select the Use a Dynamic DNS...

Страница 149: ...se for your account 12 Click the Register button 13 Follow the onscreen instructions to register for your NETGEAR Dynamic DNS service Specify a DNS Account That You Already Created If you already created a Dynamic DNS account with NETGEAR No IP Dyn also referred to as DynDNS or DtDNS you can set up the modem router to use your account To set up Dynamic DNS if you already created an account 1 Launc...

Страница 150: ...e domain name for your account 10 Depending on the type of account specify your user name or email address For a No IP Dyn or DtDNS account in the User Name field enter the user name for your account For a NETGEAR account in the Email field enter the email address for your account 11 In the Password field enter the password for your DDNS account 12 Click the Apply button Your settings are saved 13...

Страница 151: ...S type the modem router s Internet port IP address You can view the modem router s Internet IP address on the BASIC Home page Set Up FTP Access Through the Internet If you attach a storage device to the modem router you can access the storage device from your network see Enable FTP Access Within Your Network on page 128 You can also set up FTP access through the Internet so that you can access the...

Страница 152: ...ice attached to the modem router 6 Select the FTP via Internet check box 7 Click the Apply button Your settings are saved 8 To limit access to the admin user do the following a In the Available Network Folders table select a device If only one device is connected it is automatically selected b Click the Edit button ...

Страница 153: ...ile from a storage device connected to the modem router launch a web browser To upload a file to a storage device connected to the modem router launch an FTP client such as Filezilla 2 In the address field of the browser type ftp and the Internet port IP address For example if your IP address is 10 1 65 4 type ftp 10 1 65 4 If you are using Dynamic DNS type the DNS name For example type ftp MyName...

Страница 154: ...gs This chapter contains the following sections Control the WiFi Radios Set Up a WiFi Schedule Manage Beamforming Manage the Advanced WiFi Settings Manage WPS Settings Manage the Advanced WiFi Features Note For information about the managing the basic WiFi settings see Chapter 4 Manage the Basic WiFi Network Settings ...

Страница 155: ... disable the WiFi radios of the modem router use a wired connection to avoid being disconnected when the WiFi radios turn off Use the WiFi On Off Button To turn the WiFi radios off and on with the WiFi On Off button Press the WiFi On Off button on the right side panel of the modem router for three seconds If you turned off the WiFi radios the 2 4 GHz WiFi LED and 5 GHz WiFi LED turn off If you tur...

Страница 156: ... check box The WiFi LED for the associated radio turns off see Front Panel and Right Side Panel on page 10 Turn on the radio Select the Enable Wireless Router Radio check box The WiFi LED for the associated radio lights solid green 7 Click the Apply button Your settings are saved Set Up a WiFi Schedule You can use this feature to turn off the WiFi signal from your modem router at times when you do...

Страница 157: ...nch an Internet browser from a computer or WiFi device that is connected to the network 2 Type http www routerlogin net A login window opens 3 Type admin for the user name and type your password If you did not yet personalize your password type password for the password 4 Click the OK button The BASIC Home page displays 5 Select ADVANCED Advanced Setup Wireless Settings The previous figure does no...

Страница 158: ...orming in the 5 GHz band to enhance the WiFi range and performance for your a n ac WiFi devices When you enable beamforming and connect to the WiFi network the modem router actively tracks your device and directs WiFi to your device rather than just blasting it out in all directions Beamforming provides a better range and performance and is enabled by default You can manage beamforming transmissio...

Страница 159: ...tings are saved Manage the Advanced WiFi Settings The modem router is already configured with the optimum settings Do not change the advanced WiFi settings fragmentation length and CTS RTS threshold unless directed by technical support Incorrect settings might disable the WiFi radios To change the advanced WiFi settings 1 Launch an Internet browser from a computer or WiFi device that is connected ...

Страница 160: ...tion only Incorrect settings might disable the WiFi radios 6 Change the advanced WiFi settings for one radio or both radios Fragmentation Length 256 2346 The default setting is 2346 CTS RTS Threshold 1 2347 The default setting is 2347 You can change these setting both in the Wireless Advanced Settings 2 4GHz b g n section and in the Wireless Advanced Settings 5GHz 802 11a n ac section The selectio...

Страница 161: ...id not yet personalize your password type password for the password 4 Click the OK button The BASIC Home page displays 5 Select ADVANCED Advanced Setup Wireless Settings The Wireless Settings page displays 6 Scroll down to the WSP Settings section The Gateway s PIN field displays the PIN that you can enter on a registrar for example Windows Connect Now in Microsoft Windows 7 to configure the modem...

Страница 162: ...tion and the client running that application Legacy applications that do not support WMM and applications that do not require QoS are assigned to the best effort category which receives a lower priority than voice and video This feature is enabled by default but you can disable it PMF Protected Management Frames PMF is a security feature that protects unicast and multicast management frames from b...

Страница 163: ...e password 4 Click the OK button The BASIC Home page displays 5 Select ADVANCED Advanced Setup Wireless Settings The Wireless Settings page displays 6 Scroll down to the bottom of the page 7 Enter the settings as described in the following table Field Description WMM To disable WMM for the 2 4 GHz band clear the WMM Support 2 4GHz b g n check box By default this check box is selected and WMM is en...

Страница 164: ...s but does not require them Required The 5 GHz radio requires protected management frames and rejects unprotected management frames By default Off is selected and PFM is disabled for the 5 GHz band WMF To disable WMF for the 2 4 GHz band clear the Wireless Multicast Forwarding 2 4GHz b g n check box By default this check box is selected and WMF is enabled for the 2 4 GHz band To disable WMF for th...

Страница 165: ... triggering to set up rules for Internet traffic for services and applications You need networking knowledge to set up these features This chapter includes the following sections Manage Port Forwarding to a Local Server for Services Applications and Games Manage Port Triggering for Services Applications and Games ...

Страница 166: ...r a Default Service or Application You can forward traffic for a default service or application to a computer on your network To forward incoming traffic for a default service or application 1 Decide which type of service application or game you want to provide 2 Find the local IP address of the computer on your network that will provide the service The server computer must always receive the same...

Страница 167: ...ettings are saved The rule is added to the table on the Port Forwarding Port Triggering page Add a Port Forwarding Rule with a Custom Service or Application The modem router lists default services and applications that you can use in port forwarding rules If the service or application is not predefined you can add a port forwarding rule with a custom service or application To add a port forwarding...

Страница 168: ...ervice Type Select the protocol TCP or UDP that is associated with the service or application If you are unsure select TCP UDP External Starting Port Enter the external start port number that the service or application uses External Ending Port Enter the external end port number that the service or application uses Internal Starting Port Specify the internal start port by one of these methods Leav...

Страница 169: ...pe your password If you did not yet personalize your password type password for the password 4 Click the OK button The BASIC Home page displays 5 Select ADVANCED Advanced Setup Port Forwarding Port Triggering The following figure shows two port forwarding rules Internal IP address Either enter an IP address in the Internal IP address field or select the radio button for an attached device that is ...

Страница 170: ...e with a Custom Service or Application on page 167 10 Click the Apply button Your settings are saved The changed rule displays in the table on the Port Forwarding Port Triggering page Remove a Port Forwarding Rule You can remove a port forwarding rule that you no longer need To remove a port forwarding rule 1 Launch an Internet browser from a computer or WiFi device that is connected to the networ...

Страница 171: ... table Application Example Make a Local Web Server Public If you host a web server on your local network you can use port forwarding to allow web requests from anyone on the Internet to reach your web server To make a local web server public 1 Assign your web server either a fixed IP address or a dynamic IP address using DHCP address reservation In this example your modem router always gives your ...

Страница 172: ...ends the message to that computer 4 Your web server at IP address 192 168 1 123 receives the request and sends a reply message to your modem router 5 Your modem router performs Network Address Translation NAT on the source IP address and sends the reply through the Internet to the computer or WiFi device that sent the web page request Manage Port Triggering for Services Applications and Games Port...

Страница 173: ... rules You must define a custom service or application for each port triggering rule To add a port triggering rule 1 Launch an Internet browser from a computer or WiFi device that is connected to the network 2 Type http www routerlogin net A login window opens 3 Type admin for the user name and type your password If you did not yet personalize your password type password for the password 4 Click t...

Страница 174: ...gle address Restricts the service to a particular computer Service Type Select the protocol TCP or UDP that is associated with the service or application Triggering Starting Port Enter the number of the outbound traffic start port that must open the inbound ports Triggering Ending Port Enter the number of the outbound traffic end port that must open the inbound ports Inbound Connection Starting Po...

Страница 175: ...ame and type your password If you did not yet personalize your password type password for the password 4 Click the OK button The BASIC Home page displays 5 Select ADVANCED Advanced Setup Port Forwarding Port Triggering The Port Forwarding Port Triggering page displays 6 Select the Port Triggering radio button The following figure shows two port triggering rules 7 In the Port Triggering Portmap Tab...

Страница 176: ...le that you no longer need To disable or remove a port triggering rule 1 Launch an Internet browser from a computer or WiFi device that is connected to the network 2 Type http www routerlogin net A login window opens 3 Type admin for the user name and type your password If you did not yet personalize your password type password for the password 4 Click the OK button The BASIC Home page displays 5 ...

Страница 177: ...the modem router detects no activity A time out period is required because the modem router cannot detect when the service or application terminates To specify the time out for port triggering 1 Launch an Internet browser from a computer or WiFi device that is connected to the network 2 Type http www routerlogin net A login window opens 3 Type admin for the user name and type your password If you ...

Страница 178: ... port triggering settings display 7 Select the Disable Port Triggering check box If this check box is selected the modem router does not apply port triggering rules even if you specified them 8 Click the Apply button Your settings are saved Application Example Port Triggering for Internet Relay Chat Some application servers such as FTP and IRC servers send replies to multiple port numbers Using po...

Страница 179: ...fic to your computer 5 The IRC server sends a return message to your modem router using the NAT assigned source port for example port 33333 as the destination port and the IRC server also sends an identify message to your modem router with destination port 113 6 When your modem router receives the incoming message to destination port 33333 it checks its session table to see if a session is active ...

Страница 180: ...ith the modem router This chapter contains the following sections Perform Diagnostics Quick Tips for Troubleshooting Troubleshoot with the LEDs You Cannot Log In to the Modem Router View and Manage the Event Log Troubleshoot the Internet Connection Changes Are Not Saved Troubleshoot the WiFi Connectivity TCP IP Network Not Responding ...

Страница 181: ...ion might be unreachable However some network devices can be configured not to respond to a ping To ping an IP address 1 Launch an Internet browser from a computer or WiFi device that is connected to the network 2 Type http www routerlogin net A login window opens 3 Type admin for the user name and type your password If you did not yet personalize your password type password for the password 4 Cli...

Страница 182: ... the REFRESH button at the bottom of the field 10 To remove all information from the Results field click the Clear Results button Trace a Route Use this test to trace a route to an IP address or host name to test the connection If you use a host name you can also use this test to resolve the name to an IP address If the request times out because no reply is received the destination might be unreac...

Страница 183: ...cket size is 32 bytes Base Port Enter the port from which the probe packet is sent By default the port number is 33434 Resolve Host If you enter a host name specify whether the name is resolved to an IP address by selecting one of the following options from the Resolve Host menu Off The name is not resolved to an IP address On The name is resolved to an IP address 8 Click the Start Test button The...

Страница 184: ...WiFi device or too close Move your WiFi device near the modem router but at least 6 feet 1 8 meters away and see if the signal strength improves Make sure that the WiFi signal is not blocked by objects between the modem router and your WiFi device Make sure that the WiFi LED for the 2 4 GHz radio or 5 GHz radio that you want to connect to is not off Make sure that the modem router s SSID broadcast...

Страница 185: ...t device is connected to the modem router Power LED Is Off If the Power LED and other LEDs are off when your modem router is turned on do the following Check that the power cord is correctly connected to your modem router and that the power supply adapter is correctly connected to a functioning power outlet Check that you are using the 12 VDC 2 5A power adapter that NETGEAR supplied for this produ...

Страница 186: ...ht when you connect a device check the following The Ethernet cable connections are secure at the modem router and at the device The power is turned on to the connected device You are using the correct cable You Cannot Log In to the Modem Router If you are unable to log in to the modem router from a computer on your local network and use the web management interface check the following If you are ...

Страница 187: ...empting to set up your modem router behind an existing router in your network turn on router mode to enable the modem router to function as a bridge to the router see Cable the Modem Router to a Router and Use Bridge Mode on page 17 View and Manage the Event Log The event log is a detailed record of events that occur between the modem router and the cable service provider s cable modem termination...

Страница 188: ...synchronize its time with a server 6 To refresh the page click the Refresh button The information onscreen is updated 7 To clear the log entries click the Clear Log button All entries are removed from the table Troubleshoot the Internet Connection If your modem router cannot access the Internet check the cable connection Troubleshoot the Cable Link If your modem router is unable to access the Inte...

Страница 189: ...nstream and Upstream LEDs Are Off If both the Downstream and Upstream LEDs are off the modem router cannot get a connection with your cable Internet provider Make sure that you cabled the modem router correctly see Cable the Modem Router on page 14 If the cabling is correct but the modem router cannot get a connection contact your cable Internet provider Internet LED Is Off If the Internet LED is ...

Страница 190: ...puter is unable to load any web pages from the Internet it might be for one of the following reasons The traffic meter is enabled and the limit was reached By configuring the traffic meter not to block Internet access when the traffic limit is reached you can resume Internet access see Unblock the Traffic Meter After the Traffic Limit Is Reached on page 120 If your ISP sets a usage limit they migh...

Страница 191: ...r information about turning on the WiFi radio see Control the WiFi Radios on page 155 If you turn on the 2 4 GHz WiFi radio the 2 4 GHz WiFi LED lights green If you turn on the 5 GHz WiFi radio the 5 GHz WiFi LED lights green If you disabled the modem router s SSID broadcast your WiFi network is hidden and does not display in your WiFi client s scanning list By default SSID broadcast is enabled Fo...

Страница 192: ...llowing one displays Pinging IP address with 32 bytes of data If the path is working you see this message Reply from IP address bytes 32 time NN ms TTL xxx If the path is not working you see this message Request timed out If the path is not functioning correctly the network might not be configured correctly Do the following Verify that the Ethernet card driver software and TCP IP software are both...

Страница 193: ... information is not visible in your computer s Network Control Panel Verify that the IP address of the modem router is listed as the default router Check to see that the network address of your computer the portion of the IP address specified by the netmask is different from the network address of the remote device If the modem router cannot obtain an IP address from the cable service provider the...

Страница 194: ...and Specifications This appendix includes the factory default settings and technical specifications for the modem router This appendix contains the following sections Factory Default Settings Technical and Environmental Specifications ...

Страница 195: ...ask 255 255 255 0 DHCP server Enabled DHCP range 192 168 0 10 to 192 168 0 254 DHCP start IP address 192 168 0 11 DHCP end IP address 192 168 0 254 Reserved IP address for ReadySHARE 192 168 0 10 UPnP Enabled Wide area network WAN and security Port scan and DoS protection Disabled Default DMZ server Disabled Respond to ping on Internet port Disabled MTU size Uses the maximum MTU value for best thr...

Страница 196: ...Guest 5 GHz band NETGEAR 5G Guest SSID broadcast Enabled 2 4 GHz and 5 GHz bands Security None open network Allow guests to access main network Disabled 2 4 GHz and 5 GHz bands General and advanced WiFi settings Radio transmission power 100 nonconfigurable 2 4 GHz and 5 GHz bands Fragmentation length 2346 2 4 GHz and 5 GHz bands CTS RTS threshold 2347 2 4 GHz and 5 GHz bands Preamble mode Long Pre...

Страница 197: ...ay NAT many to one TFTP client VPN pass through DNS UPnP Power adapter North America input 120V 60 Hz 1A input North America output 12 VDC 2 5A 30W maximum output Dimensions and weight 7 68 by 7 79 by 2 52 in 195 by 198 by 64 mm 1 2 lb 0 54 kg WAN port One coaxial cable connector DOCSIS 3 0 backward compatible with DOCSIS 2 0 1 1 and 1 0 Ethernet ports Two 10 100 1000BASE T RJ 45 autosensing ports...

Страница 198: ...A2 PSK AES WPA WPA2 Enterprise Legacy methods available only in the Up to 54 Mbps mode WEP WPA PSK TKIP Operating temperature 32 to 104 F 0 to 40 C Operating humidity 90 maximum relative humidity noncondensing Electromagnetic emissions FCC part 15B C E Safety standards UL60950 1 Table 7 Modem router specifications continued Feature Description ...

Отзывы: