39
4. Convenient Features
���
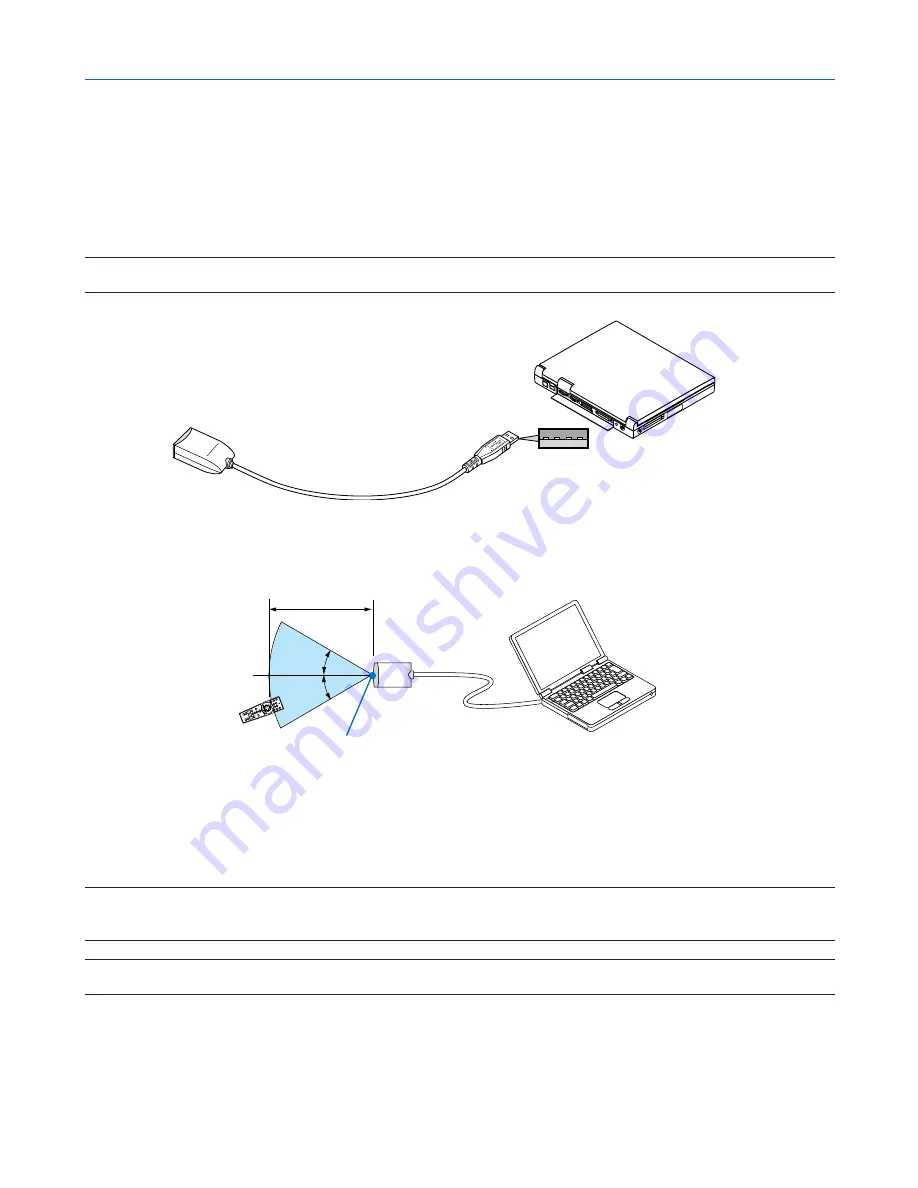
Using the Optional Remote Mouse Receiver
The optional remote mouse receiver enables you to operate your computer’s mouse functions from the remote con-
trol. It is a great convenience for your computer-generated presentations.
Connecting the remote mouse receiver to your computer
If you wish to use the remote mouse function, connect the mouse receiver and computer.
The mouse receiver can be connected directly to the computer’s USB port (type A).
NOTE: Depending on the type of connection or OS installed on your computer, you may have to restart your computer or change
your computer settings.
30
°
30
°
Remote mouse receiver
Computer
To USB port of PC or Macintosh
When operating a computer via the remote mouse receiver
Remote sensor on the remote mouse receiver
7m/22 feet
When connecting using the USB port
For PC, the mouse receiver can only be used with a Windows 98/Me/XP*, Windows 2000 or MacOS X 10.0.0 or later
operating system.
* NOTE: In SP1 or older verison of Windows XP, if the mouse cursor will not move correctly, do the following:
Clear the Enhance pointer precision check box underneath the mouse speed slider in the Mouse Properties dialog box [Pointer
Options tab].
NOTE: Wait at least 5 seconds after disconnecting the mouse receiver before reconnecting it and vice versa. The computer may not
identify the mouse receiver if it is repeatedly connected and disconnected in rapid intervals.
Содержание NP1000
Страница 1: ...LCD Projector NP2000 NP1000 User s Manual ...
Страница 145: ...LCD Projektor NP2000 NP1000 Bedienungshandbuch ...
Страница 289: ...Projecteur LCD NP2000 NP1000 Mode d emploi ...
Страница 433: ...Proiettore LCD NP2000 NP1000 Manuale dell utente ...
Страница 577: ...Proyector LCD NP2000 NP1000 Manual del usuario ...
Страница 721: ...LCD projektor NP2000 NP1000 Bruksanvisning ...
Страница 939: ......
Страница 942: ......
Страница 943: ......
Страница 981: ...35 MEMO ...
Страница 982: ...36 MEMO ...
Страница 988: ...LCD 液晶 NP2000 NP1000 用户手册 ...
Страница 1002: ...6 1 产品说明 锁定提手 1 小心地将投影机的底部朝上放置 2 按下卡口拉起提手 3 按下左右锁将提手设置在适当位置 若要将提手位置还原 将左右锁往上推然后将提手往下推 ...
Страница 1042: ...46 4 便利的功能 4 按四次 SELECT 键打亮 安全 5 按 ENTER 键显示安全画面 6 按一次 SELECT 键打亮密码输入框并按 ENTER 键 显示软键盘 ...
Страница 1100: ...104 6 使用屏幕菜单 信号源页 1 输入端口 信号类型 视频类型 信号源名 项目号码 信号源页 2 水平频率 垂直频率 同步类型 同步极性 扫描类型 ...
Страница 1112: ...116 8 使用可选的镜头 使用防盗螺丝防止镜头被盗 拧紧正面底部随机附带的防盗螺丝 镜头装置的防盗螺丝孔 ...
Страница 1127: ...Printed in China 7N8P6621 NEC Viewtechnology Ltd 2006 ...
Страница 1164: ...35 备忘录 ...
Страница 1165: ...36 备忘录 ...


