


43
115895B System Installation Manual
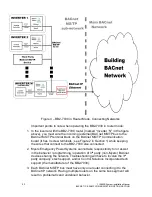
BACNET IP & SNMP COMMUNICATION OPTION SECTION
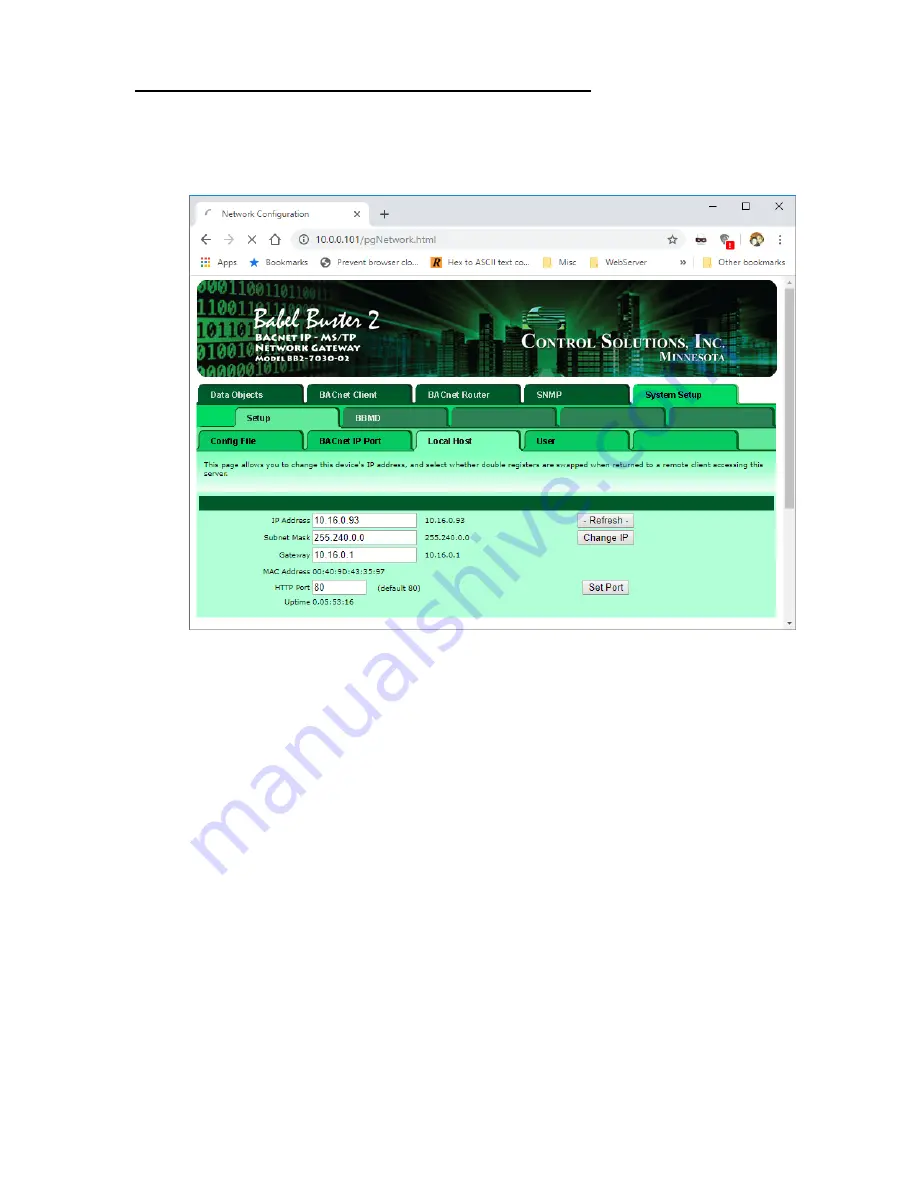
Setting up IP Address and LAN Settings
Click on the
“System Setup” tab. You will be presented with a ‘Sign in’
popup prompt. Type
“root” for Username, and “buster” for Password. Now
navigate to
“System Setup” >> “Setup” >> “Local Host”. The page should look
like this:
Enter the IP Address that you desire your BB2-7030 to have, and the
Subnet Mask and Gateway address for the LAN that the BB2-7030 will be on. If
you wish the BB2-7030 to be a DHCP client (i.e. to automatically be assigned IP
address, subnet mask and gateway address from a DHCP server if one exists
and is reachable on the LAN), simply enter
“255.255.255.255” as the IP Address.
However, DHCP is not recommended because it means the IP address of the
BB2-7030 becomes dynamic and can periodically change; you will have to
periodically update any software that communicates with it (over BACnet IP,
SNMP or HTTP).
When done, click the
“Change IP” button to save your changes. Wait at
least 15 seconds until the settings are changed and the webpage reloads. Now
cycle power to your BB2-7030 by pulling out and then re-inserting the
“BACnet
MS/TP and Power In
” connector. At this point, if you wish you may disconnect
the direct ethernet connection between your PC and the BB2-7030 and put it on
the LAN and connect to it through the LAN via its new IP address setting.
Note that clicking the
“Change IP” button results in a permanent change of
the programmed IP address, even if power to the BB2-7030 is lost. All other
programming requires explicit saving (described in the
“Saving Your Changes”
section below) but changing IP settings is the exception.
Содержание Illuminator Supernova Series
Страница 16: ...15 115895B System Installation Manual Figure 5 2 AC Connections for 6 25 k W 7 5 kW systems ...
Страница 17: ...16 115895B System Installation Manual Figure 5 3 AC Connections for 10 kW 16 7 kW systems ...
Страница 30: ...115895B System Installation Manual PART II OPTIONS MANUALS Section continues on next page ...
Страница 95: ...94 115895B System Installation Manual SERIAL TO ETHERNET ADAPTER OPTION SECTION ...
Страница 96: ...95 115895B System Installation Manual SERIAL TO ETHERNET ADAPTER OPTION SECTION ...
Страница 113: ...112 115895B System Installation Manual DRAWINGS SECTION PART III DRAWINGS Drawings section continues on next page ...
Страница 114: ...113 115895B System Installation Manual DRAWINGS SECTION ...
Страница 115: ...114 115895B System Installation Manual DRAWINGS SECTION ...
Страница 116: ...115 115895B System Installation Manual DRAWINGS SECTION ...
Страница 117: ...116 115895B System Installation Manual DRAWINGS SECTION ...
Страница 118: ...117 115895B System Installation Manual DRAWINGS SECTION ...
Страница 119: ...118 115895B System Installation Manual DRAWINGS SECTION ...
Страница 120: ...119 115895B System Installation Manual DRAWINGS SECTION ...
Страница 121: ...120 115895B System Installation Manual DRAWINGS SECTION ...
Страница 122: ...121 115895B System Installation Manual DRAWINGS SECTION ...
Страница 123: ...122 115895B System Installation Manual DRAWINGS SECTION ...
Страница 124: ...123 115895B System Installation Manual DRAWINGS SECTION ...
Страница 125: ...124 115895B System Installation Manual DRAWINGS SECTION ...
Страница 126: ...125 115895B System Installation Manual DRAWINGS SECTION ...
Страница 127: ...126 115895B System Installation Manual DRAWINGS SECTION ...
Страница 128: ...127 115895B System Installation Manual DRAWINGS SECTION ...
Страница 129: ...128 115895B System Installation Manual DRAWINGS SECTION ...
Страница 130: ...129 115895B System Installation Manual DRAWINGS SECTION ...
Страница 131: ...130 115895B System Installation Manual Notes ...


