


101
115895B System Installation Manual
SERIAL TO ETHERNET ADAPTER OPTION SECTION
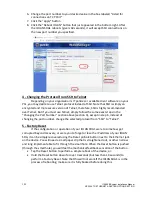
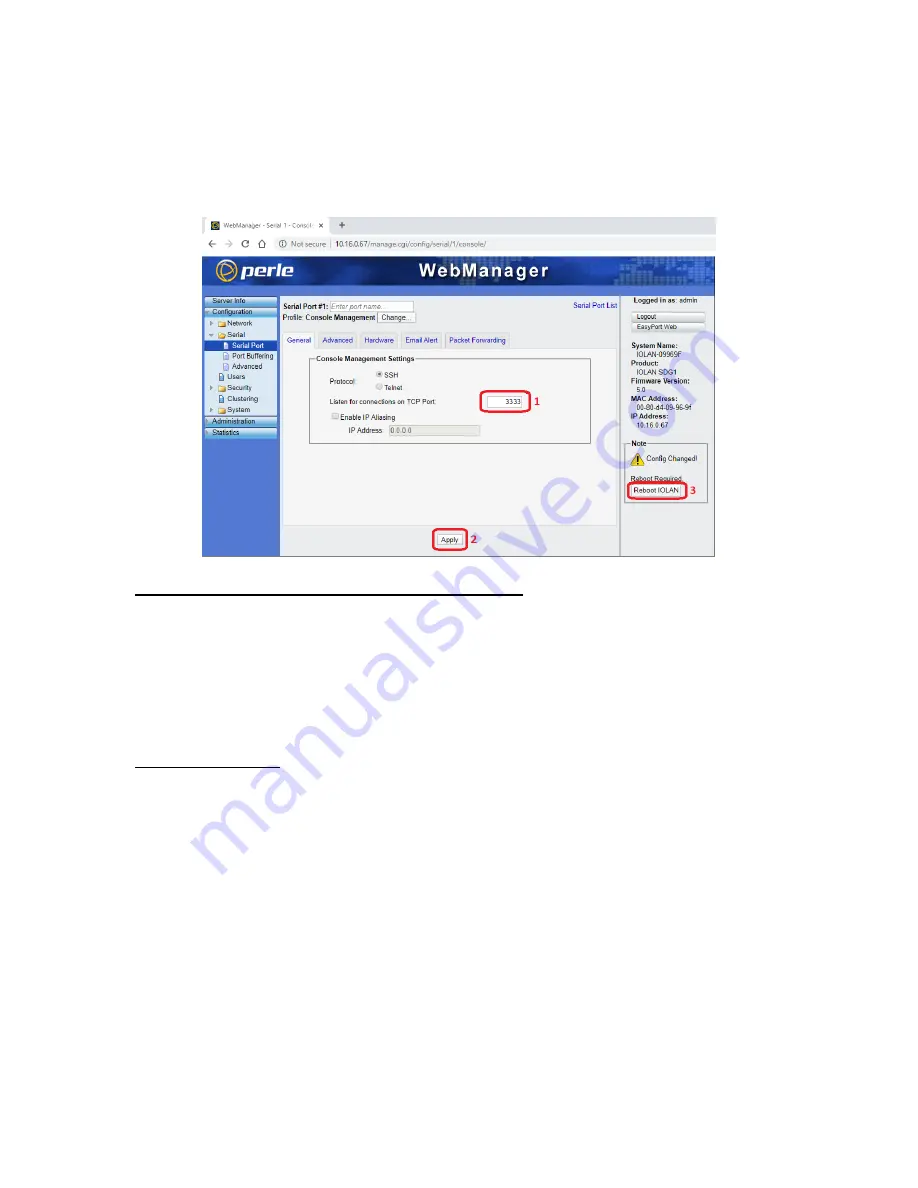
6.
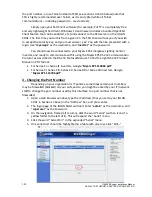
Change the port number to your desired value in the box labeled
“
Listed for
connections on TCP Port
”
7.
Click the
“
Apply
”
button
8.
Click the
“
Reboot IOLAN
”
button that just appeared in the bottom right. After
the IOLAN SDG1 reboots (give is 60 seconds), it will accept SSH connections on
the new port number you specified.
4 - Changing the Protocol from SSH to Telnet
Depending on your organization
’s IT policies
or available client software on your
PCs, you may desire to use Telnet protocol instead of SSH. Note that SSH is simply an
encrypted and more secure version of Telnet, therefore, SSH is highly recommended
over Telnet. But if you must use Telnet, simply follow the same exact steps in the
“
Changing the Port Number
”
section above (section 3), except in step 6, instead of
changing the port number, change the selected protocol from
“
SSH
”
to
“
Telnet
”
.
5 - Factory Reset
If the configuration or operation of your IOLAN SDG1 were to somehow get
corrupted beyond recovery, or were you to forget or lose the IP address of your IOLAN
SDG, it can be simply recovered using the Reset pinhole button next to the Ethernet jack
on the device. You will need a small paper clip that is straightened out, or other narrow
and long implement able to fit through the small hole. When the Reset button is pushed
(through the small hole), you will feel the mechanical feedback sensation of the button.
•
Tap the Reset button to perform a simple reboot of the device, or:
•
Hold the Reset button down for over 3 seconds (but less than 10 seconds) to
perform a Factory Reset. Note that this will not work if the IOLAN SDG1 is in the
process of rebooting; make sure it is fully booted before doing this.
Содержание Illuminator Supernova Series
Страница 16: ...15 115895B System Installation Manual Figure 5 2 AC Connections for 6 25 k W 7 5 kW systems ...
Страница 17: ...16 115895B System Installation Manual Figure 5 3 AC Connections for 10 kW 16 7 kW systems ...
Страница 30: ...115895B System Installation Manual PART II OPTIONS MANUALS Section continues on next page ...
Страница 95: ...94 115895B System Installation Manual SERIAL TO ETHERNET ADAPTER OPTION SECTION ...
Страница 96: ...95 115895B System Installation Manual SERIAL TO ETHERNET ADAPTER OPTION SECTION ...
Страница 113: ...112 115895B System Installation Manual DRAWINGS SECTION PART III DRAWINGS Drawings section continues on next page ...
Страница 114: ...113 115895B System Installation Manual DRAWINGS SECTION ...
Страница 115: ...114 115895B System Installation Manual DRAWINGS SECTION ...
Страница 116: ...115 115895B System Installation Manual DRAWINGS SECTION ...
Страница 117: ...116 115895B System Installation Manual DRAWINGS SECTION ...
Страница 118: ...117 115895B System Installation Manual DRAWINGS SECTION ...
Страница 119: ...118 115895B System Installation Manual DRAWINGS SECTION ...
Страница 120: ...119 115895B System Installation Manual DRAWINGS SECTION ...
Страница 121: ...120 115895B System Installation Manual DRAWINGS SECTION ...
Страница 122: ...121 115895B System Installation Manual DRAWINGS SECTION ...
Страница 123: ...122 115895B System Installation Manual DRAWINGS SECTION ...
Страница 124: ...123 115895B System Installation Manual DRAWINGS SECTION ...
Страница 125: ...124 115895B System Installation Manual DRAWINGS SECTION ...
Страница 126: ...125 115895B System Installation Manual DRAWINGS SECTION ...
Страница 127: ...126 115895B System Installation Manual DRAWINGS SECTION ...
Страница 128: ...127 115895B System Installation Manual DRAWINGS SECTION ...
Страница 129: ...128 115895B System Installation Manual DRAWINGS SECTION ...
Страница 130: ...129 115895B System Installation Manual DRAWINGS SECTION ...
Страница 131: ...130 115895B System Installation Manual Notes ...


