– 58 –
7-5 Setting the Basic Information
Touch the [Unit Info.] tab in the screen that appears when [Initial Settings] on the menu bar in the setting change screen is touched to
open the Unit Info setting screen and make the basic settings for AG-150A such as its name and display options.
Note: If the user logs in as a building manager, the operations may be prohibited.
7-5-1
Unit Setting
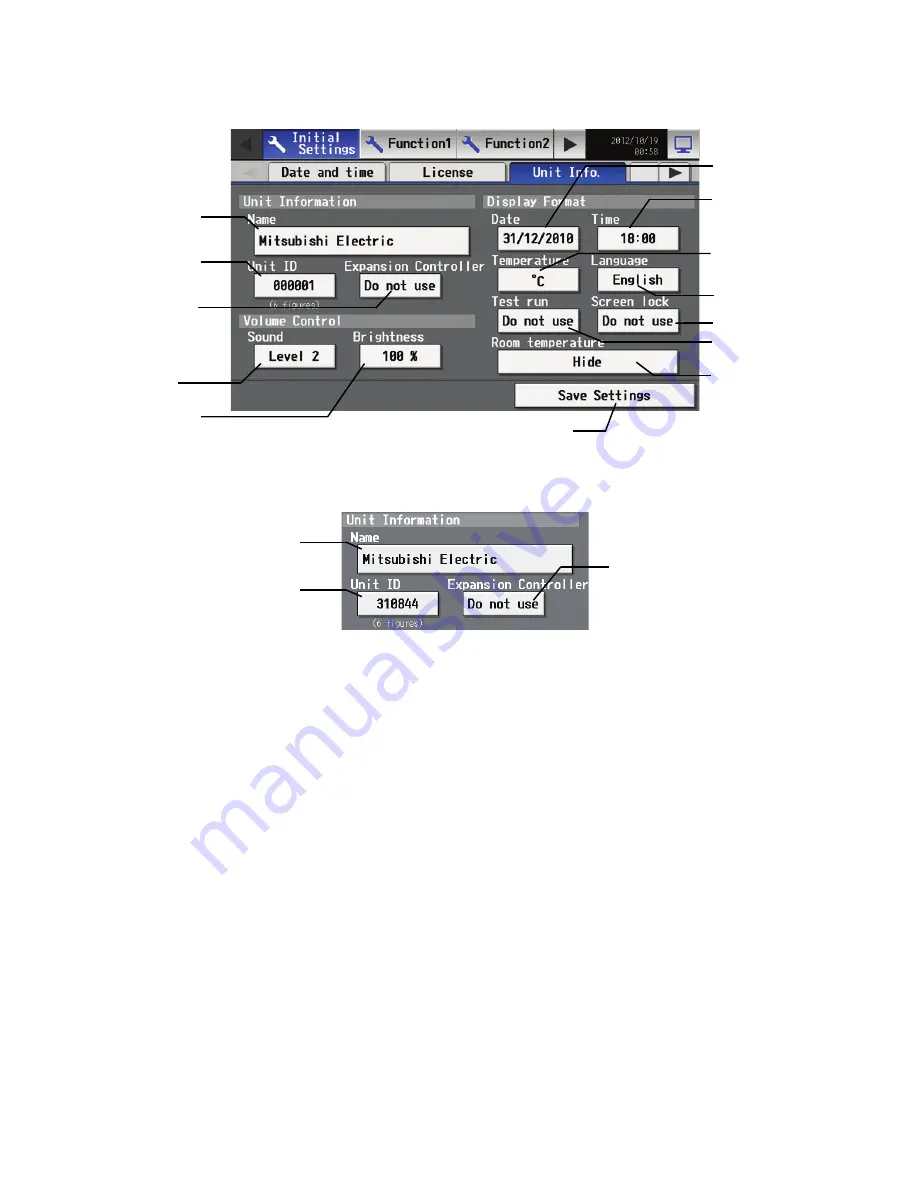
Information about the unit is entered on the screen below.
(1) Pressing the [Name] button brings up the Handwriting input screen (page 54). Enter the name for AG-150A in 40 characters or less.
The name set here is used on the display screen of the software that controls multiple AG-150A units and for the name of the sender
in the body of error messages.
Note: The following characters cannot be used in the name: < > & " '
(2) Press the [Unit ID] button and enter the ID number for AG-150A in six numerical characters (single byte) or less. Use this setting
when you want to control multiple AG-150A units with unit IDs. The unit ID that is entered here will be used on the display screen of
the software that controls multiple AG-150A units and for the sender ID in the body of error messages.
(3) When connecting an Expansion controller, press the [EC connection setting button] and select [Use].
* When the EC connection setting is set to [Use], be sure to make the EC controller settings on the Network settings screen.
(4) Press [Save settings] on the Unit Info screen to save the settings.
Brightness control
button
Language
selection button
Save Settings
Name field button
Unit ID field button
Volume control
button
Date format setting
button
Temperature unit
setting button
Time format setting
button
Test run enable/
disable button
Screen lock button
EC connection
setting button
Room Temp Disp.
selection button
Name button
Unit ID button
EC connection
setting button
WT05369X15.book Page 58 Wednesday, November 7, 2012 10:33 AM


