background image

Installation

Overview

User Guide

|

13

2 Installation

2.1 Overview

Install the PX system as follows:
1. Remove the PX system from the package, and check that all components are

present and in good working condition.

2. Mount the PX unit in a rack.
3. Make all connections between the hardware and PX.
4. Power on the PX unit.

2.2 System Components

Before installing the PX system, verify that you have all the components on the
following list, as well as any other items required for installation.

The PX system consists of:

One PX unit

One USB/Video cable (p/n 5CB00599)

Rack-mounting brackets and screws

Optional power adapter, ordered separately

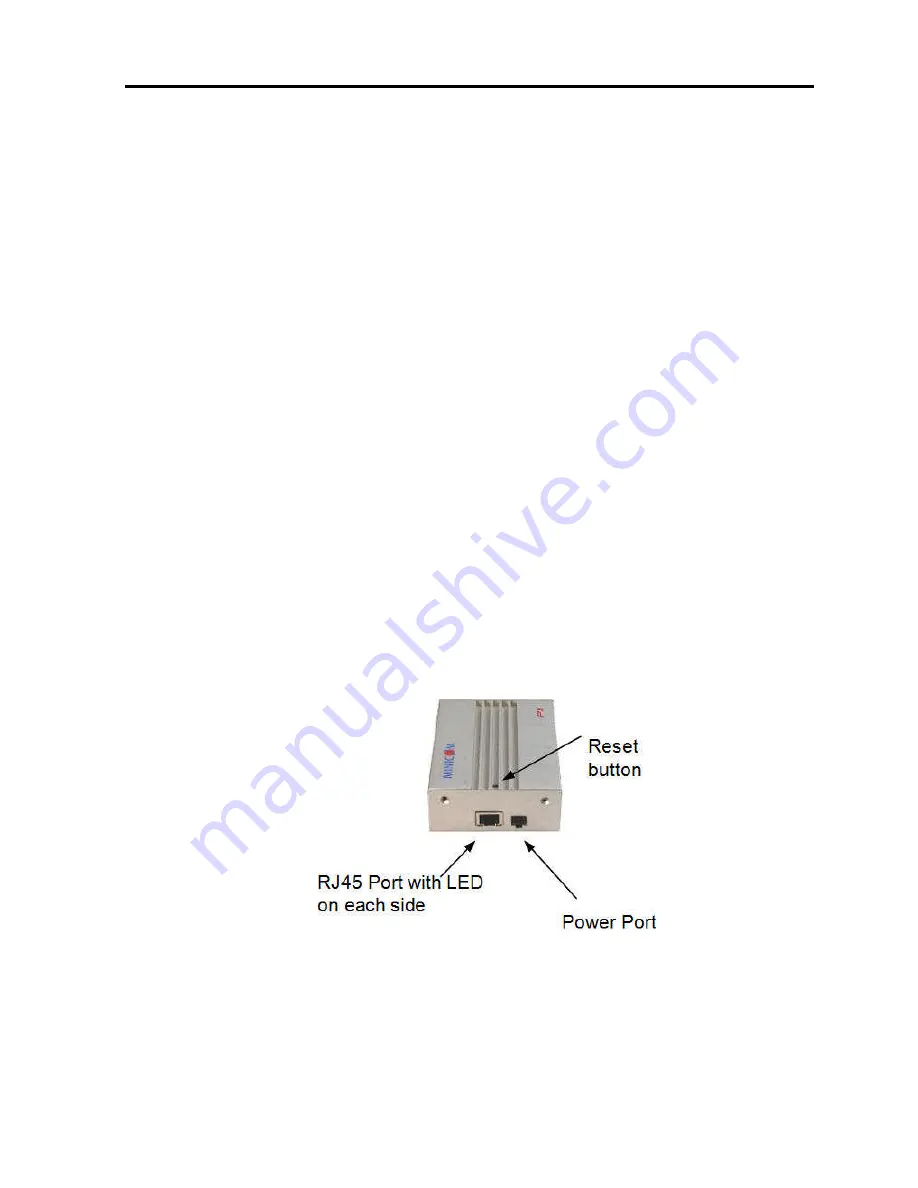
2.2.1

The PX Unit

Figure 1 – PX Unit Top and Left Side Panel

Содержание 0SU70068

Страница 1: ...PX User Guide 1111 W 35th Street Chicago IL 60609 USA www tripplite com support Copyright 2012 Tripp Lite All rights reserved...

Страница 2: ...assumes no responsibility of liability for any errors or inaccuracies that may appear in this book The software that accompanies this manual is licensed for use by the Licensee only in strict accorda...

Страница 3: ...vides instructions for logging into the Web configuration interface configuring the device ID IP address and Centralized Management settings enabling and configuring SNMP adding editing removing and b...

Страница 4: ...buttons and other elements of the user interface Arial Italics Special terms the first time they appear Monospace Text entered by the user Notes which offer an additional explanation or a hint on how...

Страница 5: ...ck Mounting Safety Considerations 14 2 3 2 Assembling the Bracket 15 2 3 3 Connecting the Bracket to the PX Unit 16 2 3 4 Connecting the PX Unit to the Rack 16 2 4 CONNECTING THE PX 17 2 4 1 PX LEDs 1...

Страница 6: ...34 4 CONDUCTING A REMOTE SESSION 37 4 1 STARTING A REMOTE SESSION 37 4 1 1 Remote Session Toolbar Buttons 39 4 2 SHARING A REMOTE SESSION 39 4 2 1 Exclusive Session 40 4 3 SERVER NAME 40 4 4 DISPLAYI...

Страница 7: ...cting the Mouse Mode 55 Relative Mouse Position Mode 56 4 12 2 Aligning the Mouse Pointers 58 4 12 3 Calibrating Mouse Pointers 58 4 13 SWITCHING TO A DIFFERENT SERVER DEVICE 58 4 14 DISCONNECTING THE...

Страница 8: ...erial Port Page 29 Figure 18 Security Page 30 Figure 19 Date and Time Page 31 Figure 20 SSL Certificate Page 32 Figure 21 Device Version Upgrade Page 33 Figure 22 Reboot Confirmation Page 33 Figure 23...

Страница 9: ...redefined Key Dialog Box 51 Figure 41 Record Macro Box 52 Figure 42 Delete Key s Confirmation Box 53 Figure 43 Relative Mouse Settings 54 Figure 44 Absolute Mouse Settings 55 Figure 45 Windows 7 Mouse...

Страница 10: ...ect to a single computer over TCP IP communication 1 1 1 Features and Benefits PX has the following features and benefits BIOS level control to any server s brand and model regardless of the server co...

Страница 11: ...Canadian Department of Communications These above rules are designed to provide reasonable protection against such interference when operating the equipment in a commercial environment If operation of...

Страница 12: ...like for like basis this varies depending on the country Send back the new equipment for recycling when it ultimately becomes waste Instructions for both customers and recyclers treatment facilities w...

Страница 13: ...e all connections between the hardware and PX 4 Power on the PX unit 2 2 System Components Before installing the PX system verify that you have all the components on the following list as well as any...

Страница 14: ...the factory default settings USB Video port 26 pin port for connecting the PX to the target server via a USB Video cable Power LED Indicates the state of the PX unit Green indicates that the unit is...

Страница 15: ...he equipment Mount the equipment in the rack in such a way that a hazardous condition does not result due to uneven mechanical loading When connecting the equipment to the supply circuit that the tota...

Страница 16: ...cket to the rack with scre instructions Figure 4 Connecting Bracket Sections Connecting the Bracket to the PX Unit You can connect the bracket to the PX unit at different angles To connect the bracket...

Страница 17: ...USB Video cable to the 26 Connect the USB and Video connectors of the USB Video cable to the relevant ports see Figure 6 For a connection to a PS 2 type computer use he PS 2 cable p n 5CB00611 ordered...

Страница 18: ...PX Connections 2 4 1 PX LEDs The PX has two green LEDs adjacent to the RJ45 connector One indicates that the PX is connected to the PoE network switch and the other shows that the target server conne...

Страница 19: ...Install an SSL certificate 2 Upgrade firmware 3 Restore factory settings 3 1 Boot Up Process By default PX boots with an automatically assigned IP address from a DHCP Dynamic Host Configuration Proto...

Страница 20: ...connect more than one PX to the same network If there is no DHCP server or you want to use static IP addresses connect the PX units one at a time and change the static IP address of each unit before c...

Страница 21: ...interface An idle timeout of 30 minutes terminates the session Before logging on the first time verify that you have the latest Java installed on your computer If not you can download and install Java...

Страница 22: ...onfiguration changes you must click the button in the toolbar for the changes to go into effect 3 2 1 Web Configuration Interface Tabs The following table summarizes the Web configuration interface ta...

Страница 23: ...certificate onto the device 3 3 Configuring the Network Settings On the network configuration page see Figure 10 you can configure the following Device ID Device IP address Centralized Management Con...

Страница 24: ...DHCP server is active on the same network to which PX is connected the can provide automatic IP assignment However best practices recommend using MAC address reservations in the DHCP server to ensure...

Страница 25: ...pe the Manager IP Address resides on the same network segment as the Centralized Management Configuring Network SNMP Settings You can activate SNMP logging to provide support network monitoring This w...

Страница 26: ...menu User 6 Click OK From the configuration menu select Users The Users page opens and displays the existing Users Figure 12 Users Page The Add User page appears Figure 13 Add User Page Password The p...

Страница 27: ...m the system You cannot delete an Administrator who is logged onto the system see Figure 12 select User s to delete Select a by selecting the first User in the group pressing the Shift button and then...

Страница 28: ...it User Page and or Access as required To change the password click parameter opens In the upper textbox type the new password in the lower textbox confirm the new password You cannot change the passw...

Страница 29: ...ed for the server The server number The number of POCs attached to the server provided that POCs are attached to the server otherwise it displays 0 hange the name of a connected server highlight the c...

Страница 30: ...pdown list All other parameters are then grayed out See the RPS or POC Installation Guide for further ng and operating the RPS or POC respectively After assigning the Serial Port to POC go to the Targ...

Страница 31: ...pecified period of or a total block High security password policy checkbox to enable the high security password policy clear the checkbox for the standard security policy to apply select the timeout i...

Страница 32: ...ile on the client computer 3 In the toolbar select The Device Version Upgrade version on the device Additional Configuration Operations appears Figure 20 SSL Certificate Page browse to locate the Cer...

Страница 33: ...fter about 30 seconds the Login page appears Depending on the type of firmware upgrade the following settings may be erased User settings KVM switch settings mouse and video adjustments and RS232 sett...

Страница 34: ...figuration page Once reset the data cannot be retrieved restore factory settings Factory Settings page appears Figure 23 Restore Factory Settings Page To preserve network settings select the Preserve...

Страница 35: ...you to reboot and restart the device by displaying the following device reboot confirmation box Figure 24 Device Reboot Confirmation Message 1 Click Yes A message box informs that Save has completed F...

Страница 36: ...ion page To log off 1 In the screen toolbar click the The Configuration screen is closed and the session closes Figure 27 Logon Page after Rebooting name and Password and click Enter The Configuration...

Страница 37: ...orm the following from the remote session Display hide the toolbar profile Display the session in full screen mode Verify Remote Presence Solutions information Power manage the target servers provided...

Страница 38: ...In User and Password type the default Administrator name and password admin and access respectively both lower case 5 Click Enter The screen of the target server or the currently selected server on th...

Страница 39: ...es and Special Keys item which enables you to add a keyboard sequence record a new custom key edit an existing key sequence and delete a key sequence Mouse button Pressing this button opens up a dropd...

Страница 40: ...ssigned via the Centralized Management and can be seen in the IE title bar You can also see the server by clicking from the toolbar 4 4 Displaying the Toolbar The toolbar appears briefly at the top of...

Страница 41: ...ppears All connected mass storage devices appear in section Figure 31 Virtual Media In the Local Drives section select the device to be mounted and click The device mounts onto the target server and a...

Страница 42: ...it an attractive alternative to physical media for the distribution of software that requires this additional information as it is simple to retrieve over the Internet In the Virtual Media page see Fi...

Страница 43: ...e devices such as USB flash drives tokens or miscellaneous USB memory sticks cards removes them from the m and redirects them with Read Write access permissions to the arget server to ensure the integ...

Страница 44: ...the appearance of mouse pointer to hide the mouse pointer for the mouse pointer to appear as a dot for the mouse pointer to appear as a regular shaped mouse cursor to hide the toolbar from the next c...

Страница 45: ...r click the Restore button window appears Full screen mode can also be activated from the Session Profile box see step 3 Verifying Remote Presence Solutions firmware KME Keyboard Mouse Emulation firmw...

Страница 46: ...LAN environment it is best to set the bandwidth setting to High For VPN and Internet environments you may want to alter the settings to increase responsiveness utomatically adapts to the best compres...

Страница 47: ...ust the video image Refreshing the video image ting the video image hanging advanced video settings Refreshing the Video Image require refreshing when changing the display attr Refreshing completely r...

Страница 48: ...the video settings as To manually adjust the video settings 1 On the toolbar select The manual controls appear Figure 37 Adjusting Video Settings Although automatic adjustment of video generally optim...

Страница 49: ...yed image the point at which each pixel is sampled the scale resolution of the session image Scale to reduce the noise level to a minimum the filter of the input video from the server A higher filter...

Страница 50: ...Special Key Manager box appears Managing Keyboard Sequences You can select any keyboard sequence a combination of keys that performs a that appears in the dropdown menu of the toolbar button to initi...

Страница 51: ...nces User Guide 51 Figure 39 Special Key Manager 2 Click the Add Predefined button A list of existing sequences appears Figure 40 Add a Predefined Key Dialog Box 3 Select a key sequence and click OK T...

Страница 52: ...ick OK The sequence appears in the Keyboard Key sequence list Recording a New Custom Key This section describes how to define a new keyboard sequence After defining the keyboard sequence you can add i...

Страница 53: ...s single or multiple key sequences from the system To delete a keyboard sequence nager box see Figure 39 select the desired key sequence Select a group of keys by selecting the first key in the group...

Страница 54: ...mode is Figure Manually Synchronizing the Mouse If the mouse settings on the target server have been changed or when the is Windows XP 2003 Server 7 2008 Server Linux or SUN Solaris you must synchron...

Страница 55: ...nds on the type of PX device and on the target operating system computer For PX USB devices If the operating system on the Target is Windows ME or later select Absolute Mouse Position mode see Figure...

Страница 56: ...Mouse Position mode enables you to configure mouse settings set The USB Option and advanced settings see Advanced Mouse onfigure settings for the Relative Mouse Position mode from the dropdown menu se...

Страница 57: ...gorithm you are using or to do so by customer support Advanced Mouse Emulation In the Advanced Mouse settings you can set the type of mouse that you would like to emulate It is recommended not to chan...

Страница 58: ...ouse pointers Align or press Ctrl M n Calibrating Mouse Pointers target server may have a different mouse pointer speed than the client computer Calibrating automatically discovers the mouse speed of...

Страница 59: ...1 On the toolbar click The Login Web page appe Conducting Disconnecting Disconnecting the Remote Session disconnect the session e appears You can re login or close the browser Conducting a Remote Ses...

Страница 60: ...for example you have forgotten the Username ore factory defaults from the PX unit in Safe mode To restore a PX USB to the factory default settings the PX USB must be connected to the PoE switch and a...

Страница 61: ...synchronization Both auto and manual modes Security SSL high grade 256 bit AES encryption Connections Ethernet RJ45 10 100 Mbit sec autosensing 26 pin connector for Video and USB keyboard mouse and vi...

Страница 62: ...deo Resolution and Refresh Rates Hz 56 60 65 66 70 72 73 75 76 85 86 640x480 x x x x x x 720x400 x x 800x600 x x x x x x 1024x768 x x x x x x x 1152x864 x 1152x900 x x 1280x720 x 1280x768 x x 1280x960...

Страница 63: ...User Guide 63 201204194 933205_EN...

Отзывы: