4-8
Chapter 4 Maintenance
7
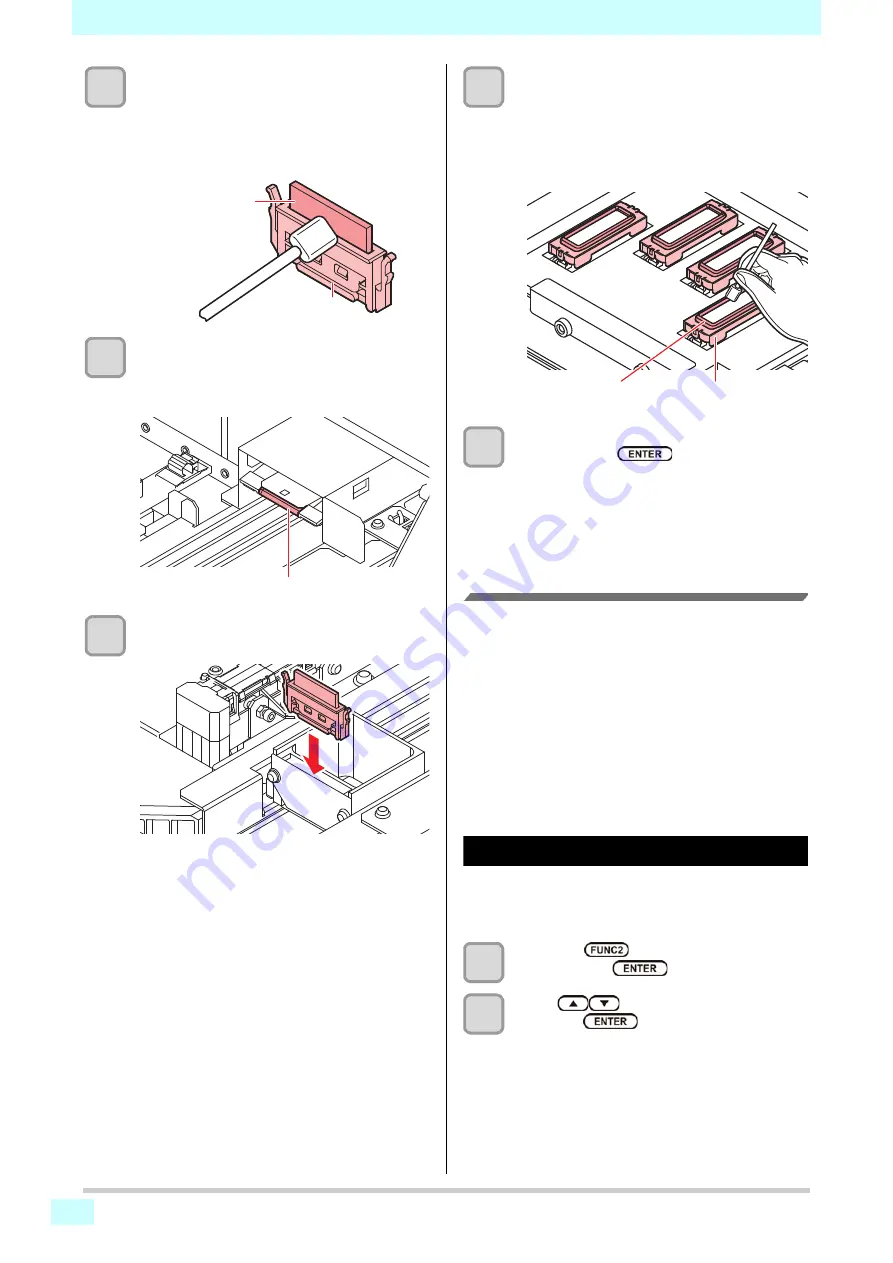
Clean the wiper and bracket.
• Wipe off the ink sticking to the wiper and bracket
with a clean stick dipped in cleaning solution for
maintenance.
Wipe off so that cleaning solution for maintenance
will not remain.
8
Clean the wiper cleaner.
• Wipe off the ink sticking to the wiper cleaner with
a clean stick dipped in cleaning solution for
maintenance.
9
Set the wiper at the original position.
• Insert the wiper by holding both ends of the wiper.
10
Clean the cap rubber and cap rubber
cover.
• Wipe off the ink sticking to the cap rubber and cap
rubber cover with a clean stick dipped in cleaning
solution for maintenance.
Wipe off so that cleaning solution for maintenance
will not remain.
11
Close the right side maintenance cover
then press the
key.
• After its initial operation, the machine returns to
step1.
Performing the Station without
[FUNC2] (TEST PRINT/CLEANING) key
You can select Station by using the [FUNC1] (MENU) key
in the Local without pressing the [FUNC2] (TEST PRINT/
CLEANING) key.
(1)
Press the [FUNC1] (MENU) key in Local.
(2)
Press [
][
] to select “Maintenance”, and press the
[ENTER] key.
(3)
Press [
][
] to select “Station”, and press the
[ENTER] key.
• The Station MENU appears. Then proceed to step 3.
Washing the Ink Discharge Passage
Wash the ink discharge passage on a regular basis (once
every 2 - 3 months) to prevent ink coagulation from
clogging the passage.
1
Press the
(TEST PRINT/CLEANING)
,
and press the
key in Local.
2
Press
to select “Station”, and
press the
key.
• The Station MENU appears.
Wiper
Bracket
Wiper cleaner
Cap rubber
Cap rubber cover
Содержание SWJ-320EA
Страница 1: ...MIMAKI ENGINEERING CO LTD https mimaki com D203278 13 Original instructions ...
Страница 72: ...3 24 ...
Страница 116: ...KM FW 1 5 MIMAKI ENGINEERING CO LTD 2018 ...


