


3
FUNCTIONAL DESCRIPTION
11
2
3
1
4
5
6
7
8
9
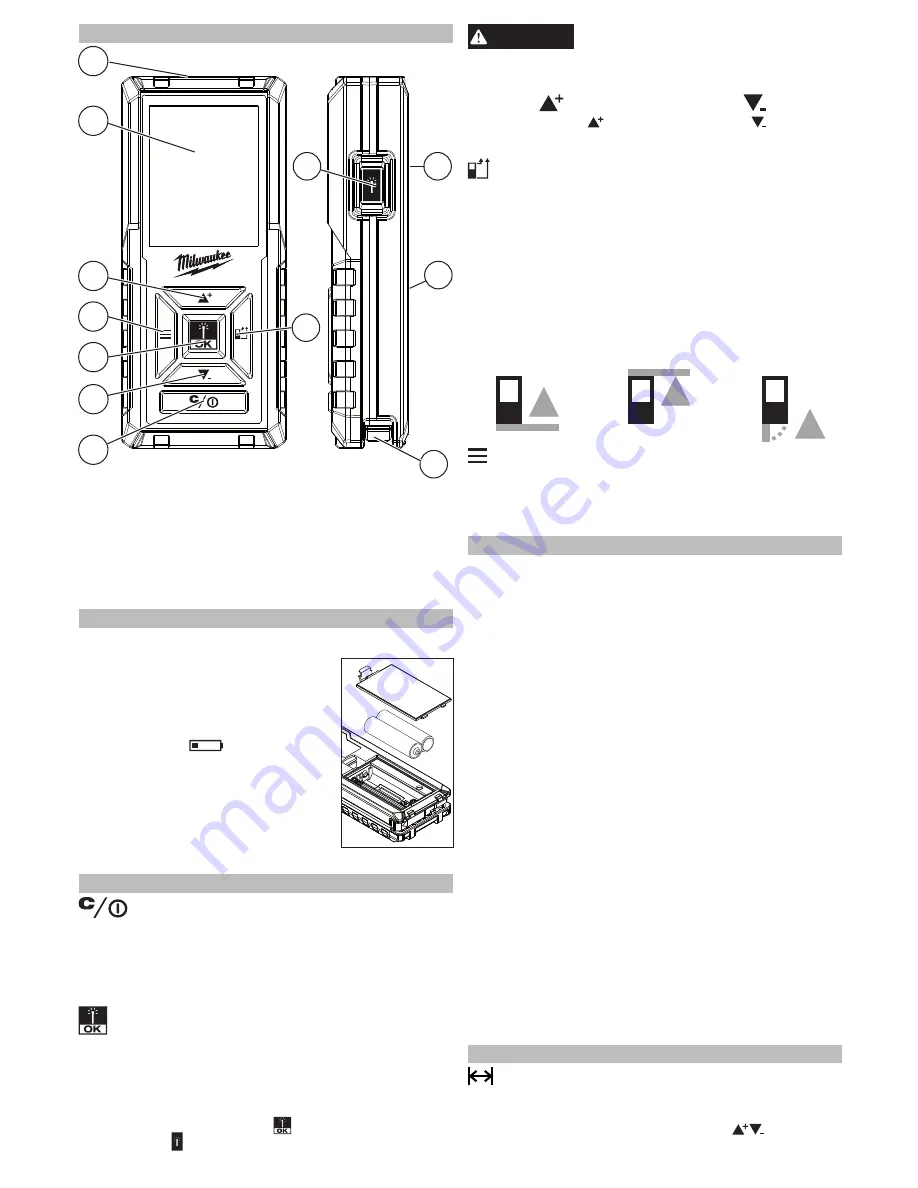
1. Optics
2. Display
3. Up / Add button
4.
Menu button
5. Laser/OK button
6. Down/Subtract button
7. Clear/Power button
8. Reference Location
button
9. Laser button
10.
Threaded mount
11. Battery door
12. Lever
12
10
ASSEMBLY
Changing Batteries
Only use alkaline batteries. Do not use
zinc-carbon batteries. If the meter will
not be used for a long time, remove
the batteries as a protection against
corrosion. Change batteries when the
battery symbol
begins flashing
in upper bar. To change the batteries:
1. Press in the tab and lift out the
battery door.
2. Insert two AAA batteries accord
-
ing to the polarity marked in the
compartment.
3. Install the battery door.
BUTTONS
Clear/Power
To turn the meter on and off, press and hold the
Clear/Power button until the unit beeps. The Length
measurement mode is active.
To clear a measurement, press the Clear/Power
button quickly.
Laser/OK
Press the Laser/OK button to:
•
Turn the laser ON
• Store the measurement
•
Select OK in the Menu
The Laser/OK button is available below the screen
in the center of the buttons , as well as on the side
of the meter
.
WARNING
Laser Light - Do Not Stare Into
Beam or view directly with optical
instruments. Do not point laser light at others.
Laser light can cause eye damage.
Up/Add
and Down/Subtract
Use the Up/Add and Down/Subtract
buttons to
navigate through menus and perform calculations.
Reference Location
The reference location indicates to the meter whether
the measurement should take place from the top
of the meter, the bottom of the meter, or the tip of
the lever.
Press the Reference Location button to toggle
between the Top and Bottom reference locations.
Extend the lever to automatically select the Lever
reference location.
The reference icon of the selected location is shown
on the upper bar of the display.
Bottom Top Lever
Menu
Press the Menu button to display HISTORY, MEA
-
SUREMENT options, and SETTINGS options.
NOTE:
The Menu button is used to save certain
calculations.
USE
Making a Measurement
Each measurement requires pressing the Laser/OK
button twice, first to lock in the measurement, and
second to save the measurement.
1. Select the measurement type from the Menu
(LENGTH defaults). See Menu Options for more
detail regarding the measurement types.
2. Aim the laser at the target.
3. Press Laser/OK to lock in the measurement.
4. Press Laser/OK again to save the measurement
into the history.
5. Continue taking measurements to complete the
requirements for the measurement type.
6. If a measurement is incorrect, press Clear/Power
to cancel the measurement and turn off the laser.
Press Laser/OK again to turn on the laser and
begin the next measurement.
Using the Level (48-22-9803 only)
The level bar is shown along the side of the display,
and the degree of angle is shown in the upper bar.
The level also is used during Indirect calculations to
determine angles.
Auto Level (48-22-9803 only)
Auto level will lock in the measurement when the
meter reaches level (0°). To use, press and hold
the Laser/OK button while tilting the meter to reach
level. Press the Laser/OK button again to store the
measurement.
MENU OPTIONS
LENGTH
Make a simple, single length measurement. The
length measurement is stored in HISTORY.
While in the Length mode, use the
buttons to
add and subtract subsequent measurements.


