24
Audio or Video Connections and therefore are
not re-assignable.
2. A given connection type/number can only be
assigned to one Input Name.
3. First switch a given connection type/number
to "NONE" before re-assigning it to a differ-
ent Input Name.
Make assignment changes by performing the
following:
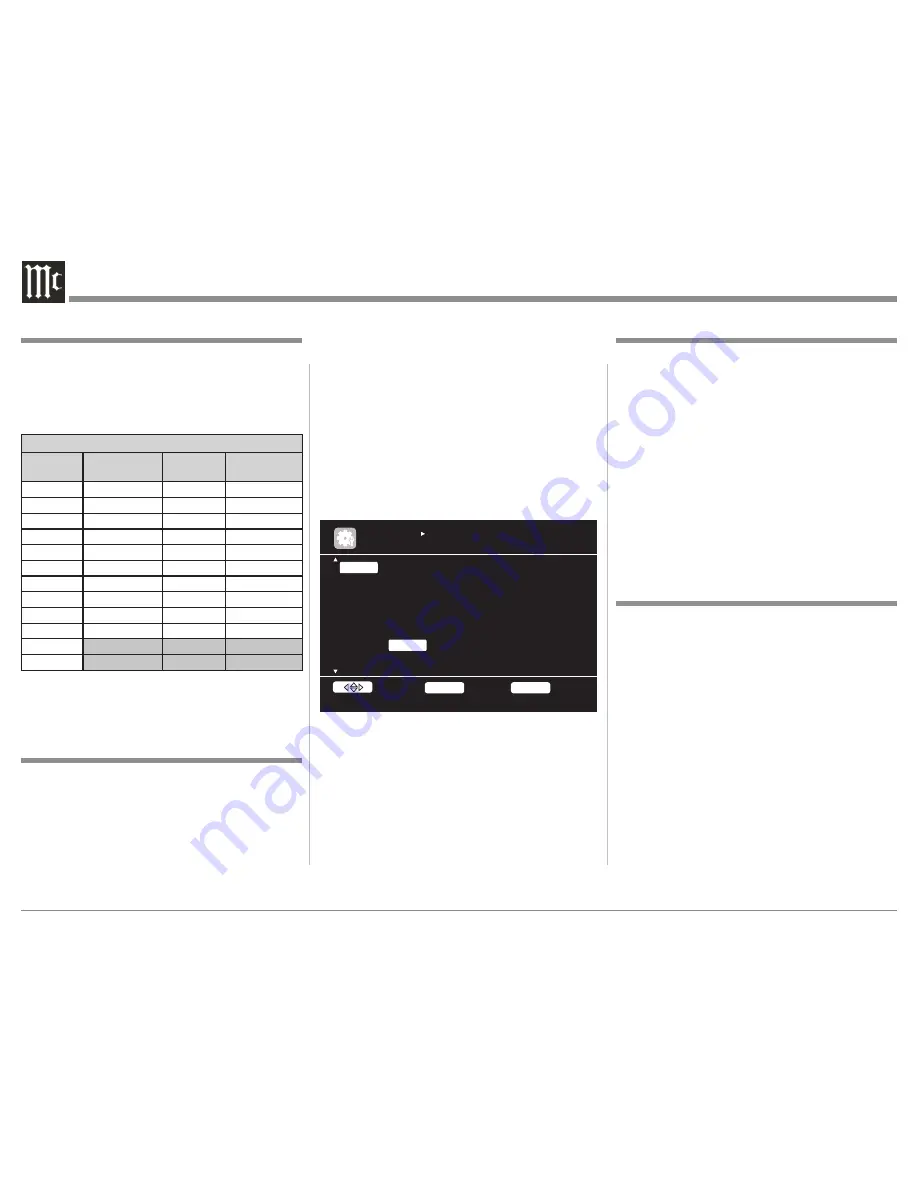
1. Press the MENU Push-button, then select "In-
put Setup" and then "Input Assign". Refer to
figure 18.
2. Use the Directional Push-buttons to select and the
ENTER Push-button to change the current setting.
3. First select the Input to be changed.
4. Then select the HDMI, DIGITAL or COMP col-
umn.
5. Press the ENTER Push-button and then select
from one of the available connections.
6. Press the ENTER Push-button to make the
change.
7. In a similar manner make any additional changes.
Default Input Connection Assignments
The MX121 has the most commonly used Inputs
preassigned to HDMI, Digital Coaxial/Optical and
Component Video (Analog) connections. There
are also permanently assigned Analog Audio and
Video connections. Please refer to the MX121 Menu
separate folded sheet "
Menu-7
".
Default Input Connection Assignment
Input
Name
HDMI
(Video/Audio)
Audio
(Digital)
Video
(Analog)
BD
HDMI-1
-
Component-1
DVD
HDMI-2
Coaxial-1
Component-2
VCR
HDMI-4
-
Component-4
SAT
HDMI-3
Coaxial-2
Component-3
GAME
HDMI-5
-
-
AUX1
HDMI-6
Optical-3
-
NET/USB
-
-
-
TV
-
Optical-1
-
CD
-
Optical-2
-
CDR
-
-
-
PHONO
TUNER
If there is a desire to reassign input connections
proceed to "Input Connection Re-Assignment". Input
names may also be changed, refer to Renaming
Inputs on this page.
Input Connection Re-Assignment
The HDMI, Digital Coaxial/Optical and Component
Video (Analog) Input Connections can be reassigned
to match up with the components in your A/V
System. To speed up the reassignment process make
a list of the desired changes. A blank reassignment
chart has been provide on the MX121 Menu separate
folded sheet "
Menu-7
" for this purpose.
Notes: 1. The PHONO, TUNER and NET/USB Inputs
by their nature do not require HDMI, Digital
Assign HDMI 6 input connector assignment
INPUT SETUP
INPUT ASSIGN
Default
[HDMI]
None
[COMP]
BD
HDMI1
None
1-RCA
DVD
HDMI2
Coax1
2-RCA
VCR
HDMI4
None
4-RCA
SAT
HDMI3
Coax2
3-RCA
GAME
HDMI5
None
None
AUX1
HDMI6
Opt3
None
TV
None
Opt1
None
RETURN
Return
ENTER
Enter
Select
Figure 18
Input Re-Naming
The MX121 default Input Names may be changed as
desired. The new Input Name(s) will appear on the
MX121 Front Panel Information Display and on the
TV/Monitor.
To change the Input Name perform the following:
1. Press the MENU Push-button, then select "Input
Setup" and then "Rename". Refer to the MX121
Menu separate folded sheet "
Menu-7
".
2. Use the Directional Push-buttons to select the
Input.
3. Using the On-Screen Keyboard, enter the new
name and press the ENTER Push-button.
The Front Panel Input Control, the INPUT
on
the Remote Control and the On-Screen Incon Control
all allow selection of the Renamed Input.
Amplifier Assignment
The MX121 Amplifier Assigment allows the use of
the Balanced Surround Back Channel Outputs to be
used instead as Balanced Audio Outputs for Zone
2 or Zone 3. They can be used for Bi-Amp (spkr-c
mode) of the Front Left and Right Channels. The
Front L&R are Low Pass Outputs and the Surround
Back Channels are Hi Pass Outputs for the Front
Right and Left Channels.
To change the Amp Assign perform the following:
1. Press the MENU Push-button, then select "Manu-
al Setup", "Speaker Setup" and then "Amp As-
sign".
2. Use the Directional Push-buttons to select "Zone2,
Zone3 or SPKR-C".
3. Press the RETURN Push-button for the change to
occur.
4. Switch the MX121 OFF and connect the Power
Amplifier(s) to the MX121 to reflect the changes
made.
Содержание MX121
Страница 31: ...31 Setup Mode con t...
Страница 41: ...41 How to Operate the MX121 con t...


