background image

3-35

 SETTINGS

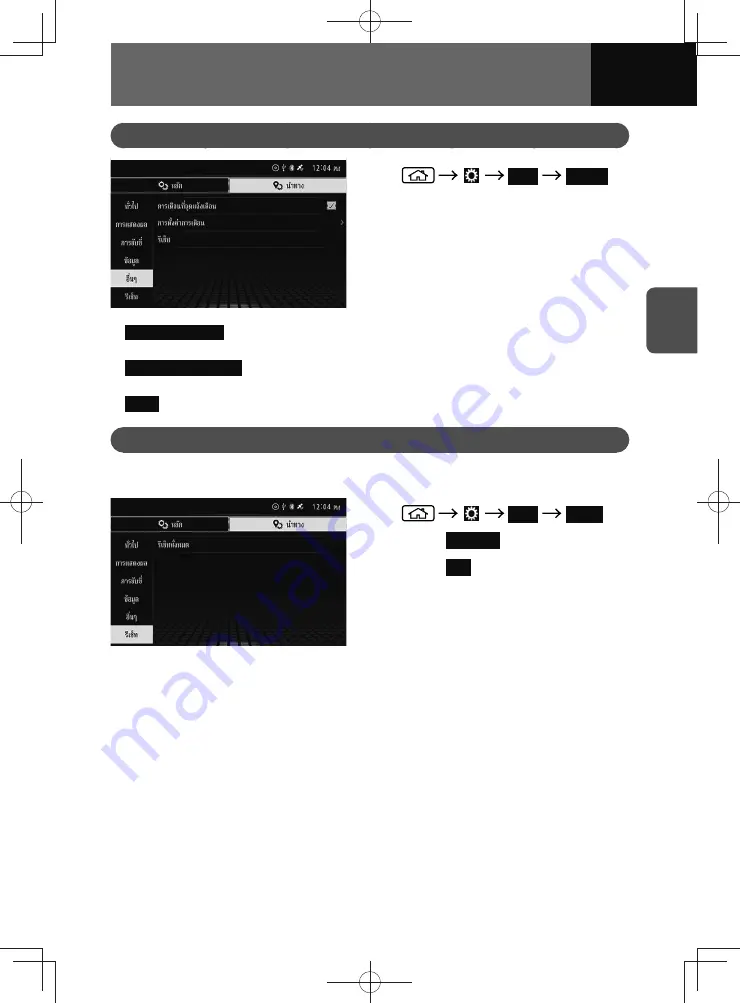
Others Settings

1. 


Navi


Others

• 

Warning Sign Alert

: Displays Warning Sign Alert on the map. You can turn this function 

on and off.

• 

Warning Sign Settings

: Touch this button, you can make individual settings for each 

type of "Warning Sign Alert".

• 

Reset

: You can restore all navigation others settings.

Restoring and Default Settings

You can restore all navigation settings and the stored navigation content to the default 
settings at once.

1. 


Navi


Reset

2. 

Touch 

Reset All

.

3. 

Touch 

Yes

.

• The data is cleared, and the 

navigation system restarts.

Содержание ZOOM-ZOOM BT-50

Страница 1: ...10mm 0 08 BLACK BTNAVIDVDAUD IE 2001TH_5102683_Cover indd 1 3 2020 07 08 16 05 41...

Страница 2: ...NING and CAUTION are reminders to be especially careful Failure to follow or wrongly following the associated instructions could result in personal injury or accidents Please read them thoroughly Due...

Страница 3: ...ion to death or serious injury to you and or other people CAUTION Failure to follow these instructions identified by this symbol could result in injuries or an accident ADVICE Failure to follow these...

Страница 4: ...with the following symbols Basic safety rules you must follow and useful operational information are described in Symbols Used in This Manual Please read all materials such as instruction manuals and...

Страница 5: ...RIPTION BEFORE USE 2 SETTINGS 3 NAVIGATION Models with NAVI 4 AUDIO 5 HANDSFREE 6 APPS 7 SPEECH RECOGNITION SYSTEM Models with NAVI 8 STEERING WHEEL BUTTONS 9 REAR CAMERA 10 REFERENCE 11 HOW TO USE TH...

Страница 6: ......

Страница 7: ...1 How to Use This Manual 1 2 How to Find a Specific Topic 1 3 HOW TO USE THIS MANUAL...

Страница 8: ...HHG FRQWURO EXWWRQ 5HSHDW EXWWRQ 5DQGRP EXWWRQ LVW EXWWRQ XGLR VHWWLQJV EXWWRQ 0XVLF 9LGHR VHOHFW EXWWRQ LGH 0RGH EXWWRQ NOTE 6RPH IXQFWLRQV PD QRW EH DYDLODEOH ZKHQ WKH YHKLFOH LV LQ PRWLRQ ADVICE WA...

Страница 9: ...How to Find a Specific Topic Search for the page describing the specific topic by using the general table of contents under CHAPTER DESCRIPTION the CHAPTER INDEX and or the TABLE OF CONTENTS on the f...

Страница 10: ...1 4 HOW TO USE THIS MANUAL...

Страница 11: ...2 Operating Precautions 2 2 How to Use This Unit 2 3 How to Use the Home Screen 2 10 Customising the Home Screen 2 13 BEFORE USE...

Страница 12: ...product as its internal structure is designed precisely If you need any technical assistance please contact your nearest MAZDA dealer ADVICE Do not use this unit when it is very hot inside the vehicle...

Страница 13: ...el 1 Turn on the vehicle engine Now Loading appears on the screen Shortly after the MAZDA logo is displayed for a few seconds followed by the CAUTION screen If you want to select the screen language t...

Страница 14: ...ay the home screen Touch and hold for more than 0 5 seconds to display the image quality adjustment screen Press to return to the previous screen Press the button Move up down the frequency 1 step Mov...

Страница 15: ...ay function incorrectly or fail to respond if operated with objects other than fingers nails operation when wearing gloves pens etc USB and AUX terminals Parts Function USB connection terminal AUX aux...

Страница 16: ...h down the disc while removing it Doing so may damage the disc or cause skipping 1 Press Connecting via the USB AUX Terminal CAUTION The USB connection cable or an AUX auxiliary connection cable must...

Страница 17: ...ns and mechanical pencils may damage the screen Touch gestures You can operate this unit using the following touch gestures For touch gestures on the map screen see Changing the scale of the map on pa...

Страница 18: ...idden items are available 1 No Function 1 If is displayed beside an item in a list touch the item to open the details setting screen Operating the volume bar You can change the volume by touching the...

Страница 19: ...ing in the System setting See page 3 7 6 Enters spaces 7 Cancel the keyboard screen 8 Confirms the entry 9 Deletes the character on the left of the cursor with a touch of the key Deletes all the enter...

Страница 20: ...he menu bar can be displayed by pressing The menu bar disappears in the following cases When is pressed When an area of the screen other than the menu buttons is touched When the unit is not operated...

Страница 21: ...Indicates that there is no response from the device connected to the USB terminal Indicates that the device connected to the USB terminal is not supported Indicates that the USB hub connected to the...

Страница 22: ...ge 1 Home Turns the home screen to one screen or two screens 2 10 3 16 2 Bluetooth Turns the Bluetooth function on or off 3 18 3 Display Turns the screen off 4 AV Turns the audio source on or off 5 No...

Страница 23: ...idget you want to change Function Page Clock calendar widget 2 14 Audio source widget 2 15 Compass widget 2 16 Navigation widget 2 17 Traffic widget 2 18 Models with NAVI only NOTE The same widget can...

Страница 24: ...clock calendar widget appears in the full screen Widget screen Full screen 2 1 3 4 1 2 No Function 1 Time 2 Date 3 Digital analog clock Select digital or analogue clock mode 4 Calendar Flick up or dow...

Страница 25: ...rrent audio to full screen display Disc USB iPod Bluetooth audio menu Radio AM FM menu 1 4 3 2 5 8 6 7 1 2 3 4 No Function 1 Album artwork 2 Track file name 3 Artist name 4 Folder album name 5 Play ti...

Страница 26: ...screen 1 2 4 3 No Function 1 Direction 2 Display the latitude 3 Display the longitude 4 Setting You can change the direction mode 1 Touch the compass widget to display the full screen 2 Touch 3 Touch...

Страница 27: ...s with NAVI If you touch an area of the widget other than a touch screen button the navigation widget appears in the full screen Widget screen Full screen 1 2 1 2 No Function Page 1 Changes the map vi...

Страница 28: ...of the road on which the traffic event is occurring 4 Distance from vehicle to traffic event 5 Touch to see the details of the selected traffic information 6 Touch to close the list and see the selec...

Страница 29: ...3 Displaying the Settings Screen 3 2 Displaying the Navigation Settings Screen 3 31 SETTINGS...

Страница 30: ...dels with NAVI NOTE See Displaying the Navigation Settings Screen on page 3 31 for the navigation settings Touch a settings button on the left hand side of the screen to view an option System settings...

Страница 31: ...e 7 9 Android Auto See page 3 6 MirrorLink See page 3 7 Keyboard See page 3 7 Initialise Sensor Learning Models with NAVI See page 3 8 Reset See page 3 9 System Update Models with NAVI See page 3 10 A...

Страница 32: ...ou to change the type of clock format 1 Touch the toggle button in Use 24 hour Format Set Use 24 hour Format to ON to display time in 24 hour format Date display settings This allows you to change the...

Страница 33: ...manually 1 Touch the Manual button on the select time zone screen 2 Touch or to set the time 3 Touch OK Daylight saving time settings You can configure daylight saving time 1 On the System setting scr...

Страница 34: ...the character The default device name is CAR AUDIO For keyboard operation see Operating the on screen keyboard on page 2 9 3 Touch OK Android Auto settings You can turn Android Auto on and off 1 On th...

Страница 35: ...change the setting of MirrorLink Turning MirrorLink on will turn Android Auto off NOTE See MirrorLink on page 7 12 for more information about MirrorLink Keyboard settings This allows you to change th...

Страница 36: ...s GPS reception Received Vehicle speed 50 km h or more Distance Time Approx 2 minutes Direction Turn 90 degrees or more to the left and right Initialise the sensor learning in the following cases Afte...

Страница 37: ...settings screen touch Reset The system reset screen will be shown Deleting personal data The settings and the data in application that were saved by the user can be cleared 1 On the Reset settings sc...

Страница 38: ...efault 2 Touch OK 3 Touch OK System update Models with NAVI You can check update methods and history 1 On the System settings screen touch System Update This displays the System Update screen Update S...

Страница 39: ...plays the update history list Viewing system data 1 On the System settings screen touch About System information Models without NAVI 1 On the About screen touch System Information The System informati...

Страница 40: ...de is necessary to update map data See Updating the Map on page 4 41 for details of map updates 1 On the About screen touch System Information The System information screen is displayed See Open Sourc...

Страница 41: ...u want to change Fader Balance settings 1 On the Audio settings screen touch Fader Balance 2 Drag the cursor to the position you want Bass settings 1 On the Audio settings screen touch Bass 2 Drag the...

Страница 42: ...s The optimal acoustical space for the vehicle can be created by setting the sound effects 1 On the Audio setting screen touch the toggle button in Sound Effect Touch ON OFF to change the setting of s...

Страница 43: ...Drag the cursor to the volume you want Models without NAVI 1 On the Audio settings screen touch Prompt Volume 2 Drag the cursor to the volume you want Guide sound output settings This allows you to s...

Страница 44: ...1 On the Display setting screen touch the toggle button in Home Screen Touch ON OFF to change the setting of home screen NOTE Models without NAVI The default setting is off full screen displayed Switc...

Страница 45: ...of animation effects Screen settings 1 On the Display settings screen touch Image Adjustment 2 Touch the feature you want to adjust on the top of the screen 3 Set your desired picture quality Contrast...

Страница 46: ...t add or adjust Bluetooth settings while driving Stop your vehicle in a safe place and apply the parking brake before adjusting Bluetooth settings 1 On the settings screen touch Bluetooth 2 Touch the...

Страница 47: ...to check paired mobile phones and portable devices and to delete them Check paired devices 1 On the Bluetooth settings screen touch Paired Device List Paired devices are displayed Delete a device 1 On...

Страница 48: ...obile phone or portable device 1 On the Bluetooth settings screen touch Add Device This displays the pairing screen for mobile phones and portable devices 2 Touch the desired registration method Pair...

Страница 49: ...ple Pairing 1 Check that the unit and your mobile phone or portable device show the same matching code then press OK on your mobile phone or portable device The button may differ by device 2 After tou...

Страница 50: ...IN code shown on the unit on your mobile phone or portable device 3 After PIN code input a screen displaying Pairing succeeded OOO works with Apple CarPlay Would you like to enable CarPlay will show i...

Страница 51: ...unit and your mobile phone or portable device show the same matching code then enter the same matching code on your mobile phone or portable device 2 Press OK on your mobile phone or portable device...

Страница 52: ...3 24 SETTINGS Bluetooth device without SSP Secure Simple Pairing 1 Enter the PIN code shown on the unit on your mobile phone or portable device 2 Touch OK...

Страница 53: ...t Auto reject settings This allows you to automatically reject incoming phone calls 1 On the Bluetooth setting screen touch the toggle button in Auto Rejecting Touch ON OFF to change the setting of au...

Страница 54: ...OTE Enables to use the handsfree phone Enables to use the Bluetooth audio player 1 Indicates that your mobile device is successfully connected with HFP Hands Free Profile 2 Indicates that your audio d...

Страница 55: ...tem Configurable items Handsfree Bluetooth Audio Connection disconnection will take place with each touch 3 Touch OK A connection mark will be shown on the Paired Device List screen Transferring addre...

Страница 56: ...e 11 23 1 On the settings screen touch Wi Fi 2 Touch the setting you want to change OFF See page 3 28 Miracast See page 3 29 Turning Wi Fi off This allows you to turn Wi Fi features off 1 On the Wi Fi...

Страница 57: ...er to the user manual for your smartphone The Miracast display name will vary according to make and model Please refer to the appropriate user manual for your smartphone model Please connect to the de...

Страница 58: ...ar camera guide line display settings Set whether or not camera guide lines are displayed while reversing 1 On the settings screen touch Camera 2 Touch the toggle button in Guide Line Touch ON OFF to...

Страница 59: ...enter misspelled text to search for a location by name the system will automatically search the database for a possible keywords and display corresponding search results About You can check the map ve...

Страница 60: ...map is automatically reduced to display the entire route This setting can be turned on and off Current Location Info You can select the information e g current street name or latitude and longitude al...

Страница 61: ...egories to include or to avoid in the route to match the user s preferences Route Mode You can select the route mode from Normal or Straight Line If you are driving on an off road Straight Line which...

Страница 62: ...to set the direction 5 Touch OK Data Settings 1 Navi Data 2 Touch the item you want to set Delete History 1 You can delete recorded history data Delete Saved Points 2 You can delete recorded favourit...

Страница 63: ...this button you can make individual settings for each type of Warning Sign Alert Reset You can restore all navigation others settings Restoring and Default Settings You can restore all navigation sett...

Страница 64: ...3 36 SETTINGS...

Страница 65: ...ion 4 2 Navigation Menu and Map 4 4 Destination Search 4 10 Saving Locations 4 24 Route 4 27 Track Log 4 31 Traffic Information TMC 4 33 Navigation System Tips 4 35 Updating the Map 4 41 NAVIGATION Mo...

Страница 66: ...hicle and the safety of its passengers While driving listen to the voice instructions as best as possible and glance at the screen briefly and only when it is safe However do not rely solely on voice...

Страница 67: ...om your present starting location to your destination The system is also designed to direct you to a destination that is unfamiliar to you in an efficient manner This system uses Globetech maps The ca...

Страница 68: ...page No Function Page 1 Displays the map screen 4 5 2 Searches for the destination 4 10 3 Sets the saved point as the favourite destination 4 24 4 Deletes the route 4 30 5 Displays the next or previou...

Страница 69: ...guidance points appear 4 Distance to the waypoint destination Touch to switch between displaying the distance to a waypoint and the distance to the destination 5 Travel time to the waypoint destinati...

Страница 70: ...location information Touch the information bar to display detailed information 4 23 13 Direction of destination This guideline is displayed only when Straight Guideline is on 3 33 14 Starts and stops...

Страница 71: ...r up to the next three expressway services Displayed information includes the names of expressway services and parking areas distance to your vehicle estimated arrival time and service facility icons...

Страница 72: ...ers Zoom out NOTE By touching after zooming in to or out from the map with the pinch in pinch out operation the map scale returns to the size prior to zooming in out If zooming in to or out from the m...

Страница 73: ...an touch and drag the screen to scroll the map to the desired direction 2 1 The cursor appears at the selected point together with additional information and options No Function Page 1 Returns to the...

Страница 74: ...s of Interest POI 4 15 5 Displays the next or previous page You can flick left or right to display the next or previous page 6 Searches nearby MAZDA dealers 4 16 7 Searches by telephone number 4 17 8...

Страница 75: ...ing by the searched location on the way to the same destination is searched Destination The route to a new destination is searched 4 Select a route from the route planning types If necessary you can e...

Страница 76: ...h time you touch you can sort the list of search results in the following order Display destinations with names that include the input text Display destinations that are nearest to current location Di...

Страница 77: ...4 13 NAVIGATION Models with NAVI Searching by coordinates 1 Touch Coordinates 2 Enter the latitude and longitude touch OK The location confirmation screen appears See page 4 23...

Страница 78: ...house number Touch the desired house number City Enter the city name Touch the desired city name Enter the road name Touch the desired road name Enter the house number Touch the desired house number...

Страница 79: ...elect the desired destination from the list Each time you touch it changes the search area in the following order Search for POIs around the current location Search for POIs around the destination Sea...

Страница 80: ...24 or search for POIs in surrounding areas on the location confirmation screen See page 4 23 Touch you can filter search results to only the dealer including the name your entered Touch you can call...

Страница 81: ...made for telephone numbers that are not registered in the map data Touch you can save the searched location See page 4 24 or search for POIs in surrounding areas on the location confirmation screen S...

Страница 82: ...called 1 Touch History 2 Select the desired destination from the list 3 2 1 3 The following menu will be displayed No Function Page 1 Sets the previous search location as the new destination or waypoi...

Страница 83: ...n the saving favourite locations 1 Touch Saved Points 2 Select the desired destination from the list 4 3 2 1 3 The following menu will be displayed No Function Page 1 Sets the previous search location...

Страница 84: ...in the selected zone is displayed below the text input area You can also select the city from the list The city name list is sorted in matching order from the front each time a character is entered 3...

Страница 85: ...arching by scrolling the map 1 Touch Map Search 2 Drag the map in the desired direction to scroll and then marker over the desired location 3 Touch or hold down marker Display the destination location...

Страница 86: ...ation from the list Each time you touch it changes the search results in the following order Display destinations with names that include the input text Display destinations that are nearest to curren...

Страница 87: ...te guidance Location confirmation screen Whenever you select a destination from a search features or point on map marker will appear over the selected location and information and options will be disp...

Страница 88: ...ing methods the location confirmation screen may not be displayed 2 Touch Save The saved point screen appears 2 1 3 3 Touch and save the desired categories No Function 1 Save as home 2 Save as favouri...

Страница 89: ...phone number of saved places can be edited 1 Search Saved Points or Search Saved Points 2 Touch the desired favourite 3 Touch The edit point screen appears 4 Touch the desired enter field and edits 5...

Страница 90: ...4 26 NAVIGATION Models with NAVI Deleting Your Favourite Locations 1 Search Saved Points or Search Saved Points 2 Touch the desired favourite 3 Touch 4 Touch Yes...

Страница 91: ...e indicator 2 Distance to the destination 3 Estimated remaining time to the destination or waypoint 4 Displays the route point list 4 28 5 Display the current position map 6 Saves the displayed route...

Страница 92: ...formation Touch an item on the list the map screen around the selected location is displayed Checking the route simulation 2 1 1 Route Overview or Route Overview Route simulation will start automatica...

Страница 93: ...pressway toll road ferry route traffic U turn or unpaved road This setting will only be applied to the current route Delete the current route 1 2 3 4 3 Select the desired destination or waypoint in th...

Страница 94: ...Saved Route You can recall a previously saved route 1 Load Route or Load Route If there is no route data saved this feature will not be available and Load Route will be greyed out 3 2 1 2 Select the d...

Страница 95: ...logs can be recorded every 10 m Touch the touch screen button again to stop recording The track log is saved The touch screen button disappears automatically if you begin driving on a road when a tra...

Страница 96: ...on the map only off road map Editing the name of track logs You can change the name of the saved track logs Track logs are saved under the name of the date on which they are recorded 1 Track Log Displ...

Страница 97: ...ed information for route searches when you set a destination When traffic information is being received a special icon is displayed on the map When there is no traffic information available for the ro...

Страница 98: ...affic information 1 Traffic or Traffic You can also see this by touching on the map screen 1 2 2 Touch the traffic information you want to check No Function 1 Touch to see the details of the selected...

Страница 99: ...map screen Tunnels tall buildings trucks or even the placement of objects on the instrument panel may obstruct the GPS signals The GPS satellites may not send signals due to repairs or improvements be...

Страница 100: ...eroute while driving at high speed In auto reroute a detour route may be shown After auto reroute the route may not be changed If an unnecessary U turn is shown or announced If a location has multiple...

Страница 101: ...essary to take measurements Furthermore if there are any obstacles around the GPS antenna it will not be possible to receive electromagnetic waves from the satellite In tunnels If the immediate area i...

Страница 102: ...ual position even when correcting using map matching Furthermore the vehicle marker may shift if the map data and the shape of the road being driven on differ Actual vehicle swept path Vehicle swept p...

Страница 103: ...chains Shows the current position in the last confirmed position before moving when using another means of transport such as a ferry until the GPS can determine the new position The system actually n...

Страница 104: ...may be displayed when navigating a district Always drive by following actual traffic regulations Route search complete When searching for a route it may not be displayed quickly enough for the next le...

Страница 105: ...site for details on your own download period The database containing 3 years of map data will differ depending on the map database on your unit How to Update Maps To update map data on the unit visit...

Страница 106: ...xports data to the USB flash drive 6 Once the data has finished exporting to the USB flash drive remove the USB flash drive 7 Connect the USB flash drive on your computer Go to the map update site Map...

Страница 107: ...e USB terminal Once the USB flash drive has been located the update icon will appear in the status bar 2 Drag the status bar downwards to display the Information screen 3 Touch the update information...

Страница 108: ...4 44 NAVIGATION Models with NAVI...

Страница 109: ...adio 5 3 Disc Player If Equipped 5 6 USB Music File Player 5 11 USB Video File Player 5 14 DVD Player If Equipped 5 18 VIDEO CD Player If Equipped 5 33 iPod Player 5 38 Bluetooth Audio 5 43 VTR AUX Au...

Страница 110: ...isc CD MP3 AAC WMA disc DVD or Video CD Disc 5 6 DVD 5 18 Video CD 5 33 Displays the USB music or video screen Music file 5 11 Video file 5 14 or Displays the iPod or Apple CarPlay screen You cannot u...

Страница 111: ...down buttons 4 Auto preset button 5 Scan button 6 Frequency scale 7 Audio settings button 8 Preset buttons NOTE For AM FM frequencies see Specifications on page 11 23 Listening to the radio 1 On the...

Страница 112: ...2 Touch and hold the desired preset button for more than 1 5 seconds The selected station is stored and displayed on the preset button To manually set additional stations for the remaining preset chan...

Страница 113: ...tons remain in the initial values Selecting a preset channel from the preset channel list 1 Touch the desired preset channel in the preset channel list Searching in scan mode 1 Touch The tuner searche...

Страница 114: ...ns 3 Play Pause button 4 Repeat button 5 Random button 6 Scan button 7 List button 8 Audio settings button 9 Track file list 10 Text scroll button 11 Media button 12 Folder selection buttons NOTE Some...

Страница 115: ...of folder name and file name If you attempt to play a non MP3 WMA AAC format file Disc occurs error appears NOTE Sound may jump if the disc is damaged or the recording surface is dirty It may not be...

Страница 116: ...ching once will return to the start of the current track or file Touching twice in quick succession will return to the previous track or file or Continue to the next track or file Searching for a trac...

Страница 117: ...characters of the name on the list exceed the display limit Touch the buttons to scroll the display Swipe the screen up or down Scroll the list Searching in scan mode CDs 1 Touch Plays about 10 secon...

Страница 118: ...wing order Repeats the current file Repeats all files in the current playlist To cancel repeat playback touch until appears Random playback 1 Touch Whenever is touched the mode is switched in the foll...

Страница 119: ...Random button 7 List button 8 Audio settings button 9 File list 10 Music Video select button 11 Text scroll button NOTE Some functions may not be available when the vehicle is in motion and buttons T...

Страница 120: ...forwarding and fast reversing 1 Touch for more than 0 5 seconds or press and hold or Fast reverse or Fast forward NOTE Fast forward or fast reverse operates until you release the button Fast forward o...

Страница 121: ...if there are multiple folder layers Touch to scroll through the display or Appear if the characters of the name on the list exceed the display limit Touch the buttons to scroll the display Swipe the s...

Страница 122: ...ty location and apply the parking brake 2 10 11 5 6 9 4 7 12 8 3 1 1 Progress bar 2 Folder selection buttons 3 File up down and fast forward fast reverse buttons 4 Play Pause button 5 Stop button 6 Sp...

Страница 123: ...unt of time to scan the drive and fetch all the file information Please refrain from storing any unnecessary data such as folders or files other than music or video files on your USB flash drive To pl...

Страница 124: ...l return to the previous file or Advance to the next file Selecting a file from the file list 1 Touch 2 Touch the file you want When touching the structure name the touched page will be displayed or D...

Страница 125: ...yback touch Changing the image size 1 Touch Whenever is touched the mode is switched in the following order Normal Black strips are shown on the left and right edges of the screen Full Image will be e...

Страница 126: ...13 12 8 4 1 15 1 Progress bar 2 Title up down button 3 Return button 4 Chapter up down and fast forward fast reverse buttons 5 Play Pause button 6 Stop button 7 Speed control button 8 Repeat button 9...

Страница 127: ...the region code 3 or ALL Attempt to play any other DVD and the message Incorrect region code will be displayed NOTE The automatic playback feature will not function for certain discs In such cases you...

Страница 128: ...ession will return to the previous chapter or Advance to the next chapter Search for a title 1 Touch or Return to the beginning of the previous title Proceed to the next title Search using the touch f...

Страница 129: ...1 Touch Whenever is touched the mode is switched in the following order Repeat the selected chapter Repeat the selected title To cancel repeat playback touch until appears NOTE Operation and screens...

Страница 130: ...ayback 1 Touch 2 Touch or Display the disc menu screen Display the top menu Display the title menu currently being played 3 Touch the menu you want to view NOTE The recorded menu items vary depending...

Страница 131: ...ation buttons to be displayed and used 1 Touch the screen during playback and then touch 2 Touch 3 Touch or to select the menu View Displays mini disc menu operation keys direction arrows Position Cha...

Страница 132: ...tings 1 Touch 2 Touch or Changing the audio language If the disc contains multiple audio languages you can change between languages 1 Touch Each touch of changes the language NOTE On some discs the au...

Страница 133: ...e If the disc includes multiple angles it is possible to change the angle 1 Touch Each time you touch angle changes to the next angle in the sequence Audio output 1 Touch Whenever is touched the mode...

Страница 134: ...are shown on the left and right edges of the screen Full Image will be enlarged in all directions Zoom Image is enlarged horizontally NOTE Viewing a video on the zoom screen for personal enjoyment is...

Страница 135: ...icture quality Brightness To reduce the brightness slide to the left To increase the brightness slide to the right Contrast To reduce the contrast slide to the left To increase the contrast slide to t...

Страница 136: ...display and set the parental screening level 1 Touch 2 Touch the button to configure the following settings Audio Language Change the audio language See page 5 29 Subtitle Language Change the subtitl...

Страница 137: ...e selected language is not on the disc the playback is performed in the language specified in the disc Selecting the subtitle language 1 Touch language for Subtitle Language 2 Touch the desired langua...

Страница 138: ...age is not included on the disc the video will be played using a language specified on the disc Setting the TV Aspect 1 Touch TV Aspect 2 Touch the desired screen output 16 9 Ordinary wide screen imag...

Страница 139: ...There are eight different levels of viewing restriction 1 Touch Parental Setting 2 Enter your 4 digit passcode on the code entry screen If the code number is not entered Please input parental code app...

Страница 140: ...t playing general and adult themed DVD software Levels 2 to 7 Play only the general and children s DVD software Prohibit playing adult themed DVD software Level 8 Play all DVD software Default Playing...

Страница 141: ...e and park in a safe location 8 4 5 7 3 6 2 1 10 9 1 Track up down and fast forward fast reverse buttons 2 Return button 3 Play Pause button 4 Stop button 5 Speed control button 6 Repeat button 7 Sear...

Страница 142: ...udio menu screen touch The playback starts Touch the video image to enter full screen mode To display the operation button touch button again touch the screen Fast forwarding and fast reversing 1 Touc...

Страница 143: ...revious track or Advance to the next track Search using the touch function 1 Touch 2 Touch Track Time or 123 Track Search by track number Time Search by playback length 123 Search by menu number the n...

Страница 144: ...This begins playback from a specific point on the disc Audio output 1 Touch Whenever is touched the mode is switched in the following order Lch output main audio Rch output supplementary audio Lch out...

Страница 145: ...ize 1 Touch Whenever is touched the mode is switched in the following order Normal Black strips are shown on the left and right edges of the screen Full Image will be enlarged in all directions Zoom I...

Страница 146: ...is iPod do not disconnect the iPod Doing so may damage the data in the iPod NOTE iPod and iTunes may be used with materials without copyright or materials for which copying or playback are permitted...

Страница 147: ...r in the sound output when connected via an iPod connection cable Unknown is displayed if track name album title or artist name cannot be acquired when connected to an iPod is displayed for characters...

Страница 148: ...playback 1 Touch To resume playback touch Fast forwarding and fast reversing 1 Touch for more than 0 5 seconds or press and hold or Fast reverse or Fast forward NOTE Fast forward or fast reverse oper...

Страница 149: ...limit Touch the buttons to scroll the display Swipe the screen up or down Scroll the list Repeat playback 1 Touch Whenever is touched the mode is switched in the following order Repeat all files on th...

Страница 150: ...later iPhone 6S iOS 7 0 0 or later iPhone 6 Plus iOS 7 0 0 or later iPhone 6S Plus iOS 7 0 0 or later iPhone 7 iOS 7 0 0 or later iPhone 7 Plus iOS 7 0 0 or later iPhone 8 iOS 7 0 0 or later iPhone 8...

Страница 151: ...y moving objects in factory production lines and other locations license required special low output wireless stations no license required and amateur radios license required The 3 types of wireless s...

Страница 152: ...es Specification Bluetooth Specification Ver 4 0 EDR Profile A2DP Advanced Audio Distribution Profile Ver 1 3 AVRCP Audio Video Remote Control Profile Ver 1 6 Certain features and displays may not be...

Страница 153: ...er depending on your device or applications Pausing playback 1 Touch To resume playback touch Selecting a track 1 Touch or press or Touch once will return to the start of the current track Touching tw...

Страница 154: ...splay Swipe the screen up or down Scroll the list Repeat playback 1 Touch Whenever is touched the mode is switched in the following order Repeats the current track Repeats all tracks on the current al...

Страница 155: ...vehicle in a safe place and apply the parking brake VTR screen 2 1 AUX Auxiliary screen 1 Wide mode button 2 Audio settings button NOTE You need to buy a connection cable to connect your portable audi...

Страница 156: ...e operation button touch button again touch the screen Changing the image size 1 Touch Whenever is touched the mode is switched in the following order Normal Black strips are shown on the left and rig...

Страница 157: ...6 About Bluetooth Handsfree 6 2 Connected Menu 6 5 Making a Call 6 6 Receiving a Call 6 10 Operations During a Call 6 10 Editing to Set the Bluetooth Handsfree 6 13 HANDSFREE...

Страница 158: ...leave your mobile phone in the vehicle High temperatures inside the vehicle may damage the phone When disposing of the vehicle be sure to erase all personal data stored on this unit See page 3 9 Phon...

Страница 159: ...when the vehicle is in motion Bluetooth handsfree performance can be influenced by mobile phone network handset and driving conditions About the Display 3 2 1 1 Reception level indicator 2 Bluetooth...

Страница 160: ...icon may be greyed out or Bluetooth connection may not be possible When the mobile phone is hidden from the display when the mobile phone is behind or under a seat or in the glove box or console box W...

Страница 161: ...6 5 HANDSFREE Connected Menu Displaying the Phone NOTE In this chapter Phone will be referred to handsfree Models with NAVI Models without NAVI 1 2 Display the handsfree screen...

Страница 162: ...ouch Dial 2 Enter the telephone number on the handsfree screen You can enter telephone numbers of up to 32 digits Touch to delete 1 digit from the entered number Touch and hold for more than 1 second...

Страница 163: ...reen up or down Scroll the phone book list Transfer Transfer the phone book in the mobile phone to the unit See page 6 14 If 2 or more telephone numbers are saved for the selected person name or telep...

Страница 164: ...ndsfree screen touch History 2 Select from the All Missed Outgoing Incoming tabs All Shows an overview of information from the Missed Outgoing and Incoming tabs Missed Call from missed calls Outgoing...

Страница 165: ...deleted and the most recent items are saved Touch and hold the number displayed for more than 1 second to store in speed dial See page 6 15 Calling from Speed Dial 1 On the handsfree screen touch Spe...

Страница 166: ...ceiving calls during navigation Operations During a Call During a call the outgoing call or incoming call talking screen is displayed and you can perform the following operations Adjusting call volume...

Страница 167: ...e for calls Operating from the unit 1 Touch Touch to switch to handsfree call Operating from the mobile phone You can transfer calls while making and receiving a call talking and placing a call on hol...

Страница 168: ...ll while holding the current call on the talking screen 1 Touch on the talking screen if the phone rings Touch to end call waiting Ending call waiting will connect the call on hold and enable you to c...

Страница 169: ...ed it may not be displayed correctly Normally items set to secret cannot be read Although it may be possible depending on the specifications of the mobile phone Group names saved in the mobile phone a...

Страница 170: ...r the telephone numbers phone book data saved in the mobile phone to the unit In the phone book of this unit you can save up to 1 000 persons and up to 5 telephone numbers for each person 1 On the han...

Страница 171: ...story A maximum of nine phone numbers can be stored on each mobile phone registered on this device Registering from the phone book 1 On the phone book screen touch the desired item 2 Touch and hold th...

Страница 172: ...r more than 1 second 2 Touch the desired number in the speed dial list 1 9 3 Touch OK Registering from the speed dial list 1 Touch Speed Dial 2 Touch the desired empty number 1 9 on the speed dial lis...

Страница 173: ...6 17 HANDSFREE Deleting Speed Dial 1 Touch and hold the number for deletion 1 9 on the speed dial list screen for more than 1 second 2 Touch OK...

Страница 174: ...6 18 HANDSFREE...

Страница 175: ...7 Before Using Application 7 2 Connected Menu 7 5 Apple CarPlay 7 6 Android Auto 7 10 MirrorLink 7 12 Miracast 7 14 APPS...

Страница 176: ...certain functions are not available while driving for reasons of safety In order to maximize signal reception performance and precision of the smartphone please ensure the smartphone is placed as clo...

Страница 177: ...e Apple CarPlay on page 7 6 for details on Apple CarPlay operation About App based Connected Content Requirements for using the connected content services of the application on this unit The latest ve...

Страница 178: ...ce by its provider Since some applications use signals from GPS satellites and wireless communication lines they may not work properly in the following locations In tunnels In underground parking lots...

Страница 179: ...tal device or Android smartphone are connected You need to register or setup the unit or smartphones before operating each mode For details on registrations or settings see below Apple CarPlay See Whe...

Страница 180: ...y on this unit s screen depending on the application s specifications Check the Apple CarPlay support website for more information about Apple CarPlay Due to changes to the device s specifications dif...

Страница 181: ...connecting via USB for the first time a message appears on the screen when you connect your iPhone to the unit via USB Please touch Yes 1 Open the protective cover on the USB AUX terminal 2 Connect yo...

Страница 182: ...turn the Wi Fi toggle switch to on Connect to an iPhone from this unit 1 On the System settings screen touch Search Apple CarPlay Device 2 Touch the iPhone you would like to connect to Once connected...

Страница 183: ...e System settings screen touch Selecting from Apple CarPlay Device 2 On your iPhone go to Settings Bluetooth and select CAR AUDIO 3 The Apple CarPlay screen appears If another screen is displayed touc...

Страница 184: ...es a Bluetooth connection when connected NOTE Android smartphone applications may not display on this unit s screen depending on the application s specifications Due to changes to the device s specifi...

Страница 185: ...ne to the USB terminal 3 Touch the button on the connected menu screen 4 The CAUTION screen is only display the first time connection on the screen Read the caution carefully and touch I agree 5 The A...

Страница 186: ...information about MirrorLink You must turn the MirrorLink setting on in the system settings before using MirrorLink See page 3 7 NOTE Android smartphone applications may not display on this unit s scr...

Страница 187: ...1 Open the protective cover on the USB AUX terminal 2 Connect your Android smartphone to the USB terminal 3 Touch the button on the connected menu screen 4 The CAUTION screen is displayed on the scre...

Страница 188: ...smartphone while driving Stop your vehicle in a safe place before setting up your Android smartphone or performing other tasks NOTE Miracast features are not available on all Android smartphones Due...

Страница 189: ...Miracast application to on NOTE For the Miracast settings see Miracast on off on page 3 29 For information on how to use your Android smartphone please refer to the user manual for your Android smartp...

Страница 190: ...7 16 APPS...

Страница 191: ...8 About the Speech Recognition System 8 2 Speech Recognition System Operation 8 3 SPEECH RECOGNITION SYSTEM Models with NAVI...

Страница 192: ...commands cannot be recognized Keep all windows closed while using the system Noise such as wind or other background noise may interfere with correct recognitions It may also occur if the air condition...

Страница 193: ...Touch The language setting screen appears Touch the desired language on the list Touch A list of available commands will be displayed on the screen 2 Speak a speech command Speak a speech command with...

Страница 194: ...ech command list for the speech recognition system OOO For commands in the list that contain placeholder words in speak the desired number title or name where they appear Main commands Command Functio...

Страница 195: ...as the destination Find the nearby facility name Displays the route to nearby facility Show the whole route Displays the whole route Show destination Displays the destination screen Find the Postal c...

Страница 196: ...spoken contact name and phone type of the contact from the phonebook Call phone number Places a call to spoken phone number List recent calls Display the recent calls list List missed calls Display th...

Страница 197: ...9 Steering Wheel Buttons Operation 9 2 STEERING WHEEL BUTTONS...

Страница 198: ...ume continuously Phone mode Press this button to adjust the ringtone volume while a call is being received Press this button to adjust the call volume while making or during a call MODE Button 1 To op...

Страница 199: ...up or seek down Disc CD VCD iPod and Bluetooth audio mode Press this button to navigate track up or track down Press and hold this button to start fast forward or fast reverse Disc MP3 WMA AAC and US...

Страница 200: ...with NAVI 1 Press this button to activate speech recognition mode For details on the speech recognition system functions see Speech Recognition System Operation on page 8 3 Press and hold this button...

Страница 201: ...10 Rear Camera Operation 10 2 REAR CAMERA...

Страница 202: ...to directly spray on or around the camera The very high water pressure from this type of cleaning equipment may cause serious damage to the rear camera Do not subject the camera to a strong impact fo...

Страница 203: ...camera lens If the temperature changes rapidly such as after spilling hot water on the camera in cold weather the rear camera may not operate correctly When you shift into reverse gear the screen turn...

Страница 204: ...the ends of or under the bumper will not be displayed Colors displayed in the rearward image may be different from the actual colors It may be difficult to see the screen in the following cases but th...

Страница 205: ...11 If the Following Messages Appear 11 2 When You Think There is a Malfunction 11 3 Media 11 5 Copyright and Trademarks 11 20 Open Source License Information 11 22 Specifications 11 23 REFERENCE...

Страница 206: ...er waiting a long time contact your MAZDA dealer Communication Error Please reboot the system There is communication error to another unit Turn the engine switch turned Off and On If the message conti...

Страница 207: ...ain when the handsfree mode is turned off Sound comes out of only one side left or right front or rear The sound balance is not adjusted appropriately Check the balance and fader adjustments Sound qua...

Страница 208: ...on cable is not connected correctly Check the cable is correctly connected to the terminal Unable to connect to the Bluetooth audio device The audio device is not registered correctly Delete the regis...

Страница 209: ...e high power stations If a vehicle is moving away from the station transmitter the radio signal will tend to fade and drift This is a common condition with FM and is accompanied by distortion Fading a...

Страница 210: ...deterioration due to long exposure to the environment inside the vehicle CD R RW which are not finalized or saved in the UDF format cannot be played excluding MP3 WMA AAC DVD R RW may not be able to p...

Страница 211: ...y cause skipping or sticking and warped discs may become stuck in the unit When the disc becomes dirty wipe it gently with a soft lint free cloth from centre to the edge To remove fingerprints or othe...

Страница 212: ...d No playback problems due to the protector ring coming off in the product When removing an ejected disc pull it straight out of the slot Pressing downwards may scratch the recorded surface of the dis...

Страница 213: ...6 112 128 144 160 kbps 20 320 kbps 8 384 kbps Sampling frequency MPEG1 Layer3 32 44 1 48 kHz MPEG2 Layer3 16 22 05 24 kHz MPEG2 5 8 11 025 12 kHz 32 44 1 48 kHz 8 11 025 12 16 22 05 24 32 44 1 48 kHz...

Страница 214: ...wing formats File formats ISO9660 Level 1 or Level 2 Romeo Joliet UDF2 01 If MP3 WMA AAC files are recorded in a format other than those described above the files may not be played normally or file na...

Страница 215: ...closed lead out or the disc is finalized Each session must also be saved in the same format MP3 WMA AAC playback When you load a disc containing MP3 WMA AAC files the unit first checks all files reco...

Страница 216: ...line shopping trial listening and free download sites You can download music files from these sites by following their payment and other rules Converting a music CD into MP3 WMA AAC files Prepare a co...

Страница 217: ...connection method is ON We recommend making a backup of your data in case you accidentally delete it If the USB flash drive is a non branded product or has been damaged it may not be possible to conne...

Страница 218: ...11 025 12 kHz Ver 9 Std 48 kHz or less Ver 9 Lossless 10 Pro 96 kHz or less 8 11 025 12 16 22 05 24 32 44 1 48 kHz 8 48 kHz VBR Variable Bit Rate O 8 320 kbps O 8 320 kbps Tag information 2 3 Ver 1 0...

Страница 219: ...128 160 192 224 256 320 kbps MPEG2 Layer3 MPEG2 5 8 16 24 32 40 48 56 64 80 96 112 128 144 160 kbps Audio bit rate WMA 8 320 kbps Audio bit rate AAC LC 8 320 kbps Item Specifications File format FLV M...

Страница 220: ...bnormal operation during playback for files with unconformities with data of the MP4 standard and the file may not be available for playback Example files without sound registered and files that could...

Страница 221: ...onditions of Use USB flash drive format Maximum number of directory layers No limit The maximum length for a path including path is 4 096 characters Maximum number of files 19 998 Audio files 9 999 Vi...

Страница 222: ...ys disc contents as intended by the software creator Be sure to read the instruction manual supplied with the disc Region code of playable discs 3 Region code mark is indicated on some DVDs to represe...

Страница 223: ...e played ALL The disc can be played anywhere in the world while a number indicates a region code 3 Southeast Asia Disc configuration The videos and tracks recorded on a DVD are divided into sections A...

Страница 224: ...e and has been certified by the developer to meet Apple performance standards Apple is not responsible for the operation of this device or its compliance with safety and regulatory standards Please no...

Страница 225: ...is protected by certain intellectual property rights of Microsoft Use or distribution of such technology outside of this product is prohibited without a license from Microsoft Microsoft Windows are e...

Страница 226: ...ense Information This unit uses software based on an open source software license See the open source software license for details 1 On the System screen touch About 2 Touch Open Source License Models...

Страница 227: ...current A 2 1 A Bluetooth Version Ver 4 0 EDR Profile HFP Hands Free Profile Ver 1 7 PBAP Phone Book Access Profile Ver 1 2 A2DP Advanced Audio Distribution Profile Ver 1 3 AVRCP Audio Video Remote C...

Страница 228: ...MEMO...

Страница 229: ...MEMO...

Страница 230: ...MEMO...

Страница 231: ...MEMO...

Страница 232: ...MEMO...

Страница 233: ...MEMO...

Страница 234: ...MEMO...

Отзывы: