


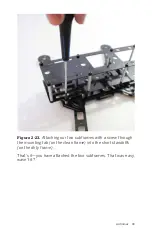


The process is quite simple in theory: mount the prop you need
balanced to a free-spinning axle. This free-spinning axle can be
achieved in a number of different ways. Place a metal rod
through the middle of your prop mounting hole and suspend
that between two magnets, allowing it to spin from an almost
frictionless fulcrum point. This lack of friction allows any heavy
spot on the propeller to gently rotate toward the ground, under
the effects of gravity.
Is the propeller perfectly motionless, or does it want to “lean” in
one direction or the other? Using this technique to identify
heavy spots in the prop, one can either apply additional weight
to the light side, or subtract weight from the heavy side. Keep in
mind that these are typically very small adjustments. Adding
weight might come in the form of a few small clips of Scotch
tape or label stickers, while subtracting weight is usually done
with sandpaper and a bit of patience. When fully balanced, the
propeller should be able to be moved to any position without
one blade or the other leaning toward the ground.
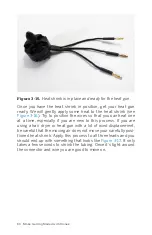
If the thought of building a prop balancer sounds intimidating,
don’t worry. Several companies make balancers of all shapes
and sizes. The model that we use, shown in
, is one
that we have had as long as we have been working with
RC aircraft.
Modern-day propellers come pretty close to perfectly balanced
from the factory, but it’s always a good idea to double-check
them yourself. Usually the better quality the prop is, the more
likely it is to come balanced from the factory. Cheaper props
may save you a little money, but you will have to spend the time
to balance them yourself.
Power Train 45
Содержание Belinda Kilby
Страница 1: ......
Страница 3: ...Make Getting Started with Drones Terry Kilby and Belinda Kilby...
Страница 25: ...Figure 1 5 Basic quadcopter showing how the stick commands would move the craft Introduction 13...
Страница 26: ......
Страница 90: ......
Страница 126: ......
Страница 142: ...Figure 8 7 Mobius camera next to the quick release camera mount 130 Make Getting Started with Drones...
Страница 146: ...Figure 9 4 Firmware upload has begun Figure 9 5 Firmware verification in progress 134 Make Getting Started with Drones...
Страница 153: ...Figure 9 10 Compass setup Figure 9 11 Compass calibration ArduPilot Mega APM Setup 141...
Страница 198: ......


