


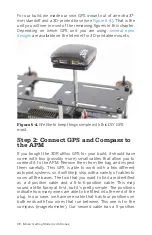


plug on one end and a 6-position plug on the other with five
wires that run between them. That’s right, one of your plugs will
have an empty spot in the plug; this is normal, so do not be
alarmed. We will get into why that is the case later, but for now,
have a look at the cables we will be using in
. If you did
not get these cables with your compass, tell your vendor imme-
diately, especially if you bought the APM and GPS together from
the same store!
Figure 5-5.
Make sure that you have the right cables for the job.
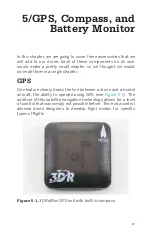
Now that we have identified the proper cables, let’s take a look
at the GPS unit itself. There is not much to it; it’s a small black
square with two ports on the left side labeled GPS and MAG.
Upon closer examination you will notice that the GPS port has
six small pins inside it and the MAG port has four. Is this starting
GPS, Compass, and Battery Monitor 99
Содержание Belinda Kilby
Страница 1: ......
Страница 3: ...Make Getting Started with Drones Terry Kilby and Belinda Kilby...
Страница 25: ...Figure 1 5 Basic quadcopter showing how the stick commands would move the craft Introduction 13...
Страница 26: ......
Страница 90: ......
Страница 126: ......
Страница 142: ...Figure 8 7 Mobius camera next to the quick release camera mount 130 Make Getting Started with Drones...
Страница 146: ...Figure 9 4 Firmware upload has begun Figure 9 5 Firmware verification in progress 134 Make Getting Started with Drones...
Страница 153: ...Figure 9 10 Compass setup Figure 9 11 Compass calibration ArduPilot Mega APM Setup 141...
Страница 198: ......


