background image

User Manual of Digital Video Recorder 


110 


Reconnect device. 


Check for compatibility from vendor.


Figure 7. 28


USB Flash Drive Management


Management of USB writers and DVD-R/W 

1.


Enter Search Result interface of record files. 

Menu>Export>Normal 
Set search condition and click 

Search 

button to enter Search Result interface. 

Note:


At least one channel shall be selected.


Figure 7. 29


Normal Video Search for Backup


2.


Select record files you want to back up. 

Click

 Export

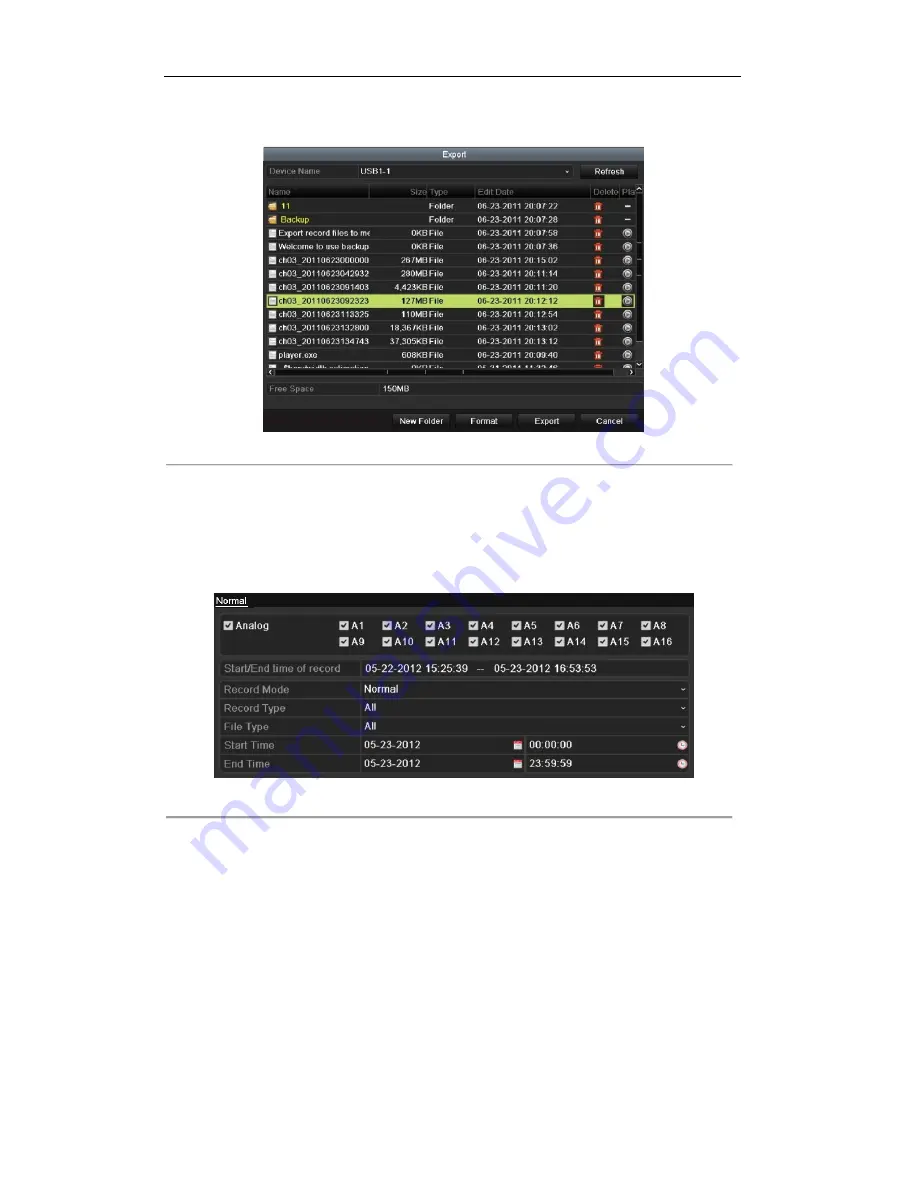
 button to enter Export interface. 

Note:


At least one record file shall be selected.


©2015 LT Security, Inc. All Rights Reserved. White papers, data sheets, quick start guides, and/or user manuals 

are for reference only and may or may not be entirely up to date or accurate based upon the version or models. 

Product names mentioned herein may be the unregistered and/or registered trademarks of their respective owners. 

Содержание FA16CH

Страница 1: ...ll Rights Reserved White papers data sheets quick start guides and or user manuals are for reference only and may or may not be entirely up to date or accurate based upon the version or models Product names mentioned herein may be the unregistered and or registered trademarks of their respective owners ...

Страница 2: ...arked with CE and comply therefore with the applicable harmonized European standards listed under the Low Voltage Directive 2006 95 EC the EMC Directive 2004 108 EC the RoHS Directive 2011 65 EU 2012 19 EU WEEE directive Products marked with this symbol cannot be disposed of as unsorted municipal waste in the European Union For proper recycling return this product to your local supplier upon the p...

Страница 3: ... the DVR in conjunction with an UPS if possible Power down the unit before connecting and disconnecting accessories and peripherals A factory recommended HDD should be used for this device Improper use or replacement of the battery may result in hazard of explosion Replace with the same or equivalent type only Dispose of used batteries according to the instructions provided by the battery manufact...

Страница 4: ...LLC with the use right of the HDMI technology VGA is the trademark of IBM UPnPTM is a certification mark of the UPnPTM Implementers Corporation Other names of companies and product contained in this manual may be trademarks or registered trademarks of their respective owners 2015 LT Security Inc All Rights Reserved White papers data sheets quick start guides and or user manuals are for reference o...

Страница 5: ...ng table Series Model Type ST Series 4CH 8CH 16CH Network DVR FT Series 4CH 8CH 16CH Network DVR FA Series 4CH 8CH 16CH 24CH 32CH Network DVR 2015 LT Security Inc All Rights Reserved White papers data sheets quick start guides and or user manuals are for reference only and may or may not be entirely up to date or accurate based upon the version or models Product names mentioned herein may be the u...

Страница 6: ...preset patrol and pattern Zooming in out by clicking the mouse and PTZ tracing by dragging mouse HDD Management 4 8CH FT ST series up to 2 SATA hard disks can be connected for 16CH ST and 24 32CH FA series 4 SATA hard disks and 1 eSATA disk can be connected and for other series 8 SATA hard disks and 1 eSATA disk can be connected Each disk with a maximum of 4TB storage capacity 8 network disks 8 NA...

Страница 7: ...re when system is abnormal Other Local Functions Manual and automatic video quality diagnostics Users can operate by mouse and remote control Three level user management admin user can create many operating account and define their operating permission which includes the permission to access any channel Completeness of operation alarm exceptions and log writing and searching Manually triggering an...

Страница 8: ...t to the remote host Remotely start stop recording Remotely start stop alarm output Remote PTZ control Remote JPEG capture Two way audio and voice broadcasting Embedded WEB server Development Scalability SDK for Windows and Linux system Source code of application software for demo Development support and training for application system 2015 LT Security Inc All Rights Reserved White papers data she...

Страница 9: ...ting Toolbar in Live View Mode 40 3 3 Channel zero Encoding 42 3 4 Adjusting Live View Settings 43 3 5 Manual Video Quality Diagnostics 44 3 6 User Logout 45 Chapter 4 PTZ Controls 46 4 1 Configuring PTZ Settings 47 4 2 Setting PTZ Presets Patrols Patterns 48 4 2 1 Customizing Presets 48 4 2 2 Calling Presets 48 4 2 3 Customizing Patrols 49 4 2 4 Calling Patrols 50 4 2 5 Customizing Patterns 51 4 ...

Страница 10: ...d Files 96 7 1 1 Backing up by Normal Video Search 96 7 1 2 Backing up by Event Search 101 7 1 3 Backing up Video Clips 103 7 1 4 Backing up POS 106 7 2 Managing Backup Devices 109 Chapter 8 Alarm Settings 112 8 1 Setting Motion Detection 113 8 2 Setting Sensor Alarms 115 8 3 Detecting Video Loss 118 8 4 Detecting Video Tampering 120 8 5 Setting All day Video Quality Diagnostics 122 8 6 Handling E...

Страница 11: ...ngs 163 11 1 Configuring OSD Settings 164 11 2 Configuring Privacy Mask 165 11 3 Configuring Video Parameters 166 Chapter 12 DVR Management and Maintenance 167 12 1 Viewing System Information 168 12 1 1 Viewing Device Information 168 12 1 2 Viewing Camera Information 168 12 1 3 Viewing Record Information 168 12 1 4 Viewing Alarm Information 169 12 1 5 Viewing Network Information 169 12 1 6 Viewing...

Страница 12: ...3 Editing a User 184 13 6 Logging out Shutting down Rebooting Device 186 Appendix 187 Glossary 188 Troubleshooting 189 List of Compatible IP Cameras 192 2015 LT Security Inc All Rights Reserved White papers data sheets quick start guides and or user manuals are for reference only and may or may not be entirely up to date or accurate based upon the version or models Product names mentioned herein m...

Страница 13: ...s Reserved White papers data sheets quick start guides and or user manuals are for reference only and may or may not be entirely up to date or accurate based upon the version or models Product names mentioned herein may be the unregistered and or registered trademarks of their respective owners ...

Страница 14: ...TX RX indicator flickers green when network connection is functioning normally 2 USB Interfaces Universal Serial Bus USB ports for additional devices such as USB mouse and USB Hard Disk Drive HDD 3 Composite Keys 1 MENU Enter numeral 1 Access the main menu interface 2 ABC F1 Enter numeral 2 Enter letters ABC The F1 button when used in a list field will select all items in the list In PTZ Control m...

Страница 15: ...light is red 5 Control Buttons Directional buttons In menu mode the direction buttons are used to navigate between different fields and items and select setting parameters In playback mode the Up and Down buttons are used to speed up and slow down record playing and the Left and Right buttons are used to move the recording 30s forwards or backwards In the image setting interface the up and down bu...

Страница 16: ... is detected HDD HDD indicator blinks in red when data is being read from or written to HDD Tx Rx Tx Rx indictor blinks in green when network connection is functioning properly 2 DVD R W Slot for DVD R W 3 Composite Keys SHIFT Switch between the numeric or letter input and functions of the composite keys Input letter or numbers when the light is out Realize functions when the light is red 1 MENU E...

Страница 17: ...de these buttons can be used to cycle through channels In PTZ control mode it can control the movement of the PTZ camera ENTER The ENTER button is used to confirm selection in any of the menu modes It can also be used to tick checkbox fields In Playback mode it can be used to play or pause the video In single frame Playback mode pressing the button will advance the video by a single frame In Auto ...

Страница 18: ...bles Remote Control 3 Alphanumeric Buttons Same as Alphanumeric buttons on front panel 4 EDIT Button Same as EDIT IRIS button on front panel 5 A Button Same as A FOCUS button on front panel 6 REC Button Same as REC SHOT button on front panel 7 PLAY Button Same as the PLAY AUTO button on front panel 8 INFO Button Same as the ZOOM button on front panel 2015 LT Security Inc All Rights Reserved White ...

Страница 19: ...roubleshoot Steps 1 Go into Menu Settings General More Settings by operating the front control panel or the mouse 2 Check and remember DVR ID The default ID is 255 This ID is valid for all IR remote controls 3 Press the DEV button on the remote control 4 Enter the DVR ID in step 2 5 Press the ENTER button on the remote If the Status indicator on the front panel turns blue the remote control is ope...

Страница 20: ...l and show the quick set menu Menu Select and enter Double Click Live view Switch between single screen and multi screen Click and Drag PTZ control Wheeling Privacy mask and motion detection Select target area Digital zoom in Drag and select target area Live view Drag channel time bar Right Click Single Click Live view Show menu Menu Exit current menu to upper level menu Scroll Wheel Scrolling up ...

Страница 21: ...cription English Capital English Numbers Symbols Lowercase Uppercase Backspace Space Enter Exit 2015 LT Security Inc All Rights Reserved White papers data sheets quick start guides and or user manuals are for reference only and may or may not be entirely up to date or accurate based upon the version or models Product names mentioned herein may be the unregistered and or registered trademarks of th...

Страница 22: ...l Bus USB port for additional devices 7 Network Interface Connector for network 8 RS 485 Interface Connector for RS 485 devices 9 Power Supply DC 12V power supply 10 Power Switch Switch for turning on off the device 11 GND Ground Figure 1 7 4 8 16CH FA Series 2015 LT Security Inc All Rights Reserved White papers data sheets quick start guides and or user manuals are for reference only and may or m...

Страница 23: ...u 8 Network Interface Connector for network 9 RS 485 Interface Connector for RS 485 devices 10 Power Supply DC 12V power supply 11 Alarm Alarm in and alarm out 12 Power Switch Switch for turning on off the device 13 GND Ground Figure 1 9 16ch ST Series Figure 1 10 24 32ch FA Series Table 1 8 Description of Front Panel 2015 LT Security Inc All Rights Reserved White papers data sheets quick start gu...

Страница 24: ...cts to Ta Tb pin of controller For cascading devices the first DVR s D D pin should be connected with the D D pin of the next DVR Connector for alarm input Connector for alarm output 10 Power Supply AC 100 240V power supply 11 Power Switch Switch for turning on off the device 12 GND Ground 13 LINE IN BNC connector for audio input 14 eSATA Connects external SATA HDD CD DVD RW 15 RS 232 Interface Co...

Страница 25: ...hts Reserved White papers data sheets quick start guides and or user manuals are for reference only and may or may not be entirely up to date or accurate based upon the version or models Product names mentioned herein may be the unregistered and or registered trademarks of their respective owners ...

Страница 26: ...n Shutting down the DVR Steps There are two proper ways to shut down the DVR To shut down the DVR OPTION 1 Standard shutdown 1 Enter the Shutdown menu Menu Shutdown Figure 2 1 Shutdown Menu 2 Select the Shutdown button 3 Click the Yes button 4 Turn off the power switch on the rear panel when the note appears for FT series Figure 2 2 Shutdown Tips OPTION 2 By operating the front panel for ST series...

Страница 27: ...tdown menu Figure 2 1 you can also reboot the DVR Steps 1 Enter the Shutdown menu by clicking Menu Shutdown 2 Click the Logout button to log out or the Reboot button to reboot the DVR 2015 LT Security Inc All Rights Reserved White papers data sheets quick start guides and or user manuals are for reference only and may or may not be entirely up to date or accurate based upon the version or models P...

Страница 28: ...shown in Figure 2 4 Figure 2 4 Login Window 3 Enter the admin password By default the password is 12345 You are highly recommended to change the default password right after the first login to avoid safety problem 4 To change the admin password check the New Admin Password checkbox Enter the new password and confirm the password in the given fields 5 Click the Next button to enter the date and tim...

Страница 29: ...ich will take you to the Advanced Network Setup Wizard window as shown in Figure 2 7 Figure 2 7 Advanced Network Configuration 8 Set the parameters of port No ezviz Cloud Auto UPnP or DDNS if required 2015 LT Security Inc All Rights Reserved White papers data sheets quick start guides and or user manuals are for reference only and may or may not be entirely up to date or accurate based upon the ve...

Страница 30: ...ton to enter the Record Settings window as shown in Figure 2 9 Figure 2 9 Record Settings 12 Click Copy to copy the recording setting to other cameras 13 Click OK to save the settings and exit the wizard 2015 LT Security Inc All Rights Reserved White papers data sheets quick start guides and or user manuals are for reference only and may or may not be entirely up to date or accurate based upon the...

Страница 31: ... Camera in the pop up menu to enter the IP Camera Management interface Figure 2 10 Adding IP Camera Interface 3 The online cameras with same network segment will be displayed in the camera list Click the button to add the camera Or you can click the Add All button to add all the detected online IP cameras Table 2 1 Explanation of the icons Icon Explanation Icon Explanation Edit basic parameters of...

Страница 32: ...ick Add to add the camera OPTION 2 Steps 1 Enter the Camera Management interface Menu Camera Camera Figure 2 12 Main Menu 2 Repeat the step 3 and 4 of OPTION 1 to add the camera 2015 LT Security Inc All Rights Reserved White papers data sheets quick start guides and or user manuals are for reference only and may or may not be entirely up to date or accurate based upon the version or models Product...

Страница 33: ...ly check the checkbox of Channel No in the pop up window as shown in the following figure and click OK to finish adding Figure 2 14 Selecting Multiple Channels 2 3 2 Editing the Connected IP Cameras and Configuring Customized Protocols After the adding of the IP cameras the basic information of the camera lists in the page you can configure the basic setting of the IP cameras Steps 2015 LT Securit...

Страница 34: ...and exit the editing interface To edit advanced parameters Steps 1 Drag the horizontal scroll bar to the right side and click the icon Figure 2 16 Network Configuration of the Camera 2 You can edit the network information and the password of the camera 2015 LT Security Inc All Rights Reserved White papers data sheets quick start guides and or user manuals are for reference only and may or may not ...

Страница 35: ...xit the interface 2015 LT Security Inc All Rights Reserved White papers data sheets quick start guides and or user manuals are for reference only and may or may not be entirely up to date or accurate based upon the version or models Product names mentioned herein may be the unregistered and or registered trademarks of their respective owners ...

Страница 36: ... Reserved White papers data sheets quick start guides and or user manuals are for reference only and may or may not be entirely up to date or accurate based upon the version or models Product names mentioned herein may be the unregistered and or registered trademarks of their respective owners ...

Страница 37: ...of the record and alarm in the channel so that you can know whether the channel is recorded or whether there are alarms occur as soon as possible Table 3 1 Description of Live View Icons Icons Description Alarm video loss tampering motion detection or sensor alarm Record manual record schedule record motion detection or alarm triggered record Alarm Record 2015 LT Security Inc All Rights Reserved W...

Страница 38: ...le 3 2 Priorities of Interfaces HDMI VGA CVBS Main output Auxiliary output 1 HDMI VGA 2 HDMI CVBS 3 VGA CVBS 4 CVBS means the interface is in use means the interface is out of use or the connection is invalid And the HDMI VGA and CVBScan be used at the same time When the aux output is enabled the main output cannot do any operation and you can do some basic operation on the live view mode for the ...

Страница 39: ...3 Using an Auxiliary Monitor Certain features of the Live View are also available while in an Aux monitor These features include Single Screen Switch to a full screen display of the selected camera Camera can be selected from a dropdown list Multi screen Switch between different display layout options Layout options can be selected from a dropdown list Previous Screen When displaying less than the...

Страница 40: ...tput 3 2 5 Quick Setting Toolbar in Live View Mode On the screen of each channel there is a quick setting toolbar which shows when you point the mouse to the bottom of the screen Figure 3 2 Quick Setting Toolbar Table 3 5 Description of Quick Setting Toolbar Icons Icons Description Icons Description Icons Description Enable Disable Manual Record Instant Playback Mute Audio on PTZ Control Digital Z...

Страница 41: ... 3 4 Image Settings You can adjust the image parameters including brightness contrast saturation hue sharpness and de noising You can also click Default to restore the default settings and click Copy to copy the image settings to other analog cameras Refer to the Chapter 11 3 Configuring Video Parameters for details 2015 LT Security Inc All Rights Reserved White papers data sheets quick start guid...

Страница 42: ...nnel Zero Encoding tab Figure 3 5 Live View Channel Zero Encoding 3 Check the checkbox after Enable Channel Zero Encoding 4 Configure the Frame Rate Max Bitrate Mode and Max Bitrate 5 Click the Apply button to activate the settings After you set the Channel Zero encoding you can get a view in the remote client or web browser of 16 channels in one screen 2015 LT Security Inc All Rights Reserved Whi...

Страница 43: ...in the live view mode Event Output Designates the output to show event video if available you can select a different video output interface from the Video Output Interface when an event occurs Full Screen Monitoring Dwell Time The time in seconds to show alarm event screen 2 Set the camera order 1 Select View tab Figure 3 7 Live View Camera Order 2 Click a window to select it and then double click...

Страница 44: ...e and the results will be displayed on a list You can view the video status and diagnostics time of the selected channels Figure 3 9 Diagnostics Result Note Connect the camera to the device for the video quality diagnostics Three exception types can be diagnosed Blurred Image Abnormal Brightness and Color Cast 2015 LT Security Inc All Rights Reserved White papers data sheets quick start guides and...

Страница 45: ...n 2 Click Logout Note After you have logged out the system menu operation on the screen is invalid It is required a user name and password to login the system 2015 LT Security Inc All Rights Reserved White papers data sheets quick start guides and or user manuals are for reference only and may or may not be entirely up to date or accurate based upon the version or models Product names mentioned he...

Страница 46: ...s Reserved White papers data sheets quick start guides and or user manuals are for reference only and may or may not be entirely up to date or accurate based upon the version or models Product names mentioned herein may be the unregistered and or registered trademarks of their respective owners ...

Страница 47: ...ck the RS 485 Settings button to set the RS 485 parameters Figure 4 2 PTZ General 4 Enter the parameters of the PTZ camera Note All the parameters should be exactly the same as the PTZ camera parameters 5 Click Apply button to save the settings 2015 LT Security Inc All Rights Reserved White papers data sheets quick start guides and or user manuals are for reference only and may or may not be entir...

Страница 48: ...3 Enter the preset No 1 255 in the preset text field and click the Set button to link the location to the preset Repeat the steps2 3 to save more presets You can click the Clear button to clear the location information of the preset or click the Clear All button to clear the location information of all the presets 4 2 2 Calling Presets Purpose This feature enables the camera to point to a specifie...

Страница 49: ...button to call it 4 2 3 Customizing Patrols Purpose Patrols can be set to move the PTZ to different key points and have it stay there for a set duration before moving on to the next key point The key points are corresponding to the presets The presets can be set following the steps above in Customizing Presets Steps 1 Enter the PTZ Control interface Menu Camera PTZ Figure 4 5 PTZ Settings 2015 LT ...

Страница 50: ...ted patrol or click the Clear All button to delete all the key pints for all patrols 4 2 4 Calling Patrols Purpose Calling a patrol makes the PTZ to move according the predefined patrol path Steps 1 Click the button PTZ in the lower right corner of the PTZ setting interface Or press the PTZ button on the front panel or click the PTZ Control icon in the quick setting bar or select the PTZ option in...

Страница 51: ...terns Purpose Follow the procedure to move the PTZ camera according to the predefined patterns Steps 1 Click the button PTZ in the lower right corner of the PTZ setting interface Or press the PTZ button on the front panel or click the PTZ Control icon in the quick setting bar or select the PTZ option in the right click menu to show the PTZ control panel 2 Click the button to show the general setti...

Страница 52: ...o the location where you want to set the limit and click the Left Limit or Right Limit button to link the location to the corresponding limit Note The speed dome starts linear scan from the left limit to the right limit and you must set the left limit on the left side of the right limit as well the angle from the left limit to the right limit should be no more than 180º 2015 LT Security Inc All Ri...

Страница 53: ...ome needs to reboot to make settings take effect 4 2 9 One touch Park Purpose For some certain model of the speed dome it can be configured to start a predefined park action scan preset patrol and etc automatically after a period of inactivity park time Steps 1 Click the button PTZ in the lower right corner of the PTZ setting interface Or press the PTZ button on the front panel or click the PTZ Co...

Страница 54: ...trol 1 path after the park time Park Preset 1 The dome moves to the predefined preset 1 location after the park time Note The park time can only be set through the speed dome configuration interface by default the value is 5s 4 Click the button again to inactivate it 2015 LT Security Inc All Rights Reserved White papers data sheets quick start guides and or user manuals are for reference only and ...

Страница 55: ...er of the window indicating that this camera is in PTZ control mode Figure 4 13 PTZ Panel Table 4 1 Description of the PTZ panel icons Icon Description Icon Description Icon Description Direction button and the auto cycle button Zoom Focus Iris Zoom Focus Iris The speed of the PTZ movement Light on off Wiper on off 3D Zoom Image Centralization Menu Switch to the PTZ control interface Switch to the...

Страница 56: ...ghts Reserved White papers data sheets quick start guides and or user manuals are for reference only and may or may not be entirely up to date or accurate based upon the version or models Product names mentioned herein may be the unregistered and or registered trademarks of their respective owners ...

Страница 57: ...interface to configure the encoding parameters Menu Record Encoding Figure 5 3 Record Encoding 2 Set the encoding parameters for recording 1 Select the Record tab to configure 2 Select a camera number in the camera dropdown list You can configure the stream type the resolution the video quality and other parameters on demand for Main Stream Continuous and Main Stream Event respectively The Input R...

Страница 58: ... HDD You must configure the redundant HDD in HDD settings For detailed information see Chapter 5 8 Configuring Redundant Recording Record Audio Check the checkbox of Record Audio to record the sound otherwise record the image without sound Video Stream Main stream and sub stream are selectable for recording When you select sub stream you can record for a longer time with the same storage space Ena...

Страница 59: ...tings 5 Optional If the parameters can also be used to other cameras click Copy to copy the settings to other channels 2015 LT Security Inc All Rights Reserved White papers data sheets quick start guides and or user manuals are for reference only and may or may not be entirely up to date or accurate based upon the version or models Product names mentioned herein may be the unregistered and or regi...

Страница 60: ...n list 3 Check the checkbox of Enable Schedule 4 Configure the record schedule Edit the schedule 1 Click Edit 2 In the message box you can choose the day to which you want to set schedule 3 To schedule an all day recording check the checkbox after the All Day item 2015 LT Security Inc All Rights Reserved White papers data sheets quick start guides and or user manuals are for reference only and may...

Страница 61: ...Schedule to Other Days Note The Holiday option is available when you enable holiday schedule in Holiday settings See Chapter 5 7 Configuring Holiday Record 5 Click OK to save setting and back to upper level menu Draw the schedule 1 Click on the color icon to select a record type in the event list on the right side of the interface 2015 LT Security Inc All Rights Reserved White papers data sheets q...

Страница 62: ...nnels If the settings can also be used to other channels click Copy and then choose the channel to which you want to copy Figure 5 12 Copy Schedule to Other Channels 5 Click Apply in the Record Schedule interface to save the settings 2015 LT Security Inc All Rights Reserved White papers data sheets quick start guides and or user manuals are for reference only and may or may not be entirely up to d...

Страница 63: ...on Detection 1 Choose camera you want to configure 2 Check the checkbox after Enable Motion Detection 3 Drag and draw the area for motion detection by mouse If you want to set the motion detection for all the area shot by the camera click Full Screen To clear the motion detection area click Clear Figure 5 14 Motion Detection Mask 4 Click Handling and the message box for channel information pops up...

Страница 64: ...e schedule Please refer to the step 4 of Chapter 5 2 Configuring Record Schedule while you may choose Motion as the record type 2015 LT Security Inc All Rights Reserved White papers data sheets quick start guides and or user manuals are for reference only and may or may not be entirely up to date or accurate based upon the version or models Product names mentioned herein may be the unregistered an...

Страница 65: ... 1 Select Alarm Input number and configure alarm parameters 2 Choose N O normally open or N C normally closed for alarm type 3 Check the checkbox of Setting 4 Click the button Figure 5 18 Alarm Handling 5 Choose the alarm triggered recording channel 2015 LT Security Inc All Rights Reserved White papers data sheets quick start guides and or user manuals are for reference only and may or may not be ...

Страница 66: ... input number Figure 5 19 Copy Alarm Input 3 Configure the schedule Please refer to the step 4 of Chapter 5 2 Configuring Record Schedule while you may choose Alarm as the record type 2015 LT Security Inc All Rights Reserved White papers data sheets quick start guides and or user manuals are for reference only and may or may not be entirely up to date or accurate based upon the version or models P...

Страница 67: ... Edit Schedule POS 3 In the message box you can choose the day to which you want to set schedule 4 Set the Type as POS 5 To schedule an all day recording check the checkbox after the All Day item 2015 LT Security Inc All Rights Reserved White papers data sheets quick start guides and or user manuals are for reference only and may or may not be entirely up to date or accurate based upon the version...

Страница 68: ...k Copy Figure 5 23 Copy Schedule to Other Days 7 Click OK to back to upper level menu If you can to copy the same schedule settings to other camera s click Copy to enter the Copy Camera interface and then select the camera s you want to copy Figure 5 24 Copy Schedule to Other Channels 2015 LT Security Inc All Rights Reserved White papers data sheets quick start guides and or user manuals are for r...

Страница 69: ...us icon of Analog to enable manual record of all channels 3 Disable manual record Click the status icon to change it to Or click the status icon of Analog to disable manual record of all channels Note After rebooting all the manual records enabled are canceled 2015 LT Security Inc All Rights Reserved White papers data sheets quick start guides and or user manuals are for reference only and may or ...

Страница 70: ...nter the Edit interface Figure 5 27 Edit Holiday Settings 2 Check the checkbox of Enable 3 Select Mode from the dropdown list There are three different modes for the date format to configure holiday schedule By Month By Week and By Month are selectable 2015 LT Security Inc All Rights Reserved White papers data sheets quick start guides and or user manuals are for reference only and may or may not ...

Страница 71: ...ed for each day And the time periods cannot be overlapped each other In the time table of the channel both holiday schedule and normal day schedule are displayed Repeat the above step 4 to set Holiday schedule for other channel If the holiday schedule can also be used to other channels click Copy and choose the channel you want to apply the settings 2015 LT Security Inc All Rights Reserved White p...

Страница 72: ... Read Write status Steps 1 Enter HDD Information interface Menu HDD Figure 5 30 HDD General 2 Select the HDD and click to enter the Local HDD Settings interface 1 Set the HDD property to Redundant Figure 5 31 HDD General Editing 2 Click Apply to save the settings 3 Click OK to back to the upper level menu 3 Enter the Record setting interface Menu Record Encoding 1 Select the Record tab 2015 LT Sec...

Страница 73: ...o be used to other channels click Copy and choose the channel you want to apply the settings 2015 LT Security Inc All Rights Reserved White papers data sheets quick start guides and or user manuals are for reference only and may or may not be entirely up to date or accurate based upon the version or models Product names mentioned herein may be the unregistered and or registered trademarks of their...

Страница 74: ...er level menu Repeat the above steps to configure more HDD groups 5 Choose the Channels which you want to save the record files in the HDD group 1 Select Advanced on the left bar Figure 5 34 HDD Advanced 2 Choose Group number in the dropdown list of Record on HDD Group 3 Check the channels you want to save in this group 4 Click Apply to save settings Note After you have configured the HDD groups y...

Страница 75: ...sults Figure 5 36 Export Search Result 5 Protect the record files 1 Find the record files you want to protect and then click the icon which will turn to indicating that the file is locked Note The record files of which the recording is still not completed cannot be locked 2 Click to change it to to unlock the file and the file is not protected 2015 LT Security Inc All Rights Reserved White papers ...

Страница 76: ...ave any files in a Read only HDD If you want to save files in the HDD change the property to R W If there is only one HDD and is set to Read only the DVR cannot record any files Only live view mode is available If you set the HDD to Read only when the DVR is saving files in it then the file will be saved in next R W HDD If there is only one HDD the recording will be stopped 2015 LT Security Inc Al...

Страница 77: ...Reserved White papers data sheets quick start guides and or user manuals are for reference only and may or may not be entirely up to date or accurate based upon the version or models Product names mentioned herein may be the unregistered and or registered trademarks of their respective owners ...

Страница 78: ...ure 6 2 Figure 6 2 Right click Menu under Live View Front Panel press PLAY button to play back record files of the channel under single screen live view mode Under multi screen live view mode the recorded files of the top left channel will be played back Note Pressing numerical buttons will switch playback to the corresponding channels during playback process 2 Playback management The toolbar in t...

Страница 79: ...e 30s forward Speed down Speed up Previous day Next day Scaling up down the time line Full Screen Exit Video type Process bar Video type bar Note The indicates the start time and end time of the record files Represents normal recording manual or schedule represents event recording motion alarm motion alarm motion alarm Playback progress bar use the mouse to click any point of the progress bar to l...

Страница 80: ... that day in the calendar the icon for that day is displayed as Otherwise it is displayed as In the Playback interface The toolbar in the bottom part of Playback interface can be used to control playing process as shown in Figure 6 6 Figure 6 6 Interface of Playback by Time Figure 6 7 Toolbar of Playback by Time 2015 LT Security Inc All Rights Reserved White papers data sheets quick start guides a...

Страница 81: ...arm motion alarm Playback progress bar use the mouse to click any point of the progress bar to locate special frames 6 1 3 Playing Back by Event Search Purpose Play back recording files on one or several channels searched out by restricting event type e g alarm input and motion detection Steps 1 Enter the Playback interface Menu Playback 2 Select the Event in the drop down list on the top left sid...

Страница 82: ...onfigured 6 Optional If multiple channels are triggered recording by the alarm input clicking the button will pop up a synchoronouse playback channel selection window Select channel s you want to play and click the OK button 7 Playback management 2015 LT Security Inc All Rights Reserved White papers data sheets quick start guides and or user manuals are for reference only and may or may not be ent...

Страница 83: ...lay Play Single frame play 30s reverse 30s forward Speed down Speed up Previous day Next day Scaling up down the time line Full Screen Exit Video type Process bar Video type bar Notes represents normal recording manual or schedule represents event recording motion alarm motion alarm motion alarm Playback progress bar use the mouse to click any point of the progress bar to locate special frames 201...

Страница 84: ...tion about searching and playback of the record files Figure 6 12 Interface of Playback by Time Click button to add default tag Click button to add customized tag and input tag name Note Max 64 tags can be added to a single video file 3 Tag management Click button to check edit and delete tag s Figure 6 13 Tag Management Interface Steps 2015 LT Security Inc All Rights Reserved White papers data sh...

Страница 85: ... click the Back button to back to the search interface Note Pre play and post play can be configured Figure 6 15 Interface of Playback by Tag Figure 6 16 Toolbar of Playback by Tag Table 6 4 Detailed Explanation of Playback by tag Toolbar 2015 LT Security Inc All Rights Reserved White papers data sheets quick start guides and or user manuals are for reference only and may or may not be entirely up...

Страница 86: ... the less effective information When you select the smart playback mode the system will analyze the video containing motion or VCA information and mark it with green color on the playback process bar The filtering rule of record files and playback speed for the non related and related video can be configured on your demand Note The playback by smart search is not supported for IP cameras Steps 1 E...

Страница 87: ...otion Detection Click the button and then click and draw the mouse to set the detection area manually You can also click the button to set the full screen as the detection area 5 Click the to search and then the result will be displayed as in the progress bar of the Smart Playback interface Or you can click the button to clear all the set areas 6 Click the button to play 2015 LT Security Inc All R...

Страница 88: ...on Operation Smart search Stop Pause play Play Process bar Scaling up down the time line Video type picture 6 1 6 Playing Back by System Logs Purpose Play back record file s associated with channels after searching system logs Steps 1 Enter Log Information interface Menu Maintenance Log Information 2015 LT Security Inc All Rights Reserved White papers data sheets quick start guides and or user man...

Страница 89: ...record file at the time point of the log the message box No result found will pop up 4 Playback management The toolbar in the bottom part of Playback interface can be used to control playing process 2015 LT Security Inc All Rights Reserved White papers data sheets quick start guides and or user manuals are for reference only and may or may not be entirely up to date or accurate based upon the vers...

Страница 90: ...t side The files are listed in the right side list You can click the button to refresh the file list 3 Select and click the button to play back it Figure 6 22 Interface of External File Playback 2015 LT Security Inc All Rights Reserved White papers data sheets quick start guides and or user manuals are for reference only and may or may not be entirely up to date or accurate based upon the version ...

Страница 91: ...k Interface Alarm Input Figure 6 24 Exact match set Note Match condition can choose Exact match or Approximate match Approximate match you can enter specific keyword in the textbox then it can search all the videos which include the keyword Exact match you can add logical and conditional statement to search the video you want 4 Click to get the search result information listed in the right side pa...

Страница 92: ...ices support 8 ch 16 ch and 16 ch synchronous playback respectively 6 Playback interface The toolbar in the bottom part of Playback interface can be used to control playing process Figure 6 25 Toolbar of Playback by POS Table 6 6 Detailed Explanation of Playback by event Interface Button Operation Button Operation Button Operation Button Operation Audio on Mute Start Stop clipping Add default tag ...

Страница 93: ...he playback screen or press button on the front panel represents playback or adverse playback of one frame 6 2 2 Digital Zoom Steps 1 Click the button on the playback control bar to enter Digital Zoom interface 2 Use the mouse to draw a red rectangle and the image within it will be enlarged up to 16 times Figure 6 26 Draw Area for Digital Zoom 3 Right click the image to exit the digital zoom inter...

Страница 94: ...ple channels and click to select a date on the calendar Figure 6 27 4 ch Synchronous Playback Interface 3 Click to play back the record files reversely 2015 LT Security Inc All Rights Reserved White papers data sheets quick start guides and or user manuals are for reference only and may or may not be entirely up to date or accurate based upon the version or models Product names mentioned herein ma...

Страница 95: ...eserved White papers data sheets quick start guides and or user manuals are for reference only and may or may not be entirely up to date or accurate based upon the version or models Product names mentioned herein may be the unregistered and or registered trademarks of their respective owners ...

Страница 96: ...and Manual The command triggered record is configured by the platform when the device accessed via the platform 2 Two different File types are selectable Unlocked and Locked Figure 7 1 Normal Video Search for Backup 3 Select record files you want to back up Click button to play the record file if you want to check it Check the checkbox before the record files you want to back up Note The size of t...

Страница 97: ...ives or USB HDDs via the device USB writer and DVD R W cannot be formatted Figure 7 3 Export by Normal Video Search using USB Flash Drive 2015 LT Security Inc All Rights Reserved White papers data sheets quick start guides and or user manuals are for reference only and may or may not be entirely up to date or accurate based upon the version or models Product names mentioned herein may be the unreg...

Страница 98: ...e and click button to check it Note The Player player exe will be exported automatically during record file export Figure 7 6 Checkup of Export Result using USB Flash Drive 2015 LT Security Inc All Rights Reserved White papers data sheets quick start guides and or user manuals are for reference only and may or may not be entirely up to date or accurate based upon the version or models Product name...

Страница 99: ...rebooting the device 2 Enter Export interface Menu Export Normal Set search condition and click Search button to enter the search result interface 3 Select record files you want to back up Click button to play the record file if you want to check it Tick record files you want to back up Note The size of the currently selected files is displayed in the lower left corner of the window 2015 LT Securi...

Страница 100: ...ng eSATA HDD Stay in the Exporting interface until all record files are exported with pop up message Export finished 5 Check backup result Choose the record file in Export interface and click button to check it Note The Player player exe will be exported automatically during record file export 2015 LT Security Inc All Rights Reserved White papers data sheets quick start guides and or user manuals ...

Страница 101: ...or Backup 2 Select record files to export 1 Select an alarm input in the list and click to enter Export interface 2 Clicking will take you to the interface with detailed information of all channels triggered by the selected alarm input You can view detailed information of the record file e g start time end time and file size Note The size of the currently selected files is displayed in the lower l...

Страница 102: ...e Figure 7 13 Export by Event Using USB Flash Drive Stay in the Exporting interface until all record files are exported with pop up message Export finished 2015 LT Security Inc All Rights Reserved White papers data sheets quick start guides and or user manuals are for reference only and may or may not be entirely up to date or accurate based upon the version or models Product names mentioned herei...

Страница 103: ... file you want to set video clips Please refer to Chapter 6 1 Playing Back Record Files 2 During playback use buttons and in the playback toolbar to start or stop clipping record file s 3 Quit Playback interface after finishing clipping and you will then be prompted to save the clips Note A maximum of 30 clips can be selected for each channel 2015 LT Security Inc All Rights Reserved White papers d...

Страница 104: ...ted USB device is not recognized Click Reconnect device Check for compatibility from vendor You can also format USB flash drive or USB HDDs via the device 2015 LT Security Inc All Rights Reserved White papers data sheets quick start guides and or user manuals are for reference only and may or may not be entirely up to date or accurate based upon the version or models Product names mentioned herein...

Страница 105: ... player exe will be exported automatically during record file export Figure 7 20 Checkup of Video Clips Export Result Using USB Flash Drive 2015 LT Security Inc All Rights Reserved White papers data sheets quick start guides and or user manuals are for reference only and may or may not be entirely up to date or accurate based upon the version or models Product names mentioned herein may be the unr...

Страница 106: ...POS Search for Backup 6 Select record files to export 3 Select an alarm input in the list and click to enter Export interface 4 Clicking will take you to the interface with detailed information of all channels triggered by the selected alarm input You can view detailed information of the record file e g start time end time and file size Note The size of the currently selected files is displayed in...

Страница 107: ...e Figure 7 23 Export by POS Using USB Flash Drive Stay in the Exporting interface until all record files are exported with pop up message Export finished 2015 LT Security Inc All Rights Reserved White papers data sheets quick start guides and or user manuals are for reference only and may or may not be entirely up to date or accurate based upon the version or models Product names mentioned herein ...

Страница 108: ...e 7 25 Checkup of POS Export Result Using USB Flash Drive 2015 LT Security Inc All Rights Reserved White papers data sheets quick start guides and or user manuals are for reference only and may or may not be entirely up to date or accurate based upon the version or models Product names mentioned herein may be the unregistered and or registered trademarks of their respective owners ...

Страница 109: ...ult of Normal Video Search for Backup 3 Backup device management Click New Folder button if you want to create a new folder in the backup device Select a record file or folder in the backup device and click button if you want to delete it Select a record file in the backup device and click button to play it Click Format button to format the backup device Note If the inserted USB device is not reco...

Страница 110: ...ne channel shall be selected Figure 7 29 Normal Video Search for Backup 2 Select record files you want to back up Click Export button to enter Export interface Note At least one record file shall be selected 2015 LT Security Inc All Rights Reserved White papers data sheets quick start guides and or user manuals are for reference only and may or may not be entirely up to date or accurate based upon...

Страница 111: ...ted USB writer or SATA writer is not recognized Click the Refresh button Reconnect device Check for compatibility from vendor Figure 7 31 USB Writer Management 2015 LT Security Inc All Rights Reserved White papers data sheets quick start guides and or user manuals are for reference only and may or may not be entirely up to date or accurate based upon the version or models Product names mentioned h...

Страница 112: ...hts Reserved White papers data sheets quick start guides and or user manuals are for reference only and may or may not be entirely up to date or accurate based upon the version or models Product names mentioned herein may be the unregistered and or registered trademarks of their respective owners ...

Страница 113: ...itivity bar to set sensitivity Click to set alarm response actions Figure 8 2 Set Detection Area and Sensitivity 3 Click Trigger Channel tab and select one or more channels which will start to record or become full screen monitoring when motion alarm is triggered 2015 LT Security Inc All Rights Reserved White papers data sheets quick start guides and or user manuals are for reference only and may ...

Страница 114: ...er to Chapter 8 7 Setting Alarm Response Actions Repeat the above steps to set up arming schedule of other days of a week Click the OK button to complete the motion detection settings of the channel 6 If you want to set motion detection for another channel repeat the above steps or just copy the above settings to it Note You are not allowed to copy the Trigger Channel action Figure 8 5 Copy Settin...

Страница 115: ... Settings Interface 3 Select Trigger Channel tab and select one or more channels which will start to record or become full screen monitoring when an external alarm input is triggered 4 Select Arming Schedule tab to set the channel s arming schedule Choose one day of a week and Max eight time periods can be set within each day Note Time periods shall not be repeated or overlapped 2015 LT Security I...

Страница 116: ...e settings of the alarm input Note Please check whether the PTZ or speed dome supports PTZ linkage One alarm input can trigger presets patrol or pattern of more than one channel But presets patrols and patterns are exclusive Figure 8 9 Set PTZ Linking of Alarm Input 7 If you want to set handling action of another alarm input repeat the above steps or just copy the above settings to it 2015 LT Secu...

Страница 117: ... All Rights Reserved White papers data sheets quick start guides and or user manuals are for reference only and may or may not be entirely up to date or accurate based upon the version or models Product names mentioned herein may be the unregistered and or registered trademarks of their respective owners ...

Страница 118: ...he channel Select Arming Schedule tab to set the channel s arming schedule Choose one day of a week and up to eight time periods can be set within each day Or you can click the Copy button to copy the time period settings to other day s Note Time periods shall not be repeated or overlapped Figure 8 12 Set Arming Schedule of Video Loss 2015 LT Security Inc All Rights Reserved White papers data shee...

Страница 119: ... 5 Click the OK button to complete the video loss settings of the channel Repeat the above steps to finish settings of other channels or click the Copy button copy the above settings to them 2015 LT Security Inc All Rights Reserved White papers data sheets quick start guides and or user manuals are for reference only and may or may not be entirely up to date or accurate based upon the version or m...

Страница 120: ...ing method of video tampering Set arming schedule and alarm response actions of the channel 1 Click Arming Schedule tab to set the arming schedule of response action 2 Choose one day of a week and up to eight time periods can be set within each day Note Time periods shall not be repeated or overlapped Figure 8 14 Set Arming Schedule of Video Tampering 2015 LT Security Inc All Rights Reserved White...

Страница 121: ...mplete the video tampering settings of the channel Repeat the above steps to finish settings of other channels or click the Copy button copy the above settings to them 5 Click the Apply button to save and activate the settings 2015 LT Security Inc All Rights Reserved White papers data sheets quick start guides and or user manuals are for reference only and may or may not be entirely up to date or ...

Страница 122: ...the channel 1 Click Arming Schedule tab to set the arming schedule of response action 2 Choose one day of a week and up to eight time periods can be set within each day Note Time periods shall not be repeated or overlapped Figure 8 15 Set Arming Schedule of Video Quality Diagnostics 3 Select Linkage Action tab to set alarm response actions of video tampering alarm please refer to Chapter 8 7 Setti...

Страница 123: ...s Without the Alarm Module ST Series With the Alarm Module Figure 8 16 Exception Settings Interface 2 Check the checkbox of Enable Event Hint to display the Event Exception icon when an exceptional event occurs And click the icon to select the detailed event hint for display Note Click the icon appears in the live view interface and you can view the detailed information of the exceptional event Cl...

Страница 124: ... 4 Click Apply to save the settings 2015 LT Security Inc All Rights Reserved White papers data sheets quick start guides and or user manuals are for reference only and may or may not be entirely up to date or accurate based upon the version or models Product names mentioned herein may be the unregistered and or registered trademarks of their respective owners ...

Страница 125: ...ed with Remote Client Note The alarm signal will be transmitted automatically at detection mode when remote alarm host is configured Please refer to Chapter 9 2 6 Configuring the Remote Alarm Host for details of alarm host configuration Send Email Send an email with alarm information to a user or users when an alarm is detected Please refer to Chapter 9 2 8 Configuring Email for details of Email c...

Страница 126: ... of a week You can also use Copy button to copy an arming schedule to other days Click the OK button to complete the arming schedule setting of alarm output 4 Click the Apply button to save the settings 2015 LT Security Inc All Rights Reserved White papers data sheets quick start guides and or user manuals are for reference only and may or may not be entirely up to date or accurate based upon the ...

Страница 127: ...clear and make related operations Menu Manual Alarm Click Trigger Clear button if you want to trigger or clear an alarm output Click Trigger All button if you want to trigger all alarm outputs Click Clear All button if you want to clear all alarm output Figure 8 20 Clear or Trigger Alarm Output Manually 2015 LT Security Inc All Rights Reserved White papers data sheets quick start guides and or use...

Страница 128: ...ghts Reserved White papers data sheets quick start guides and or user manuals are for reference only and may or may not be entirely up to date or accurate based upon the version or models Product names mentioned herein may be the unregistered and or registered trademarks of their respective owners ...

Страница 129: ...e configured independently You can select LAN1 or LAN2 in the NIC type field for parameter settings You can select one NIC card as default route And then the system is connecting with the extranet the data will be forwarded through the default route Net fault Tolerance Mode The two NIC cards use the same IP address and you can select the Main NIC to LAN1 or LAN2 By this way in case of one NIC card...

Страница 130: ...erification code consists of 6 capital letters and is located at the bottom of the DVR Figure 9 2 PT Cloud Settings Interface 6 Click the Apply button to save and exit the interface After configuration you can access and manage the DVR by your mobile phone on which the PT Cloud application is installed or by CMS Configuring DDNS Purpose If your DVR is set to use PPPoE as its default network connec...

Страница 131: ...ext field enter the domain obtained from the DynDNS website 3 Enter the User Name and Password registered in the DynDNS website Figure 9 5 DynDNS Settings Interface PeanutHull Enter the User Name and Password obtained from the PeanutHull website Figure 9 6 PeanutHull Settings Interface NO IP Enter the account information in the corresponding fields Refer to the DynDNS settings 1 Enter Server Addre...

Страница 132: ...ice domain name in the HiDDNS server first and then enter the alias to the Device Domain Name in the DVR you can also enter the domain name directly on the DVR to create a new one Figure 9 8 HiDDNS Settings Interface Register the device on the HiDDNS server 1 Go to the HiDDNS website www hiddns com 2 Click to register an account if you do not have one and use the account to log in Figure 9 9 Regis...

Страница 133: ... access the device You can refer to Chapter 9 2 5 Configuring NAT for the mapped HTTP port No OPTION 2 Access the devices via NVMS7000 For NVMS7000 in the Add Device window select and then edit the device information Nickname Edit a name for the device as you want Server Address www hiddns com Device Domain Name It refers to the Device Domain Name on the device or the Device Name on the HiDDNS ser...

Страница 134: ...lick to register an account if you do not have one and use the account to log in Figure 9 13 Register an Account 3 Once registered an address can be created This will be the web address that the customer uses to reach the NVR DVR Figure 9 14 Register the Device 4 In the Domain Management interface click Create addiontional domain names to register the device The address for the customer to use sho...

Страница 135: ... the e mail account password The default DDNS type is LTS and the default server is ns1 dvrlists com our server Leave this information alone 5 Click the Apply button to save and exit the interface 9 2 2 Configuring PPPoE Settings Purpose The DVR also allows access by Point to Point Protocol over Ethernet PPPoE Steps 1 Enter the Network Settings interface Menu Configuration Network 2 Select the PPP...

Страница 136: ...igure the following NTP settings Interval Time interval between the two synchronizing actions with NTP server The unit is minute NTP Server IP address of NTP server NTP Port Port of NTP server 5 Click the Apply button to save and exit the interface Note The time synchronization interval can be set from 1 to 10080 minutes and the default value is 60 minutes If the DVR is connected to a public netwo...

Страница 137: ...n the network and establish functional network services for data sharing communications etc You can use the UPnP function to enable the fast connection of the device to the WAN via a router without port mapping Before you start If you want to enable the UPnP function of the device you must enable the UPnP function of the router to which your device is connected When the network working mode of the...

Страница 138: ...ternal port No for server port http port and RTSP port respectively Note You can use the default port No or change it according to actual requirements External Port indicates the port No for port mapping in the router The value of the RTSP port No should be 554 or between 1024 and 65535 while the value of the other ports should be between 1 and 65535 and the value must be different from each other...

Страница 139: ...igured to realize live view for more than the maximum number of cameras through network A multicast address spans the Class D IP range of 224 0 0 0 to 239 255 255 255 It is recommended to use the IP address ranging from 239 252 0 0 to 239 255 255 255 When adding a device to the CMS Client Management System software the multicast address must be the same as the device smulticast IP RTSP Port The RT...

Страница 140: ...e only configured through the web browser Steps 1 Open web browser input the IP address of device and the web server will select the language automatically according to the system language and maximize the web browser 2 Input the correct user name and password and click Login button to log in the device 3 Enter the HTTPS settings interface Configuration Remote Configuration Network Settings HTTPS ...

Страница 141: ...nt is detected e g an alarm or motion event is detected etc Before configuring the Email settings the DVR must be connected to a local area network LAN that maintains an SMTP mail server The network must also be connected to either an intranet or the Internet depending on the location of the e mail accounts to which you want to send notification Additional the Preferred DNS server must be configur...

Страница 142: ...he name of the receiver of the Email Receiver s Address The Email address of the receiver Enable Attached Pictures Check the checkbox of Enable Attached Picture if you want to send email with attached alarm images The interval is the time between two captures of the alarm images Interval The interval refers to the time between two actions of sending attached pictures E mail Test Sends a test messa...

Страница 143: ...pen the Command Prompt window in your PC and input telnet IP Address to connect with the DVR as shown in the figure below Example If the IP address of the DVR is 192 0 0 64 you can input telnet 192 0 0 64 and then press Enter to connect to the DVR Figure 9 32 Connect to DVR Note The telnet function turns invalid after the device shutting down or rebooting you have to enable it again if required 20...

Страница 144: ...re 9 33 Network Traffic Interface 2 You can view the sending rate and receiving rate information on the interface The traffic data is refreshed every 1 second 2015 LT Security Inc All Rights Reserved White papers data sheets quick start guides and or user manuals are for reference only and may or may not be entirely up to date or accurate based upon the version or models Product names mentioned he...

Страница 145: ...cket loss The testing result pops up on the window If the testing is failed the error message box will pop up as well Figure 9 35 Testing Result of Network Delay and Packet Loss 9 4 2 Exporting Network Packet Purpose By connecting the DVR to network the captured network data packet can be exported to USB flash disk SATA and other local backup devices Steps 1 Enter the Network Traffic interface Men...

Страница 146: ...re 9 36 Export Network Packet 4 Click the Export button to start exporting 5 After the exporting is complete click OK to finish the packet export Figure 9 37 Packet Export Attention Note Up to 1M data can be exported each time 2015 LT Security Inc All Rights Reserved White papers data sheets quick start guides and or user manuals are for reference only and may or may not be entirely up to date or ...

Страница 147: ...Checking Result If the message box pops out with other information instead of this one you can click Network button to show the quick setting interface of the network parameters Figure 9 40 Network Parameters Configuration 2015 LT Security Inc All Rights Reserved White papers data sheets quick start guides and or user manuals are for reference only and may or may not be entirely up to date or accu...

Страница 148: ...e 9 41 Network Stat Interface 3 View the bandwidth of Remote Live View bandwidth of Remote Playback and bandwidth of Net Total Idle 4 Click Refresh button to get the latest bandwidth statistics 2015 LT Security Inc All Rights Reserved White papers data sheets quick start guides and or user manuals are for reference only and may or may not be entirely up to date or accurate based upon the version o...

Страница 149: ...hts Reserved White papers data sheets quick start guides and or user manuals are for reference only and may or may not be entirely up to date or accurate based upon the version or models Product names mentioned herein may be the unregistered and or registered trademarks of their respective owners ...

Страница 150: ...ized the status of the HDD will change from Uninitialized to Normal Figure 10 4 HDD Status Changes to Normal Note Initializing the HDD will erase all data on it The HDDs which are free of working for a long time can be enabled to sleep thus to decrease the power consumption of the device and extend the life of the HDDs Click Menu HDD Advanced 2015 LT Security Inc All Rights Reserved White papers d...

Страница 151: ...ck the checkbox of Enable HDD Sleeping and the HDDs will be set to work for all time 2015 LT Security Inc All Rights Reserved White papers data sheets quick start guides and or user manuals are for reference only and may or may not be entirely up to date or accurate based upon the version or models Product names mentioned herein may be the unregistered and or registered trademarks of their respect...

Страница 152: ... IP SAN settings Add NAS disk 1 Enter the NetHDD IP address in the text field 2 Click Search to search the available NAS disks 3 Select the NAS disk from the list shown below Or you can just manually enter the directory in the text field of NetHDD Directory 4 Click OK to add the configured NAS disk Note Up to 8 NAS disks can be added 2015 LT Security Inc All Rights Reserved White papers data sheet...

Страница 153: ...ly added the NAS or IP SAN disk return to the HDD Information menu The added NetHDD will be displayed in the list Note If the added NetHDD is uninitialized please select it and click the Init button for initialization Figure 10 10 Initialize Added NetHDD 2015 LT Security Inc All Rights Reserved White papers data sheets quick start guides and or user manuals are for reference only and may or may no...

Страница 154: ...g steps for operating instructions Figure 10 11 Set eSATA Mode 3 When the eSATA type is selected to Record enter the HDD Information interface Menu HDD General 4 Edit the property of the selected eSATA or initialize it is required Note Two storage modes can be configured for the eSATA when it is used for Record Please refer to Chapter 10 4 Managing HDD Group and Chapter 10 5 Configuring Quota Mode...

Страница 155: ...ox will pop up Figure 10 14 Attention for Reboot 4 Click the Yes button to reboot the device to activate the changes 5 After reboot of device enter the HDD Information interface Menu HDD General 6 Select HDD from the list and click the icon to enter the Local HDD Settings interface as shown in Figure 10 15 2015 LT Security Inc All Rights Reserved White papers data sheets quick start guides and or ...

Страница 156: ...revent important recorded files from being overwritten when the HDD becomes full in overwrite recording mode When the HDD property is set to redundancy the video can be recorded both onto the redundancy HDD and the R W HDD simultaneously so as to ensure high security and reliability of video data Steps 1 Enter the HDD Information interface Menu HDD General 2 Select HDD from the list and click the ...

Страница 157: ... list Note At least 2 hard disks must be added on your DVR when you want to set a HDD to Redundancy and there is one HDD with R W property 2015 LT Security Inc All Rights Reserved White papers data sheets quick start guides and or user manuals are for reference only and may or may not be entirely up to date or accurate based upon the version or models Product names mentioned herein may be the unre...

Страница 158: ...py button to enter the Copy Camera interface as shown in Figure 10 19 Figure 10 19 Copy Settings to Other Camera s 6 Select the camera s to be configured with the same quota settings You can also click the checkbox of Analog to select all cameras 7 Click the OK button to finish the Copy settings and back to the Storage Mode interface 8 Click the Apply button to apply the settings Note If the quota...

Страница 159: ...itialized or Abnormal please initialize the HDD before use And if the HDD initialization is failed please replace it with a new one Checking HDD Status in System Information Interface Steps 1 Enter the System Information interface Menu Maintenance System Info 2 Click the HDD tab to view the status of each HDD displayed on the list as shown in Figure 10 21 Figure 10 21 View HDD Status 2 2015 LT Sec...

Страница 160: ...DD to view its S M A R T information list as shown in Figure 10 22 Note If you want to use the HDD even when the S M A R T checking is failed you can check the checkbox before the Continue to use this disk when self evaluation is failed item Figure 10 22 S M A R T Settings Interface 2015 LT Security Inc All Rights Reserved White papers data sheets quick start guides and or user manuals are for ref...

Страница 161: ...re 10 24 Bad Sector Detecting 4 You can click the Pause button to pause the detection and click the Resume button to resume the detection 5 If there is error information about the HDD you can click the Error Info button to view the information 2015 LT Security Inc All Rights Reserved White papers data sheets quick start guides and or user manuals are for reference only and may or may not be entire...

Страница 162: ...ter Send Email and Trigger Alarm Output Note Trigger alarm output is applicable to the ST series Please refer to Chapter 8 7 Setting Alarm Response Actions Figure 10 25 Configure HDD Error Alarm 4 When the Trigger Alarm Output is selected you can also select the alarm output to be triggered from the list below 5 Click the Apply button to save the settings 2015 LT Security Inc All Rights Reserved W...

Страница 163: ...ghts Reserved White papers data sheets quick start guides and or user manuals are for reference only and may or may not be entirely up to date or accurate based upon the version or models Product names mentioned herein may be the unregistered and or registered trademarks of their respective owners ...

Страница 164: ...tion 7 Copy Camera Settings 1 If you want to copy the OSD settings of the current camera to other cameras click the Copy button to enter the Copy Camera interface as shown in Figure 11 2 Figure 11 2 Copy Settings to Other Cameras 2 Select the camera s to be configured with the same OSD settings You can also check the checkbox of Analog to select all cameras 3 Click the OK button to finish the Copy...

Страница 165: ...each area can be adjusted 5 The configured privacy mask zones on the window can be cleared by clicking the corresponding Clear Zone1 4 icons on the right side of the window or click Clear All to clear all zones Figure 11 4 Set Privacy Mask Area 6 You can click the Copy button to copy the privacy mask settings of the current camera to other cameras Please refer to step 7 of Chapter 11 1Configuring ...

Страница 166: ...ght and Outdoor 5 Adjust the image parameters according to actual needs The parameters include Brightness Contrast Saturation Hue Sharpness and De noising You can also click Restore to set the parameters to the default settings 6 You can click Copy to copy the image settings of the current camera to other analog cameras 7 Click Apply to save the settings 2015 LT Security Inc All Rights Reserved Wh...

Страница 167: ... All Rights Reserved White papers data sheets quick start guides and or user manuals are for reference only and may or may not be entirely up to date or accurate based upon the version or models Product names mentioned herein may be the unregistered and or registered trademarks of their respective owners ...

Страница 168: ...em Information interface Menu Maintenance System Info 2 Click the Camera tab to enter the Camera Information menu to view the status of each camera as shown in Figure 12 2 Figure 12 2 Camera Information Interface 12 1 3Viewing Record Information Steps 1 Enter the System Information interface Menu Maintenance System Info 2015 LT Security Inc All Rights Reserved White papers data sheets quick start ...

Страница 169: ...u to view the alarm information as shown in Figure 12 4 Figure 12 4 Alarm Information Interface 12 1 5Viewing Network Information Steps 1 Enter the System Information interface Menu Maintenance System Info 2 Click the Network tab to enter the Network Information menu to view the network information as shown in Figure 12 5 2015 LT Security Inc All Rights Reserved White papers data sheets quick star...

Страница 170: ... menu to view the HDD status free space property etc as shown in Figure 12 6 Figure 12 6 HDD Information Interface 2015 LT Security Inc All Rights Reserved White papers data sheets quick start guides and or user manuals are for reference only and may or may not be entirely up to date or accurate based upon the version or models Product names mentioned herein may be the unregistered and or register...

Страница 171: ...ng the Start Time End Time Major Type and Minor Type 3 Click the Search button to start search log files 4 The matched log files will be displayed on the list shown below Note Up to 2000 log files can be displayed each time Figure 12 8 Log Search Results 2015 LT Security Inc All Rights Reserved White papers data sheets quick start guides and or user manuals are for reference only and may or may no...

Страница 172: ... the log files to the selected backup device You can click the New Folder button to create new folder in the backup device or click the Format button to format the backup device before log export Note Please connect the backup device to DVR before operating log export The log files exported to the backup device are named by exporting time e g 20110514124841logBack txt 2015 LT Security Inc All Righ...

Страница 173: ... Export 2 Click the IP Camera Import Export tab the content of detected plugged external device appears 3 Click the Export button to export configuration files to the selected local backup device 4 To import a configuration file select the file from the selected backup device and click the Import button After the importing process is completed you must reboot the DVR 2015 LT Security Inc All Right...

Страница 174: ...n to export configuration files to the selected local backup device 3 To import a configuration file select the file from the selected backup device and click the Import button After the import process is completed you must reboot the DVR Note After having finished the import of configuration files the device will reboot automatically 2015 LT Security Inc All Rights Reserved White papers data shee...

Страница 175: ...TP Before you start Configure PC running FTP server and DVR to the same Local Area Network Run the 3rd party TFTP software on the PC and copy the firmware into the root directory of TFTP Steps 1 Enter the Upgrade interface Menu Maintenance Upgrade 2 Click the FTP tab to enter the local upgrade interface as shown in Figure 12 13 Figure 12 13 FTP Upgrade Interface 3 Enter the FTP Server Address in t...

Страница 176: ... IP address subnet mask gateway MTU default route and server port all other parameters of the device will be restored to factory default settings 2015 LT Security Inc All Rights Reserved White papers data sheets quick start guides and or user manuals are for reference only and may or may not be entirely up to date or accurate based upon the version or models Product names mentioned herein may be t...

Страница 177: ...Reserved White papers data sheets quick start guides and or user manuals are for reference only and may or may not be entirely up to date or accurate based upon the version or models Product names mentioned herein may be the unregistered and or registered trademarks of their respective owners ...

Страница 178: ...olled remotely by the PC through the network Note RS 232 serial port is available for 16ch ST and 24 32ch FA series Steps 1 Enter the RS 232 Settings interface Menu Configuration RS 232 Figure 1 1 RS 232 Settings Interface 2 Configure RS 232 parameters including baud rate data bit stop bit parity flow control and usage 3 Click Apply to save the settings 2015 LT Security Inc All Rights Reserved Whi...

Страница 179: ...the same with the resolution of the VGA HDMI display Time Zone Select the time zone Date Format Select the date format System Date Select the system date System Time Select the system time Mouse Pointer Speed Set the speed of mouse pointer 4 levels are configurable Enable Wizard Enable disable the Wizard when the device starts up Enable ID Authentication Enable disable the use of the login passwor...

Страница 180: ...uto DST Adjustment item Or you can manually check the Enable DST checkbox and then you choose the date of the DST period 2015 LT Security Inc All Rights Reserved White papers data sheets quick start guides and or user manuals are for reference only and may or may not be entirely up to date or accurate based upon the version or models Product names mentioned herein may be the unregistered and or re...

Страница 181: ... CVBS interface Auto Logout Set timeout time for menu inactivity E g when the timeout time is set to 5 Minutes then the system will exit from the current operation menu to live view screen after 5 minutes of menu inactivity Menu Output Mode You can choose the menu display on different video output There are auto HDMI VGA and Main CVBS selectable 4 Click the Apply button to save the settings 2015 L...

Страница 182: ...r level to Operator or Guest Different user levels have different operating permission Operator The Operator user level has permission of Local Log Search in Local Configuration Remote Log Search and Two way Audio in Remote Configuration and all operating permission in Camera Configuration Guest The Guest user has permission of Local Log Search in Local Configuration Remote Log Search in Remote Co...

Страница 183: ... parameters restoring factory default parameters and importing exporting configuration files Local Advanced Operation Operating HDD management initializing HDD setting HDD property upgrading system firmware clearing I O alarm output Local Shutdown Reboot Shutting down or rebooting the DVR Remote Configuration Remote Log Search Remotely viewing logs that are saved on the DVR Remote Parameters Setti...

Страница 184: ... controlling PTZ movement of the selected camera s Remote PTZ Control Remotely controlling PTZ movement of the selected camera s Local Video Export Locally exporting recorded files of the selected camera s 7 Click the OK button to save the settings and exit interface Note Only the admin user account has the permission of restoring factory default parameters 13 5 2Deleting a User Steps 1 Enter the ...

Страница 185: ...e new one in the text field of Password and Confirm Admin You are only allowed to edit password and MAC address Check the checkbox of Change Password if you want to change the password and the input the correct old password and the new one in the text field of Password and Confirm 5 Click the OK button to save the settings and exit the interface 2015 LT Security Inc All Rights Reserved White paper...

Страница 186: ...o reboot the device Note After you have logged out the system menu operation on the screen is invalid It is required a user name and password to login the system 2015 LT Security Inc All Rights Reserved White papers data sheets quick start guides and or user manuals are for reference only and may or may not be entirely up to date or accurate based upon the version or models Product names mentioned...

Страница 187: ...rved White papers data sheets quick start guides and or user manuals are for reference only and may or may not be entirely up to date or accurate based upon the version or models Product names mentioned herein may be the unregistered and or registered trademarks of their respective owners ...

Страница 188: ...worked device such as a router or computer system using the Internet Protocol Suite to notify a domain name server to change in real time ad hoc the active DNS configuration of its configured hostnames addresses or other information stored in DNS Hybrid DVR A hybrid DVR is a combination of a DVR and NVR NTP Acronym for Network Time Protocol A protocol designed to synchronize the clocks of computer...

Страница 189: ...talled in the device b The installed HDD has not been initialized c The installed HDD is not compatible with the device or is broken down Steps 1 Verify at least one HDD is installed in the device 1 If not please install the compatible HDD Note Please refer to the Quick Operation Guide for the HDD installation steps 2 If you do not want to install a HDD select Menu Configuration Exceptions and unc...

Страница 190: ...any to do the further process The image gets stuck when DVR is playing back by single or multi channel cameras Possible Reasons a The frame rate is not the real time frame rate b The DVR supports up to 16 channel synchronize playback at the resolution of 4CIF if you want a 16 channel synchronize playback at the resolution of 720p the frame extracting may occur which leads to a slight stuck Steps 1...

Страница 191: ...HDD General to view the HDD status and verify the HDD is detected and can be read and written normally 4 Check if the fault is solved by the above steps If it is solved finish the process If not please contact the engineer from our company to do the further process 2015 LT Security Inc All Rights Reserved White papers data sheets quick start guides and or user manuals are for reference only and ma...

Страница 192: ... 1 0build131202 1280 960 DS 2CD4012F V5 1 0 build 131202 1280 1024 DS 2CD4232FWD I V5 1 0 build 131202 2048 1536 DS 2CD793PFWD EI V5 1 0 build 131202 704 576 iDS 2CD9122 V3 5 0 build131012 1920 1080 iDS 2CD9121 V3 4 2 build 130718 1600 1200 DS 2CD976 B V3 1 build 120423 1600 1200 DS 2DF7274 V5 1 0 build 130923 1280 960 DS 2DE7174 V5 0 2Build130926 1280 960 Video Solutions for Security Professional...

Отзывы: