background image

Sonar

The Sonar function provides a view of the water and bottom
beneath your vessel, allowing you to detect fish and examine the
structure of the sea floor.
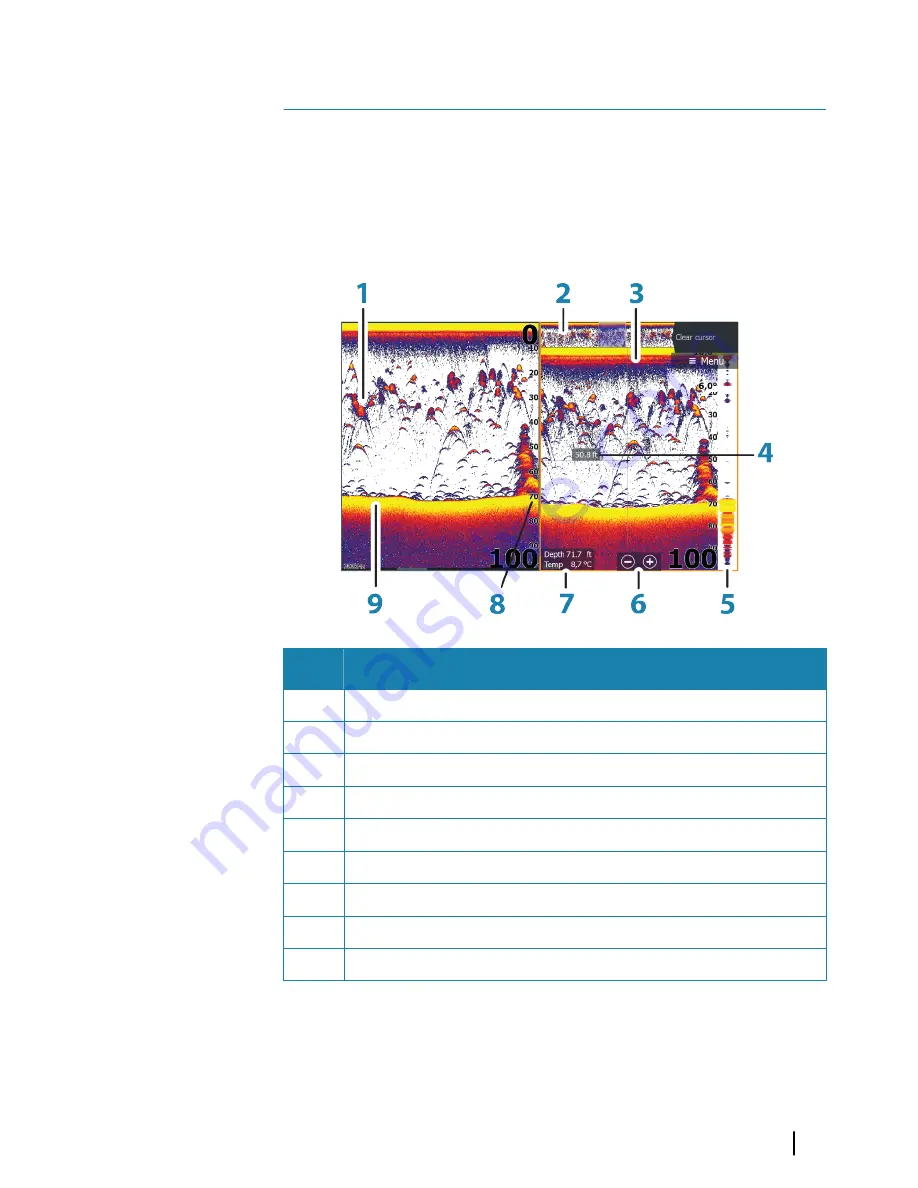
The Sonar image

Key

Description

1

Fish arches

2

History preview*

3

Temperature graph*

4

Depth at cursor

5

Amplitude scope*

6

Zoom (range) buttons

7

Water depth and Water temperature at cursor location

8

Range scale

9

Bottom

* Optional Sonar image items.

7

Sonar

 | HDS Gen3 Operator Manual

63

Содержание HDS Gen3 Touch

Страница 1: ...ENGLISH HDSGen3 Operator Manual lowrance com...

Страница 2: ......

Страница 3: ...lating to the product Documentation may be translated to or has been translated from another language Translation In the event of any conflict between any Translation of the Documentation the English...

Страница 4: ...eer SonicHub SonicHub StructureMap StructureMap StructureScan StructureScan StructureScan HD StructureScan HD Copyright Copyright 2014 Navico Holding AS Warranty The warranty card is supplied as a sep...

Страница 5: ...ion to a comment or some important information Warning Used when it is necessary to warn personnel that they should proceed carefully to prevent risk of injury and or damage to equipment personnel Man...

Страница 6: ...to the unit s internal memory Use the menu options or the keys and on screen buttons to maneuver in the pdf file as described below Search Goto page Page Up and Down Select the relevant panel button S...

Страница 7: ...in the upper right corner of the panel Key operation Press the X key The Software version The software version currently on this unit can be found in the About dialog The About dialog is available in...

Страница 8: ...8 Preface HDS Gen3 Operator Manual...

Страница 9: ...el 28 Creating a Man Overboard waypoint 29 Screen capture 30 Customizing your system 30 Customizing the Home page wallpaper 30 Adjusting panel size 31 Data Overlay 32 Adding new favorite pages 32 Edit...

Страница 10: ...sition 59 Navigate a route 61 Navigating with the autopilot 61 Navigation settings 63 Sonar 63 The Sonar image 64 Zooming the Sonar image 64 Using the cursor on the Sonar panel 64 Viewing Sonar histor...

Страница 11: ...uctureScan data 89 Using StructureMap with mapping cards 90 Structure options 91 Info panels 91 Dashboards 91 Customizing the Info panel 93 Video 93 The Video panel 93 Setting up the video panel 94 Si...

Страница 12: ...16 Radar settings 118 AIS 118 AIS target symbols 119 Searching for AIS items 119 Viewing information about single AIS targets 120 AIS information on radar panels 120 Calling an AIS vessel 121 AIS SART...

Страница 13: ...140 Settings 143 Vessels 144 Sun Moon 144 Trip calculator 144 Files 144 Find 145 Alarms 145 Alarm system 145 Type of messages 145 Single alarms 146 Multiple alarms 146 Acknowledging a message 147 Alar...

Страница 14: ...14 Contents HDS Gen3 Operator Manual...

Страница 15: ...cursor keys to select then confirm by pressing the Enter key Press and hold Press and hold on the screen Use the cursor keys to select then press and hold the Enter key Drag Drag an item to a new pos...

Страница 16: ...to move through menu items to adjust a value and to move the cursor on a panel 4 Zoom Out Zoom In keys and MOB key Zoom keys for panels and images Simultaneous pressing both keys saves a Man Overboard...

Страница 17: ...ls a long press expands active panel to a full page panel and back again 9 Waypoint key Press to display the dialog for saving new waypoints Press twice to quick save a waypoint Press and hold to acce...

Страница 18: ...out a task or for browsing stored information 2 Local time and Water depth 3 Applications Select a button to display the application as a full page panel Press and hold a button to display pre config...

Страница 19: ...nted as a full page or in combination with other panels in a multiple panel page All pages are accessed from the Home page Key Description 1 Application panel 2 Menu Panel specific menu 3 System Contr...

Страница 20: ...ation combined with each of the other panels Note The number of quick split pages cannot be changed and the pages cannot be customized or deleted Access a quick split page by pressing and holding the...

Страница 21: ...A 2000 network A Mercury icon appears in the Tools menu when the device is available FUSION Link integration The FUSION Link devices appear as additional sources when using the audio function No addit...

Страница 22: ...on page 91 GoFree wireless The HDS Gen3 includes built in wireless functionality that lets you use a wireless device to remotely view phone and tablet and control the system tablet only The system is...

Страница 23: ...tivating functions Select the icon of the function you want to set or toggle on or off For those functions that toggle on and off an orange bar across the top of the icon indicates the function is act...

Страница 24: ...ght conditions Note Details on the chart may be less visible when the Night mode is selected Locking the touchscreen You can temporarily lock a touchscreen to prevent accidental operation of the syste...

Страница 25: ...enu drag the menu to the right or press and hold the Menu key When you hide a menu on one page the menu on other pages is also hidden To display the menu again select the menu option or press the Menu...

Страница 26: ...rk a position and to select items Position the cursor by tapping the desired location on the screen or by using the Cursor keys to move the cursor By default the cursor is not shown on the panel When...

Страница 27: ...r with a line drawn from the vessel center to the cursor position and the distance is listed in the cursor information window 3 You can reposition the measuring points by dragging either icon as long...

Страница 28: ...ion the system displays navigation information back to the MOB waypoint Multiple MOB waypoints are saved by repeatedly pressing the MOB buttons The vessel continues to show navigation information to t...

Страница 29: ...tributes Delete it Goto it When you select the Edit menu option the Edit Waypoint dialog opens Screen capture Simultaneously press and hold the Pages and Power keys to take a screen capture By default...

Страница 30: ...s chosen as the wallpaper it is automatically copied to the Wallpaper folder Adjusting panel size You can change the panel size for an active split page The panel size can be adjusted for both favorit...

Страница 31: ...off for any active page by selecting the Data overlay icon on the System Controls dialog When Data overlay is on an orange bar appears above the icon Edit overlay data Use the Edit overlay option on t...

Страница 32: ...out The system displays the new favorite page and the new page is included in the list of favorite pages on the Home page Edit favorite pages 1 Select the edit icon for a favorite icon to enter edit m...

Страница 33: ...gate routes place waypoints and display AIS targets You can overlay a radar image a StructureScan image or weather information The Chart panel Key Description 1 Waypoint 2 Vessel with Heading extensio...

Страница 34: ...re navico com c map jeppesen com or navionics com Note Insight charts are referred to as Lowrance in the menu Charts on microSD cards are shared over the Ethernet network so only one chart card per ve...

Страница 35: ...on orientates itself using COG Course over Ground Chart scale You zoom in and out on the chart by using the zoom or buttons the or keys or two fingers to pinch zoom out and spread zoom in Chart range...

Страница 36: ...n the direction of the next waypoint when navigating a route or navigating to a waypoint If not navigating the heading up orientation is used until navigation is started Look ahead Moves the vessel ic...

Страница 37: ...ons are useful features for toggling between the vessel s current location and the cursor position Creating routes You can create routes as follows on the chart panel 1 Position the cursor on the char...

Страница 38: ...right side of the chart panel Panning the 3D chart You can move the chart in any direction by selecting the Pan icon and then panning in the desired direction Controlling the view angle You can contro...

Страница 39: ...lay is selected the chart menu expands to include basic functions for the selected overlay Radar Structure and Weather functions are described in separate sections in this manual Insight specific char...

Страница 40: ...ull All available information for the chart in use Insight chart categories Insight charts include several categories and sub categories that you can turn on off individually depending on which inform...

Страница 41: ...ll chart types Community edits Toggles on the chart layer including Navionics edits These are user information or edits uploaded to Navionics Community by users and made available in Navionics charts...

Страница 42: ...of geographical layer information Safety depth The Navionics charts use different shades of blue to distinguish between shallow and deep water Safety depth based on a selected limit is drawn without...

Страница 43: ...evolution over time Dynamictideinformation Dynamiccurrentinformation The following icons and symbology are used Icons Description Current speed The arrow length depends on the rate and the symbol is r...

Страница 44: ...lite photo images of an area as an overlay on the chart The availability of such photos is limited to certain regions and Navionics cartography version You can view photo overlays in either 2D or 3D m...

Страница 45: ...rposes The range is only as accurate as the underlying chart data meaning that if the chart only contains 5 meter intervals for contour lines the shading is rounded to the nearest available contour li...

Страница 46: ...for that location are displayed Dynamic current data can be viewed by zooming inside a 1 nautical mile zoom range At that range the Current icon changes to an animated dynamic icon that shows the spe...

Страница 47: ...n automatic route The boat s draught width and height must be input to use the autorouting and easy routing features Note Autorouting is not available in Insight units or in any unit used in U S terri...

Страница 48: ...s based on information from the active GPS sensor Synchronize 2D 3D chart Links the position shown on one chart with the position shown on the other chart when a 2D and a 3D chart are shown side by si...

Страница 49: ...he Tools panel on the Home page or from the chart Settings dialog Waypoints A waypoint is a user generated mark positioned on a chart on a radar image or on the Sonar image Each waypoint has an exact...

Страница 50: ...alog Press twice to quickly save a waypoint If the cursor is active the waypoint is saved at the cursor position If the cursor is not active the waypoint is saved at your vessel s position Moving a wa...

Страница 51: ...ssel comes within the defined radius Routes A route consists of a series of routepoints entered in the order that you want to navigate them When you select a route on the chart panel it turns green an...

Страница 52: ...epoint is added after the last point in the route 4 Drag a routepoint to move it to a new position 5 Save the route by selecting the save option in the menu Note The menu changes depending on the sele...

Страница 53: ...tart the feature Note HDS Gen3 units designed for sale in the U S region do not have Autorouting or Easy Routing capabilities Autorouting or Easy Routing features are disabled on all non U S units whe...

Страница 54: ...ng When the automatic routing is completed the route appears in preview mode and the legs are color coded to indicate save or unsafe areas Navionics uses red unsafe and green safe while C MAP uses red...

Страница 55: ...uting The Edit Route dialog You can add and remove routepoints from the Edit Route dialog This dialog is activated by selecting an active route s pop up or from the menu The dialog can also be accesse...

Страница 56: ...automatic tracking function can be turned off from the Trails dialog Creating new Trails You can start a new trail from the Trails dialog activated by using the Trails tool on the Home page Trails se...

Страница 57: ...Waypoints Routes and Trails HDS Gen3 Operator Manual 57...

Страница 58: ...vigate the vessel For information about positioning waypoints and creating routes refer to Waypoints Routes andTrails on page 49 Steer panel The Steer panel can be used to display information when you...

Страница 59: ...s the defined XTE limit this is indicated with a red arrow including the distance from the track line Refer to XTElimit on page 61 Data Fields The Steer panel provides the following information XTE Cr...

Страница 60: ...select a routepoint to start navigating from a selected position Starting a route from the steer panel Select the start route option on the menu and then details from the dialogs Start navigating a r...

Страница 61: ...re information about autopilot functionality refer to Autopilot on page 97 Navigation settings Arrival radius Sets an invisible circle around the destination waypoint The vessel is considered arrived...

Страница 62: ...tings dialog Auto the unit positions a point automatically when a course change is registered Distance select the Distance field and enter the distance you want to record Time select the Time field an...

Страница 63: ...amine the structure of the sea floor The Sonar image Key Description 1 Fish arches 2 History preview 3 Temperature graph 4 Depth at cursor 5 Amplitude scope 6 Zoom range buttons 7 Water depth and Wate...

Страница 64: ...splayed when you zoom the Sonar image Drag the zoom bar vertically to view different parts of the water column Using the cursor on the Sonar panel The cursor can be used to measure a distance to a tar...

Страница 65: ...sume normal scrolling select Clear cursor or press the X key Setting up the Sonar image Use the Sonar menu options to set up the image When the cursor is active some options on the Sonar menu are repl...

Страница 66: ...Home page Sensitivity Increasing Sensitivity shows more detail on the screen Decreasing Sensitivity displays less Too much detail clutters the screen Conversely desired echoes may not be displayed if...

Страница 67: ...options The Advanced option is only available when cursor is not active Noise rejection Signal interference from bilge pumps engine vibration and air bubbles can clutter the image The noise rejection...

Страница 68: ...y so the unit only sends sonar signals to the user selected depth range This allows the display to continue smooth scrolling if the bottom depth is out of transducer range When the unit is in manual m...

Страница 69: ...to increase in size compared to using lower byte settings Create StructureMap when completed If StructureScan is available on the network you can convert the loggings to StructureMap format smf after...

Страница 70: ...mage on the left side of the panel By default the zoom level is set to 2x You can select up to 8x zoom from the drop down menu using the keys or the zoom or buttons The range zoom bars on the right si...

Страница 71: ...is adjusted as described for the Zoom option Flasher The Flasher mode shows a flasher style sonar view in the left panel and a normal sonar view in the right panel Palettes You can select between seve...

Страница 72: ...a snapshot of available sonar history You can scroll through sonar history by dragging the preview slider horizontally By default Preview is turned on when the cursor is active Fish ID You can select...

Страница 73: ...tallation manual Overlay downscan When a StructureScan unit is connected to your system you can overlay DownScan images on the regular echo image When activated the Sonar menu expands to include basic...

Страница 74: ...s allowing you to clear settings adjustments made while using a fishing mode Log sonar You can record sonar data This option is also available from the Advanced option in the Sonar menu For more infor...

Страница 75: ...Installation Used for Sonar installation and setup See the separate HDS Gen3 Installation manual Sonar HDS Gen3 Operator Manual 75...

Страница 76: ...ges of structure and fish directly below your boat down to 92 m 300 ft The StructureScan page is accessed from the Home page when the StructureScan transducer is connected and the Structure and Sonar...

Страница 77: ...e StructureScan panel By default the cursor is not shown on the StructureScan image When you position the cursor on a DownScan image the screen pauses the cursor information window and the history bar...

Страница 78: ...y stored You can pan the history by dragging the image or the highlighted part of the history bar to the left or right In a SideScan view you can pan the image to see sides and history by dragging the...

Страница 79: ...areas of the screen This makes it easier to distinguish object from the background To adjust the contrast setting 1 Select the contrast icon or activate the contrast option in the menu to display the...

Страница 80: ...to on for optimal signal returns and clarity Flipping the Structure image left right If required the left right SideScanning images can be flipped to match the corresponding side of your vessel if th...

Страница 81: ...sensor ensures that the SpotlightScan returns match up correctly with the orientation of your trolling motor For installation instructions refer to the SpotlightScan Installation Manual The Spotlight...

Страница 82: ...pedal 6 Select Calibrate 7 Select OK on the confirmation dialog Displaying SpotlightScan images To display SpotlightScan images the SpotlightScan feature must first be turned on in the Advanced Settin...

Страница 83: ...d of the V should be aligned in the direction the trolling motor is pointing Note Do not use the arrow indicator on the trolling motor head as a heading reference as it might not be aligned correctly...

Страница 84: ...on the motor is pointing Refer to AligningtheSpotlightScanimage on page 83 Look Ahead You can make the top half of the image predominant on the display for a better view of what is in front of you Sel...

Страница 85: ...le to prevent image distortion Rotate the trolling motor at a slow constant speed to achieve the best results Reducing the range increases the size of the water column providing the best view of fish...

Страница 86: ...erlay Touch operation zoom the chart and the scanned image by using the zoom or buttons or by pinching or spreading on the screen Drag on the panel to view the scanned image Key operation zoom the cha...

Страница 87: ...ata is automatically deleted as new data is added When increasing the search range the ping speed of the StructureScan transducer is reduced but the width and the length of the image history is increa...

Страница 88: ...scan of an area Recording StructureScan data StructureScan data can be recorded from a chart panel with Structure overlay enabled StructureScan recordings can also be started from a StructureScan pane...

Страница 89: ...ion Using StructureMap with mapping cards StructureMap allows you to maintain full chart capability and can be used with embedded cartography as well as Navionics Insight and other third party chartin...

Страница 90: ...ast Determines the brightness ratio between light and dark areas of the screen Water column Shows hides the water column in Live mode If turned OFF schools of bait fish might not be seen on the SideSc...

Страница 91: ...el You can also select the dashboard from the menu Vesseldashboard Navigationdashboard Anglerdashboard Note Additional dashboards can be activated from the menu if other systems e g CZone are present...

Страница 92: ...tion 3 Select the gauge you want to change Selected gauge is indicated with a blue background 4 Select information to be displayed configure limits and eventually change the source for the information...

Страница 93: ...on a multiple panel page The video image is proportionally scaled to fit into the video panel Areas not covered by the image are colored black Setting up the video panel Video source HDS Gen3 supports...

Страница 94: ...this mode the unit automatically runs through the main features of the product it changes pages automatically adjusts settings opens menus and so on If you tap on a touchscreen or press a key when de...

Страница 95: ...n recorded files in the simulator Advanced simulator settings The Advanced simulator settings allows for manually controlling the simulator GPS source Selects where the GPS data is generated from Spee...

Страница 96: ...Set start position Moves your vessel to the current cursor position Note This option is only available when the GPS source is set to Simulated course 96 Simulator HDS Gen3 Operator Manual...

Страница 97: ...rsor position to a waypoint or along a route Follow pre defined turn patterns Xi5 trolling motor software You may have to update the software in the MotorGuide Xi5 trolling motor to use it with the Lo...

Страница 98: ...can select the position of the Autopilot Controller on the page Refer to Autopilotsettings on page 104 Note As long as the Autopilot Controller is active you cannot operate the background panel or it...

Страница 99: ...s from navigation mode to the selected arrival mode when your vessel reaches the destination Arrival mode is set to Standby by default Before starting a navigation mode or a turn pattern it is importa...

Страница 100: ...efined turn patterns When you select a turn pattern the system creates temporary waypoints on the turn The last waypoint on the turn is the final waypoint When the vessel reaches the final waypoint th...

Страница 101: ...shaped pattern Spiral turn Steers the vessel in a spiral with a decreasing or increasing radius Spiraldecreasingradius Spiralincreasingradius Zigzag turns Steers the vessel in a zigzag pattern Autopil...

Страница 102: ...esired location to start recording a new trail 2 Select Save route to select the end location of the route The Edit trail dialog appears 3 Select Create route The Edit route dialog appears 4 Enter the...

Страница 103: ...rop selects a target propeller rate percentage of power shown as in the Autopilot information bar Cruise selects a target cruise control speed shown as mph or kn in the Autopilot information bar Note...

Страница 104: ...controller on the panel Auto hide autopilot bar Controls whether the Autopilot information bar is shown when the autopilot is in Standby mode Arrival mode The autopilot switches from navigation mode...

Страница 105: ...vessel at the current destination Note We recommend only using heading lock in open water Anchor point setup Anchor points can be saved as a new waypoint replaced with an existing waypoint or set as...

Страница 106: ...yed as an overlay on a chart panel For more information see Chartoverlay on page 39 Note Radar overlay requires data from the heading sensor The Radar panel Key Description 1 Orientation 2 Range 3 Hea...

Страница 107: ...lowing modes are available Off The power to the radar scanner is turned off Standby The power to the radar scanner is on but the radar is not transmitting Transmit The scanner is on and transmitting D...

Страница 108: ...tic and manual mode in the slide bar Sea clutter Sea clutter is used to filter the effect of random echo returns from waves or rough water near the vessel When you increase Sea clutter filtering the o...

Страница 109: ...could be caused by radar signals from other radar units operating in the same frequency band A high setting reduces the interference from other radars In order not to miss weak targets the interferenc...

Страница 110: ...e an option where you can clear target trails from your radar panel temporarily The target trails start to appear again unless you switch them off as described above The radar palette Different colors...

Страница 111: ...rner of the radar panel as either TM True motion or RM Relative motion The radar position can only be changed when the radar is transmitting Center Lookahead Customoffset Center Default setting The ra...

Страница 112: ...EBL VRM on off by selecting the relevant markers on the data bar or by deselecting the marker from the menu Defining an EBL VRM marker 1 Ensure that the cursor is not active 2 Activate the menu select...

Страница 113: ...sector that you can define on the radar image When activated an alarm alerts you when a radar target enters or exits the zone Defining a guard zone 1 Ensure that the cursor is not active 2 Activate th...

Страница 114: ...et symbols shown below Symbol Description Acquiring MARPA target Typically it takes up to 10 full rotations of the scanner Tracking MARPA target not moving or at anchor Tracking and safe MARPA target...

Страница 115: ...ions for cancelling individual targets or to stop the tracking function Cancel tracking individual targets by selecting the target icon and then selecting Cancel target on the menu Viewing MARPA targe...

Страница 116: ...es with in this zone an alarm can be triggered For more information refer to Marpa settings under Radarsettings on page 116 Recording radar data You can record radar data and save the file internally...

Страница 117: ...fine the length of the MARPA trail making it easier to follow target movement A circle can be added around your vessel to present the danger zone The radius of the ring is the same as the closest poin...

Страница 118: ...eature an important tool for safe travelling and collision avoidance You can set alarms to notify you if an AIS target gets too close or if the target is lost AIS target symbols The system uses the AI...

Страница 119: ...ing the Find option in the Tools panel From a chart panel you can search for AIS targets by using the Find option in the menu If the cursor is active the system searches for vessels around the cursor...

Страница 120: ...em includes a VHF radio supporting DSC Digital Select Calling calls over NMEA 2000 you can initiate a DSC call to other vessels from the HDS Gen3 The call option is available in the AIS Vessel Details...

Страница 121: ...the position received from the AIS SART An alarm message is displayed If you have enabled the siren the alarm message is followed by an audible alarm Note The icon is green if the received AIS SART da...

Страница 122: ...n and its distance and bearing from your vessels If you select the AIS SART icon on the chart panel then you can see the AIS MOB details Note If the MOB function is already active this will be termina...

Страница 123: ...r TCPA Refer to Definingdangerousvessels on page 125 AIS vessel lost Sets the range for lost vessels If a vessel is lost within the set range an alarm occurs Note The check box controls whether the al...

Страница 124: ...the system to receive addressed messages from AIS and DSC vessels It is also important to have the MMSI number entered to avoid seeing your own vessel as an AIS target on the chart Note The Vessel me...

Страница 125: ...ther set as off as a fixed distance or to indicate the distance the vessel will move in the selected time period If Off is selected then no COG extension lines are shown for the vessel For information...

Страница 126: ...ico and the Caribbean Sea The SiriusXM products received vary depending on your selected subscription package For more information refer to www siriusXM com Before you can start using your audio equip...

Страница 127: ...the screen on all pages The information in the Media bar varies depending on the active audio source Select the Media bar to replace the application menus with Audio menus Key Description 1 Media bar...

Страница 128: ...ble audio sources from the menu Note The Mic source selects a high voltage level input allowing you to broadcast loud hailer messages over the audio system Volume Master volume control By default the...

Страница 129: ...depending on the active audio device Device explorer You can use the device menu or Device explorer menu options to access the source s native menu or file structure which can be used to select track...

Страница 130: ...reble and the balance between zones Turn on or off individual speaker zones in the Master control The Mixer options vary depending on the activated audio device The following is an example of the USB...

Страница 131: ...the Sirius feed Sirius then appears in the source list when the FUSION server is active To use the AUX source for a different device the Sirius must be detached from the AUX source Note To use SiriusX...

Страница 132: ...splays all available Sirius channels whether or not you have a subscription for the channel Favorites list You can create a list of your favorite Sirius channels from within the channels list You cann...

Страница 133: ...001 sold separately Controlling DVD video 1 Insert a DVD into the device 2 Open the Home page and select the Video page 3 Activate the Audio panel and select DVD as the source on the menu 4 Select th...

Страница 134: ...bbean Sea The audio and weather products received vary depending on your selected subscription package For more information refer to www siriusxm com marineweather Sirius status panel When the weather...

Страница 135: ...ast icon 3 Wind barb 4 Storm icon 5 SST color bar 6 SST color shading Use the Sirius weather option menu to select which weather symbology that should be displayed and how they should appear on the ch...

Страница 136: ...wind speed The example below shows 3 x large barb 1 x small barb 35 knots and 60 knots indicated with 1 x arrow barb 1 x large barb Windspeed 35knots Windspeed 60knots Showing weather details If pop u...

Страница 137: ...shown on the left side of the display You define how the color codes are used to identify sea surface temperature See Adjustingcolorcodes on page 139 Wave indication Colors are used to indicate forec...

Страница 138: ...e zone location Marine zones Sirius service includes access to weather reports for all U S Marine Zones with the exception of the high seas zones You can setup the system to read the forecast for a se...

Страница 139: ...t is available for animation You can animate the past or the future depending on which weather view you have turned on With precipitation overlay you can animate for the past and only assume weather c...

Страница 140: ...t to edit or delete Tides Displays tide information for the tide station nearest to your vessel Select the arrow panel buttons to change the date or select the date field to access the calendar functi...

Страница 141: ...control the format for latitude and longitude coordinates displayed on the chart panel Magnetic variation Magnetic variation is the difference between true bearings and magnetic bearings caused by di...

Страница 142: ...ons and dialogs where you specify settings for your charts Settings and display options made in the Chart settings page are common for all chart panels Refer to Chartsettings on page 47 Sonar Provides...

Страница 143: ...figuration options For more information about using this panel refer to the Installation Manual Vessels Provides dialogs where you define your vessel s MMSI set icon filters set course extension lengt...

Страница 144: ...ly reset when the date changes Files File management system for files waypoints routes trails and settings Copying files to a microSD card You can copy screen captures and logs to a microSD card You c...

Страница 145: ...active The alarm is recorded in the alarm listing so that you can see the details and take the appropriate corrective action Type of messages The messages are classified according to how the reported...

Страница 146: ...message Option Result Close Sets the alarm state to acknowledged meaning that you are aware of the alarm condition The siren buzzer stops and the alarm dialog is removed However the alarm remains acti...

Страница 147: ...larms are setup in the Alarms Settings dialog The alarm dialogs can also be activated from the Tools panel The alarm dialogs include information about active alarms and alarm history Alarms HDS Gen3 O...

Страница 148: ...148 Alarms HDS Gen3 Operator Manual...

Страница 149: ...nd turn the unit on 3 Continue pressing the waypoint key until the calibration process starts The system runs through the screen calibration When completed the unit returns to the application screen N...

Страница 150: ...instructions for how to install the software are included in the upgrade files Backing up your system data Waypoints Routes and Trails that you create are filed in your system It is recommended to reg...

Страница 151: ...extra bits of information these systems store about items User Data file version 3 w depth Should be used when transferring user data from an HDS system to a legacy Lowrance LMS LCX etc User data file...

Страница 152: ...area from where you want to export data 1 Drag the boundary box to define the desired region 2 Select the export option from the menu 3 Select the appropriate file format 4 Select the serial port fie...

Страница 153: ...is purged This is necessary to allow user data to be synchronized across multiple units on an Ethernet network If you have numerous deleted unpurged Waypoints purging may improve the performance of y...

Страница 154: ...item Toggle a checkbox option on or off Show basic information for a selected item Press and hold On any panel with a cursor to activate the cursor assist feature On a panel button to see available sp...

Страница 155: ...Icon Description Pinch to zoom out on the chart or on an image Spread to zoom in on the chart or on an image Touchscreen operation HDS Gen3 Operator Manual 155...

Страница 156: ...156 Touchscreen operation HDS Gen3 Operator Manual...

Страница 157: ...ival mode Autopilot 99 Arrival radius 61 Audio 126 Auxiliary 130 Controls 129 Detaching Sirius 131 Device explorer 129 Device menu 129 DVD video 133 Enable 126 Master volume control 128 Mixer 130 Opti...

Страница 158: ...s 46 Look ahead 36 Measuring distance 27 Navionics 41 42 43 Annotation 42 Chart shading 43 Colored seabed areas 42 Community edits 41 Contours depth 42 Depth highlight range 45 Dynamic tides and curre...

Страница 159: ...ard copying 144 Files management 144 Find items tool 144 Fishing mode 73 Flasher 71 Frequency SpotlightScan 83 Front panel 16 Fuel 142 FUSION Link 126 G Go to cursor 26 GoFree wireless 22 H Heading Lo...

Страница 160: ...To cursor position 59 Trails 62 With autopilot 61 XTE alarm 61 Navigation settings 61 Network Settings 143 Sonar 73 NMEA 0183 Data logging 149 NMEA 0183 Exporting log file 150 Noise rejection 67 O Op...

Страница 161: ...arget trails 110 Threshold 109 Radio as an audio device 131 Range SpotlightScan 83 Recording sonar data 68 reset fishing mode 74 Restore defaults 141 Routes 51 Autorouting 53 Creating a new route on t...

Страница 162: ...ng the cursor 64 View history 65 View options 70 View recorded data 69 Zoom bar 64 Zooming 64 SonicHub 126 Speed control Trolling motor 103 Spiral turn Autopilot 101 Split pages 20 Split screen Sonar...

Страница 163: ...Datum 141 Key beeps 141 Language 141 Magnetic variation 141 Restore defaults 141 Satellites 141 Text size 141 Time 141 Systems Controls dialog 23 T Temperature graph 71 Text size 141 Time 141 Tools 14...

Страница 164: ...74 View SpotlightScan 84 W Wallpaper 30 Wallpaper customizing 30 Warranty 4 Waypoints routes and trails Export 151 Export region 152 Purging 153 Waypoints 49 Alarm settings 51 Dialog 49 Edit 51 Moving...

Страница 165: ......

Страница 166: ...988 10740 001 0980...

Отзывы:

Похожие инструкции для HDS Gen3 Touch