


8
Starting the System
Starting the System
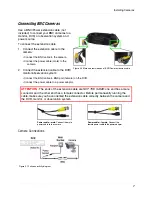
To power the system On/Off:
• Connect the
power cable
to the DC 12V port on the rear panel of the system
Note:
Make sure all cameras and cables are properly connected prior to powering on the system.
At startup, the system performs a basic system check and runs an initial loading sequence. After
a few moments, the system loads a live Quad split-screen display view—Live Viewing: you can
also view in full-screen single channel. See “Display Modes” on page 9.
Camera Title, Status Icons, and Date / Time bar appear on the On-Screen Display.
CH4
CH2
2008/11/20 10:32:30
Figure 6.0 Live viewing with on-screen display
2
4
5
6
1
3
CH3
CH1
1.
Camera Title
:
CH1~4 appears in the top-left corner of each channel.
2.
Main Display
: Displays both full-screen single channel and Quad split-screen.
3.
Status Icons
: Status icons for Motion recording and Video Loss.
4.
Motion Alarm Icon
: Icon for triggered motion alarm.
5.
Recording Icon
: Shown during active recording (manual and scheduled recording).
6.
Date / Time
:Year/month/day and hour/minute/second appear in a black bar in the bottom-left corner of
the main display screen.