background image

25

Getting Started

Setting Decoder

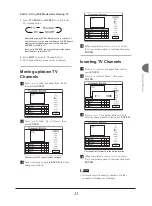
Use this option to switch on or off the ‘Decode’ 

function for particular TV channel(s). 

 1 

   Press 



 to select a channel from the list, 

then press 

ENTER

.

 2 

   Press 



 to select ‘Decode’, then press 

ENTER

.

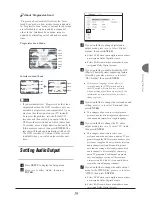
CNN News
Animax
AXN Sports
Discovery
HBO

CH:01

CNN News
Animax
AXN Sports
Discovery
HBO

CH:01

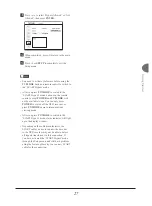
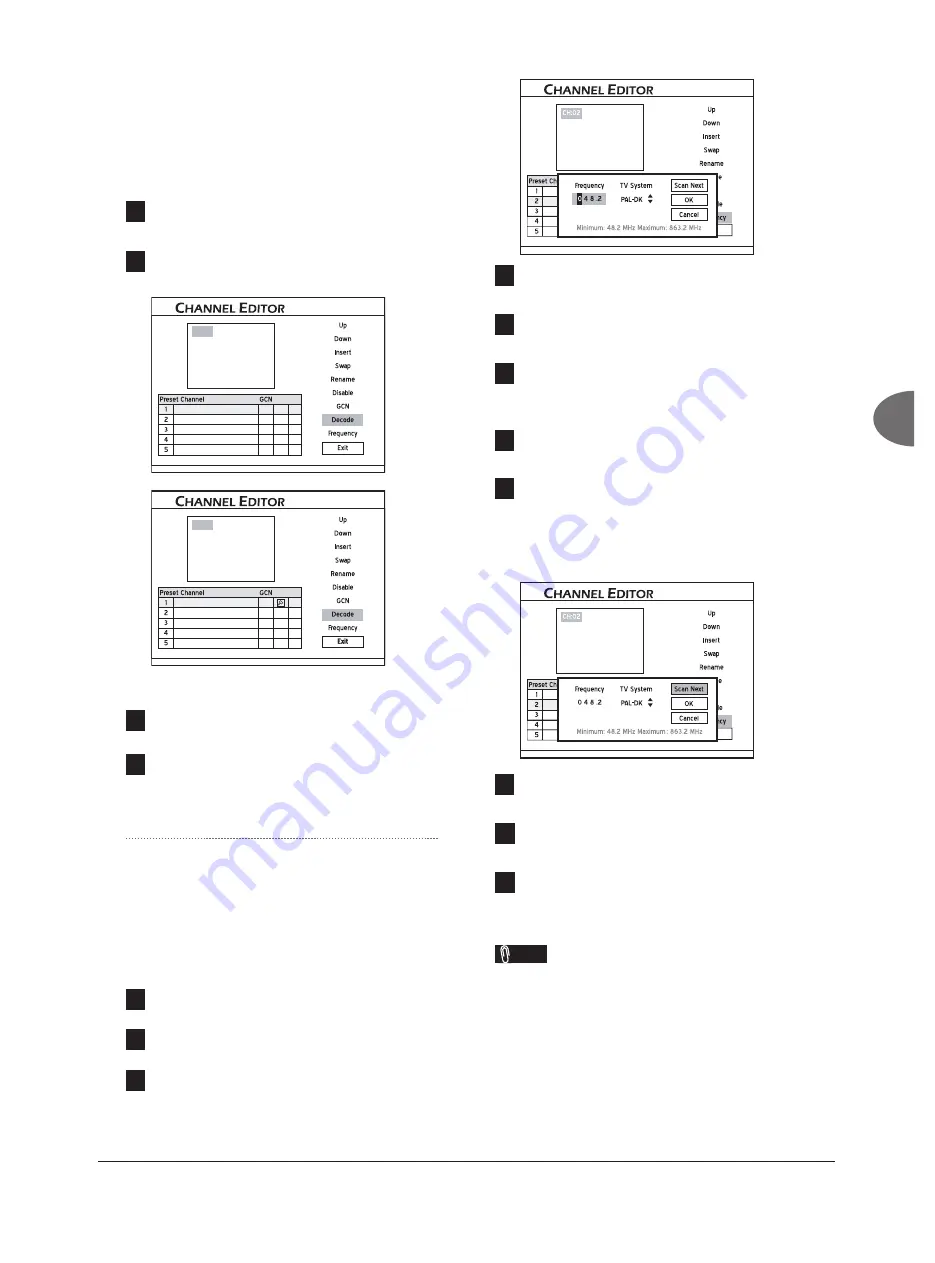
A key icon will appear, indicating that the ‘Decode’ function 

for the selected channel is switched on. 

 3 

   To set the ‘Decode’ function on or off for other 

TV channels, repeat steps 1-2.

 4 

   When completed, press 



 to select 

‘Exit’ or another option to continue, then press 

ENTER

.

Setting Channel Frequency

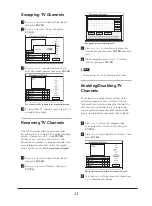
Use this option to search for better channel signal, 

or to search for a particular channel which has not 

been listed after the scanning process. 

 1 

   Press 



 to select a channel from the list, 

then press 

ENTER

.

 2 

   Press 



 to select ‘Frequency’, then press 

ENTER

.

 3 

   The dialogue box for entering the channel 

frequency will appear. Press 



 or 

number buttons (0-9) to enter the channel 

frequency, then press 

ENTER

.

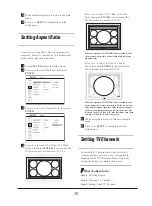
CNN News
Animax
AXN Sports
Discovery
HBO

 4 

   Press 



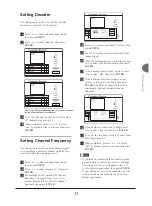
 to select a suitable TV system, then 

press 

ENTER

.

 5 

   The DVD recorder will start searching for the 

channel signal. 

 6 

   When the scanning process is completed, press 



 to select your desired option, then press 

ENTER

 7 

   If the scanning result is what you want, press 



 to select ‘OK’, then press 

ENTER

.

 8 

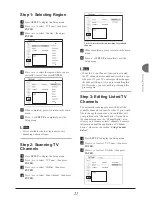
   If the scanning result is not what you want, 

press 



 to select ‘Scan Next’, then press 

ENTER

. The DVD recorder will then start 

searching for the next available channel 

frequency. 

CNN News
Animax
AXN Sports
Discovery
HBO

 9 

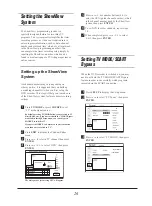
   If you decide not to make any change, press 



 to select ‘Cancel’, then press 

ENTER

10 

   To  apply  the  frequency  setting  to  other  chan-

nels, repeat steps 1-5. 

11 

   When completed, press 



 to select 

‘Exit’ or another option to continue, then press 

ENTER

.

  Note 

•   If you have not completed the channel scanning 

process before you select this option, a dialogue 

box asking you to do so will appear. Press




to select desired application, then press 

ENTER

If you still choose not to scan channels, you will 

need to switch on the channels one by one for 

further applications. 

Содержание LVW-5045

Страница 1: ...SIMPLY AMAZING LVW 5025GHC 5045GHC 5045GDL 5055GDL HDD DVD Recorder LVW 5025 5045 5055...

Страница 2: ...sing Channel Editor 22 Setting the ShowView System 26 Setting TV MODE SCART Bypass 26 Easier Application Access Contents Menu 28 Introducing Contents Menu 29 Using Contents Menu 30 On Screen Input Key...

Страница 3: ...ormats 70 Playing MPEG 4 Files 70 Navigation Menu 71 Subtitle 71 DivX VOD 72 Step 1 Applying for a User Account 72 Step 2 Registering Your DVD Recorder 72 Step 3 Selecting Video Files 73 Step 4 Playin...

Страница 4: ...where they exit from the product 11 ACCESSORIES ATTACHMENTS Use only accessories attachments speci ed by the manufacturer 12 USAGE Unplug this product during lightning storms or when it is not used f...

Страница 5: ...SCAN OUTPUTS NOTICE REQUIREMENTS CONSUMERS SHOULD NOTE THAT NOT ALL HIGH DEFINITION TELEVISION SETS ARE FULLY COMPATIBLE WITH THIS PRODUCT AND MAY CAUSE ARTIFACTS TO BE DISPLAYED IN THE PICTURE IN CAS...

Страница 6: ...ries DivX DivX Certi ed and associated logos are trademarks of DivXNetworks Inc and are used under license This symbol indicates that used electrical and electronic equipment requires special handling...

Страница 7: ...B Yes LVW 5055GDL Yes Yes Yes Yes Yes 250GB Yes Note Please note that given the various compression technologies some MPEG 4 les may not be supported by this DVD recorder DivX VOD video on demand serv...

Страница 8: ...ase see the Quick Reference section at the end of this manual if you need the complete listings of system setup menu and the support ing disc types of this DVD recorder 3 Please see the Speci cations...

Страница 9: ...Super Long Play 6 hours Just Fit Depending on the storage capacity available on disc For Timer Recording only Using Easy Guider Record p 36 Recording p 46 Timer Recording There is no need to worry ab...

Страница 10: ...vert your home videos to discs or create a copy of your digital photo albums MPEG 4 Videos Now you can play MPEG 4 videos on this DVD recorder and enjoy a better viewing experience with your TV Digita...

Страница 11: ...sed Rewritable RW or RW discs on the other hand allow users to erase recordings and then to add new ones to the same section repeatedly Format Rewritability Disc Type Minus Recordable Write Once DVD R...

Страница 12: ...ether all the accessories are included in your package box Remote Control 1 Batteries 2 Audio Video Cable 1 Power Cord 1 Not available in all models Antenna Cable 1 SCART Cable 1 Not available in all...

Страница 13: ...rrent mode from HDD hard disk drive to DVD and vice versa 8 SOURCE button Selects equipment connected via line inputs 9 RECORD button Starts recording 10 PLAY button Starts playback 11 STOP button Sto...

Страница 14: ...2 3 4 5 6 7 8 1 VHF UHF IN OUT jacks Connects antenna cables 2 SCART IN jack Connects the output of external equipment via SCART cable 3 SCART OUT jack Connects the input of external equipment via SC...

Страница 15: ...nu 14 HDD DVD button Press to switch between HDD and DVD mode 15 SETUP button Press to display the System Setup menu 16 POWER button Press to switch on or off the recorder 17 CH CH buttons Press to se...

Страница 16: ...p Your DVD Recorder Before you start 1 Do not plug the AC power cord into the outlet until all other connections are made 2 It is recommended that you connect VIDEO OUT jack of the DVD recorder direct...

Страница 17: ...L OUT OPTICAL jack on the DVD recorder to the digital optical input on a stereo ampli er or a receiver Step 2 Connecting the Video Cable Option 1 Using SCART Cable Use a SCART cable to connect the SCA...

Страница 18: ...to the RF IN jack on the television 3 Use a SCART cable to connect the SCART IN jack on the DVD recorder to the SCART OUT jack on the CANAL decoder 4 Use a SCART cable to connect the SCART OUT jack on...

Страница 19: ...ton Guide to Complete System Setup Menu p 91 Front AV Composite HQ SP LP EP SLP Recording Before you start 1 Check whether the video signal from this DVD recorder is correctly displayed on your TV scr...

Страница 20: ...Espa ol 5 When completed press to return to the main menu 6 Press or SETUP to completely exit the Setup menu Note Available language versions vary depending on model types For the Menu Audio and Subt...

Страница 21: ...original mode in just a few seconds 5 When completed press to return to the main menu 6 Press or SETUP to completely exit the Setup menu Setting System Time 1 Press SETUP to display the Setup menu 2 P...

Страница 22: ...r Select Bit Stream when your ampli er has an integrated Dolby Digital decoder 4 If you would like to enable disable the DTS Digital Theater System supporting feature offered by your discs press to se...

Страница 23: ...to return to the main menu 6 Press or SETUP to completely exit the Setup menu Setting TV Channels To record the TV program you want to watch it is important that you set up a list of recognizable chan...

Страница 24: ...ls 5 When completed press to return to the main menu 6 Press or SETUP to completely exit the Setup menu Note When the Scan Channel function is activated the TV channels are scanned and stored in a spe...

Страница 25: ...the SETUP button on the remote control Before you start 1 Please complete the basic system settings introduced in the previous section rst Using Channel Editor Channel Editor offers users an easy to...

Страница 26: ...max 2 Press to select Up or Down then press ENTER CNN News AXN Sports HBO Discovery Animax The order of the TV channel will be changed 3 Each time when you press ENTER the item changes as follows CH 0...

Страница 27: ...lected will then be switched on or off 3 To switch on or off other channels repeat steps 1 2 to complete the settings Swapping TV Channels 1 Press to select a channel from the list then press ENTER 2...

Страница 28: ...0 9 to enter the channel frequency then press ENTER CNN News Animax AXN Sports Discovery HBO 4 Press to select a suitable TV system then press ENTER 5 The DVD recorder will start searching for the cha...

Страница 29: ...annel number and start end time which are all contained in the ShowView programming numbers You can complete the timer recording setup simply by inputting the ShowView number which can be found in mos...

Страница 30: ...remote control except POWER and TV MODE will not be available to use You can only press POWER to switch off the DVD recorder or press TV MODE again to return previous viewing mode After you press TV M...

Страница 31: ...control works Are the batteries being installed Easier Application Access This chapter introduces three specially designed interfaces which aim to offer you a more convenient and hassle free operatio...

Страница 32: ...ectories in the source medium For example if you organize your music and picture les as follows Root C A D1 jpg C2 jpg C1 jpg B2 mp3 B1 mp3 A2 mp3 A1 mp3 these les will be regrouped and displayed as f...

Страница 33: ...AY to start playback 2 Indicates the album name 3 Indicates the number of les contained in the album 4 Indicates a default album which groups together les which are not included in any speci c folder...

Страница 34: ...playback 6 If you have selected the music or picture le catalogue press to select desired album Press PLAY to start playback or press ENTER to go to the selected album 7 Press to select desired track...

Страница 35: ...on the entry bar 8 Indicates the function of discarding changes and returning to the previous page 9 Indicates the function of inserting space 10 Indicates the function of quitting the applica tion U...

Страница 36: ...ack which allows you to delete character by character in a backward direction then press ENTER If you want to delete all the characters you have entered press to select Clear then press ENTER 5 When c...

Страница 37: ...of the disc being played will be shown If you have been listening to an audio CD The display window will be blank If you have been browsing pictures A Picture icon will be shown Note Press GUIDER if...

Страница 38: ...to select Play then press ENTER 2 Press to select DVD or HDD as the source medium then press ENTER 3 Press to select Picture then press ENTER 4 Press to select a le album you wish to play then press E...

Страница 39: ...syAccess_EasyGuider_03_01 EasyAccess_EasyGuider_03_01 EasyAccess_EasyGuider_03_01 EasyAccess_EasyGuider_03_01 EasyAccess_EasyGuider_03_01 EasyAccess_EasyGuider_03_01 EasyAccess_EasyGuider_03_01 EasyAc...

Страница 40: ...ou select and insert a record able disc Guide to Using the Discs p 94 2 Check whether the system date and time of the DVD recorder is correct Setting System Time p 18 3 Check whether there is enough s...

Страница 41: ...s If a TV program starts earlier than is scheduled the DVD recorder will then be automatically switched on and off according to the updated time Note This DVD recorder allows you to set up a maxi mum...

Страница 42: ...tion will appear Press ENTER to exit the screen About VPS PDC VPS video programming system PDC program delivery control are used to control the activation and duration of preset TV channel recordings...

Страница 43: ...like to make copies from disc to the hard drive Copying from Disc to Hard Drive 1 On the Easy Guider menu press to select Copy then press ENTER 2 Press to select DVD to HDD then press ENTER 3 If you...

Страница 44: ...u would like to copy then press ENTER EasyAccess_EasyGuider_06_02 EasyAccess_EasyGuider_06_02 EasyAccess_EasyGuider_06_02 EasyAccess_EasyGuider_06_02 EasyAccess_EasyGuider_06_02 EasyAccess_EasyGuider_...

Страница 45: ...der_07_02 EasyAccess_EasyGuider_07_02 EasyAccess_EasyGuider_07_02 EasyAccess_EasyGuider_07_02 EasyAccess_EasyGuider_07_02 EasyAccess_EasyGuider_07_02 EasyAccess_EasyGuider_07_02 EasyAccess_EasyGuider_...

Страница 46: ...ress ENTER Note The application will permanently delete selected les or albums Overall clean up time may vary depending on the original recording conditions Tools for Hard Drive Defragment 1 On the Ea...

Страница 47: ...for Disc then press ENTER 3 Press to select Erase then press ENTER 4 Press to select Go then press ENTER to start erasing 5 The erasing process will then start 6 When completed press to select Exit th...

Страница 48: ...require nalization Discs containing other types of media les are considered as data there is no need to nalize these discs Tools for Disc Label Disc 1 On the Easy Guider menu press to select Disc Tool...

Страница 49: ...able format then press ENTER Recording_01_03 This DVD recorder adopts the DVD VR record ing format which enjoys a relatively greater compatibility However it is still likely that recordings made with...

Страница 50: ...R Recording_01_03 Front AV Composite Recording Guide to Recording Options p 97 2 When completed press SETUP to exit the Setup menu 3 Press OPEN CLOSE to open the disc tray 4 Carefully place the disc i...

Страница 51: ...se recording Press STOP to stop recording 8 Press RECORD again if you need to start another recording session Recording from VCR V8 Camcorder Before you start 1 Make sure all the cables are well conne...

Страница 52: ...o select Recording then press to enter the sub menu Press to select a recording mode then press ENTER Guide to Recording Options p 97 2 When completed press SETUP to exit the Setup menu 3 Press SOURCE...

Страница 53: ...One Touch Recording will start with the DVD recorder s default settings if you do not make any setting changes before activating this function The overall recording time depends on the selected recor...

Страница 54: ...l During recording this DVD recorder can automati cally divide a session into chapters by inserting chapter marks You can select a preferred interval through the Setup menu 1 Press SETUP to display th...

Страница 55: ...e recording Press to select a suitable format then press ENTER Recording_01_03 This DVD recorder adopts the DVD VR record ing format which enjoys a relatively greater compatibility However it is still...

Страница 56: ...whether there is enough space on the disc or on the hard drive Introducing Timer Record Menu Press TIMER to display the Timer Record menu You can press on a highlighted program to switch between the...

Страница 57: ...time 4 Indicates the page you are viewing 5 Indicates the ShowView number of your desired TV program s 6 Indicates the assigned recording mode 7 Indicates the sound option selected for the program 8 I...

Страница 58: ...udio mode then press ENTER 11 Press to select PDC then press ENTER Press to switch on or off the PDC function then press ENTER 12 Press to select OK then press ENTER to save the setting and return to...

Страница 59: ...on then press ENTER to display the ShowView setup menu 1 Press or number buttons 0 9 to enter the ShowView number then press ENTER PDC Sound Details of the preset program will be displayed 2 The Prese...

Страница 60: ...preset programs before you can assign the feature to other timer recordings Meanwhile please be reminded that the PDC is applicable only when your DVD recorder is in standby mode If you have been usin...

Страница 61: ...l not be able to make use of the Time Shift function Before you start 1 Check whether the video signal of this DVD recorder is correctly displayed on your TV screen Connecting up Your DVD Recorder p 1...

Страница 62: ...press TIME SHIFT 3 Press PLAY when you decide to go back to watch the program The program will then be played back from where it is interrupted 4 Press PAUSE STEP to pause playback Press PLAY again to...

Страница 63: ...deo discs marked with the same region code as printed on its rear panel example of region code or all region discs which are labeled with the icon ALL If you try to play discs with different region co...

Страница 64: ...aying video les When playing audio CDs or music les When playing pictures Repeat The Repeat feature allows you to repeat a track title le or disc depending on the media type 1 Press to select Repeat t...

Страница 65: ...ontrol then press ENTER A control pad will appear 2 Press to select the zoom in icon then press ENTER repeatedly to enlarge the picture by 1 2X 3 4X or 1X Or select the zoom out icon then press ENTER...

Страница 66: ...may preview using the disc menu Some titles may be further divided into a smaller unit called chapter To view the disc menu press MENU on the remote control to activate the function Editing_00_03 To...

Страница 67: ...ge the subtitle language of the disc at any time Setting Language p 17 1 Press to select Subtitle then press ENTER to go to the sub menu 2 Press to select a subtitle language then press ENTER 3 Press...

Страница 68: ...e screen 3 Press NAVI again or repeatedly press to exit the Navigation menu Note Different categories of information will be shown depending on the media type Playing DVD Video Disc 1 Press OPEN CLOSE...

Страница 69: ...he disc press OPEN CLOSE Programmed Playback 1 Press OPEN CLOSE to open the disc tray 2 Carefully place the disc on the tray with the label side facing up then press OPEN CLOSE 3 If playback does not...

Страница 70: ...OPEN CLOSE to open the disc tray 2 Carefully place the disc on the tray with the label side facing up then press OPEN CLOSE 3 Press CONTENTS to display the Contents Menu 4 Press to select the source m...

Страница 71: ...and music les at the same time You can use this function either through the Contents Menu or through Easy Guider Using Contents Menu 1 Press CONTENTS to display the Contents Menu 2 Press to select the...

Страница 72: ...s illegal to download and use unauthorized copyrighted materials Make sure you obtain the permission or authorization from copyright owners and related third parties before you start using or watching...

Страница 73: ...map based subtitles such as idx sub are not supported by this DVD recorder Playing MPEG 4 Files 1 Press OPEN CLOSE to open the disc tray 2 Carefully place the disc in the tray with the label side faci...

Страница 74: ...orrect le name You need to give the same le names to video title and subtitle le so that the DVD recorder can match one le with the other For example name XXX avi for the video title and XXX txt for t...

Страница 75: ...video les Step 4 Playing the les on your DVD recorder Step 1 Applying for a User Account To watch DRM protected video les you need to register a user account on the DivX website rst For more informat...

Страница 76: ...tch from various online rental or retail shops Normally users pay to get the viewing rights of these video les which are downloaded to users PCs If you would like to watch them on your TV you need to...

Страница 77: ...depending on the disc format minus or plus If you do not nalize a disc before playing it on other compatible devices results of the editings you have made on the disc will not be shown Please nish all...

Страница 78: ...ng played is shown 2 Indicates the editing options for titles 3 Indicates the selected thumbnail picture 4 Indicates the original editing markings of current title 5 Indicates the progress bar for cur...

Страница 79: ...s and hard drive only The entry bar CANNOT be left blank If such a condition occurs you will not be able to exit the keypad screen Please follow the instruction given in the pop up dialogue box and go...

Страница 80: ...writ ten slot may not be exact as it is likely to be affected by the recording mode of the overwritten title It is suggested that you allow some exibil ity when assigning new recording to this section...

Страница 81: ...e the title with its previous next title and only when the previ ous next title has the same recording quality TV signal audio and video settings Otherwise the function will not be applicable Protecte...

Страница 82: ...ting Chapter Mark During playback you can insert chapter mark s within a title 1 Start playing back desired title via Contents Menu or via disc menu 2 Press EDIT to display the Edit menu 3 On the Edit...

Страница 83: ...or NEXT to advance to the previous or next chapter 5 As the playback progresses press ENTER at desired point to hide a chapter 6 To hide more chapters within the title repeat steps 4 to 5 Or press to...

Страница 84: ...5 To show more hidden chapters within the title repeat steps 3 to 5 Or press to select Exit then press ENTER to exit the setting Note This function is applicable to titles saved on DVD discs and hard...

Страница 85: ...amages and other remedies This DVD recorder complies with ISO standard for discs therefore it may not be able to let you copy every le to discs if the number of le directory level is more than seven i...

Страница 86: ...isc cannot be copied from DVD to hard drive The One Touch Copying function will not be applicable if any part of the title you would like to copy is set to Copy Once protection Copying from Hard Drive...

Страница 87: ...D in le names can only be copied to a CD disc CD R RW prepared in SVCD format CD R RW discs prepared in Audio CD format can only be used to copy WAV music les When the copying is completed you need to...

Страница 88: ...noises Check if the disc is distorted or scratched If the video output signal from the recorder goes via VCR to your TV set or if you connect the recorder to a TV VIDEO combination set the copyright...

Страница 89: ...r the input source setting on the ampli er is correct There is no sound when playback is paused or is under scanning mode even forwards at regular speed or is set for slow motion Press PLAY to resume...

Страница 90: ...Default code for the function 0000 Check whether the cables between TV and DVD recorder are well connected TV channels TV channels cannot be changed Switch the input signal source of the recorder to...

Страница 91: ...xial x 1 RF Output Coaxial x 1 SCART Input CVBS RGB in Decoder x 1 SCART Output CVBS S Video RGB out x 1 Video Output Cinch yellow x 1 Audio L R Output Cinch white red x 1 Component Video Output Y Pb...

Страница 92: ...rive HQ High Quality 52 hours SP Standard Play 104 hours LP Long Play 156 hours EP Extended Play 208 hours SLP Super Long Play 312 hours Just Fit Variable 4 7 GB Recordable Rewritable DVD HQ High Qual...

Страница 93: ...r 2 CD DA PCM Audio Format Supported Playback Playable Formats MP3 WMA WAV LPCM Dolby Digital 2 channel Dolby Digital 5 1 channel digital out only DTS only digital out Disc Types Supported Playback DV...

Страница 94: ...leep Off 30 minutes 60 minutes 90 minutes 120 minutes This option allows users to set reset desired time slot before the DVD recorder automatically switches to an inactive mode Restore This option all...

Страница 95: ...reset the display interval for each picture VCD PBC On Off This option allows users to enable disable playback control function on VCD discs which adopt the VCD 2 0 standard DivX R VOD Registration Th...

Страница 96: ...k TV Audio Stereo Main SAP Sub Mono This option allows users to preset the sound effect of TV programs MPEG PCM Bit Stream This option allows users to select an appropriate signal output mode TV Tuner...

Страница 97: ...DVD R DL Double Layer DVD R double layer discs written in DVD Video format and nalized or with JPEG BMP MP3 WMA WAV MPEG 4 les Video CD VCD CDs for video les recorded with CD sound VHS quality MPEG 1...

Страница 98: ...aped as these can damage the recorder It may not be possible to play CD R CD RW DVD R DVD RW DVD R DVD RW in all cases due to the type of disc or condition of the recording Important Unplayable Disc T...

Страница 99: ...c DVD RW DVD VR Data Disc For media data les Disc Finalization Disc Content Type Finalization Recording after Finalization DVD R Data le Not required N A DVD VR Required No DVD RW Data le Not required...

Страница 100: ...3 for MP3 and WMA tags This DVD recorder does not support MP3 Pro les The MP3 le bitrates supported by this DVD recorder are 32Kbps 320Kbps Guide to Recording Options Recording Mode Media Mode Recordi...

Страница 101: ...igh Quality 115 minutes SP Standard Play 230 minutes LP Long Play 345 minutes EP Extended Play 460 minutes SLP Super Long Play 690 minutes Just Fit Variable 700 MB Recordable Rewritable CD VCD 68 minu...

Страница 102: ...zation information DivX VOD DivX VOD video on demand service is designed to protect copyrights of digital videos Through an online registration process DivX VOD prevents unauthorized downloads or le s...

Страница 103: ...ion Picture Experts Group This is an international standard for compression of moving images On some DVDs digital audio has been compressed and recorded in this format NTSC National Television System...

Страница 104: ...nology Europe B V Meerenakkerplein 16 5652 BJ EINDHOVEN The Netherlands Tel 31 40 2508000 Fax 31 40 2508092 Service e mail dceu_support liteonit com http www liteonit com DC english liteonit htm USA L...

Отзывы: