37
206-4324
Channel Attributes and Channel Bank Allocation
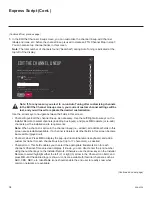
Three attributes are available for each channel: Encrypted, OSD, and Blank Video. When the
TV creates an FTG Channel Map upon completion of the Express Script, the OSD attribute
(displays the channel number, label, and icon) is automatically assigned to all channels, and the
Encrypted attribute is assigned to each Pro:Idiom encrypted channel detected during the channel
scan. The Blank Video attribute is not assigned automatically to any channels; however, in the
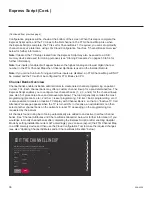
“Edit the Channel Lineup” screen of the Express Script, you have the option to assign the Blank
Video (i.e., “BLANK”) attribute to channels, as required. When you assign the BLANK attribute
to a channel (as opposed to the default “NORMAL”), this means that the channel audio will be
audible; however, its video will be black (no picture). The NORMAL or BLANK attribute applies
to the channel regardless of channel bank allocation.
Once you have set a channel’s NORMAL/BLANK attribute, determine the channel bank allocation
for each of the four available channel banks: ADDED or DELETED. When DELETED, the channel
will not appear in the channel lineup of the currently selected channel bank.
Selecting a Channel Bank
To select a channel bank, press
CH. BANK
on the Installer Remote. The first time you press the
CH. BANK key, the TV display will show the currently active channel bank (default = Channel
Bank 1). Each successive CH. BANK key press selects channel banks numerically, i.e., from
Channel Bank 1 to Channel Bank 4. Press
CH. BANK
repeatedly until the desired channel bank
is selected.
Updating Channel Attributes and/or Channel Bank Allocation
If you would like to modify channel attributes and/or channel bank allocation and/or update the
FTG Channel Map in general, you can save (export) the FTG Channel Map to a USB memory
device (see “Exporting a Clone File” on pages 58 to 60) and then use the Cloud Configuration
Tool / Channel Map web page to make the required changes. On the Channel Map web page,
Zones 1 to 4 are used to create custom channel lineups for Channel Banks 1 to 4. A checked
Zone Restriction (1 to 4) checkbox means that the selected channel is “deleted” from the same
numbered channel bank. Refer to the Channel Map web page overview on page 69 and also the
Cloud Configuration Tool User Guide
for further information. The Cloud Configuration Tool is
available at:
cct.procentric.tv
.
Note:
Hospital Mode channel banks and Lodging TV Zoning are mutually exclusive features of
these TV models. If you wish to use channel banks, do not change the TV Zone # during the TV
setup, as the TV Zone # will be used to track channel banks (banks are selected after configuration
using the CH. BANK key on the remote as described above). If it becomes necessary to import
a “.tlx” file with Installer Menu updates, in order to ensure that the Installer Menu settings are
accepted by all UV770M TVs regardless of their current channel bank, you must also ensure that
the new Installer Menu profile has a Zone 0 assignment. For additional information on TV Zoning,
see Reference section, “Using the TV’s Zoning Features.”
Inactive TV Setup
To create an inactive TV display on Channel Bank 4, you need to modify the channel bank
allocation for each channel in Channel Bank 4 to DELETED. You can do this in the Express
Script, or you can use the Cloud Configuration Tool, as indicated above, to make changes.
Express Script (Cont.)

