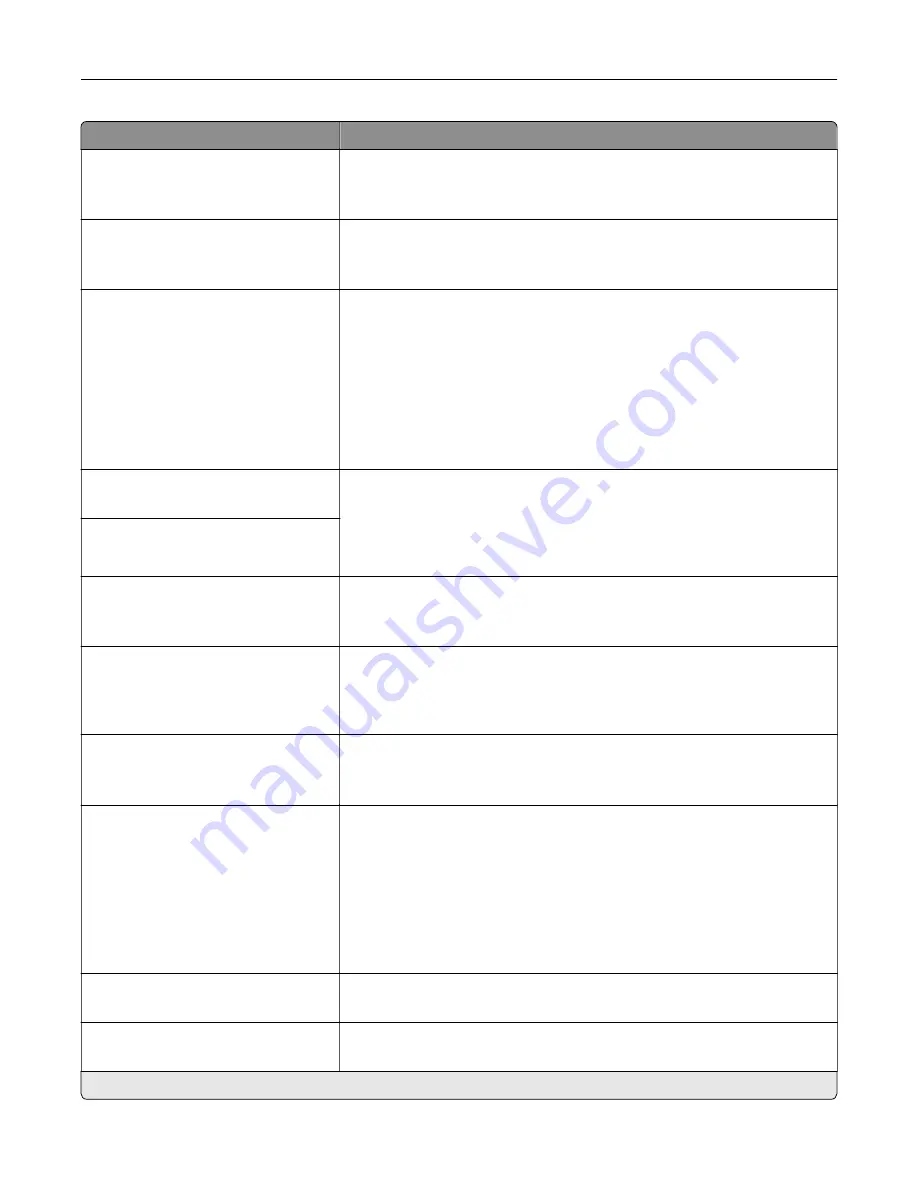
Menu item
Description
Pitch
0.08–100 (10*)
Specify the pitch for fixed or monospaced fonts.
Note:
Pitch refers to the number of fixed
‑
space characters in a horizontal
inch of type.
Orientation
Portrait*
Landscape
Specify the orientation of text and graphics on the page.
Lines per Page
1–255
Specify the number of lines of text for each page printed through the PCL®
datastream.
Notes:
•
This menu item activates vertical escapement that causes the
selected number of requested lines to print between the default
margins of the page.
•
60 is the U.S. factory default setting. 64 is the international factory
default setting.
PCL5 Minimum Line Width
1–30 (2*)
Set the initial minimum stroke width.
Notes:
•
Jobs printed in 1200 dpi use the value directly.
•
Jobs printed in 4800 CQ use half the value.
PCLXL Minimum Line Width
1–30 (2*)
A4 Width
198 mm*
203 mm
Set the width of the logical page on A4
‑
size paper.
Note:
Logical page is the space on the physical page where data is
printed.
Auto CR after LF
Off*
On
Set the printer to perform a carriage return after a line feed control
command.
Note:
Carriage return is a mechanism that commands the printer to move
the position of the cursor to the first position on the same line.
Auto LF after CR
Off*
On
Set the printer to perform a line feed after a carriage return control
command.
Tray Renumber
Assign MP Feeder
Assign Tray [x]
Assign Manual Paper
Assign Manual Envelope
Configure the printer to work with a different print driver or custom
application that uses a different set of source assignments to request a
given paper source.
Choose from the following options:
Off*—The printer uses the factory default paper source assignments.
None—The paper source ignores the Select Paper Feed command.
0–199—Select a numeric value to assign a custom value to a paper
source.
Tray Renumber
View Factory Defaults
Show the factory default value assigned for each paper source.
Tray Renumber
Restore Defaults
Restore the tray renumber values to their factory defaults.
Note:
An asterisk (*) next to a value indicates the factory default setting.
Understanding the printer menus
91
Содержание XC8155
Страница 66: ...5 Touch Scan Here If necessary change the scan settings 6 Scan the document Scanning 66 ...
Страница 159: ... Scanner glass pad 3 Close the scanner cover Emptying the hole punch box 1 Open door J Maintaining the printer 159 ...
Страница 160: ...2 Remove and empty the hole punch box 3 Insert the hole punch box 4 Close door J Maintaining the printer 160 ...
Страница 170: ...2 Remove the waste toner bottle 3 Remove the imaging unit 4 Remove the photoconductor unit Maintaining the printer 170 ...
Страница 172: ...Replacing an imaging unit 1 Open door A 2 Remove the waste toner bottle Maintaining the printer 172 ...
Страница 176: ...3 Remove the pick roller 4 Unpack the new pick roller Maintaining the printer 176 ...
Страница 186: ...4 Insert the new transfer roller 5 Remove the white packing material 6 Close door B Maintaining the printer 186 ...
Страница 193: ...2 Open door G 3 Remove the staple cartridge 4 Unpack the new staple cartridge Maintaining the printer 193 ...
Страница 195: ...2 Open door G 3 Pull out the staple cartridge holder Maintaining the printer 195 ...
Страница 218: ...2 Open door G 3 Pull out the staple cartridge holder Clearing jams 218 ...
Страница 222: ... Area J1 Areas J3 and J4 Areas J5 and J6 3 Close door J Clearing jams 222 ...
Страница 227: ...5 Insert the staple cartridge holder 6 Close door J Clearing jams 227 ...
Страница 284: ...Installing the staple finisher 1 Turn off the printer 2 Open door C 3 Remove the paper bail Upgrading and migrating 284 ...
Страница 287: ...4 Open the covers at the side of the caster base 5 Open door C Upgrading and migrating 287 ...


