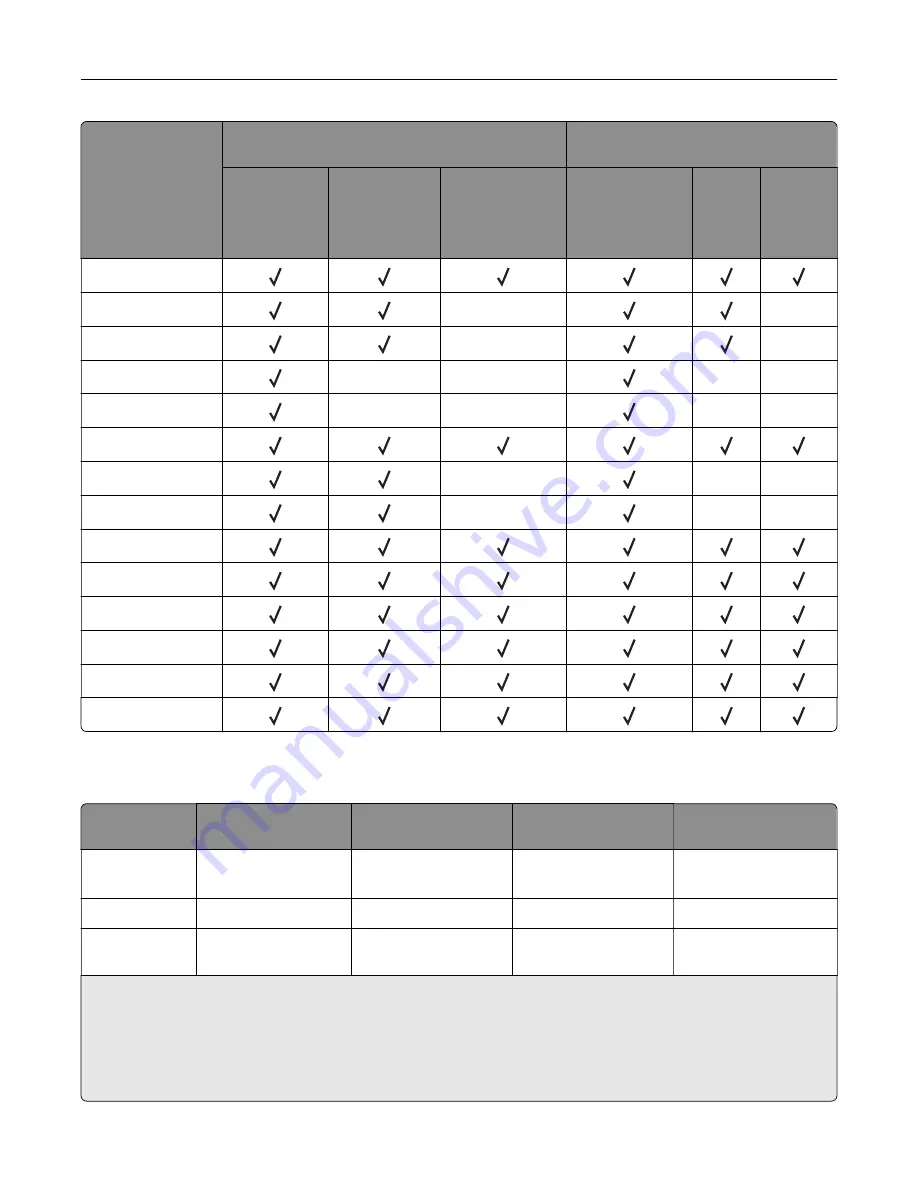
Paper type
Staple finisher
Multiposition staple, hole punch
finisher
Non
‑
finishing
Offset
Staple
Standard bin
(Normal
and offset
stacking)
2
‑
bin
mailbox
Staple
and hole
punch
Recycled
Glossy
X
X
Heavy Glossy
X
X
Labels
X
X
X
X
Vinyl Labels
X
X
X
X
Bond
Envelope
X
X
X
Rough Envelope
X
X
X
Letterhead
Preprinted
Colored Paper
Light Paper
Heavy Paper
Rough Cotton
Supported paper weights
Paper type
Standard 550
‑
sheet
tray
2200-sheet tray
Envelope tray
Multipurpose feeder
Plain Paper
1,2
60–176 g/m
2
(16–
47 lb)
3
60–120 g/m
2
(16–32 lb)
N/A
60–176 g/m
2
(16–47 lb)
Banner Paper
N/A
N/A
N/A
90–105 g/m
2
(24–28 lb)
Glossy
88–176 g/m
2
(60–
120 lb)
N/A
N/A
88–176 g/m
2
(60–
120 lb)
1
Grain short paper that weighs at least 90 g/m
2
(24 lb) is supported in two
‑
sided printing.
2
Recycled paper that weighs 75–120 g/m
2
(20–32 lb) is supported in two
‑
sided printing.
3
The paper weight is also supported in two
‑
sided printing.
4
100% cotton content maximum weight is 24 lb bond.
5
28 lb
‑
bond envelopes are limited to 25% cotton content.
Paper support
37
Содержание XC8155
Страница 66: ...5 Touch Scan Here If necessary change the scan settings 6 Scan the document Scanning 66 ...
Страница 159: ... Scanner glass pad 3 Close the scanner cover Emptying the hole punch box 1 Open door J Maintaining the printer 159 ...
Страница 160: ...2 Remove and empty the hole punch box 3 Insert the hole punch box 4 Close door J Maintaining the printer 160 ...
Страница 170: ...2 Remove the waste toner bottle 3 Remove the imaging unit 4 Remove the photoconductor unit Maintaining the printer 170 ...
Страница 172: ...Replacing an imaging unit 1 Open door A 2 Remove the waste toner bottle Maintaining the printer 172 ...
Страница 176: ...3 Remove the pick roller 4 Unpack the new pick roller Maintaining the printer 176 ...
Страница 186: ...4 Insert the new transfer roller 5 Remove the white packing material 6 Close door B Maintaining the printer 186 ...
Страница 193: ...2 Open door G 3 Remove the staple cartridge 4 Unpack the new staple cartridge Maintaining the printer 193 ...
Страница 195: ...2 Open door G 3 Pull out the staple cartridge holder Maintaining the printer 195 ...
Страница 218: ...2 Open door G 3 Pull out the staple cartridge holder Clearing jams 218 ...
Страница 222: ... Area J1 Areas J3 and J4 Areas J5 and J6 3 Close door J Clearing jams 222 ...
Страница 227: ...5 Insert the staple cartridge holder 6 Close door J Clearing jams 227 ...
Страница 284: ...Installing the staple finisher 1 Turn off the printer 2 Open door C 3 Remove the paper bail Upgrading and migrating 284 ...
Страница 287: ...4 Open the covers at the side of the caster base 5 Open door C Upgrading and migrating 287 ...


