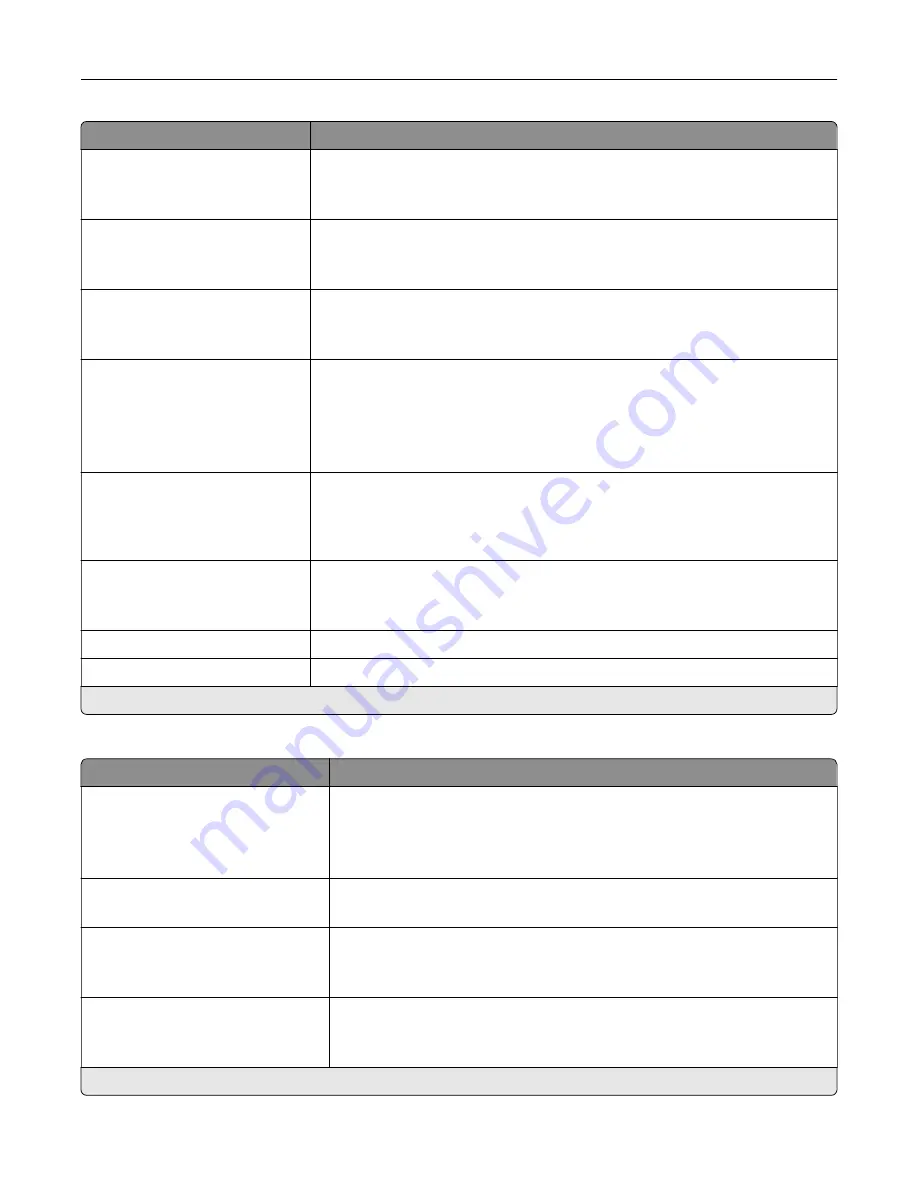
Menu item
Description
Custom Job Scanning
Off*
On
Turn on scanning of custom jobs by default.
Note:
This menu item appears only when a hard disk is installed.
Scan Preview
Off*
On
Show a preview of the scan on the display.
Note:
This menu item appears only when a hard disk is installed.
Adjust ADF Skew
Off*
On
Correct slight skew in the scanned image.
Enable Color Fax Scans
Off by Default*
On by Default
Never Use
Always Use
Enable color scans for fax.
Auto Convert Color Faxes to
Mono Faxes
On*
Off
Convert all outgoing color faxes to black and white.
Confirm Fax Number
Off*
On
Ask the user to confirm the fax number.
Dial Prefix
Set a dialing prefix.
Dialing Prefix Rules
Establish a dialing prefix rule.
Note:
An asterisk (*) next to a value indicates the factory default setting.
Fax Receive Settings
Menu item
Description
Fax Job Waiting
None*
Toner
Toner and Supplies
Remove fax jobs that request specific unavailable resources from the print
queue.
Rings to Answer
1–25 (3*)
Set the number of rings for incoming fax.
Auto Reduction
On*
Off
Scale incoming fax to fit on the page.
Paper Source
Tray [X]
Auto*
Set the paper source for printing incoming fax.
Note:
An asterisk (*) next to a value indicates the factory default setting.
Understanding the printer menus
105
Содержание XC8155
Страница 66: ...5 Touch Scan Here If necessary change the scan settings 6 Scan the document Scanning 66 ...
Страница 159: ... Scanner glass pad 3 Close the scanner cover Emptying the hole punch box 1 Open door J Maintaining the printer 159 ...
Страница 160: ...2 Remove and empty the hole punch box 3 Insert the hole punch box 4 Close door J Maintaining the printer 160 ...
Страница 170: ...2 Remove the waste toner bottle 3 Remove the imaging unit 4 Remove the photoconductor unit Maintaining the printer 170 ...
Страница 172: ...Replacing an imaging unit 1 Open door A 2 Remove the waste toner bottle Maintaining the printer 172 ...
Страница 176: ...3 Remove the pick roller 4 Unpack the new pick roller Maintaining the printer 176 ...
Страница 186: ...4 Insert the new transfer roller 5 Remove the white packing material 6 Close door B Maintaining the printer 186 ...
Страница 193: ...2 Open door G 3 Remove the staple cartridge 4 Unpack the new staple cartridge Maintaining the printer 193 ...
Страница 195: ...2 Open door G 3 Pull out the staple cartridge holder Maintaining the printer 195 ...
Страница 218: ...2 Open door G 3 Pull out the staple cartridge holder Clearing jams 218 ...
Страница 222: ... Area J1 Areas J3 and J4 Areas J5 and J6 3 Close door J Clearing jams 222 ...
Страница 227: ...5 Insert the staple cartridge holder 6 Close door J Clearing jams 227 ...
Страница 284: ...Installing the staple finisher 1 Turn off the printer 2 Open door C 3 Remove the paper bail Upgrading and migrating 284 ...
Страница 287: ...4 Open the covers at the side of the caster base 5 Open door C Upgrading and migrating 287 ...


