background image

4

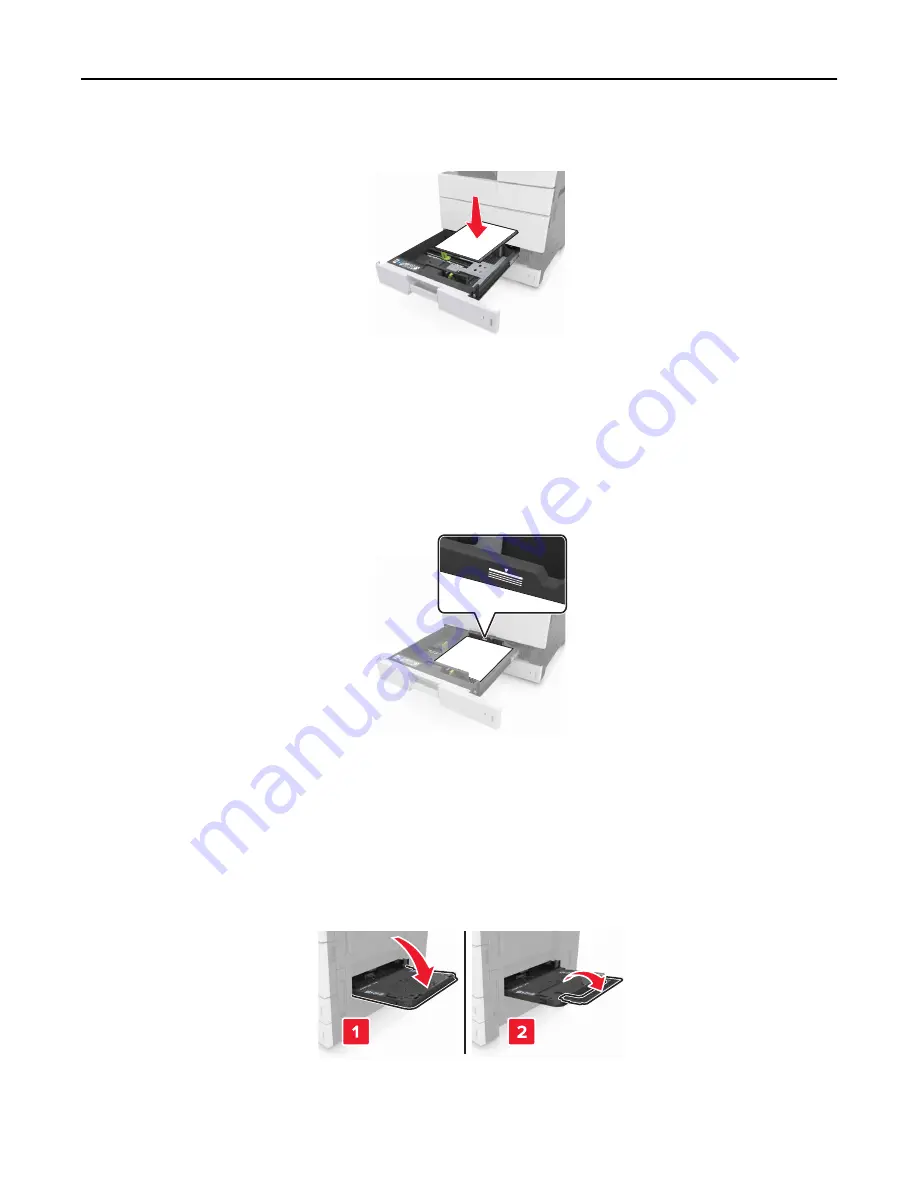
Load the paper stack with the printable side faceup.

Notes:

Load printable side facedown for duplex printing.

Load pre-punched paper with the holes toward the front or the left side of the tray.

Load letterhead with the header on the left side of the tray.

Make sure that the paper is below the maximum fill line on the edge of the paper tray. Overfilling may cause
paper jams.

5

Insert the tray.

6

From the control panel, set the paper size and paper type in the Paper menu to match the paper loaded in the tray.

Loading the multipurpose feeder

1

Open the multipurpose feeder.

Loading paper and specialty media

53

Содержание MX910 Series

Страница 1: ...MX910 Series User s Guide June 2014 www lexmark com Machine type s 7421 Model s 036 236 436...

Страница 2: ...tons 18 Setting up and using the home screen applications 20 Finding the IP address of the printer 20 Finding the IP address of the computer 20 Accessing the Embedded Web Server 20 Customizing the hom...

Страница 3: ...70 Printing forms and a document 70 Printing from a flash drive or mobile device 71 Printing confidential and other held jobs 73 Printing information pages 74 Canceling a print job 75 Copying 76 Maki...

Страница 4: ...an options 115 Understanding the printer menus 117 Menus list 117 Paper menu 118 Reports menu 128 Network Ports menu 129 Security menu 141 Settings menu 148 Saving money and the environment 198 Saving...

Страница 5: ...nderstanding jam messages and locations 243 x page jam clear jammed paper from multipurpose feeder 200 xx 245 x page jam open door C and clear all jammed paper 2yy xx 245 x page jam slide the 3000 she...

Страница 6: ...oblems 294 Solving copy problems 320 Solving fax problems 322 Solving scanner problems 329 Solving home screen application problems 333 Embedded Web Server does not open 333 Contacting customer suppor...

Страница 7: ...nter weight is greater than 18 kg 40 lb and requires two or more trained personnel to lift it safely CAUTION POTENTIAL INJURY Before moving the printer follow these guidelines to avoid personal injury...

Страница 8: ...se described in the user documentation to a service representative CAUTION SHOCK HAZARD To avoid the risk of electrical shock when cleaning the exterior of the printer unplug the power cord from the e...

Страница 9: ...and photos Setting up and using the printer software Configuring the printer on a network Caring for and maintaining the printer Troubleshooting and solving problems User s Guide and Quick Reference...

Страница 10: ...ntries and regions See the printed warranty that came with this printer Connecting the printer to an outlet Connect the power cord to the printer and then to a properly grounded and easily accessible...

Страница 11: ...F Allow the following recommended amount of space around the printer for proper ventilation 1 Rear 201 mm 7 91 in 2 Right side 556 mm 21 89 in 3 Front 476 mm 18 74 in 4 Left side 176 mm 6 93 in 5 Top...

Страница 12: ...NG HAZARD Floor mounted configurations require additional furniture for stability You must use either a printer stand or printer base if you are using multiple input options If you purchased a multifu...

Страница 13: ...rted only if another optional tray is installed The staple finisher is not supported if another finisher is installed Understanding the basic functions of the scanner Make quick copies or set the prin...

Страница 14: ...two sided documents Load an original document faceup Use the scanner glass for single page documents book pages small items such as postcards or photos transparencies photo paper or thin media such a...

Страница 15: ...sing the Sleep button until the printer wakes Performing a power on reset using the main power switch 4 Keypad Enter numbers letters or symbols 5 Start button Start a job depending on which mode is se...

Страница 16: ...printer is turned on the display shows a basic screen referred to as the home screen Touch the home screen buttons and icons to initiate an action such as copying faxing or scanning to open the menu...

Страница 17: ...ntext sensitive Help dialog 14 Search Held Jobs Search for one or more of the following items User name for held or confidential print jobs Job names for held jobs excluding confidential print jobs Pr...

Страница 18: ...e IP address when accessing the Embedded Web Server so you can view and remotely configure printer settings even when you are not physically near the printer Using the touch screen buttons Note Your h...

Страница 19: ...tons Touch To Accept Save a setting Cancel Cancel an action or a selection Exit a screen and return to the previous screen without saving changes Reset Reset values on the screen Understanding the pri...

Страница 20: ...ing a network setup page or menu settings page and then finding the TCP IP section Note An IP address appears as four sets of numbers separated by periods such as 123 123 123 123 Finding the IP addres...

Страница 21: ...e different applications Use To Card Copy Scan and print both sides of a card on a single page For more information see Setting up Card Copy on page 23 Fax Scan a document and then send it to a fax nu...

Страница 22: ...rom the printer home screen Note The printer must have permission to access the network folder FTP site or Web site where the bookmark is stored From the computer where the bookmark is stored use shar...

Страница 23: ...print when the application is used Default contrast setting Specify a setting to increase or decrease the level of contrast when a copy of the scanned card is printed Select Best for Content if you wa...

Страница 24: ...y periods such as 123 123 123 123 2 Click Settings Apps Apps Management Multi Send 3 From the Profiles section click Add and then customize the settings Notes See the mouse over help beside each field...

Страница 25: ...tion are correct type the correct IP address of the host computer where the specified destination is located For more information on obtaining the IP address of the host computer see Finding the IP ad...

Страница 26: ...on file for one or multiple applications For one application a Navigate to Settings Apps Apps Management select an application Configure b Export or import the configuration file Notes If a JVM Out of...

Страница 27: ...orms and Bar Code PRESCRIBE IPDS LexmarkTM Internal Solutions Ports ISP Standard 10 100 1000 Ethernet MarkNetTM N8350 802 11 b g n wireless print server MarkNet N8352 802 11 b g n wireless print serve...

Страница 28: ...4 Use the following illustration to locate the appropriate connector Warning Potential Damage Controller board electronic components are easily damaged by static electricity Touch a metal surface on...

Страница 29: ...1 Option card connector 2 Memory card connector 3 Lexmark Internal Solutions Port or printer hard disk connector 5 Align the base of the access cover to the printer Additional printer setup 29...

Страница 30: ...power cord from the electrical outlet before continuing If you have any other devices attached to the printer then turn them off as well and unplug any cables going into the printer 1 Access the contr...

Страница 31: ...then turn them off as well and unplug any cables going into the printer Warning Potential Damage Controller board electronic components are easily damaged by static electricity Touch a metal surface o...

Страница 32: ...ottom front door of the printer CAUTION SHOCK HAZARD If you are accessing the controller board or installing optional hardware or memory devices sometime after setting up the printer then turn the pri...

Страница 33: ...ss the controller board For more information see Accessing the controller board on page 27 3 Remove the printer hard disk Note The hard disk must be removed before installing an ISP a Unplug the hard...

Страница 34: ...ll the ISP in the same location where the hard disk was located on the controller board a Align the posts of the plastic mounting bracket with the holes on the controller board cage and then press the...

Страница 35: ...ew for the ISP to attach the ISP to the bracket 5 Secure the ISP mounting bracket to the controller board cage using the screws 6 Removethethumbscrews that attach the harddisk mounting bracket to theh...

Страница 36: ...ck into place 8 Insert the plug of the hard disk interface cable into the connector on the ISP and then connect the ISP solution interface cable into the receptacle of the controller board Removing a...

Страница 37: ...ontroller board electronic components are easily damaged by static electricity Touch a metal surface on the printer before touching any controller board electronic components or connectors 1 Access th...

Страница 38: ...urn the printer off and unplug the power cord from the electrical outlet before continuing If you have any other devices attached to the printer then turn them off as well and unplug any cables going...

Страница 39: ...tached to the printer then turn them off as well and unplug any cables going into the printer CAUTION TIPPING HAZARD Floor mounted configurations require additional furniture for stability You must us...

Страница 40: ...nplug the power cord from the electrical outlet and then from the printer 3 Unpack the optional tray and then remove all packing material 4 Attach the stabilizing feet to the optional tray Note Make s...

Страница 41: ...from the printer 6 Lift the printer using the handles at the sides CAUTION POTENTIAL INJURY The printer weight is greater than 18 kg 40 lb and requires two or more trained personnel to lift it safely...

Страница 42: ...inter with the tray and then lower the printer into place 8 Remove the tape from the connectors and then plug the connectors into the receptacles of the printer 9 Open Tray 2 and Tray 3 Additional pri...

Страница 43: ...re the tray to the printer using the locking clips and the metal bracket Back Front 11 Reinstall the connector cover 12 Connect the power cord to the printer and electrical outlet Additional printer s...

Страница 44: ...Ethernet cable Make sure to match the following The USB symbol on the cable with the USB symbol on the printer The appropriate Ethernet cable to the Ethernet port Use the To 1 EXT port Connectadditio...

Страница 45: ...ur Setting up the printer software Installing the printer 1 Obtain a copy of the software installer package 2 Run the installer and then follow the instructions on the computer screen 3 For Macintosh...

Страница 46: ...ue on to installing the printer A valid unique IP address for the printer to use on the network The network gateway The network mask A nickname for the printer optional Note A printer nickname can mak...

Страница 47: ...ll not have any security information Note We do not recommend using an unsecured wireless network Notes If you do not know the SSID of the network that your computer is connected to then launch the wi...

Страница 48: ...roperly For more information see the instruction sheet that came with the wireless network adapter Using the Push Button Configuration method 1 From the printer control panel navigate to Network Ports...

Страница 49: ...5 Turn off the printer and then disconnect the Ethernet cable Then wait for at least five seconds and then turn the printer back on 6 To verify if your printer is connected to the network print a netw...

Страница 50: ...alled correctly A list of installed options appears toward the bottom of the page If an option you installed is not listed then it is not installed correctly Remove the option and then install it agai...

Страница 51: ...sal paper size setting is a user defined setting that lets you print on paper sizes that are not preset in the printer menus 1 From the home screen navigate to Paper Menu Universal Setup 2 Select a un...

Страница 52: ...f the paper you are loading Note Use the indicators on the bottom of the tray to position the guides 3 Flex the sheets back and forth to loosen them and then fan them Do not fold or crease the paper S...

Страница 53: ...rhead with the header on the left side of the tray Make sure that the paper is below the maximum fill line on the edge of the paper tray Overfilling may cause paper jams 5 Insert the tray 6 From the c...

Страница 54: ...he paper Load only one size and type of paper Loading letterhead Without an optional finisher With an optional finisher One sided printing Note For long edge orientation load letterhead facedown with...

Страница 55: ...For long edge orientation load letterhead faceup with the header on the left side of the feeder Loading prepunched paper One sided printing Two sided printing Load envelopes with the flap side up War...

Страница 56: ...d by periods such as 123 123 123 123 If you are using a proxy server then temporarily disable it to load the Web page correctly 2 Click Settings Paper Menu 3 Change the paper size and type settings fo...

Страница 57: ...dress on the printer home screen The IP address appears as four sets of numbers separated by periods such as 123 123 123 123 If you are using a proxy server then temporarily disable it to load the Web...

Страница 58: ...the paper loaded in the tray Preprinting perforation and creasing may significantly affect the print quality and cause jams or other paper feed problems Before loading the card stock on the tray flex...

Страница 59: ...ng material Do not use labels with exposed adhesive Use full label sheets Partial sheets may cause labels to peel off during printing resulting in a jam Partial sheets also contaminate the printer and...

Страница 60: ...0 g m2 16 lb might not be stiff enough to feed properly and may cause jams Note Two sided printing is supported for 60 169 g m2 16 45 lb paper Curl Curl is the tendency for paper to curl at its edges...

Страница 61: ...ing an offset lithographic or engraved printing process Avoid paper with rough or heavily textured surfaces Use inks that are not affected by the resin in toner Inks that are oxidation set or oil base...

Страница 62: ...addition the company encourages purchasing paper from suppliers who demonstrate their commitment to sustainable forestry practices Lexmark does not endorse specific suppliers although a converter s pr...

Страница 63: ...l paper sources and the sizes types and weights of paper they support Note For an unlisted paper size select the closest larger listed size Paper sizes supported by the printer Paper sizes supported b...

Страница 64: ...5 in 1 1 1 X X Universal 89 9 x 139 7 mm 3 54 x 5 5 in to 1219 2 x 1219 2 mm 48 0 x 48 0 in X X 4 7 3 4 Envelope 98 x 191 mm 3 9 x 7 5 in X X X X X X 9 Envelope 98 x 225 mm 3 9 x 8 9 in X X X X X X 10...

Страница 65: ...the length is from 148 mm 5 83 in to 458 mm 18 in Note Banner is supported in the multipurpose feeder only if the width is up to 296 9 mm 11 69 in and the length is up to 1219 2 mm 48 in Make sure the...

Страница 66: ...to 176 x 250 mm 6 9 x 9 8 in X X Custom Scan Size x 2 2 1 Paper is supported only in short edge orientation 2 The paper source supports paper size without size sensing Paper types and weights supporte...

Страница 67: ...zes types and weights supported by the finishers The printer engine supports 60 256 g m2 16 68 lb paper weights Note When a finisher is installed the standard finisher bin becomes the default bin even...

Страница 68: ...Paper type Staple finisher Staple hole punch finisher Booklet finisher Plain Paper 5 Card Stock 2 X Transparency1 2 3 X Recycled 2 X Glossy 2 X Heavy Glossy 2 4 X Labels 2 3 X Bond X 1 Print on trans...

Страница 69: ...together For more information see Tips on using transparencies on page 60 2 The paper type is supported only if the finisher stacks the paper but does not staple it 3 The paper type is supported only...

Страница 70: ...end the print job For Windows users a With a document open click File Print b Click Properties Preferences Options or Setup c Adjust the settings if necessary d Click OK Print For Macintosh users a Cu...

Страница 71: ...lash drive icon appears on the printer home screen when a flash drive is inserted If you insert the flash drive when the printer requires attention such as when a jam has occurred then the printer ign...

Страница 72: ...ash drives and file types Notes High speed USB flash drives must support the full speed standard Low speed USB devices are not supported USB flash drives must support the File Allocation Table FAT sys...

Страница 73: ...the first copy is satisfactory The print job is automatically deleted from the printer memory when all copies are printed Reserve Job Expiration Store print jobs for printing at a later time Note The...

Страница 74: ...TCP IP section in the Network Ports menu The IP address appears as four sets of numbers separated by periods such as 123 123 123 123 If you are using a proxy server then temporarily disable it to loa...

Страница 75: ...keypad then touch Resume to return to the home screen Canceling a print job from the computer For Windows users 1 Open the printers folder In Windows 8 From the Search charm type run and then navigat...

Страница 76: ...pying using the ADF or scanner glass 1 Load an original document into the ADF tray or on the scanner glass Note To avoid a cropped image make sure the size of the original document and the size of the...

Страница 77: ...Home screen customization Copy Shortcuts Display Submit To delete the shortcut touch Manage Shortcuts Copy Shortcuts select the shortcut Delete Entry Delete now Creating a copy shortcut using the prin...

Страница 78: ...ocument 3 Touch Copy to and then select the tray containing the paper type you want to use 4 Touch Copy It Copying different paper sizes Copying onto mixed paper sizes 1 Load an original document into...

Страница 79: ...s 2 From the home screen touch Copy 3 From the Scale area touch or to decrease or increase the value by 1 Touching Copy to or Copy from after setting Scale manually changes the scale value back to Aut...

Страница 80: ...paper Notes Make sure to set the paper size to letter legal A4 or JIS B5 Make sure to set the copy size to 100 1 Load an original document into the ADF tray or on the scanner glass 2 From the home sc...

Страница 81: ...printer control panel touch Cancel Job or press on the keypad 2 Touch the job you want to cancel and then touch Delete Selected Jobs Note If you press on the keypad then touch Resume to return to the...

Страница 82: ...are in relation to the original document Sides Duplex This option lets you make one or two sided copies from one or two sided original documents Collate This option keeps the pages of a print job sta...

Страница 83: ...e paper in two bifold or three trifold Note This option appears only if a booklet finisher is installed Header Footer This inserts Date Time Page number Bates number or Custom text in the specified he...

Страница 84: ...the corner with the arrow Setting up the printer to e mail Configuring e mail settings 1 Open a Web browser and then type the printer IP address in the address field Notes View the printer IP address...

Страница 85: ...e it to load the Web page correctly 2 Click Settings 3 From the Other Settings column click Manage Shortcuts E mail Shortcut Setup 4 Typeauniquenameforthee mailrecipient andthentypethee mailaddress If...

Страница 86: ...original document into the ADF tray or on the scanner glass 2 From the home screen navigate to E mail Recipient s type the e mail address Done Send as 3 Select the file type you want to send Note If y...

Страница 87: ...ment Save As Shortcut This option lets you save the current settings as a shortcut by assigning a shortcut name Note Selecting this option automatically assigns the next available shortcut number Dark...

Страница 88: ...This option appears only when a working printer hard disk is installed Using the advanced options Select from the following settings Advanced Imaging This adjusts the Background Removal Color Balance...

Страница 89: ...x feature during a lightning storm Do not set up this product or make any electrical or cabling connections such as the fax feature power cord or telephone during a lightning storm Notes The following...

Страница 90: ...el for fax setup When the printer is turned on for the first time a series of start up screens appear If the printer has fax capabilities then the Fax Name and Fax Number screens appear 1 When the Fax...

Страница 91: ...with the printer to the port of the printer 2 Connect the other end of the telephone cable to an active analog wall jack Tips for this setup You can set the printer to receive faxes automatically Auto...

Страница 92: ...same telephone wall jack To connect 1 Connect one end of the telephone cable that came with the printer to the port of the printer 2 Connect the other end of the telephone cable to an active analog w...

Страница 93: ...on your line then you need to set the printer to receive faxes automatically Auto Answer On Set the printer to pick up calls two rings after the answering machine For example if the answering machine...

Страница 94: ...faxes even if you have set it to receive faxes automatically Setup 3 Printer is sharing the line with a telephone subscribed to voice mail service To connect 1 Connect one end of the telephone cable t...

Страница 95: ...nly one telephone number on your line then you need to set the printer to receive faxes manually Auto Answer Off When you answer the telephone and you hear fax tones press 9 or the manual answer code...

Страница 96: ...nswering machine in your network Interference causes noise and static on the telephone failed and poor quality faxes for the printer and slow Internet connection on your computer Note Contact your DSL...

Страница 97: ...port on the VoIP adapter is active plug an analog telephone into the phone port and then listen for a dial tone If you hear a dial tone then the port is active If you need two phone ports for your de...

Страница 98: ...port of the printer Notes To make sure that the telephone port on the cable modem is active plug an analog telephone into the telephone port and then listen for a dial tone If you hear a dial tone th...

Страница 99: ...e analog telephone wall jack 3 Connect your analog telephone to the port of the printer Scenario 5 Countries or regions with different telephone wall jacks and plugs Some countries or regions may have...

Страница 100: ...egion may not come with your printer and you may need to purchase it separately There may be an adapter plug installed in the port of the printer If you are using a telephone adapter or a facility tha...

Страница 101: ...ll jack 3 If you want to connect another device telephone or answering machine to the same wall jack and if the device has a non RJ 11 connector then connect it directly to the telephone adapter Notes...

Страница 102: ...onnecting the printer to a wall jack in Germany The German wall jack has two kinds of ports The N ports are for fax machines modems and answering machines The F port is for telephones N F N Faxing 102...

Страница 103: ...her end of the telephone cable to the RJ 11 adapter and then connect the adapter to an N port 3 If you want to connect a telephone and answering machine to the same wall jack then connect the devices...

Страница 104: ...printer to answer single double and triple ring patterns a From the home screen navigate to Settings Fax Settings Analog Fax Setup Answer On b Select the pattern setting you want to change and then t...

Страница 105: ...er home screen The IP address appears as four sets of numbers separated by periods such as 123 123 123 123 If you are using a proxy server then temporarily disable it to load the Web page correctly 2...

Страница 106: ...nt faceup short edge first into the ADF tray or facedown on the scanner glass Notes Do not load postcards photos small items transparencies photo paper or thin media such as magazine clippings into th...

Страница 107: ...ettings Manage Shortcuts Fax Shortcut Setup Note A password may be required If you do not have an ID and password then contact your system support person 3 Type a name for the shortcut and then enter...

Страница 108: ...ax lighter or darker 1 Load an original document faceup short edge first into the ADF tray or facedown on the scanner glass Notes Do not load postcards photos small items transparencies photo paper or...

Страница 109: ...f you press on the keypad then touch Resume to return to the home screen Holding and forwarding faxes Holding faxes This option lets you hold received faxes from printing until they are released Held...

Страница 110: ...the Forward to menu select Fax E mail FTP LDSS or eSF 5 In the Forward to Shortcut field enter the shortcut number where you want the fax forwarded Note The shortcut number must be valid for the setti...

Страница 111: ...e of the image before it is included in the fax When the first page is scanned the scanning is paused and a preview image appears Note This option appears only when a working printer hard disk is inst...

Страница 112: ...or multiple page or two sided documents Load the original document faceup Use the scanner glass for single page documents book pages smallitems suchaspostcardsorphotos transparencies photo paper or th...

Страница 113: ...number 5 Click Add Creating an FTP shortcut using the printer control panel 1 From the home screen navigate to FTP FTP type the FTP address type a name for the shortcut Done 2 Verify that the shortcut...

Страница 114: ...nly in Windows Vista or later Make sure your computer and printer are connected to the same network 1 Open the printers folder and then select your printer Note If your printer is not in the list then...

Страница 115: ...the scanned documents are in relation to the original document Resolution This option lets you adjust the output quality of your file Increasing the image resolution increases the file size and the ti...

Страница 116: ...d working printer hard disk is installed Using the advanced options Select from the following settings Advanced Imaging This adjusts the Background Removal Color Balance Color Dropout Contrast JPEG Qu...

Страница 117: ...1 Standard USB Parallel x Serial x SMTP Setup Edit Security Setups Miscellaneous Security Settings Confidential Print Erase Temporary Data Files Security Audit Log Set Date and Time Settings Help Mana...

Страница 118: ...print job continues using the linked tray Paper Size Type menu Use To Tray x Size A4 A5 A6 JIS B5 JIS B4 Letter Legal 12 x 18 11 x 17 SRA3 A3 Executive Oficio Mexico Folio Statement Universal Specify...

Страница 119: ...f Custom Type x Use this menu to configure automatic tray linking MP Feeder Size A4 A5 A6 JIS B5 JIS B4 Letter Legal 12 x 18 11 x 17 SRA3 A3 Executive Oficio Mexico Folio Statement Universal Specify t...

Страница 120: ...the factory default setting From the Paper menu set Configure to Cassette for MP Feeder Type to appear as a menu Manual Paper Size A4 A5 A6 JIS B5 Letter Legal Executive Oficio Mexico JIS B4 A3 11 x...

Страница 121: ...s the U S factory default setting DL Envelope is the international factory default setting Manual Envelope Type Envelope Rough Envelope Custom Type x Specify the envelope type being manually loaded No...

Страница 122: ...otes Normal is the factory default setting The options appear only if card stock is supported Transparency Texture Smooth Normal Rough Specify the relative texture of the transparencies loaded Note No...

Страница 123: ...xture Smooth Normal Rough Specify the relative texture of the paper loaded Note Normal is the factory default setting Rough Cotton Texture Rough Specify the relative texture of the cotton paper loaded...

Страница 124: ...eprinted as the paper type Colored Loading Duplex Off Determine and set two sided printing for all print jobs with Colored as the paper type Light Loading Duplex Off Determine and set two sided printi...

Страница 125: ...selected in other menus Notes Paper is the factory default setting The custom media type must be supported by the selected tray or multipurpose feeder in order to print from that source Custom Names...

Страница 126: ...the height exceeds the maximum then the printer uses the maximum height allowed 17 inches is the U S factory default setting You can increase the height in 0 01 inch increments 432 mm is the internat...

Страница 127: ...otes This menu appears only when optional bins are installed Standard Bin is the factory default setting Assign Type Bin Plain Paper Bin Card Stock Bin Transparency Bin Recycled Bin Glossy Bin Heavy G...

Страница 128: ...ess information Note This menu item appears only in network printers or in printers connected to print servers and when there is more than one network option installed Shortcut List Print a report con...

Страница 129: ...ergy Efficient Ethernet Enable Disable Reduce power consumption when the printer receives no data from the Ethernet network Note Enable is the factory default setting PCL SmartSwitch On Off Set the pr...

Страница 130: ...s when the setting is changed from the control panel Job Buffering Off On Auto Temporarily store print jobs in the printer hard disk before printing This menu only appears when a formatted disk is ins...

Страница 131: ...bles the timeout If a value between 1 and 9 is selected then Invalid appears on the display and the value is not saved Banner Page Off On Allow the printer to print a banner page Note Off is the facto...

Страница 132: ...d and managed remotely using a Web browser Note Yes is the factory default setting WINS Server Address View or change the current WINS server address Enable DDNS Yes No View or change the current DDNS...

Страница 133: ...etwork and enable network security Notes Start Push Button Method connects the printer to a wireless network when buttons on both the printer and the access point wireless router are pressed within a...

Страница 134: ...rk Note The default zone for the network is the factory default setting Standard USB menu Use To PCL SmartSwitch On Off Set the printer to automatically switch to PCL emulation when a print job receiv...

Страница 135: ...k buffers The printer automatically restarts when the setting is changed from the printer control panel The menu selection is then updated Job Buffering Off On Auto Temporarily store print jobs in the...

Страница 136: ...witch is set to On It uses the default printer language specified in the Setup menu if PCL SmartSwitch is set to Off NPA Mode On Off Auto Set the printer to perform the special processing required for...

Страница 137: ...s printer hardware initialization requests from the computer Notes Off is the factory default setting The computer requests initialization by activating the Init signal from the parallel port Many per...

Страница 138: ...on when a print job received through a serial port requires it regardless of the default printer language Notes On is the factory default setting When set to Off the printer does not examine incoming...

Страница 139: ...ter hard disk before printing Notes Off is the factory default setting The printer does not buffer print jobs on the printer hard disk On buffers print jobs on the printer hard disk Auto buffers print...

Страница 140: ...e printer uses the DSR Signal Notes Off is the factory default setting DSR is a handshaking signal used by most serial cables The serial port uses DSR to distinguish data sent by the computer from dat...

Страница 141: ...used when communicating to the SMTP server Some SMTP servers require credentials to send an e mail Notes None is the factory default setting for Device Initiated E mail and User Initiated E mail Devi...

Страница 142: ...in failures specifies the number of failed login attempts before users are locked out Settings range from 1 to 10 attempts 3 attempts is the factory default setting Failure time frame specifies the ti...

Страница 143: ...Allow means a server certificate is requested If no certificate is provided then the session proceeds normally If a bad certificate is provided then it will be ignored and the session proceeds normal...

Страница 144: ...e by the file system All permanent data on the printer hard disk are preserved such as downloaded fonts macros and held jobs Note This menu appears only when a formatted working printer hard disk is i...

Страница 145: ...recorded in the secure audit log and remote syslog No is the factory default setting Enable Remote Syslog determines if logs are sent to a remote server No is the factory default setting Remote Syslog...

Страница 146: ...rough the printer control panel or EWS No is the factory default setting E mail log wrapped alert determines if the printer sends the administrator an e mail when log entries are wrapping No is the fa...

Страница 147: ...Time Zone Setup DST Start Week DST Start Day DST Start Month DST Start Time DST End Week DST End Day DST End Month DST End Time DST Offset Enable the user to set up the time zone Enable NTP On Off En...

Страница 148: ...ff Energy Energy Paper Paper Minimize the use of energy paper or specialty media Notes Off is the factory default setting This resets the printer to its factory default settings Energy minimizes the p...

Страница 149: ...quality and full speed printing Run Initial setup Yes No Set the printer to run the setup wizard Note Yes is the factory default setting After completing the setup wizard the default becomes No Keybo...

Страница 150: ...ters behind a port blocking firewall Note 9751 12000 is the factory default setting Displayed Information Left side Right side Custom Text x Specify what is displayed on the upper left and right corne...

Страница 151: ...ay Default is the factory default setting for Message to Display Displayed Information continued Waste Toner Bottle Paper Jam Load Paper Service Errors Customizethedisplayedinformationfor WasteToner B...

Страница 152: ...FTP Shortcuts Profiles and Apps Bookmarks and Jobs by user Date Format MM DD YYYY DD MM YYYY YYYY MM DD Format the printer date Notes MM DD YYYY is the U S factory default setting DD MM YYYY is the in...

Страница 153: ...jam occurs in the ADF Notes Job level is the factory default setting If selected then the entire job must be rescanned if any pages jam If Page level is selected then rescan from the jammed page forwa...

Страница 154: ...Allow the printer to print even when the display is off Note Allow printing with display off is the factory default setting Timeouts Hibernate Timeout Disabled 1 hour 2 hours 3 hours 6 hours 1 day 2 d...

Страница 155: ...his has no effect on PCL emulation print jobs Timeouts Job Hold Timeout 5 255 Set the amount of time the printer waits for user intervention before it holds jobs that require unavailable resources and...

Страница 156: ...ow the printer responds when pressing the Sleep button while the printer is idle Notes Sleep is the factory default setting Sleep or Hibernate sets the printer to operate at a lower power configuratio...

Страница 157: ...ce Black White Laser Color Laser Inkjet Photo Film Magazine Newspaper Press Other Specify how the original document was produced Note Black White Laser is the factory default setting Sides Duplex 1 si...

Страница 158: ...b stacked in sequence when printing multiple copies Note 1 2 3 1 2 3 is the factory default setting Punch Off 2 holes 3 holes 4 holes Specify the type of hole punch finishing to be used in a print or...

Страница 159: ...jobs Note Tray 1 is the factory default setting Transparency Separators On Off Place a sheet of paper between transparencies Notes On is the factory default setting When set to On a blank page is plac...

Страница 160: ...factory default setting for Print on Overlay Confidential Copy Draft Urgent Custom Off Specify the overlay text printed on each page of the copy job Note Off is the factory default setting Custom Ove...

Страница 161: ...fault setting Mirror Image Off On Create a mirror image of the original document Note Off is the factory default setting Negative Image Off On Create a negative image of the original document Note Off...

Страница 162: ...fax jobs Notes Equal is the factory default setting Equal splits the memory for sending and receiving fax jobs into equal amounts Mostly send specifies that most of the memory is set to send fax jobs...

Страница 163: ...page Notes Off by default is the factory default setting for Fax Cover Page Off is the factory default setting for all other menu items Fax Send Settings Use To Resolution Standard Fine 200 dpi Super...

Страница 164: ...d on a page Notes Off is the factory default setting Long edge assumes binding along the long edge of the page left edge for portrait and top edge for landscape Short edge assumes binding along the sh...

Страница 165: ...on Mode for fax jobs Note Yes is the factory default setting Enable Fax Scans On Off Fax files that are scanned at the printer Note On is the factory default setting Driver to fax Yes No Allow the pri...

Страница 166: ...ting for each color threshold Notes None is the factory default setting for Color Dropout 128 is the factory default setting for each color threshold Contrast 0 5 Best for content Specify the contrast...

Страница 167: ...able resources Note None is the factory default setting Rings to Answer 1 25 Specify the number of rings before answering an incoming fax job Note 3 is the factory default setting Auto Answer Yes No A...

Страница 168: ...rwarding Print Print and Forward Forward Enable forwarding of received faxes to another recipient Note Print is the factory default setting Forward to Fax E mail FTP LDSS eSF Specify the type of recip...

Страница 169: ...lt setting Receive Error Log Print Never Print on Error Enable printing of a receive error log following a receive error Note Print Never is the factory default setting Auto Print Logs On Off Enable a...

Страница 170: ...actory default setting Ringer Volume Off On Control the fax speaker ringer volume Note On is the factory default setting Answer On Use To All Rings Single Ring Only Double Ring Only Triple Ring Only S...

Страница 171: ...m Magazine Newspaper Press Other Specify how the original document was produced Note Black White Laser is the factory default setting Color Off On Specify whether the printer captures and transmits co...

Страница 172: ...e for portrait and left edge for landscape JPEG Quality Best for content 5 90 Set the quality of a JPEG photo image in relation to file size and quality of the image Notes Best for content is the fact...

Страница 173: ...t Bin Standard Bin Bin x Specify the bin for FTP logs Notes Standard Bin is the factory default setting Bin x appears only when at least one optional bin is installed E mail Bit Depth 1 bit 8 bit Enab...

Страница 174: ...ting Mirror Image Off On Create a mirror image of the original document Note Off is the factory default setting Negative Image Off On Create a negative image of the original document Note Off is the f...

Страница 175: ...hoto Film Magazine Newspaper Press Other Specify how the original document was produced Note Black White Laser is the factory default setting Color Off On Specify whether the printer captures and tran...

Страница 176: ...d left edge for landscape JPEG Quality Best for content 5 90 Set the quality of a JPEG photo image in relation to the file size and quality of the image Notes Best for content is the factory default s...

Страница 177: ...lt setting Bin x appears only when an optional bin is installed FTP bit Depth 1 bit 8 bit Enable the Text Photo mode to have smaller file sizes by using 1 bit images when Color is set to Off Note 8 bi...

Страница 178: ...mage Off On Create a mirror image of the original document Note Off is the factory default setting Negative Image Off On Create a negative image of the original document Note Off is the factory defaul...

Страница 179: ...Inkjet Photo Film Magazine Newspaper Press Other Specify how the original document was produced Note Black White Laser is the factory default setting Color On Off Specify whether the printer captures...

Страница 180: ...page top edge for portrait and left edge for landscape JPEG Quality Best for content 5 90 Set the quality of a JPEG photo image in relation to file size and quality Notes Best for content is the facto...

Страница 181: ...ault setting This menu item appears only when a formatted working printer hard disk is installed Scan Preview On Off Specify whether a preview appears on the display for scan jobs Notes Off is the fac...

Страница 182: ...m or cool outputs Cool values generate a bluer output than the default while warm values generate a redder output than the default Note 0 is the factory default setting Print Settings Copies 1 999 Spe...

Страница 183: ...ng along the short edge of the page top edge for portrait and left edge for landscape Paper Saver Orientation Auto Landscape Portrait Specify the orientation of a multiple page document Note Auto is t...

Страница 184: ...ed in a print job Note Do Not Print is the factory default setting Print Settings Setup menu Use To Printer Language PCL Emulation PS Emulation Set the default printer language Notes PCL Emulation is...

Страница 185: ...rmanent storage Downloads remain in the flash memory or printer hard disk even when the printer is turned off This menu item appears only if an optional flash memory or printer hard disk is installed...

Страница 186: ...2 3 1 2 3 Stack the pages of a print job in sequence when printing multiple copies Note 1 2 3 1 2 3 is the factory default setting Separator Sheets Off Between Copies Between Jobs Between Pages Specif...

Страница 187: ...is the factory default setting The printer chooses between portrait and landscape Paper Saver Border None Solid Print a border when using Paper Saver Note None is the factory default setting Staple Jo...

Страница 188: ...es are offset such as all page 1 s and all page 2 s Between Jobs sets the same offset position for the entire print job regardless of the number of copies printed This menu appears only when a support...

Страница 189: ...tory default setting Contrast 0 5 Adjust the contrast of printed objects Note 0 is the factory default setting Job Accounting menu Note This menu item appears only when a formatted working printer har...

Страница 190: ...responds when disk usage reaches the maximum limit 100MB Note None is the factory default setting URL to Post Logs Determine and set where the printer posts job accounting logs E mail Address to Send...

Страница 191: ...ginating screen after the deletion Do Not Delete sets the printer to return to the originating screen after the deletion Activate Hex Trace Assist in isolating the source of a print job problem Notes...

Страница 192: ...d protected Job Buffer Size must not be set to 100 PCL Emul menu Use To Font Source Resident Disk Download Flash All Specify the set of fonts used by the Font Name menu Notes Resident is the factory d...

Страница 193: ...racters per inch cpi Pitch can be increased or decreased in 0 01 cpi increments For nonscalable monospaced fonts the pitch appears on the display but it cannot be changed PCL Emulation Settings Orient...

Страница 194: ...l Env Off None 0 199 Configure the printer to work with printer software or programs that use different source assignments for trays and feeders Notes Off is the factory default setting None ignores t...

Страница 195: ...s Zapf Chancery NewSansMTJA NewSansMTCS NewSansMTCT NewSansMTKO Set the default font for HTML documents Note The Times font is used in HTML documents that do not specify a font Use To Font Size 1 255...

Страница 196: ...ing Anchor Top Left Best Fit Anchor Center Fit Height Width Fit Height Fit Width Scale the image to fit the selected paper size Notes Best Fit is the factory default setting When Auto Fit is set to On...

Страница 197: ...ning the cause of repeating print quality defects and lists settings that can be used to adjust print quality Information Guide Provides help in locating additional information Supplies Guide Provides...

Страница 198: ...rinting multiple pages on one side of a single sheet of paper Using recycled paper As an environmentally conscious company Lexmark supports the use of recycled office paper produced specifically for u...

Страница 199: ...e the printer IP address in the address field Notes View the printer IP address on the printer home screen The IP address appears as four sets of numbers separated by periods such as 123 123 123 123 I...

Страница 200: ...numbers separated by periods such as 123 123 123 123 If you are using a proxy server then temporarily disable it to load the Web page correctly 2 Click Settings General Settings 3 In the Screen Bright...

Страница 201: ...ties may not exist in your area The foam used in Lexmark packaging is recyclable where foam recycling facilities exist Facilities may not exist in your area When you return a cartridge to Lexmark you...

Страница 202: ...flash memory Both types are used to store the operating system device settings network information bookmark settings and embedded solutions Hard disk memory Some printers have a hard disk drive insta...

Страница 203: ...edded solutions by following these steps 1 Turn off the printer 2 From the control panel hold down 2 and 6 while turning the printer on Release the buttons when the screen with the progress bar appear...

Страница 204: ...lt in loss of data Disk encryption can take from several minutes to more than an hour during which the printer is unavailable for other user tasks A status bar indicates the progress of the disk wipin...

Страница 205: ...r of the printer unplug the power cord from the electrical outlet and disconnect all cables from the printer before proceeding 2 Remove paper from the standard bin and multipurpose feeder 3 Remove any...

Страница 206: ...t free cloth 1 White underside of the scanner cover 2 Scanner glass 3 ADF glass 4 White underside of the ADF cover 3 Close the scanner cover Cleaning the charger and the printhead lens 1 Open the bott...

Страница 207: ...2 Remove the waste toner bottle 3 Locate the white tab 4 Gently pull the tab until it stops and then slowly slide it back into place Repeat three times Maintaining the printer 207...

Страница 208: ...wiper 6 Insert the wiper into the hole until it stops and then slide it out Repeat three times 7 Put the wiper back to its holder 8 Reinstall the waste toner bottle 9 Close the bottom front door Maint...

Страница 209: ...Emptying the hole punch box 1 Open door H 2 Remove and empty the hole punch box Maintaining the printer 209...

Страница 210: ...twork 1 Open a Web browser and then type the printer IP address in the address field Notes View the printer IP address on the home screen The IP address appears as four sets of numbers separated by pe...

Страница 211: ...s designed to function best with genuine Lexmark supplies and parts Use of third party supplies or parts may affect the performance reliability or life of the printer and its imaging components Use of...

Страница 212: ...nter supplies Store supplies right side up in their original packing until you are ready to use them Do not expose supplies to Direct sunlight Temperatures above 35 C 95 F High humidity above 80 Salty...

Страница 213: ...Replacing supplies Replacing a photoconductor unit 1 Open the bottom front door 2 Remove the waste toner bottle 3 Unlock the photoconductor unit Maintaining the printer 213...

Страница 214: ...tor unit to direct light for more than 10 minutes Extended exposure to light may cause print quality problems Warning Potential Damage Do not touch the photoconductor drum Doing so may affect the prin...

Страница 215: ...r Replacing the staple cartridge Replacing the staple cartridge in the staple finisher Note The staple finisher is supported only in select printer models 1 Press the latch on the staple finisher and...

Страница 216: ...2 Remove the staple cartridge holder 3 Remove the empty staple cartridge from the cartridge holder 4 Insert the new cartridge into the cartridge holder Maintaining the printer 216...

Страница 217: ...5 Push the cartridge holder into the finisher until the holder clicks into place 6 Slide the finisher back into place Maintaining the printer 217...

Страница 218: ...Replacing the staple cartridge in the booklet finisher 1 Open door H and then pull out the booklet maker 2 Remove the staple cartridge holder Maintaining the printer 218...

Страница 219: ...rtridge holder 4 Insert the new cartridge into the cartridge holder 5 Push the cartridge holder into the booklet maker until the holder clicks into place 6 Push the booklet maker back into place and t...

Страница 220: ...e in the staple hole punch finisher 1 Open door H 2 Remove the staple cartridge holder 3 Remove the empty staple cartridge from the cartridge holder 4 Insert the new cartridge into the cartridge holde...

Страница 221: ...6 Close door H Replacing the toner cartridge 1 Open the top front door 2 Rotate the toner cartridge counterclockwise and then pull it out 3 Unpack the new toner cartridge remove the packing material a...

Страница 222: ...4 Insert the toner cartridge into the printer 5 Rotate the cartridge clockwise to lock it into place Maintaining the printer 222...

Страница 223: ...t door 7 Clean the charger and the printhead lens For more information see Cleaning the charger and the printhead lens on page 206 Replacing the waste toner bottle 1 Open the bottom front door Maintai...

Страница 224: ...ens For more information see steps 3 7 of Cleaning the charger and the printhead lens on page 206 4 Unpack the new waste toner bottle 5 Insert the new waste toner bottle into the printer until it clic...

Страница 225: ...Replacing the 300K maintenance kit Replacing the exhaust and ozone filters 1 Exhaust filter 2 Ozone filter Replacing the exhaust filter 1 Pull out the exhaust filter Maintaining the printer 225...

Страница 226: ...2 Unpack the new exhaust filter 3 Insert the new filter Replacing the ozone filter 1 Pull out the ozone filter 2 Unpack the new ozone filter Maintaining the printer 226...

Страница 227: ...k feed and separator rollers 1 Pick roller 2 Feed roller 3 Separator roller Note You can use the rollers stored in the compartment inside the standard trays For more information see Storing the roller...

Страница 228: ...f the printer 2 Remove all trays Standard tray Optional 2 x 500 or 2500 sheet tray Note To remove the optional 2 x 500 sheet tray follow the procedure in removing the standard tray Maintaining the pri...

Страница 229: ...nter Note If the 3000 sheet tray is installed slide the tray to open the door 4 Open door D Notes You can only open door D if the optional 2 x 500 or 2500 sheet tray is installed If the 3000 sheet tra...

Страница 230: ...5 Locate the rollers Maintaining the printer 230...

Страница 231: ...ey click into place Note Make sure to insert the rollers to their right places 8 Close doors C and D 9 Insert the trays Replacing the transfer module Note Use the screwdriver located inside the bottom...

Страница 232: ...r CAUTION HOT SURFACE The inside of the printer might be hot To reduce the risk of injury from a hot component allow the surface to cool before touching it Note If the 3000 sheet tray is installed the...

Страница 233: ...pletely 7 Unpack the new transfer module Warning Potential Damage Do not expose the transfer belt to direct light for more than 10 minutes Extended exposure to light may cause print quality problems W...

Страница 234: ...lock 11 Reinstall the door stopper 12 Close door C Replacing the transfer roller 1 Open door C Make sure that it does not hit any cable attached to the printer Note If the 3000 sheet tray is installe...

Страница 235: ...he printer on Release the buttons when the screen with the progress bar appears 3 From the Configuration menu navigate to Reset Maintenance Counter Reset 300K Maintenance Kit 4 Touch Back and then exi...

Страница 236: ...2 Remove the ADF scan pad 3 Unpack the new ADF scan pad and then remove the packing materials 4 Lay the ADF scan pad flat on the scanner glass with the white area facedown Maintaining the printer 236...

Страница 237: ...damage Turn off the printer and then unplug the power cord from the electrical outlet Disconnect all cords and cables from the printer If the printer does not have a caster base but is configured with...

Страница 238: ...e printer must have a surface able to support the full footprint of the printer Any cart used to move the hardware options must have a surface able to support the dimensions of the hardware options Ke...

Страница 239: ...r home screen The IP address appears as four sets of numbers separated by periods such as 123 123 123 123 If you are using a proxy server then temporarily disable it to load the Web page correctly 2 C...

Страница 240: ...e alerts Note The percentage of estimated remaining supply that prompts the alert can be set on some supplies for some supply conditions 1 Open a Web browser and then type the printer IP address 2 Cli...

Страница 241: ...ring the factory default settings For more information see Printing a menu settings page on page 50 For a more comprehensive method of restoring the printer factory default settings see Erasing non vo...

Страница 242: ...ing of paper Do not remove a tray while the printer is printing Do not load a tray while the printer is printing Load it before printing or wait for a prompt to load it Do not load too much paper Make...

Страница 243: ...e jam location and information to clear the jam appears on the printer display Open the doors covers and trays indicated on the display to remove the jam Notes When Jam Assist is set to On the printer...

Страница 244: ...ovethejammed paper Pull out the tray and then remove the jammed paper x page jam slide the 3000 sheet tray and open door D 24y xx Doors C and F x page jam slide the 3000 sheet tray and open door F 24y...

Страница 245: ...en fan them Do not fold or crease the paper Straighten the edges on a level surface 6 Reload the paper x page jam open door C and clear all jammed paper 2yy xx 1 Open door C Make sure that it does not...

Страница 246: ...Fuser area Below the fuser area Duplex area Above the duplex area Clearing jams 246...

Страница 247: ...ocate the jammed paper 4 Remove the jammed paper Note Make sure that all paper fragments are removed 5 Close the trays and door C x page jam slide the 3000 sheet tray and open door C 2yy xx 1 Slide th...

Страница 248: ...paper from any of the following locations Note Make sure that all paper fragments are removed CAUTION HOT SURFACE The inside of the printer might be hot To reduce the risk of injury from a hot compon...

Страница 249: ...mmed paper 5 Remove the jammed paper Note Make sure that all paper fragments are removed 6 Close the trays and door C 7 Slide the 3000 sheet tray back into place x page jam open door D and clear all j...

Страница 250: ...at all paper fragments are removed 2 Open the optional tray and then locate the jammed paper 3 Remove the jammed paper Note Make sure that all paper fragments are removed 4 Close the tray and door D C...

Страница 251: ...e 3000 sheet tray 2 Open door D and then remove the jammed paper Note Make sure that all paper fragments are removed 3 Open the optional tray and then locate the jammed paper 4 Remove the jammed paper...

Страница 252: ...6 Slide the 3000 sheet tray back into place x page jam slide the 3000 sheet tray and open door F 24y xx 1 Slide the 3000 sheet tray 2 Remove the jammed paper Note Make sure that all paper fragments ar...

Страница 253: ...mmed paper Note Make sure that all paper fragments are removed 4 Close door F 5 Open door C Make sure that it does not hit any cable attached to the printer 6 Remove the jammed paper from any of the f...

Страница 254: ...ments are removed CAUTION HOT SURFACE The inside of the printer might be hot To reduce the risk of injury from a hot component allow the surface to cool before touching it Fuser area Below the fuser a...

Страница 255: ...ack into place x page jam open doors G H and J and clear jammed paper Leave paper in bin 4yy xx 1 Open door G and then remove the jammed paper Note Make sure that all paper fragments are removed 2 Ope...

Страница 256: ...Remove the jammed paper from any of the following locations Note Make sure that all paper fragments are removed Door J Note If there is a jammed paper between the finisher bins then remove the paper C...

Страница 257: ...Areas H1 and H2 Areas H3 and H4 Area H6 5 Close Door H 6 Open door C and then remove the jammed paper Note Make sure that door C does not hit any cable attached to the printer Clearing jams 257...

Страница 258: ...e removed If the 3000 sheet tray is installed then slide the tray to the right to open the door 7 Close door C x page jam press latch to access area G Leave paper in bin 40y xx 1 Remove all paper from...

Страница 259: ...finisher to the left and then remove the jammed paper Notes Make sure that all paper fragments are removed If necessary turn spinner wheel G1 downward to feed jammed paper into the finisher bin and t...

Страница 260: ...hot To reduce the risk of injury from a hot component allow the surface to cool before touching it Notes Make sure that door C does not hit any cable attached to the printer Make sure that all paper f...

Страница 261: ...G and clear jammed staples Leave paper in bin 402 93 1 Remove all paper from the staple finisher bin 2 Press the latch on the staple finisher and then slide the finisher to the left 3 Remove the stap...

Страница 262: ...loose staples 5 Press the staple guard down until it clicks into place 6 Press the staples against the metal bracket Note If the staples are at the rear of the cartridge then shake the cartridge downw...

Страница 263: ...7 Push the cartridge holder into the finisher until the holder clicks into place 8 Slide the finisher back into place Clearing jams 263...

Страница 264: ...r H and rotate knob H6 clockwise Leave paper in bin 426 xx 428 xx If the jammed paper is located under door G then open the door and remove the paper 1 Open door J and then lift handle J1 2 Open door...

Страница 265: ...ed paper from any of the following locations Note Make sure that all paper fragments are removed Door J Note If there is a jammed paper between the finisher bins then remove the paper Areas H1 and H2...

Страница 266: ...Areas H3 and H4 Area H6 4 Using handle H5 pull out the booklet maker 5 Remove the jammed paper from any of the following locations Note Make sure that all paper fragments are removed Clearing jams 266...

Страница 267: ...Area H8 Area H9 Clearing jams 267...

Страница 268: ...nter might be hot To reduce the risk of injury from a hot component allow the surface to cool before touching it Notes Make sure that door C does not hit any cable attached to the printer Make sure th...

Страница 269: ...nts from the ADF tray 2 Open the top ADF top cover 3 Remove jammed paper Note Make sure that all paper fragments are removed 4 Close the cover 5 Open the scanner cover and then open the bottom ADF doo...

Страница 270: ...7 Close the door 8 Close the scanner cover Clearing jams 270...

Страница 271: ...the control panel and then touch Finished changing paper Touch Use current paper source to use the available paper size and type in the tray Touch Reset active bin to reset the active bin for a linked...

Страница 272: ...ear the message and continue printing Touch Reset active bin to reset the active bin for a linked set of bins Cancel the print job Install additional printer memory Configuration change some held jobs...

Страница 273: ...o format the printer hard disk and clear the message Note Formatting deletes all the files stored in the printer hard disk Disk near full Securely clearing disk space Try one or more of the following...

Страница 274: ...ge appears again after completing the setup then contact your system support person Fax Station Number not set up Contact system administrator Try one or more of the following From the printer control...

Страница 275: ...following From the printer control panel touch Continue to print the part of the job already stored and begin collating the rest of the print job Cancel the current print job Insufficient memory to su...

Страница 276: ...r and then touch Finished loading paper on the control panel Touch Reset active bin to reset the active bin for a linked set of bins Cancel the current job Load paper source with paper type paper size...

Страница 277: ...paper loaded in the tray Reset active bin To reset the active bin for a linked set of bins Cancel the print job Load Multipurpose Feeder with paper type paper size paper orientation Try one or more of...

Страница 278: ...ncel job to clear the message Touch Reset active bin to reset the active bin for a linked set of bins Install additional printer memory Memory full cannot print faxes From the printer control panel to...

Страница 279: ...needed Try one or more of the following Touch Use current supplies to clear the message and continue printing Cancel the current print job Parallel port x disabled 56 Try one or more of the following...

Страница 280: ...of the following If the photoconductor unit is missing then install it For more information see Replacing a photoconductor unit on page 213 If the photoconductor unit is installed then remove and the...

Страница 281: ...last successful scan job Touch Finish job without further scanning to end the last successful scan job Touch Restart job to restart the scan job with the same settings from the previous scan job Repla...

Страница 282: ...Touch Restart job to restart the scan job with the same settings from the previous scan job Replace x maintenance kit 0 estimated pages remain 80 xy The printer is scheduled for maintenance For more...

Страница 283: ...the instruction sheet that came with the supply or see the Replacing supplies section of the User s Guide Note If you do not have a replacement cartridge then see the Ordering supplies section of the...

Страница 284: ...e The printer is scheduled for maintenance Serial port x disabled 56 Try one or more of the following From the printer control panel touch Continue to clear the message The printer discards any data r...

Страница 285: ...cel the current job The device is operating in Safe Mode Some print options may be disabled or provide unexpected results Touch Continue on the control panel to clear the message and continue printing...

Страница 286: ...urn off the printer 2 Unplug the power cord from the electrical outlet 3 Remove the unsupported option card from the printer controller board and then replace it with a supported card 4 Connect the po...

Страница 287: ...o the printerandtheotherto a properly grounded electrical outlet Step 4 Check other electrical equipment plugged into the electrical outlet Does other electrical equipment work Unplug the other electr...

Страница 288: ...to the printer and the computer print server option or other network device Step 9 Makesuretoinstallallhardwareoptionsproperlyandremoveanypacking material Are all hardware options properly installed...

Страница 289: ...te correctly The problem is solved Go to step 2 Step 2 Check if the internal option is properly installed in the controller board a Turnofftheprinterusingthepowerswitch andthenunplugthepower cord from...

Страница 290: ...r listed in the Installed Features list Go to step 2 Check if the internal print server is supported by the printer Note An internal print server from another printer may not work with this printer St...

Страница 291: ...the paper size indicators on the tray If you are printing on custom size paper then make sure that the paper guides rest against the edges of the paper Make sure the paper is below the maximum paper f...

Страница 292: ...listed in the Installed Features list Is the USB or parallel interface card listed in the Installed Features list Go to step 2 Check if you have a supported USB or parallel interface card Note A USB o...

Страница 293: ...The problem is solved Step 2 a Load paper from a fresh package Note Paper absorbs moisture due to high humidity Store paper in its original wrapper until you use it b Resend the print job Do paper jam...

Страница 294: ...may contain a formatting error or invalid data Delete the print job and then send it again For PDF files generate a new PDF and then print it again If you are printing from the Internet then the print...

Страница 295: ...f the indicator light on the printer control panel is blinking green Note A green blinking light indicates that the printer is busy Is the indicator light blinking green Wait until the printer is read...

Страница 296: ...s supported by the tray b Resend the print job Did the job print from the correct tray or on the correct paper The problem is solved Go to step 2 Step 2 a From the Paper menu on the printer control pa...

Страница 297: ...rint job by eliminating the number and size of fonts the number and complexity of images and the number of pages in the job Did the job print and collate correctly The problem is solved Contact custom...

Страница 298: ...move held jobs stored in the printer memory b Resend the print job Did the job print The problem is solved Go to step 4 Step 4 a Disable the Page Protect feature From the control panel navigate to Set...

Страница 299: ...rint after clearing the message Do the jobs print The problem is solved Go to step 4 Step 4 a Check if the ports USB serial or Ethernet are working and if the cables are securely connected to the comp...

Страница 300: ...the print job Do the trays link correctly The problem is solved Go to step 2 Step 2 a Fromtheprintercontrol panel setthepapersizeandtypeinthePaper menu to match the paper loaded in the trays to be li...

Страница 301: ...ormation contact your system support person c Resend the print job Do prints still contain characters that have jagged or uneven edges Go to step 2 The problem is solved Step 2 a Use a font that is su...

Страница 302: ...he paper size specified in the tray settings Step 3 a Depending on your operating system specify the paper size from Printing Preferences or from the Print dialog b Resend the print job Is the page or...

Страница 303: ...it to direct light for more than 10 minutes Extended exposure to light can cause print quality problems b Resend the print job Did the gray background disappear from the prints The problem is solved G...

Страница 304: ...arning Potential Damage Do not expose the photoconductor unit to direct light for more than 10 minutes Extended exposure to light can cause print quality problems b Resend the print job Do horizontal...

Страница 305: ...he Print dialog b Resend the print job Are the margins correct The problem is solved Contact customer support Paper curl Action Yes No Step 1 Move the width and length guides in the tray to the correc...

Страница 306: ...Check if there is a packing material left on the photoconductor unit 1 Remove the photoconductor unit 2 Check if the packing material is properly removed from the photoconductor unit Warning Potentia...

Страница 307: ...minutes Extended exposure to light may cause print quality problems b Resend the print job Is the printer printing solid black pages Go to step 2 The problem is solved Step 2 a Clean the charger and...

Страница 308: ...d in the tray has texture or rough finishes Are you printing on textured or rough paper From thecontrol panel set the paper texture in the Paper menu to match the paper loaded in the tray Go to step 5...

Страница 309: ...cify the paper type texture and weight from the tray settings to match the paper loaded in the tray Change the paper loaded in the tray to match the paper type texture and weight specified in the tray...

Страница 310: ...direct light for more than 10 minutes Extended exposure to light can cause print quality problems Is the print still too dark Contact customer support The problem is solved Print is too light Action Y...

Страница 311: ...resh package Note Paper absorbs moisture due to high humidity Store paper in its original wrapper until you use it b Resend the print job Is the print still too light Go to step 6 The problem is solve...

Страница 312: ...esend the print job Do repeating defects still appear on prints Contact customer support The problem is solved Shadow images appear on prints ABCD ABCD ABCD ABCD Leading edge Trailing edge Action Yes...

Страница 313: ...tial Damage Do not expose the photoconductor unit to direct light for more than 10 minutes Extended exposure to light can cause print quality problems Do shadow images still appear on prints Contact c...

Страница 314: ...d in the tray Step 3 a Load paper from a fresh package Note Paper absorbs moisture due to high humidity Store paper in its original wrapper until you use it b Resend the print job Do streaked horizont...

Страница 315: ...d Step 2 From the control panel set the paper texture type and weight in the Paper menu to match the paper loaded in the tray Do the paper texture type and weight match the paper in the tray Go to ste...

Страница 316: ...6 Replace the photoconductor unit and then resend the print job Do streaked vertical lines appear on prints Contact customer support The problem is solved Toner fog or background shading appears on p...

Страница 317: ...e paper loaded in the tray Go to step 2 Specify the paper type texture and weight from the tray settings to match the paper loaded in the tray Step 2 Resend the print job Does the toner still rub off...

Страница 318: ...of transparency b Resend the print job Is the print quality still poor Contact customer support The problem is solved Uneven print density Action Yes No Step 1 a Clean the charger and the printhead le...

Страница 319: ...send the print job Do vertical voids appear on prints Go to step 4 The problem is solved Step 4 a Remove the photoconductor unit and then reinstall it Warning Potential Damage Do not expose the photoc...

Страница 320: ...Check the placement of the document or photo Make sure the document or photo is loaded facedown on the scanner glass in the upper left corner Is the document or photo loaded correctly Go to step 2 Pla...

Страница 321: ...actory Go to step 5 See Print quality problems on page 301 Step 5 Check the placement of the document or photo Make sure that the document or photo is loaded facedown on the scanner glass in the upper...

Страница 322: ...setting c Resend the copy job Do pages show washed out or overexposed prints Contact customer support The problem is solved Solving fax problems Caller ID is not shown Action Yes No Contact your telep...

Страница 323: ...s Ready appear on the display Go to step 4 Turn on the printer and then wait until Ready appears on the display Step 4 Check the printer connections If applicable check if the cable connections for th...

Страница 324: ...log phone service or the correct digital connector Go to step 7 Connect the printer to an analog phone service or the correct digital connector Step 7 Check for a dial tone Did you hear a dial tone Go...

Страница 325: ...a fax The problem is solved Contact customer support Can receive but not send faxes Action Yes No Step 1 Check if the printer is in Fax mode From the home screen touch Fax to put the printer in Fax mo...

Страница 326: ...proxy server then temporarily disable it to load the Web page correctly b Click Settings Fax Settings Analog Fax Setup c In the Rings to Answer field enter the number of times you want the phone to ri...

Страница 327: ...h Next e Select a time zone and then touch Next f Select Fax and E mail and then touch Next Are fax and e mail functions set up The problem is solved Contact customer support Received fax has poor pri...

Страница 328: ...page correctly Print a network setup page or menu settings page and then locate the IP address in the TCP IP section b Click Settings Fax Settings Analog Fax Setup c In the Max Speed menu click one o...

Страница 329: ...ions between the printer and the print server secure Contact customer support Tighten the cable connections Partial document or photo scans Action Yes No Check the placement of the document or photo M...

Страница 330: ...ty problems on page 301 Step 6 Check the scan settings From the Scan screen make sure that the Content Type and Content Source settings are correct for the document being scanned Are the Content Type...

Страница 331: ...heck box in the destination configuration settings Scanner unit does not close Action Yes No Check if there are obstructions in the scanner unit a Lift the scanner unit b Remove any obstruction keepin...

Страница 332: ...cal outlet Step 4 Check if the electrical outlet is turned off by a switch or breaker Is the electrical outlet turned off by a switch or breaker Turn on the switch or reset the breaker Go to step 5 St...

Страница 333: ...ar in the log Go to step 2 Contact customer support Step 2 Resolve the error Is the application working now The problem is solved Contact customer support Embedded Web Server does not open Action Yes...

Страница 334: ...have already taken to find a solution You need to know your printer model type and serial number For more information see the label at the back of the printer The serial number is also listed on the m...

Страница 335: ...Any reference to a product program or service is not intended to state or imply that only that product program or service may be used Any functionally equivalent product program or service that does...

Страница 336: ...onotype Corporation plc Antique Olive Monsieur Marcel OLIVE Apple Chancery Apple Computer Inc Arial The Monotype Corporation plc CG Times Based on Times New Roman under license from The Monotype Corpo...

Страница 337: ...e harmful interference in which case the user will be required to correct the interference at his own expense The manufacturer is not responsible for any radio or television interference caused by usi...

Страница 338: ...ct disposal Do not dispose of the printer or supplies in the same manner as normal household waste Consult your local authorities for disposal and recycling options Static sensitivity notice This symb...

Страница 339: ...og sp rreanordningen er sl et fra Undg at blive udsat for laserstr len GEVAAR Onzichtbare laserstraling wanneer cartridges worden verwijderd en een vergrendeling wordt genegeerd Voorkom blootstelling...

Страница 340: ...nergy saving mode called Sleep Mode The Sleep Mode saves energy by lowering power consumption during extended periods of inactivity The Sleep Mode is automatically engaged after this product is not us...

Страница 341: ...ne relative aux quipements pouvant causer des interf rences NMB 003 Japanese VCCI notice European Community EC directives conformity This product is in conformity with the protection requirements of E...

Страница 342: ...sponse to an incoming call In most but not all areas the sum of RENs should not exceed five 5 0 To be certain of the number of devices that may be connected to a line as determined by the total RENs c...

Страница 343: ...only to the requirement that the sum of the RENs of all the devices does not exceed five The modem REN is located on the rear of the equipment on the product labeling Telephone companies report that...

Страница 344: ...equired for compliance with Telecom s telepermit requirements are dependent on the equipment associated with this device The associated equipment shall be set to operate within the following limits fo...

Страница 345: ...y with the protection requirements of EC Council directives 2004 108 EC 2006 95 EC 1999 5 EC and 2011 65 EU on the approximation and harmonization of the laws of the Member States relating to electrom...

Страница 346: ...maximum shielding Industrie Canada Canada Selon la r glementation d Industrie Canada l metteur radio ne fonctionner qu avec une antenne dont le type et le gain maximal ou inf rieur ont t approuv s par...

Страница 347: ...urer of this product is Lexmark International Inc 740 West New Circle Road Lexington KY 40550 USA The authorized representative is Lexmark International Technology Hung ria Kft 8 Lechner d n fasor Mil...

Страница 348: ...as 1999 5 EB direktyvos nuostatas Malti Bil pre enti Lexmark International Inc jiddikjara li dan il prodott huwa konformi mal ti ijiet essenzjali u ma dispo izzjonijiet o rajn relevanti li jinsabu fid...

Страница 349: ...Maintenance message for such item To obtain warranty service you may be required to present proof of original purchase You may be required to deliver your product to the Remarketer or Lexmark or ship...

Страница 350: ...TO CHANGE AT ANY TIME WITHOUT NOTICE Limitation of liability Your sole remedy under this limited warranty is set forth in this document For any claim concerning performance or nonperformance of Lexma...

Страница 351: ...p atthe IETFfor AdditionoftheCamelliaCipherSuitestoTransportLayerSecurity TLS implemented in the product or service The use of certain patents in this product or service is subject to the reasonable n...

Страница 352: ...reen 22 understanding 21 attaching cables 44 automatic document feeder ADF using 14 available internal options 27 avoiding jams 63 avoiding paper jams 242 B Bin Setup menu 126 blocking junk faxes 108...

Страница 353: ...ts using the printer control panel 77 on both sides of the paper two sided 79 copying different paper sizes 78 copying from selected tray 78 copying multiple pages on one sheet 80 copying on both side...

Страница 354: ...87 Send As 87 subject 86 e mail screen advanced options 88 options 87 88 E mail Settings menu 170 e mail shortcut creating using the control panel 85 e mail shortcuts creating using the Embedded Web...

Страница 355: ...screen customizing 21 hiding icons 21 showing icons 21 home screen applications configuring 22 finding information 22 home screen buttons and icons description 16 HTML menu 195 I icons on the home scr...

Страница 356: ...ustom Types 125 Default Source 118 diagram of 117 Edit Security Setups 141 Erase Temporary Data Files 144 E mail Settings 170 Fax Mode Analog Fax Setup 162 Finishing 186 Flash Drive 179 FTP Settings 1...

Страница 357: ...from printer control panel 210 checking using the Embedded Web Server 210 storing 212 using genuine Lexmark 211 parts ordering 300K maintenance kit 212 PCL Emul menu 192 PDF menu 191 Personal Identif...

Страница 358: ...the 3000 sheet tray and open door C 2yy xx 247 x page jam slide the 3000 sheet tray and open door D 24y xx 251 Cartridge low 88 xy 271 Cartridge nearly low 88 xy 271 Cartridge very low 88 xy 271 Chang...

Страница 359: ...ain 84 xy 283 Replace unsupported cartridge 32 xy 283 Replace unsupported photoconductor 32 xy 283 Replace waste toner bottle 82 xy 283 Restore held jobs 283 Scanner disabled by admin 840 01 283 Scann...

Страница 360: ...83 Replace unsupported cartridge 32 xy 283 Replace unsupported photoconductor 32 xy 283 Replace waste toner bottle 82 xy 283 replacing parts pick feed separator rollers 227 transfer module 231 transfe...

Страница 361: ...me 104 setting the Universal paper size 51 setting up e mail alerts 239 setting up fax country or region specific 99 digital telephone service 98 DSL connection 95 standard telephone line connection 9...

Страница 362: ...essage remains after jam is cleared 293 troubleshooting print envelope seals when printing 295 error reading flash drive 295 held jobs do not print 294 incorrect characters print 296 incorrect margins...

Страница 363: ...u 190 V verify print jobs 73 printing from a Macintosh computer 73 printing from Windows 73 vertical voids appear 318 viewing reports 239 virtual display checking using Embedded Web Server 239 voice m...

Отзывы: