background image

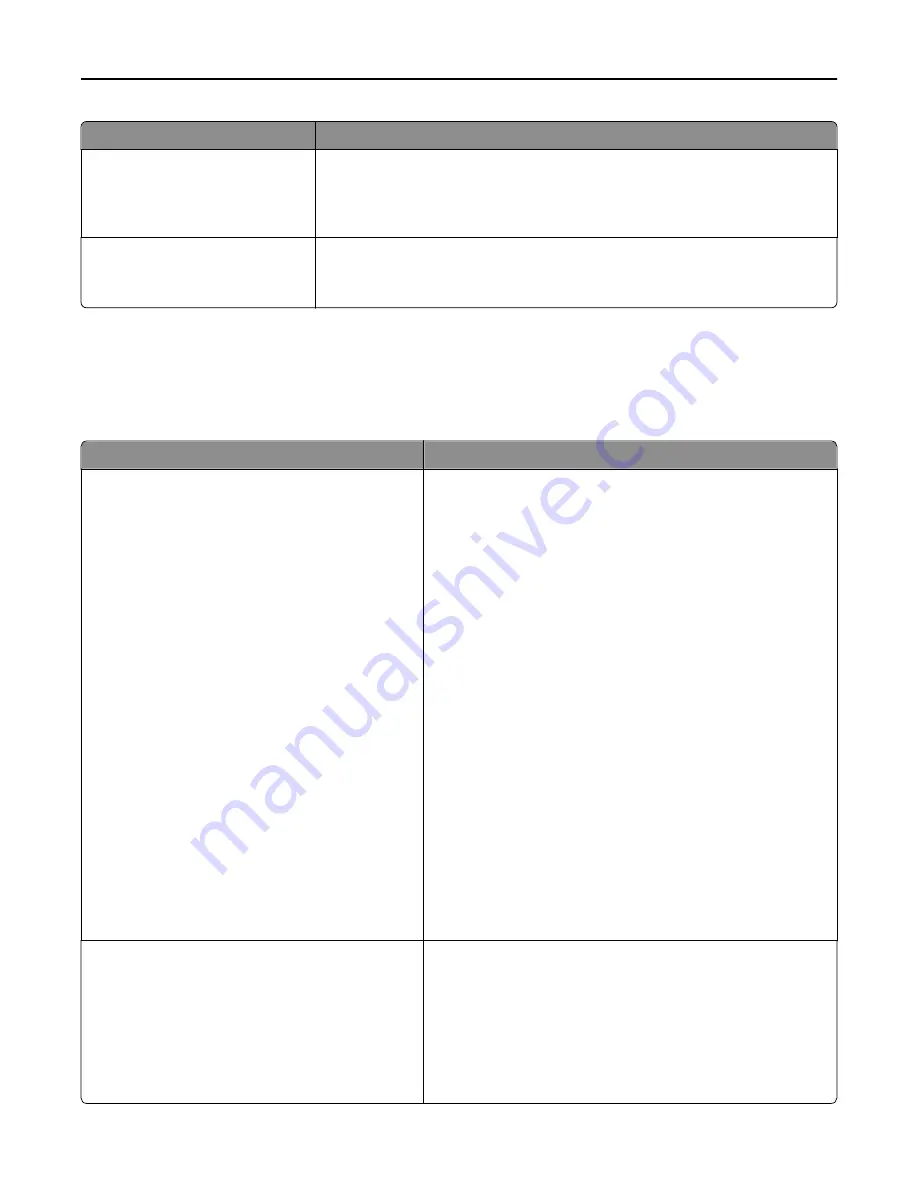
Use

To

Automatically Observe DST

On
Off

Set the printer to use the applicable daylight saving time (DST) start and end times
associated with the printer Time Zone setting.

Note: 

On is the factory default setting and uses the applicable Daylight Saving Time

associated with the Time Zone setting.

Enable NTP

On
Off

Enable Network Time Protocol, which synchronizes the clocks of devices on a
network.

Note: 

On is the factory default setting.

Settings menu

General Settings menu

Use

To

Display Language

English
Francais
Deutsch
Italiano
Espanol
Dansk
Norsk
Nederlands
Svenska
Portuguese
Suomi
Russian
Polski
Greek
Magyar
Turkce
Cesky
Simplified Chinese
Traditional Chinese
Korean
Japanese

Set the language of the text that appears on the printer display.

Note: 

Not all languages are available for all printer models.

Show Supply Estimates

Show estimates
Do not show estimates

Get an estimate on the status of supplies.

Notes:

Show estimates displays the estimated supply status in pages
on the control panel, printer Web page, and on the Menu
Settings and the Device Statistics reports.

Do not show estimates hides the estimated supply status in
any location.

Understanding the printer menus

171

Содержание M5100 Series

Страница 1: ...M5100 Series User s Guide Important Click here before using this guide October 2014 www lexmark com Machine type s 4063 Model s 29E 49E 69E ...

Страница 2: ...printer setup 39 Using M5155 and M5163 40 Learning about the printer 40 Setting up and using the home screen applications 46 Loading paper and specialty media 50 Printing 69 Managing your printer 75 Using M5170 84 Learning about the printer 84 Setting up and using the home screen applications 91 Loading paper and specialty media 95 Printing 115 Managing your printer 121 Paper and specialty media g...

Страница 3: ...ms 214 Understanding jam messages and locations 216 x page jam lift front cover to remove cartridge 200 201 218 x page jam open upper rear door 202 221 x page jam open upper and lower rear door 231 234 222 x page jam remove standard bin jam 203 224 x page jam remove tray 1 to clear duplex 235 239 224 x page jam open tray x 24x 226 x page jam clear manual feeder 250 227 x page jam remove paper open...

Страница 4: ...sages 235 Solving printer problems 252 Solving home screen application problems 286 Embedded Web Server does not open 286 Contacting customer support 287 Notices 288 Product information 288 Edition notice 288 Power consumption 292 Index 305 Contents 4 ...

Страница 5: ... manufacturer s instructions and local regulations CAUTION HOT SURFACE The inside of the printer might be hot To reduce the risk of injury from a hot component allow the surface to cool before touching CAUTION POTENTIAL INJURY To reduce the risk of equipment instability load each tray separately Keep all other trays closed until needed CAUTION POTENTIAL INJURY The printer weight is greater than 18...

Страница 6: ...nufacturer is not responsible for the use of other replacement parts CAUTION POTENTIAL INJURY Do not cut twist bind crush or place heavy objects on the power cord Do not subject the power cord to abrasion or stress Do not pinch the power cord between objects such as furniture and walls If any of these things happen a risk of fire or electrical shock results Inspect the power cord regularly for sig...

Страница 7: ...ind it here Initial setup instructions Connecting the printer Installing the printer software Setup documentation The setup documentation came with the printer and is also available at http support lexmark com Additional setup and instructions for using the printer Selecting and storing paper and specialty media Loading paper Configuring printer settings Viewing and printing documents and photos S...

Страница 8: ...our country or region and then select your product to view the appropriate support site Support telephone numbers and hours of operation for your country or region can be found on the support Web site or on the printed warranty that came with your printer Record the following information located on the store receipt and at the back of the printer and have it ready when you contact customer support...

Страница 9: ... in the room meets the latest revision of the ASHRAE 62 standard or the CEN Technical Committee 156 standard Provide a flat sturdy and stable surface Keep the printer Clean dry and free of dust Away from stray staples and paper clips Away from the direct airflow of air conditioners heaters or ventilators Free from direct sunlight and humidity extremes Observe the recommended temperatures and avoid...

Страница 10: ...1 2 3 4 5 1 Right side 305 mm 12 in 2 Front 508 mm 20 in 3 Left side 305 mm 12 in 4 Rear 305 mm 12 in 5 Top 115 mm 4 5 in Selecting a location for the printer 10 ...

Страница 11: ...and Bar Code PRESCRIBE IPDS Printer hard disk LexmarkTM Internal Solutions Ports ISP Parallel 1284 B interface MarkNetTM N8350 802 11 b g n wireless printer server RS 232 C serial interface Accessing the controller board Note This task requires a flat head screwdriver CAUTION SHOCK HAZARD If you are accessing the controller board or installing optional hardware or memory devices sometime after set...

Страница 12: ...2 Using a screwdriver loosen the screws on the controller board shield 3 Remove the shield 1 2 4 Use the following illustration to locate the appropriate connector Additional printer setup 12 ...

Страница 13: ...face on the printer first before touching any controller board electronic component or connector 1 3 2 1 Lexmark Internal Solutions Port or printer hard disk connector 2 Option card connector 3 Memory card connector 5 Align the screws with the holes on the shield and then reattach the shield 2 1 Additional printer setup 13 ...

Страница 14: ... printer off and unplug the power cord from the electrical outlet before continuing If you have any other devices attached to the printer then turn them off as well and unplug any cables going into the printer Warning Potential Damage Controller board electronic components are easily damaged by static electricity Touch something metal on the printer first before touching any controller board elect...

Страница 15: ...tential Damage Do not touch the connection points along the edge of the card Doing so may cause damage 3 Align the notch 1 on the memory card with the ridge 2 on the connector 1 2 4 Push the memory card straight into the connector and then push the card toward the controller board wall until it clicks into place 5 Reattach the controller board shield and then the controller board access cover Addi...

Страница 16: ... going into the printer Warning Potential Damage Controller board electronic components are easily damaged by static electricity Touch something metal on the printer first before touching any controller board electronic components or connectors 1 Access the controller board For more information see Accessing the controller board on page 11 2 If an optional printer hard disk is installed then remov...

Страница 17: ... pull it out completely 1 2 3 5 Align the posts of the plastic bracket with the holes on the controller board cage and then press the plastic bracket on the controller board cage until it clicks into place Make sure the cables are neatly tucked under the plastic bracket Additional printer setup 17 ...

Страница 18: ... angle over the plastic bracket so that any overhanging connectors will pass through the ISP opening in the controller board cage 7 Lower the ISP toward the plastic bracket until the ISP is seated between the guides of the plastic bracket Additional printer setup 18 ...

Страница 19: ... 9 Attach the two provided screws to secure the ISP mounting bracket to the controller board shield 10 Tighten the thumbscrew that is attached to the ISP Warning Potential Damage Do not screw it on too tightly 11 Connect the ISP solution interface cable into the receptacle of the controller board Note The plugs and receptacles are color coded Additional printer setup 19 ...

Страница 20: ...then turn them off as well and unplug any cables going into the printer Warning Potential Damage Controller board electronic components are easily damaged by static electricity Touch a metal surface on the printer before touching any controller board electronic components or connectors 1 Access the controller board For more information see Accessing the controller board on page 11 2 Unpack the opt...

Страница 21: ...tire length of the connector on the card must touch and be flushed against the controller board 5 Close the controller board access door Note When the printer software and any hardware options are installed it may be necessary to manually add the options in the printer driver to make them available for print jobs For more information see Adding available options in the print driver on page 33 Inst...

Страница 22: ...to the printer Warning Potential Damage Controller board electronic components are easily damaged by static electricity Touch something metal on the printer first before touching any controller board electronic components or connectors 1 Access the controller board For more information see Accessing the controller board on page 11 2 Unpack the printer hard disk 3 Locate the appropriate connector o...

Страница 23: ... ISP and then press the printer hard disk down until the standoffs are in place Installation warning Hold only the edges of the printed circuit board assembly Do not touch or press on the center of the printer hard disk Doing so may cause damage c Insert the plug of the printer hard disk interface cable into the receptacle of the ISP Note The plugs and receptacles are color coded Additional printe...

Страница 24: ... only the edges of the printed circuit board assembly Do not touch or press on the center of the printer hard disk Doing so may cause damage Note Make sure the cables are neatly tucked under the printer hard disk 5 Insert the plug of the printer hard disk interface cable into the receptacle of the controller board Note The plugs and receptacles are color coded Additional printer setup 24 ...

Страница 25: ...d or installing optional hardware or memory devices sometime after setting up the printer then turn the printer off and unplug the power cord from the electrical outlet before continuing If you have any other devices attached to the printer then turn them off as well and unplug any cables going into the printer Additional printer setup 25 ...

Страница 26: ...the controller board For more information see Accessing the controller board on page 11 2 Unplug the printer hard disk interface cable from the controller board leaving the cable attached to the printer hard disk To unplug the cable squeeze the paddle at the plug of the interface cable to disengage the latch before pulling out the cable 3 Remove the screws holding the printer hard disk in place Ad...

Страница 27: ... turn them off as well and unplug any cables going into the printer CAUTION TIPPING HAZARD Floor mounted configurations require additional furniture for stability You must use either a printer stand or printer base if you are using multiple input options If you purchased a printer with a similar configuration then you may need additional furniture For more information see www lexmark com multifunc...

Страница 28: ...ations require additional furniture for stability You must use either a printer stand or printer base if you are using multiple input options If you purchased a printer with a similar configuration then you may need additional furniture For more information see www lexmark com multifunctionprinters 1 Turn off the printer using the power switch and then unplug the power cord from the electrical out...

Страница 29: ...8 Align the printer with the tray and then slowly lower the printer into place Note Optional trays lock together when stacked Additional printer setup 29 ...

Страница 30: ...9 Connect the power cord to the printer then to a properly grounded electrical outlet and then turn on the printer Additional printer setup 30 ...

Страница 31: ...icks into place and then remove stacked trays one at a time from the top to the bottom Attaching cables CAUTION POTENTIAL INJURY Do not set up this product or make any electrical or cabling connections such as a power cord a fax feature or USB cable during a lightning storm Connect the printer to the computer using a USB cable or Ethernet cable Make sure to match the following The USB symbol on th...

Страница 32: ...lock that will secure the controller board 6 Printer power cord socket Connect the printer to a properly grounded electrical outlet Warning Potential Damage Do not touch the USB cable any wireless network adapter or the printer in the area shown while actively printing Loss of data or a malfunction can occur Note This feature is available only if you purchase optional trays and a caster base After...

Страница 33: ... on the computer screen 3 For Macintosh users add the printer Note Obtain the printer IP address from the TCP IP section in the Network Ports menu Adding available options in the print driver For Windows users 1 Open the printers folder In Windows 8 From the Search charm type run and then navigate to Run type control printers OK Additional printer setup 33 ...

Страница 34: ... SSID is a name assigned to a wireless network Wired Equivalent Privacy WEP Wi Fi Protected Access WPA WPA2 and 802 1X RADIUS are types of security used on a network Preparing to set up the printer on an Ethernet network To configure your printer to connect to an Ethernet network organize the following information before you begin Note If your network automatically assigns IP addresses to computer...

Страница 35: ...r WPA2 preshared key or passphrase WPA includes encryption as an additional layer of security The choices are AES or TKIP Encryption must be set for the same type on the router and on the printer or the printer will not be able to communicate on the network 802 1X RADIUS If you are installing the printer on an 802 1X network then you may need the following Authentication type Inner authentication ...

Страница 36: ...cast secured or unsecured SSIDs Enter a network name Manually type the SSID Note Make sure to type the correct SSID Wi Fi Protected Setup Connect the printer to a wireless network using Wi Fi Protected Setup 3 Follow the instructions on the printer display Connecting the printer to a wireless network using Wi Fi Protected Setup Before you begin make sure that The access point wireless router is Wi...

Страница 37: ...ected temporarily to an Ethernet network A wireless network adapter is installed in your printer and working properly For more information see the instruction sheet that came with the wireless network adapter 1 Open a Web browser and then type the printer IP address in the address field Notes View the printer IP address on the printer control panel The IP address appears as four sets of numbers se...

Страница 38: ...h users 1 From System Preferences in the Apple menu navigate to the list of printers and then select IP 2 Type the IP address in the address field 3 Apply the changes Setting up serial printing Windows only After installing the serial or communication COM port configure the printer and the computer Note Serial printing reduces print speed 1 Set the parameters in the printer a From the control pane...

Страница 39: ... then it is not installed correctly Remove the option and then install it again For more information see Printing a menu settings page on page 77 or Printing a menu settings page on page 123 Network setup page Use this page to verify the network connection This page also provides important information that aids network printing configuration Note Make sure your printer has Ethernet or wireless cap...

Страница 40: ...lly configured model CAUTION TIPPING HAZARD Floor mounted configurations require additional furniture for stability You must use either a printer stand or printer base if you are using multiple input options If you purchased a printer with a similar configuration then you may need additional furniture For more information see www lexmark com multifunctionprinters Using M5155 and M5163 40 ...

Страница 41: ...s 6 1 2 7 8 5 4 3 Hardware option Alternative hardware option 1 Staple finisher Output expander 4 bin mailbox Staple hole punch finisher 2 4 bin mailbox Staple finisher Staple hole punch finisher Output expander 3 Caster base None 4 2100 sheet tray None 5 550 sheet tray 250 sheet tray 6 250 sheet tray 550 sheet tray 7 4 bin mailbox Output expander 8 Output expander 4 bin mailbox Using M5155 and M5...

Страница 42: ...nfiguration A maximum of four optional trays may be configured with the printer The optional 250 and 550 sheet trays may be installed in any order Using the printer control panel 1 2 3 4 5 6 7 Use the To 1 Display View the printer status Set up and operate the printer 2 Home button Go to the home screen 3 Sleep button Enable Sleep mode or Hibernate mode Do the following to wake the printer from Sl...

Страница 43: ...res user intervention Sleep button light Printer status Off The printer is off idle or in Ready state Solid amber The printer is in Sleep mode Blinking amber The printer is entering or waking from Hibernate mode Blinking amber for 0 1 second then goes completely off for 1 9 seconds in a slow pulsing pattern The printer is in Hibernate mode Understanding the home screen When the printer is turned o...

Страница 44: ...ntion messages and the instructions on how to clear them 7 Status Supplies Show a printer warning or error message whenever the printer requires intervention to continue processing View more information on the printer warning or message and on how to clear it 8 Tips View a context sensitive help information These may also appear on the home screen Touch To Search Held Jobs Search current held jobs...

Страница 45: ... 5 Touch the To 1 Radio button Select or clear an item 2 Up arrow Scroll up 3 Down arrow Scroll down 4 Accept button Save a setting 5 Cancel button Cancel an action or a selection Return to the previous screen Touch To Return to the home screen Open a context sensitive Help dialog on the printer control panel Scroll to the left Scroll to the right Using M5155 and M5163 45 ...

Страница 46: ...rint server You can find the printer IP address From the top left corner of the printer home screen From the TCP IP section in the Network Ports menu By printing a network setup page or menu settings page and then finding the TCP IP section Note An IP address appears as four sets of numbers separated by periods such as 123 123 123 123 Accessing the Embedded Web Server The Embedded Web Server is th...

Страница 47: ...ation about the home screen applications Your printer comes with preinstalled home screen applications Before you can use these applications you must first activate and set up these applications using the Embedded Web Server For more information on accessing the Embedded Web Server see Accessing the Embedded Web Server on page 46 For more information on configuring and using the home screen applic...

Страница 48: ...ress appears as four sets of numbers separated by periods such as 123 123 123 123 2 Click Settings Apps Apps Management Forms and Favorites 3 Click Add and then customize the settings Notes See the mouse over help beside each field for a description of the setting To make sure the location settings of the bookmark are correct type the correct IP address of the host computer where the bookmark is l...

Страница 49: ...from a previously configured printer Notes Before importing the configuration file you can choose to preview it first or load it directly If a timeout occurs and a blank screen appears then refresh the Web browser and then click Apply 3 To export or import a configuration for multiple applications do the following a Click Settings Import Export b Do either of the following Toexportaconfigurationfi...

Страница 50: ...t supported Universal size is 216 x 356 mm 8 5 x 14 inches for one sided and two sided printing When printing on paper less than 210 mm 8 3 inches wide the printer may print at a reduced speed after a period of time to ensure the best print performance If you regularly print large jobs on narrow paper then you may use the MS710 Series printer models which print batches of 10 or more pages of narro...

Страница 51: ...play Doing so may cause a jam 2 Squeeze and slide the width guide to the correct position for the size of the paper being loaded until it clicks into place 2 1 Note Use the paper size indicators at the bottom of the tray to help position the guides Using M5155 and M5163 51 ...

Страница 52: ...and slide the guide to the correct position for the size of the paper being loaded 3 1 2 Notes Lock the length guide for all paper sizes Use the paper size indicators at the bottom of the tray to help position the guides Using M5155 and M5163 52 ...

Страница 53: ...aper stack with the printable side facedown Note Make sure the paper or envelope is loaded properly There are different ways of loading letterhead depending on whether an optional staple finisher is installed or not Without an optional staple finisher With an optional staple finisher ABC One sided printing One sided printing Using M5155 and M5163 53 ...

Страница 54: ... with the staple finisher then make sure the holes on the long edge of the paper are on the right side of the tray One sided printing Two sided printing A B C Note If the holes on the long edge of the paper are on the left side of the tray then a jam may occur Do not slide the paper into the tray Load paper as shown in the illustration Using M5155 and M5163 54 ...

Страница 55: ...e flap side is facing up and the envelopes are on the left side of the tray Make sure the paper is below the solid line which is the maximum paper fill indicator Warning Potential Damage Overfilling the tray can cause paper jams Using M5155 and M5163 55 ...

Страница 56: ... Universal size paper adjust the paper guides to lightly touch the sides of the stack and then lock the length guide 7 Insert the tray 8 From the printer control panel set the paper size and paper type in the Paper menu to match the paper loaded in the tray Note Set the correct paper size and type to avoid paper jams and print quality problems Using M5155 and M5163 56 ...

Страница 57: ...each tray separately Keep all other trays closed until needed 1 Pull out the tray 2 Adjust the width and length guides Loading A5 size paper a Pull up and slide the width guide to the position for A5 LGL OFC FOLIO LTR A4 A5 1 LGL OFC FOLIO LTR A 4 A 5 2 LGL OFC FOLIO LTR A 4 A 5 Using M5155 and M5163 57 ...

Страница 58: ...to the position for A5 until it clicks into place 1 2 c Remove the A5 length guide from its holder 1 2 d Insert the A5 length guide into its designated slot Note Press the A5 length guide until it clicks into place Using M5155 and M5163 58 ...

Страница 59: ...osition for the size of the paper being loaded LGL OFC FOLIO LTR A4 A5 1 LGL OFC FOLIO LTR A 4 A 5 2 LGL OFC FOLIO LTR A 4 A 5 b If the A5 length guide is still attached to the length guide then remove it from its place If the A5 length guide is not attached then proceed to step d Using M5155 and M5163 59 ...

Страница 60: ...A5 length guide in its holder 2 1 d Squeeze the length guide and slide it to the correct position for the size of the paper being loaded until it clicks into place LGL OFC FOLIO LTR A4 A5 Using M5155 and M5163 60 ...

Страница 61: ... different ways of loading letterhead depending on whether an optional staple finisher is installed or not Without an optional staple finisher With an optional staple finisher ABC One sided printing A B C One sided printing ABC Two sided printing A B C Two sided printing If you are loading prepunched paper for use with the staple finisher then make sure the holes on the long edge of the paper are ...

Страница 62: ...he paper are on the left side of the tray then a jam may occur Make sure the paper is below the maximum paper fill indicator Warning Potential Damage Overfilling the tray can cause paper jams 5 Insert the tray Note Press the paper stack down while inserting the tray Using M5155 and M5163 62 ...

Страница 63: ...h the paper loaded in the tray Note Set the correct paper size and type to avoid paper jams and print quality problems Loading the multipurpose feeder 1 Pull down the multipurpose feeder door Note Do not load or close the multipurpose feeder while a job is printing B5 EX EC A4 A5 L TR Using M5155 and M5163 63 ...

Страница 64: ...ently so that the multipurpose feeder is fully extended and open 3 Slide the width guide to the correct position for the size of the paper being loaded B 5 E X E C A 4 A 5 L T R Note Use the paper size indicators on the bottom of tray to help position the guides Using M5155 and M5163 64 ...

Страница 65: ...touching the printable side of the transparencies Be careful not to scratch them Flex the stack of envelopes back and forth to loosen them and then fan them Straighten the edges on a level surface 5 Load the paper or specialty media Note Slide the stack gently into the multipurpose feeder until it comes to a stop Load only one size and type of paper or specialty media at a time Make sure the paper...

Страница 66: ...ting A B C One sided printing A B C Two sided printing A B C Two sided printing If you are loading prepunched paper for use with the staple finisher then make sure the holes on the long edge of the paper are on the right side of the tray One sided printing Two sided printing A B C Note If the holes on the long edge of the paper are on the left side of the tray then a jam may occur Using M5155 and ...

Страница 67: ...he paper or specialty media is below the maximum paper fill indicator Warning Potential Damage Overfilling the feeder can cause paper jams 6 For custom or Universal size paper adjust the width guides to lightly touch the sides of the stack 7 From the Paper menu on the printer control panel set the paper size and type in the Paper menu to match the paper loaded in the tray Note Set the correct pape...

Страница 68: ... 50 Warning Potential Damage Paper loaded in the tray should match the paper type name assigned in the printer The temperature of the fuser varies according to the specified paper type Printing issues may occur if settings are not properly configured Creating a custom name for a paper type Using the Embedded Web Server 1 Open a Web browser and then type the printer IP address in the address field ...

Страница 69: ...name and then select a paper type Note Paper is the factory default paper type for all user defined custom names 4 Click Submit Using the printer control panel 1 From the home screen navigate to Paper Menu Custom Types 2 Select a custom paper type name and then select a paper type Note Paper is the factory default paper type for all user defined custom names 3 Touch Printing Printing forms and a d...

Страница 70: ...t dialog and pop up menus adjust the settings if necessary Note To print on a specific paper type adjust the paper type setting to match the paper loaded or select the appropriate tray or feeder 3 Click Print Adjusting toner darkness Using the Embedded Web Server 1 Open a Web browser and then type the printer IP address in the address field Notes View the printer IP address on the printer home scr...

Страница 71: ...er these print jobs are processed you may need to view the held jobs list to print documents from the flash drive Warning Potential Damage Do not touch the printer or the flash drive in the area shown while actively printing reading or writing from the memory device Loss of data can occur 2 From the printer control panel touch the document you want to print 3 Touch the arrows to specify the number...

Страница 72: ...em Devices formatted with New Technology File System NTFS or any other file system are not supported Recommended flash drives File type Lexar JumpDrive FireFly 512MB and 1GB SanDisk Cruzer Micro 512MB and 1GB Sony Micro Vault Classic 512MB and 1GB Documents pdf xps Images dcx gif jpeg or jpg bmp pcx tiff or tif png fls Printing confidential and other held jobs Storing print jobs in the printer 1 F...

Страница 73: ... extra memory to process additional held jobs You can set the printer to store print jobs in the printer memory until you start the print job from the printer control panel All print jobs that can be initiated by the user at the printer are called held jobs 2 Touch Printing confidential and other held jobs Note Confidential and Verify print jobs are automatically deleted from memory after printing...

Страница 74: ...he PIN Print For other print jobs navigate to Held jobs select your user name select the print job specify the number of copies Print Printing information pages Printing a font sample list 1 From the home screen navigate to Reports Print Fonts 2 Touch PCL Fonts or PostScript Fonts Printing a directory list A directory list shows the resources stored in a flash memory or in the printer hard disk Fr...

Страница 75: ...ears as four sets of numbers separated by periods such as 123 123 123 123 If you are using a proxy server then temporarily disable it to load the Web page correctly 2 Check the virtual display that appears at the top left corner of the screen The virtual display works as an actual display would work on a printer control panel Configuring supply notifications from the Embedded Web Server You can de...

Страница 76: ...ly condition is reached The supply must be replaced to continue printing 1 The printer generates an e mail about the status of the supply when supply notification is enabled 2 The printer stops when some supplies become empty to prevent damage 4 Click Submit Modifying confidential print settings 1 Open a Web browser and then type the printer IP address in the address field Notes View the printer I...

Страница 77: ...ids network printing configuration 1 From the home screen navigate to Reports Network Setup Page 2 Check the first section of the network setup page and confirm that the status is Connected If the status is Not Connected then the LAN drop may not be active or the network cable may be malfunctioning Consult your system support person for a solution and then print another network setup page Checking...

Страница 78: ...erformance specifications of the printer Energy Reduce energy use especially when the printer is idle Notes Printer engine motors do not start until a document is ready to print You may notice a short delay before the first page is printed The printer enters Sleep mode after one minute of inactivity The printer display is turned off when the printer is in Sleep mode Lights on the staple finisher a...

Страница 79: ...time before the printer enters Hibernate mode Make sure to wake the printer from Hibernate mode before sending a print job A hard reset or a long press of the Sleep button wakes the printer from Hibernate mode If the printer is in Hibernate mode then the Embedded Web Server is disabled 1 From the home screen navigate to Settings General Settings 2 Touch Press Sleep Button or Press and Hold Sleep B...

Страница 80: ...d the controller board cannot be removed Attach a security lock to the printer in the location shown Statement of Volatility Your printer contains various types of memory that can store device and network settings and user data Type of memory Description Volatile memory Your printer uses standard random access memory RAM to temporarily buffer user data during simple print jobs Non volatile memory ...

Страница 81: ...e Most data can be erased electronically but the only way to guarantee that all data is completely erased is to physically destroy each hard disk where data is stored Erasing volatile memory Thevolatilememory RAM installedinyourprinterrequires apowersourcetoretaininformation Toerasethebuffered data simply turn off the printer Erasing non volatile memory Erase individual settings device and network...

Страница 82: ...ntial information should be wiped using this method 4 Touch Yes to proceed with disk wiping Notes A status bar will indicate the progress of the disk wiping task Disk wiping can take from several minutes to more than an hour during which the printer will be unavailable for other user tasks 5 Touch Back Exit Config Menu The printer will perform a power on reset and then return to normal operating m...

Страница 83: ...o may result in loss of data Disk encryption can take from several minutes to more than an hour during which the printer will be unavailable for other user tasks A status bar will indicate the progress of the disk wiping task After the disk has been encrypted the printer will return to the Enable Disable screen 5 Touch Back Exit Config Menu The printer will perform a power on reset and then return...

Страница 84: ...lly configured model CAUTION TIPPING HAZARD Floor mounted configurations require additional furniture for stability You must use either a printer stand or printer base if you are using multiple input options If you purchased a printer with a similar configuration then you may need additional furniture For more information see www lexmark com multifunctionprinters Using M5170 84 ...

Страница 85: ...inters 6 1 2 7 8 5 4 3 Hardware option Alternative hardware option 1 Staple finisher Output expander 4 bin mailbox Staple hole punch finisher 2 4 bin mailbox Staple finisher Staple hole punch finisher Output expander 3 Caster base None 4 2100 sheet tray None 5 550 sheet tray 250 sheet tray 6 250 sheet tray 550 sheet tray 7 4 bin mailbox Output expander 8 Output expander 4 bin mailbox Using M5170 8...

Страница 86: ...onfiguration A maximum of four optional trays may be configured with the printer The optional 250 and 550 sheet trays may be installed in any order Using the printer control panel 4 1 2 3 5 6 7 Use the To 1 Display View the status of the printer Set up and operate the printer 2 Home button Go to the home screen 3 Sleep button Enable Sleep mode or Hibernate mode Do the following to wake the printer...

Страница 87: ...The printer requires user intervention Sleep button light Printer status Off The printer is off idle or in Ready state Solid amber The printer is in Sleep mode Blinking amber The printer is entering or waking from Hibernate mode Blinking amber for 0 1 second then goes completely off for 1 9 seconds in a slow pulsing pattern The printer is in Hibernate mode Understanding the home screen When the pr...

Страница 88: ...rning or message and on how to clear it 8 Tips Open a context sensitive Help information on the printer control panel Features Feature Description Attendance message alert If an attendance message affects a function then this icon appears and the red indicator light blinks Warning If an error condition occurs then this icon appears Printer IP address Example 123 123 123 123 The IP address of your ...

Страница 89: ...roll to the right 3 Up arrow Scroll up 4 Down arrow Scroll down 5 Submit Submit changes made in the printer settings 6 Back Return to the previous screen 7 Home Return to the home screen 8 Tips Open a context sensitive Help dialog on the printer control panel Using M5170 89 ...

Страница 90: ...n action or a selection Leave a screen and return to the previous screen without saving changes Increase Select a higher value Decrease Select a lower value Exit Leave the current screen Search Search current held jobs Warning View a warning or error message Using M5170 90 ...

Страница 91: ...o a print server You can find the printer IP address From the top left corner of the printer home screen From the TCP IP section in the Network Ports menu By printing a network setup page or menu settings page and then finding the TCP IP section Note An IP address appears as four sets of numbers separated by periods such as 123 123 123 123 Accessing the Embedded Web Server The Embedded Web Server ...

Страница 92: ...pplications Finding information about the home screen applications Your printer comes with preinstalled home screen applications Before you can use these applications you must first activate and set up these applications using the Embedded Web Server For more information on accessing the Embedded Web Server see Accessing the Embedded Web Server on page 46 For more information on configuring and us...

Страница 93: ...P address appears as four sets of numbers separated by periods such as 123 123 123 123 2 Click Settings Apps Apps Management Forms and Favorites 3 Click Add and then customize the settings Notes See the mouse over help beside each field for a description of the setting To make sure the location settings of the bookmark are correct type the correct IP address of the host computer where the bookmark...

Страница 94: ...rted from a previously configured printer Notes Before importing the configuration file you can choose to preview it first or load it directly If a timeout occurs and a blank screen appears then refresh the Web browser and then click Apply 3 To export or import a configuration for multiple applications do the following a Click Settings Import Export b Do either of the following Toexportaconfigurat...

Страница 95: ...gs Universal paper size is a user defined setting that lets you print on paper sizes that are not preset in the printer menus Notes The smallest supported Universal size is 70 x 127 mm 2 76 x 5 inches for one sided printing and 105 x 148 mm 4 13 x 5 83 inches for two sided duplex printing The largest supported Universal size is 216 x 356 mm 8 5 x 14 inches for one sided and two sided printing When...

Страница 96: ...ad each tray separately Keep all other trays closed until needed 1 Pull out the tray Notes When loading folio legal or Oficio size paper lift the tray slightly and then pull it out completely Do not remove trays while a job prints or while Busy appears on the display Doing so may cause a jam Using M5170 96 ...

Страница 97: ...ide the width guide to the correct position for the size of the paper being loaded until it clicks into place 2 1 Note Use the paper size indicators at the bottom of the tray to help position the guides Using M5170 97 ...

Страница 98: ...eeze and slide the guide to the correct position for the size of the paper being loaded 3 1 2 Notes Lock the length guide for all paper sizes Use the paper size indicators at the bottom of the tray to help position the guides Using M5170 98 ...

Страница 99: ...optional staple finisher is installed or not Without an optional staple finisher With an optional staple finisher ABC One sided printing One sided printing ABC Two sided printing A B C Two sided printing If you are loading prepunched paper for use with the staple finisher then make sure the holes on the long edge of the paper are on the right side of the tray One sided printing Two sided printing ...

Страница 100: ...lide the paper into the tray Load paper as shown in the illustration If you are loading envelopes then make sure that the flap side is facing up and the envelopes are on the left side of the tray Using M5170 100 ...

Страница 101: ...ximum paper fill indicator Warning Potential Damage Overfilling the tray can cause paper jams When using card stock labels or other types of specialty media make sure the paper is below the dashed line which is the alternate paper fill indicator Using M5170 101 ...

Страница 102: ...ize and paper type in the Paper menu to match the paper loaded in the tray Note Set the correct paper size and type to avoid paper jams and print quality problems Loading the 2100 sheet tray CAUTION POTENTIAL INJURY To reduce the risk of equipment instability load each tray separately Keep all other trays closed until needed 1 Pull out the tray 2 Adjust the width and length guides Using M5170 102 ...

Страница 103: ...nd slide the width guide to the position for A5 LGL OFC FOLIO LTR A4 A5 1 LGL OFC FOLIO LTR A 4 A 5 2 LGL OFC FOLIO LTR A 4 A 5 b Squeeze and slide the length guide to the position for A5 until it clicks into place 1 2 Using M5170 103 ...

Страница 104: ...Note Press the A5 length guide until it clicks into place Loading A4 letter legal oficio and folio size paper a Pull up and slide the width guide to the correct position for the size of the paper being loaded LGL OFC FOLIO LTR A4 A5 1 LGL OFC FOLIO LTR A 4 A 5 2 LGL OFC FOLIO LTR A 4 A 5 Using M5170 104 ...

Страница 105: ...he A5 length guide is still attached to the length guide then remove it from its place If the A5 length guide is not attached then proceed to step d c Put the A5 length guide in its holder 2 1 Using M5170 105 ...

Страница 106: ...eets of paper back and forth to loosen them and then fan them Do not fold or crease the paper Straighten the edges on a level surface 4 Load the paper stack with the printable side facedown Note Make sure the paper is loaded properly There are different ways of loading letterhead depending on whether an optional staple finisher is installed or not Using M5170 106 ...

Страница 107: ...C Two sided printing If you are loading prepunched paper for use with the staple finisher then make sure the holes on the long edge of the paper are on the right side of the tray One sided printing Two sided printing A B C A B C Note If the holes on the long edge of the paper are on the left side of the tray then a jam may occur Using M5170 107 ...

Страница 108: ...e the paper is below the maximum paper fill indicator Warning Potential Damage Overfilling the tray can cause paper jams 5 Insert the tray Note Press the paper stack down while inserting the tray Using M5170 108 ...

Страница 109: ...enu to match the paper loaded Note Set the correct paper size and type to avoid paper jams and print quality problems Loading the multipurpose feeder 1 Pull down the multipurpose feeder door Note Do not load or close the multipurpose feeder while a job is printing B5 EXE C A4 A5 L TR Using M5170 109 ...

Страница 110: ...he extender gently so that the multipurpose feeder is fully extended and open 3 Slide the width guide to the correct position for the size of the paper being loaded B 5 E X E C A 4 A 5 L T R Note Use the paper size indicators on the bottom of tray to help position the guides Using M5170 110 ...

Страница 111: ...void touching the printable side of the transparencies Be careful not to scratch them Flex the stack of envelopes back and forth to loosen them and then fan them Straighten the edges on a level surface 5 Load the paper or specialty media Note Slide the stack gently into the multipurpose feeder until it comes to a stop Load only one size and type of paper or specialty media at a time Make sure the ...

Страница 112: ...printing A B C One sided printing A B C Two sided printing A B C Two sided printing If you are loading prepunched paper for use with the staple finisher then make sure the holes on the long edge of the paper are on the right side of the tray One sided printing Two sided printing A B C Note If the holes on the long edge of the paper are on the left side of the tray then a jam may occur Using M5170 ...

Страница 113: ...r Make sure the paper or specialty media is below the maximum paper fill indicator Warning Potential Damage Overfilling the feeder can cause paper jams 6 For custom or Universal size paper adjust the width guides to lightly touch the sides of the stack 7 From the printer control panel set the paper size and type in the Paper menu to match the paper loaded in the tray Note Set the correct paper siz...

Страница 114: ... page 95 Warning Potential Damage Paper loaded in the tray should match the paper type name assigned in the printer The temperature of the fuser varies according to the specified paper type Printing issues may occur if settings are not properly configured Creating a custom name for a paper type Using the Embedded Web Server 1 Open a Web browser and then type the printer IP address in the address f...

Страница 115: ... Note Paper is the factory default paper type for all user defined custom names 4 Click Submit Using the printer control panel 1 From the home screen navigate to Paper Menu Custom Types 2 Select a custom paper type name and then select a paper type Note Paper is the factory default paper type for all user defined custom names 3 Touch Submit Printing Printing forms and a document Printing forms Use...

Страница 116: ... print options pop up menus adjust the settings if necessary Note To print on a specific paper type adjust the paper type setting to match the paper loaded or select the appropriate tray or feeder 3 Click Print Adjusting toner darkness 1 Open a Web browser and then type the printer IP address in the address field Notes View the printer IP address on the printer home screen The IP address appears a...

Страница 117: ...you insert the flash drive when the printer requires attention such as when a jam has occurred then the printer ignores the flash drive If you insert the flash drive while the printer is processing other print jobs then Busy appears After these print jobs are processed you may need to view the held jobs list to print documents from the flash drive Warning Potential Damage Do not touch the USB cabl...

Страница 118: ...een to print files from the flash drive Printing from a mobile device To download a compatible mobile printing application visit www lexmark com mobile Note Mobile printing applications may also be available from your mobile device manufacturer Supported flash drives and file types Notes High speed USB flash drives must support the full speed standard Low speed USB devices are not supported USB fl...

Страница 119: ...s set from the computer It must be four digits using the numbers 1 9 Repeat Job Expiration Print and store print jobs in the printer memory Verify Job Expiration Print one copy of a print job and hold the remaining copies It allows you to examine if the first copy is satisfactory The print job is automatically deleted from the printer memory when all copies are printed Reserve Job Expiration Store...

Страница 120: ...Held jobs select your user name select the print job specify the number of copies Print For Macintosh users 1 With a document open choose File Print If necessary click the disclosure triangle to see more options 2 From the print options or Copies Pages pop up menu choose Job Routing 3 Select the print job type Confidential Repeat Reserve or Verify and then assign a user name For a confidential pri...

Страница 121: ...he print job you want to cancel and then delete it For Macintosh users 1 From System Preferences in the Apple menu navigate to your printer 2 From the print queue select the print job you want to cancel and then delete it Managing your printer Finding advanced networking and administrator information This chapter covers basic administrative support tasks using the Embedded Web Server For more adva...

Страница 122: ...four sets of numbers separated by periods such as 123 123 123 123 If you are using a proxy server then temporarily disable it to load the Web page correctly 2 Click Settings Print Settings Supply Notifications 3 From the drop down menu for each supply select one of the following notification options Notification Description Off The normal printer behavior for all supplies occurs E mail Only The pr...

Страница 123: ...to other printers Note This feature is available only in network printers 1 Open a Web browser and then type the printer IP address in the address field Notes View the printer IP address on the printer home screen The IP address appears as four sets of numbers separated by periods such as 123 123 123 123 If you are using a proxy server then temporarily disable it to load the Web page correctly 2 C...

Страница 124: ...l panel From the home screen navigate to Status Supplies View Supplies Checking the status of parts and supplies from the Embedded Web Server Note Make sure that the computer and printer are connected to the same network 1 Open a Web browser and then type the printer IP address in the address field Notes View the printer IP address on the home screen The IP address appears as four sets of numbers ...

Страница 125: ...printer is in Sleep mode Lights on the staple finisher and other optional finishers are turned off when the printer is in Sleep mode Energy Paper Use all the settings associated with Energy and Paper modes Plain Paper Enable the automatic two sided duplex printing feature 4 Click Submit Reducing printer noise Enable Quiet mode to reduce printer noise 1 Open a Web browser and then type the printer ...

Страница 126: ...reen navigate to Settings General Settings 2 From the Press Sleep Button or Press and Hold Sleep Button menu select Hibernate and then touch Submit Restoring factory default settings If you want to keep a list of the current menu settings for reference then print a menu settings page before restoring the factory default settings For more information see Printing a menu settings page on page 123 If...

Страница 127: ...ser data during simple print jobs Non volatile memory Your printer may use two forms of non volatile memory EEPROM and NAND flash memory Both types are used to store the operating system device settings network information bookmark settings and embedded solutions Hard disk memory Some printers have a hard disk drive installed The printer harddiskisdesignedfordevice specificfunctionality Thislets t...

Страница 128: ...ch hard disk where data is stored Erasing volatile memory Thevolatilememory RAM installedinyourprinterrequires apowersourcetoretaininformation Toerasethebuffered data simply turn off the printer Erasing non volatile memory Erase individual settings device and network settings security settings and embedded solutions by following these steps 1 Turn off the printer 2 Hold down 2 and 6 while turning ...

Страница 129: ...information should be wiped using this method 4 Touch Yes to proceed with disk wiping Notes A status bar will indicate the progress of the disk wiping task Disk wiping can take from several minutes to more than an hour during which the printer will be unavailable for other user tasks 5 Touch Back Exit Config Menu The printer will perform a power on reset and then return to normal operating mode Co...

Страница 130: ...ing so may result in loss of data Disk encryption can take from several minutes to more than an hour during which the printer will be unavailable for other user tasks A status bar will indicate the progress of the disk wiping task After the disk has been encrypted the printer will return to the Enable Disable screen 5 Touch Back Exit Config Menu The printer will perform a power on reset and then r...

Страница 131: ...paper loaded in the tray Preprinting perforation and creasing may significantly affect the print quality and cause jams or other paper feed problems Before loading the card stock on the tray flex and fan the card stock to loosen them Straighten the edges on a level surface Tips on using envelopes From the printer control panel set the paper size type texture and weight in the Paper menu to match t...

Страница 132: ...ridge with adhesive and could void the printer and toner cartridge warranties Before loading labels on the tray flex and fan labels to loosen them Straighten the edges on a level surface Note Vinyl and polyester labels are supported only in the MS710 Series printer models Tips on using transparencies From the printer control panel set the paper size type texture and weight in the Paper menu to mat...

Страница 133: ... paper correctly Leave paper in its original wrapper until it is time to use it This limits the exposure of paper to moisture changes that can degrade its performance Store paper in its original wrapper in the same environment as the printer for 24 to 48 hours before printing Extend the time several days if the storage or transportation environment is very different from the printer environment Th...

Страница 134: ...ontent Business papers should have low moisture 4 5 Bending resistance and proper stiffness means optimum feeding through the printer Thickness impacts how much can be loaded into a tray Surface roughness measured in Sheffield units impacts print clarity and how well toner fuses to the paper Surface friction determines how easily sheets can be separated Grain and formation impacts curling which al...

Страница 135: ...Preprinted papers that can be affected by the temperature in the printer fuser Preprinted papers that require a registration the precise location on the page greater than 2 3 mm 0 9 in such as optical character recognition OCR forms In some cases registration can be adjusted with a software application to successfully print on these forms Coated papers erasable bond synthetic papers thermal papers...

Страница 136: ...en printing on paper less than 210 mm 8 3 inches wide the printer may print at a reduced speed after a period of time to ensure the best print performance Paper size1 Dimensions Standard or optional 250 or 550 sheet tray Optional 2100 sheet tray Multipurpose feeder Duplex A4 210 x 297 mm 8 3 x 11 7 in A5 148 x 210 mm 5 8 x 8 3 in 2 A6 105 x 148 mm 4 1 x 5 8 in X 1 If your preferred default paper s...

Страница 137: ...9 x 8 9 in X X 10 Envelope 105 x 241 mm 4 1 x 9 5 in X X DL Envelope 110 x 220 mm 4 3 x 8 7 in X X C5 Envelope 162 x 229 mm 6 38 x 9 01 in X X B5 Envelope 176 x 250 mm 6 93 x 9 84 in X X 1 If your preferred default paper size cannot be set in the printer control panel then you may select common paper sizes that correspond to the position of the length guide in the tray from the Paper Size Type men...

Страница 138: ...l is supported in duplex mode only if the width is from 105 mm 4 13 in to 216 mm 8 5 in and the length is from 148 mm 5 83 in to 356 mm 14 in Paper sizes types and weights supported by the output options Supported paper sizes Paper size 4 bin mailbox Output expander and high capacity output expander Staple finisher Staple hole punch finisher A6 X X A5 1 1 3 JIS B5 2 2 Executive 2 2 Letter A4 Legal...

Страница 139: ... 90 g m2 16 24 lb bond Paper labels 180 g m2 48 Ib bond X X X Dual web and Integrated 180 g m2 48 Ib bond X X X Bond 90 176 g m2 24 47 lb bond X X X 60 90 g m2 16 24 lb bond Envelope 105 g m2 28 Ib bond X X X Rough Envelope 105 g m2 28 Ib bond X X X Letterhead 90 176 g m2 24 47 lb bond X X X 60 90 g m2 16 24 lb bond 1 The finisher stacks the paper but does not staple or punch holes in it 2 Print o...

Страница 140: ... X X X 60 90 g m2 16 24 lb bond Heavy paper 90 176 g m2 24 47 lb bond X X X 60 90 g m2 16 24 lb bond Rough cotton 90 176 g m2 24 47 lb bond X X X 60 90 g m2 16 24 lb bond Custom type x 90 176 g m2 24 47 lb bond X X X 60 90 g m2 16 24 lb bond 1 The finisher stacks the paper but does not staple or punch holes in it 2 Print on transparencies by batches of only up to 20 to prevent them from sticking t...

Страница 141: ...curity Settings Help Edit Security Setups 4 Miscellaneous Security Settings 3 Confidential Print Erase Temporary Data Files Security Audit Log Set Date and Time General Settings Flash Drive Menu Print Settings Print All Guides Print Quality Printing Guide Print Defects Guide Information Guide Supplies Guide 1 Depending on the printer setup this menu item appears as Network Setup Page or Network x ...

Страница 142: ...pears only in non touch screen printer models Paper Size Type menu Use To Tray x Size A4 A5 A6 JIS B5 Letter Legal Executive Oficio Mexico Folio Statement Universal 7 3 4 Envelope 9 Envelope 10 Envelope DL Envelope C5 Envelope B5 Envelope Other Envelope Specify the paper size loaded in each tray Notes Letter is the U S factory default setting A4 is the international factory default setting If two ...

Страница 143: ...re automatic tray linking MP Feeder Size A4 A5 A6 JIS B5 Letter Legal Executive Oficio Mexico Folio Statement Universal 7 3 4 Envelope 9 Envelope 10 Envelope DL Envelope C5 Envelope B5 Envelope Other Envelope Specify the paper size loaded in the multipurpose feeder Notes Letter is the U S factory default setting A4 is the international factory default setting From the Paper menu set Configure MP t...

Страница 144: ...xecutive Oficio Mexico Folio Statement Universal Specify the paper size being manually loaded Note Letter is the U S factory default setting A4 is the international factory default setting Manual Paper Type Plain Paper Card Stock Transparency Recycled Labels Bond Letterhead Preprinted Colored Paper Light Paper Heavy Paper Rough Cotton Custom Type x Specify the paper type being manually loaded Note...

Страница 145: ...etermine when the printer selects paper from the multipurpose feeder Notes Cassette is the factory default setting Cassette configures the multipurpose feeder as the automatic paper source Manual sets the multipurpose feeder only for manual feed print jobs First configures the multipurpose feeder as the primary paper source Substitute Size menu Use To Substitute Size Off Statement A5 Letter A4 All...

Страница 146: ...h Normal Rough Specify the relative texture of the labels loaded in a specific tray Note Normal is the factory default setting Vinyl Labels Texture Smooth Normal Rough Specify the relative texture of the vinyl labels loaded in a specific tray Note Normal is the factory default setting Bond Texture Smooth Normal Rough Specify the relative texture of the bond paper loaded in a specific tray Note Rou...

Страница 147: ...relative texture of the rough or cotton paper loaded in a specific tray Note Rough is the factory default setting Custom x Texture Smooth Normal Rough Specify the relative texture of the custom paper loaded in a specific tray Note Normal is the factory default setting Paper Weight menu Use To Plain Weight Light Normal Heavy Specify the relative weight of the plain paper loaded Note Normal is the f...

Страница 148: ...the rough envelope loaded Note Normal is the factory default setting Letterhead Weight Light Normal Heavy Specify the relative weight of the letterhead loaded Note Normal is the factory default setting Preprinted Weight Light Normal Heavy Specify the relative weight of the preprinted paper loaded Note Normal is the factory default setting Colored Weight Light Normal Heavy Specify the relative weig...

Страница 149: ...s as the paper type Bond Loading Duplex Off Determine and set two sided printing for all print jobs with Bond as the paper type Letterhead Loading Duplex Off Determineandsettwo sidedprintingforallprintjobswithLetterhead as the paper type Preprinted Loading Duplex Off Determineandsettwo sided printingfor all printjobswithPreprinted as the paper type Colored Loading Duplex Off Determine and set two ...

Страница 150: ...rint dialog depending on your operating system Custom Types menu Use To Custom Type x Paper Card Stock Transparency Rough Cotton Labels Envelope Associate a paper or specialty media type with a Custom Type x name Notes Paper is the factory default setting for Custom Type x The specialty media type must be supported in the selected tray or feeder in order to print from that source Recycled Paper Ca...

Страница 151: ...ch increments 216 mm is the international factory default setting You can increase the width in 1 mm increments Portrait Height 3 14 17 inches 76 360 mm Set the portrait height Notes If the height exceeds the maximum then the printer uses the maximum height allowed 14 inches is the U S factory default setting You can increase the height in 0 01 inch increments 356 mm is the international factory d...

Страница 152: ...Overflow configures each bin as a separate mailbox Link Optional links all available bins except the standard bin and only appears when at least two optional bins are installed Type Assignment assigns each paper type to a bin or linked bin set Bins assigned the same name are automatically linked unless Link Optional is selected Overflow Bin Standard Bin Bin x Specify an alternative bin when a desi...

Страница 153: ...ter control panel language TCP IP address status of supplies status of the network connection and other information Device Statistics Print a report containing printer statistics such as supply information and details about printed pages Stapler Test Print a report that confirms that the staple finisher is functioning properly Note This menu appears only if an optional staple finisher is installed...

Страница 154: ...information such as serial number and model name Network Ports menu Active NIC menu Use To Active NIC Auto list of available network cards Allow the printer to connect to a network Notes Auto is the factory default setting This menu item appears only if an optional network adapter is installed Standard Network or Network x menu Note Only active ports appear in this menu Use To Energy Efficient Eth...

Страница 155: ...mory in the printer the size of the other link buffers and whether Resource Save is set to On or Off To increase the maximum size range for the Network Buffer disable or reduce the size of the parallel serial and USB buffers The printer automatically restarts when the setting is changed from the control panel Job Buffering Off On Auto Temporarily store print jobs in the printer hard disk before pr...

Страница 156: ...adapter Network Address UAA LAA View the network addresses Job Timeout 0 10 225 seconds Set the amount of time it takes for a network print job to be canceled Notes 90 seconds is the factory default setting A setting value of 0 disables the timeout If a value between 1 and 9 is selected then Invalid appears on the display and the value is not saved Banner Page Off On Allow the printer to print a b...

Страница 157: ...t setting Enable FTP TFTP Yes No Enablethebuilt inFTP server which letsyou sendfilestotheprinterusing FileTransfer Protocol Note Yes is the factory default setting Enable HTTP Server Yes No Enable the built in Web server Embedded Web Server When enabled the printer can be monitored and managed remotely using a Web browser Note Yes is the factory default setting WINS Server Address View or change t...

Страница 158: ...actory default setting Wireless menu Note This menu is available only in printers connected to a wireless network or printer models that have a wireless network adapter To access the menu navigate to Network Ports Network x Network x Setup Wireless Use To Wi Fi Protected Setup Start Push Button Method Start PIN Method Establish a wireless network and enable network security Notes Start Push Button...

Страница 159: ...cryption method for the wireless network AppleTalk menu To access the menu navigate to either of the following Network Ports Standard Network Standard Network Setup AppleTalk Network Ports Network x Network x Setup AppleTalk Use To Activate Yes No Enable or disable AppleTalk support Note No is the factory default setting View Name Show the assigned AppleTalk name Note The AppleTalk name can be cha...

Страница 160: ...inter to perform the special processing required for bidirectional communication following the conventions defined by the NPA protocol Notes Auto is the factory default setting Auto sets the printer to examine data determine the format and then process it appropriately The printer automatically restarts when changing the setting from the printer control panel The menu selection is then updated USB...

Страница 161: ... external print server through the USB port ENA Netmask yyy yyy yyy yyy Set the netmask information for an external print server Note This menu is available only when the printer is attached to an external print server through the USB port ENA Gateway yyy yyy yyy yyy Set the gateway information for an external print server Note This menu is available only when the printer is attached to an externa...

Страница 162: ...ready buffered on the printer hard disk are printed before normal processing resumes The parallel buffer size setting can be changed in 1 KB increments The maximum size allowed depends on the amount of memory in the printer the size of the other link buffers and whether Resource Save is set to On or Off To increase the maximum size range for the Parallel Buffer disable or reduce the size of the US...

Страница 163: ...c Binary PS On Off Auto Set the printer to process Macintosh binary PostScript print jobs Notes Auto is the factory default setting Off filters print jobs using the standard protocol On processes raw binary PostScript print jobs ENA Address yyy yyy yyy yyy Set the network address information for an external print server Note This menu item is available only if the printer is attached to an externa...

Страница 164: ...e NPA protocol Notes Auto is the factory default setting Auto sets the printer to examine data determine the format and then processes it appropriately When set to On the printer performs NPA processing If the data is not in NPA format it is rejected as bad data When set to Off the printer does not perform NPA processing Changing this setting from the printer control panel and then exiting the men...

Страница 165: ...dshaking setting XON XOFF is a software handshaking setting XON XOFF DTR and XON XOFF DTR DSR are combined hardware and software handshaking settings Robust XON On Off Determine whether the printer communicates availability to the computer Notes Off is the factory default setting This menu item applies only to the serial port if Serial Protocol is set to XON XOFF Baud 1200 2400 4800 9600 19200 384...

Страница 166: ...y port Primary SMTP Gateway Port Secondary SMTP Gateway Secondary SMTP Gateway Port SMTP Timeout 5 30 Specify the amount of time in seconds before the server stops trying to send an e mail Note 30 seconds is the factory default setting Reply Address Specify a reply address of up to 128 characters in the e mail sent by the printer Use SSL Disabled Negotiate Required Set the printer to use SSL for i...

Страница 167: ...ser Device Userid Device Password Kerberos 5 Realm NTLM Domain Security menu Edit Security Setups menu Note This menu appears only in select touch screen printer models Use To Edit Backup Password Use Backup Password Off On Password Create a backup password Notes Off is the factory default setting for Use Backup Password This menu appears only if a backup password exists Edit Building Blocks Inter...

Страница 168: ...lt setting 1 indicates the printer does not impose a lockout time Panel Login Timeout specifies how long the printer remains idle on the Home screen before automatically logging the user off Settings range from 1 to 900 seconds 30 seconds is the factory default setting Remote Login Timeout specifies how long a remote interface remains idle before automatically logging the user off Settings range f...

Страница 169: ... the printer RAM are deleted Repeat Job Expiration Off 1 hour 4 hours 24 hours 1 week Set a time limit on how long the printer stores print jobs Verify Job Expiration Off 1 hour 4 hours 24 hours 1 week Set a time limit on how long the printer stores print jobs needing verification Reserve Job Expiration Off 1 hour 4 hours 24 hours 1 week Set a time limit on how long the printer stores print jobs f...

Страница 170: ...Note Yes is the factory default setting Configure Log Enable Audit Yes No Enable Remote Syslog No Yes Remote Syslog Facility 0 23 Severity of events to log 0 7 Specify how and whether or not audit logs are created Notes Enable Audit determines if events are recorded in the secure audit log and remote syslog No is the factory default setting Enable Remote Syslog determines if logs are sent to a rem...

Страница 171: ...uage English Francais Deutsch Italiano Espanol Dansk Norsk Nederlands Svenska Portuguese Suomi Russian Polski Greek Magyar Turkce Cesky Simplified Chinese Traditional Chinese Korean Japanese Set the language of the text that appears on the printer display Note Not all languages are available for all printer models Show Supply Estimates Show estimates Do not show estimates Get an estimate on the st...

Страница 172: ...lity is not Quiet Mode Off On Reduce the amount of noise produced by the printer Notes For touch screen printer models touch Quiet Mode and then select from the options Off is the factory default setting This setting supports the performance specifications for your printer On configures the printer to produce as little noise as possible This setting is best suited for printing text and line art Se...

Страница 173: ...om key information for the control panel keyboard The additional tabs enable access to accent marks and symbols from the keypad on the control panel Notes This menu appears only in touch screen printer models Custom Key 2 appears only in select touch screen printer models Paper Sizes US Metric Specify the unit of measurement for paper sizes Notes US is the factory default setting The initial setti...

Страница 174: ...for Right side Displayed Information continued Custom Text x Customize displayed information that will appear on the upper left and right corners of the control panel Note This menu appears only in touch screen printer models Displayed Information continued Black Toner Customize the displayed information for Black Toner Select from the following options When to display Do not display Display Messa...

Страница 175: ...ptions Display Do not display Notes Profiles and Apps appears only in touch screen printer models Display is the factory default setting for Search Held Jobs Held jobs and USB Drive Do not display is the factory default setting for Change Language Profiles and Apps Bookmarks and Jobs by user Home screen customization Forms and Favorites Background and Idle Screen Eco Settings Change the icons and ...

Страница 176: ...dback Button Feedback On Off Volume 1 10 Specify whether icons and buttons have audio feedback Notes This menu appears only in touch screen printer models On is the factory default setting for Button Feedback 5 is the factory default setting for Volume Show Bookmarks Yes No Specify whether bookmarks are displayed from the Held Jobs area Notes This menu appears only in touch screen printer models Y...

Страница 177: ...0 Specify the number of minutes of inactivity before the printer enters a lower power state Notes Standby Mode appears only in touch screen printer models 15 is the factory default setting Timeouts Sleep Mode Disabled 1 120 Settheamountoftimetheprinterwaitsafterajobisprintedbefore it goes into a reduced power state Notes 20 is the factory default setting Disabled appears only when Energy Conserve ...

Страница 178: ...n when the Screen Timeout timer expires Notes Prolong Screen Timeout appears only in touch screen printer models On allows the user to reset the Screen Timeout timer instead of returning to ready state Off follows the normal Screen Timeout value Off is the factory default setting Timeouts Print Timeout Disabled 1 255 sec Set the amount of time in seconds the printer waits to receive an end of job ...

Страница 179: ...ber of automatic reboots that the printer can perform Notes 5 is the factory default setting If the printer performs a number of automatic reboots that is the same as the menu setting within a certain amount of time then the printer displays the applicable error instead of rebooting Print Recovery Auto Continue Disabled 5 255 Let the printer automatically continue printing from certain offline sit...

Страница 180: ...ernate Determine how the printer while in idle state reacts to a short press of the Sleep button Note Sleep is the factory default setting Press and Hold Sleep Button Do nothing Sleep Hibernate Determine how the printer while in idle state reacts when you press and hold the Sleep button Note Do nothing is the factory default setting Factory Defaults Do Not Restore Restore Now Restore the printer s...

Страница 181: ...nt job in sequence when printing multiple copies Note 1 2 3 1 2 3 is the factory default setting Sides Duplex 1 sided 2 sided Specify whether prints are on one side or on both sides of the page Note 1 sided is the factory default setting Staple Off On Specify whether prints are stapled Notes Off is the factory default setting On allows the printer to staple print jobs This menu appears only when a...

Страница 182: ... is not set to Off Paper Saver Off 2 Up 3 Up 4 Up 6 Up 9 Up 12 Up 16 Up Specify that multiple page images be printed on one side of a paper Notes Off is the factory default setting The number selected is the number of page images that will print per side Paper Saver Border None Solid Print a border on each page image when using N Up pages per side Notes None is the factory default setting This set...

Страница 183: ...urce Tray x Manual Feeder Multipurpose Feeder1 MP Feeder2 Specify the paper source for the separator sheet Note Tray 1 is the factory default setting Blank Pages Do Not Print Print Specify if blank pages are inserted in a print job Note Do Not Print is the factory default setting 1 This menu appears only in touch screen printer models 2 This menu appears only in non touch screen printer models Pri...

Страница 184: ...ng affects only pages printed using a PCL 5e interpreter and has no effect on pages printed using the PCL XL or PostScript interpreter Download Target RAM Flash Disk Set the storage location for downloads Notes RAM is the factory default setting Storing downloads in the RAM is temporary Storing downloads in a flash memory or in a printer hard disk places them in permanent storage Downloads remain ...

Страница 185: ...Edge Define the way duplexed pages are bound and printed Notes Long Edge is the factory default setting Long Edge assumes binding along the long edge of the page left edge for portrait and top edge for landscape Short Edge assumes binding along the short edge of the page top edge for portrait and left edge for landscape Copies 1 999 Specify the default number of copies for each print job Note 1 is...

Страница 186: ...tte for Multipurpose Feeder or MP Feeder to appear as a menu setting Paper Saver Off 2 Up 3 Up 4 Up 6 Up 9 Up 12 Up 16 Up Print multiple page images on one side of a paper Notes Off is the factory default setting The number selected is the number of page images that will print per side Paper Saver Ordering Horizontal Reverse Horizontal Reverse Vertical Vertical Specify the positioning of multiple ...

Страница 187: ...llecting the sheets in a binder or folder Notes 3 holes is the U S factory default setting 4 holes is the international factory default setting This menu appears only when a supported staple hole punch finisher is installed Offset Pages None Between Copies Between Jobs Offset pages at certain instances Notes None is the factory default setting Between Copies inserts a blank sheet between each copy...

Страница 188: ...flow charts Notes Off is the factory default setting To set this option using the Embedded Web Server type the network printer IP address in the Web browser address field Gray Correction Auto Off Automatically adjust the contrast enhancement applied to images Note Auto is the factory default setting Brightness 6 to 6 Adjust the printed output either by lightening or darkening it You can conserve t...

Страница 189: ...ost Delete Oldest Log Delete Current Log Delete Oldest Log Delete All Logs Delete All But Current Set how the printer responds when the hard disk is nearly full Notes None is the factory default setting The value defined in Log Near Full Level determines when this action is triggered Log Action at Full None E mail Delete Current Log E mail Delete Oldest Log Post Delete Current Log Post Delete Olde...

Страница 190: ...ing flash memory card is installed Delete Downloads on Disk Delete Now Do Not Delete Delete downloads from the printer hard disk including all held jobs buffered jobs and parked jobs Notes Delete Now sets the printer to delete the downloads and allows the display to return to the originating screen after the deletion Do Not Delete sets the printer display to return to the main Utilities menu Activ...

Страница 191: ...m is available only when a formatted flash memory option card or printer hard disk is installed and operating properly Make sure the flash memory option or printer hard disk is not read write write or password protected Job Buffer Size must not be set to 100 PCL Emul menu Use To Font Source Resident Disk Download Flash All Specify the set of fonts used by the Font Name menu Notes Resident is the f...

Страница 192: ...mately 0 014 inch Point sizes can be increased or decreased in 0 25 point increments PCL Emulation Settings Pitch 0 08 100 Specify the font pitch for scalable monospaced fonts Notes 10 is the factory default setting Pitch refers to the number of fixed space characters per inch cpi Pitch can be increased or decreased in 0 01 cpi increments For nonscalable monospaced fonts the pitch appears on the d...

Страница 193: ...ommand Note Off is the factory default setting Tray Renumber Assign MP Feeder Off None 0 199 Assign Tray x Off None 0 199 Assign Manual Paper Off None 0 199 Assign Manual Env Off None 0 199 Configure the printer to work with printer software or programs that use different source assignments for trays and feeders Notes Off is the factory default setting None ignores the Select Paper Feed command Th...

Страница 194: ...etting Lines per Inch can be increased or decreased in 0 25 inch increments Page Format Print Whole Sets the logical and physical printable area of the page Notes Print is the factory default setting Print data maintains its position with respect to edge of the paper When Whole is selected document margins are calculated from the top left corner of the physical edge of the page Printing does not o...

Страница 195: ...after LF On Off Specifies whether the printer automatically performs a carriage return CR after a line feed LF control command Notes Off is the factory default setting Settings are duplicated in the PCL Emulation menu Auto LF after CR On Off Specifies whether the printer automatically performs a line feed LF after a carriage return CR control command Notes Off is the factory default setting Settin...

Страница 196: ...rs Zapf Chancery NewSansMTJA NewSansMTCS NewSansMTCT NewSansMTKO Set the default font for HTML documents Note The Times font is used in HTML documents that do not specify a font Use To Font Size 1 255 pt Set the default font size for HTML documents Notes 12 pt is the factory default setting Font size can be increased in 1 point increments Scale 1 400 Scale the default font for HTML documents Notes...

Страница 197: ...Anchor Center Fit Height Width Fit Height Fit Width Scale the image to fit the selected paper size Notes Best Fit is the factory default setting When Auto Fit is set to On Scaling is automatically set to Best Fit Orientation Portrait Landscape Reverse Portrait Reverse Landscape Set the image orientation Note Portrait is the factory default setting Help menu Menu item Description Print All Guides P...

Страница 198: ... Provides help in locating additional information Connection Guide Provides information about connecting the printer locally USB or to a network Moving Guide Provides instructions for safely moving the printer Supplies Guide Provides information about ordering supplies Understanding the printer menus 198 ...

Страница 199: ... TCP IP section in the Network Ports menu The IP address appears as four sets of numbers separated by periods such as 123 123 123 123 If you are using a proxy server then temporarily disable it to load the Web page correctly 2 Click Settings General Settings 3 In the Screen Brightness field enter the brightness percentage you want for the display 4 Click Submit Saving paper and toner Studies show ...

Страница 200: ...he preview feature to see how the document looks like before you print it Print one copy of the document to check its content and format for accuracy Avoid paper jams Correctly set the paper type and size to avoid paper jams For more information see Avoiding jams on page 214 Adjusting Sleep mode 1 From the home screen navigate to Settings General Settings Timeouts Sleep Mode 2 In the Sleep Mode fi...

Страница 201: ...ities may not exist in your area The foam used in Lexmark packaging is recyclable where foam recycling facilities exist Facilities may not exist in your area When you return a cartridge to Lexmark you can reuse the box that the cartridge came in Lexmark will recycle the box Returning Lexmark cartridges for reuse or recycling Lexmark Cartridge Collection Program diverts millions of Lexmark cartridg...

Страница 202: ...life may damage your Lexmark printer or its associated components Estimated number of remaining pages The estimated number of remaining pages is based on the recent printing history of the printer Its accuracy may vary significantly and is dependent on many factors such as actual document content print quality settings and other printer settings The accuracy of the estimated number of remaining pa...

Страница 203: ... in the maintenance kit and can be individually ordered and replaced if necessary For more information on replacing the parts included in the maintenance kit see the instruction sheet that came with the part Lexmark Return Program fuser maintenance kit type Fuser maintenance kit type Part number M5100 Series Return Program fuser maintenance kit type 00 40X8420 M5100 Series Return Program fuser mai...

Страница 204: ...right side up in their original packing until you are ready to use them Do not expose supplies to Direct sunlight Temperatures above 35 C 95 F High humidity above 80 Salty air Corrosive gases Heavy dust Replacing supplies Replacing the toner cartridge 1 Lift the front cover and then pull down the multipurpose feeder door 2 1 Maintaining the printer 204 ...

Страница 205: ...rtridge into the printer by aligning the side rails of the cartridge with the arrows on the side rails inside the printer Note Make sure the cartridge is fully pushed in Warning Potential Damage When replacing a toner cartridge do not leave the imaging unit exposed to direct light for an extended period of time Extended exposure to light may cause print quality problems Maintaining the printer 205...

Страница 206: ...5 Close the multipurpose feeder door and the front cover 2 1 Replacing the imaging unit 1 Lift the front cover and then pull down the multipurpose feeder door 2 1 Maintaining the printer 206 ...

Страница 207: ... and then shake it 5 Remove all packing material from the imaging unit Warning Potential Damage Do not expose the imaging unit to direct light for more than 10 minutes Extended exposure to light may cause print quality problems Warning Potential Damage Do not touch the photoconductor drum Doing so may affect the print quality of future print jobs Maintaining the printer 207 ...

Страница 208: ...ws on the side rails of the imaging unit with the arrows on the side rails inside the printer 7 Insert the toner cartridge into the printer by aligning the side rails of the cartridge with the arrows on the side rails inside the printer Maintaining the printer 208 ...

Страница 209: ...rpose feeder door and the front cover 2 1 Replacing a staple cartridge 1 Open the stapler door 2 Pull down the latch of the staple cartridge holder and then pull the holder out of the finisher Maintaining the printer 209 ...

Страница 210: ...is task after every few months Warning Potential Damage Damage to the printer caused by improper handling is not covered by the printer warranty 1 Make sure that the printer is turned off and unplugged from the electrical outlet CAUTION SHOCK HAZARD To avoid the risk of electrical shock when cleaning the exterior of the printer unplug the power cord from the electrical outlet and disconnect all ca...

Страница 211: ... it clicks into place Moving the printer CAUTION POTENTIAL INJURY The printer weight is greater than 18 kg 40 lb and requires two or more trained personnel to lift it safely Before moving the printer CAUTION POTENTIAL INJURY Before moving the printer follow these guidelines to avoid personal injury or printer damage Turn off the printer and then unplug the power cord from the electrical outlet Dis...

Страница 212: ...the latch on the right side of the optional tray toward the front of the tray until it clicks into place Use the handholds located on both sides of the printer to lift it Make sure your fingers are not under the printer when you set it down Make sure there is adequate clearance around the printer Use only the power cord provided with this product or the manufacturer s authorized replacement Mainta...

Страница 213: ...autions Any cart used to move the printer must have a surface able to support the full footprint of the printer Any cart used to move the hardware options must have a surface able to support the dimensions of the hardware options Keep the printer in an upright position Avoid severe jarring movements Shipping the printer When shipping the printer use the original packaging or call the place of purc...

Страница 214: ...y required to hold the pages is needed for other printer tasks Avoiding jams Load paper properly Make sure paper lies flat in the tray Correct loading of paper Incorrect loading of paper Do not remove a tray while the printer is printing Do not load a tray while the printer is printing Load it before printing or wait for a prompt to load it Do not load too much paper Make sure the stack height is ...

Страница 215: ...ser s Guide Allow the paper to enter the optional mailbox bins properly Make sure to adjust the bin extender so that the paper size indicators match the size of the paper used Notes If the bin extender is shorter than the size of the paper you are printing on then the paper causes a jam in the mailbox bin For example if you are printing on a legal size paper and the bin extender is set to letter s...

Страница 216: ...d type are set correctly on the computer or printer control panel Store paper per manufacturer recommendations Understanding jam messages and locations When a jam occurs a message indicating the jam location and information to clear the jam appears on the printer display Open the doors covers and trays indicated on the display to remove the jam Notes When Jam Assist is set to On Discarding pages a...

Страница 217: ...unit and then remove the jammed paper 4 Multipurpose feeder x page jam clear manual feeder 250 Remove all paper from the multipurpose feeder and then remove the jammed paper 5 Duplex area x page jam remove tray 1 to clear duplex 235 239 Pull out tray 1 completely then push down the front duplex flap and then remove the jammed paper 6 Trays x page jam open tray x 24x Pull out the indicated tray and...

Страница 218: ...f the mailbox and then remove the jammed paper 11 Staple finisher rear door x page jam remove paper open finisher rear door Leave paper in bin 451 Open the rear door of the staple finisher and then remove the jammed paper x page jam lift front cover to remove cartridge 200 201 CAUTION HOT SURFACE The inside of the printer might be hot To reduce the risk of injury from a hot component allow the sur...

Страница 219: ...t smooth surface Warning Potential Damage Do not expose the imaging unit to direct light for more than 10 minutes Extended exposure to light may cause print quality problems 6 Pull the jammed paper gently to the right and then remove it from the printer Note Make sure all paper fragments are removed 1 2 Warning Potential Damage The jammed paper may be covered with toner which can stain garments an...

Страница 220: ... the printer as a guide 8 Insert the cartridge into the printer and then push the green handle back into place Notes Align the arrows on the guides of the toner cartridge with the arrows in the printer Make sure the cartridge is fully pushed in Clearing jams 220 ...

Страница 221: ...n upper rear door 202 CAUTION HOT SURFACE The inside of the printer might be hot To reduce the risk of injury from a hot component allow the surface to cool before touching 1 Pull down the rear door 2 Firmly grasp the jammed paper on each side and then gently pull it out Note Make sure all paper fragments are removed Clearing jams 221 ...

Страница 222: ... 231 234 CAUTION HOT SURFACE The inside of the printer might be hot To reduce the risk of injury from a hot component allow the surface to cool before touching 1 Pull down the rear door 2 Firmly grasp the jammed paper on each side and then gently pull it out Note Make sure all paper fragments are removed Clearing jams 222 ...

Страница 223: ...ear door 4 Push the back of the standard tray 5 Press down the rear duplex flap then firmly grasp the jammed paper and then gently pull the paper out Note Make sure all paper fragments are removed Clearing jams 223 ...

Страница 224: ...03 1 Firmly grasp the jammed paper on each side and then gently pull it out Note Make sure all paper fragments are removed 2 Touch or Done to clear the message and continue printing x page jam remove tray 1 to clear duplex 235 239 1 Pull out the tray completely Note Lift the tray slightly and then pull it out Clearing jams 224 ...

Страница 225: ...n firmly grasp the jammed paper and then gently pull the paper to the right and out of the printer Note Make sure all paper fragments are removed 1 2 3 Insert the tray 4 Touch or Done to clear the message and continue printing Clearing jams 225 ...

Страница 226: ... on the printer display and then pull the tray 2 Firmly grasp the jammed paper on each side and then gently pull it out Note Make sure all paper fragments are removed 3 Insert the tray 4 Touch or Done to clear the message and continue printing Clearing jams 226 ...

Страница 227: ...l paper fragments are removed 2 Flex the sheets of paper back and forth to loosen them Do not fold or crease the paper Straighten the edges on a level surface 3 Reload paper into the multipurpose feeder 4 Slide the paper guide until it lightly rests against the edge of the paper 5 Touch or Done to clear the message and continue printing Clearing jams 227 ...

Страница 228: ...om the stapler bin firmly grasp the jammed paper on each side and then gently pull it out Note Make sure all paper fragments are removed 2 Open the stapler door 3 Pull down the latch of the staple cartridge holder and then pull the holder out of the printer Clearing jams 228 ...

Страница 229: ...4 Use the metal tab to lift the staple guard and then remove any loose staples 5 Press down the staple guard until it clicks into place Clearing jams 229 ...

Страница 230: ...tridge then shake the cartridge downward to bring the staples near the metal bracket 7 Push the cartridge holder firmly back into the stapler unit until the cartridge holder clicks into place 8 Close the stapler door 9 Touch or Done to clear the message and continue printing Clearing jams 230 ...

Страница 231: ...451 1 Open the rear staple finisher door 2 Firmly grasp the jammed paper on each side and then gently pull it out Note Make sure all paper fragments are removed 3 Close the staple finisher door 4 Touch or Done to clear the message and continue printing Clearing jams 231 ...

Страница 232: ...xx 1 Open the rear output expander door 2 Firmly grasp the jammed paper on each side and then gently pull it out Note Make sure all paper fragments are removed 3 Close the rear output expander door 4 Touch or Done to clear the message and continue printing Clearing jams 232 ...

Страница 233: ...box rear door Leave paper in bin 43y xx 1 Open the rear mailbox door 2 Firmly grasp the jammed paper on each side and then gently pull it out Note Make sure all paper fragments are removed 3 Close the rear mailbox door Clearing jams 233 ...

Страница 234: ...and then gently pull it out Notes Make sure all paper fragments are removed When using A4 Folio or legal size paper make sure to adjust the bin extender so that the paper enters the bin properly 5 Touch or Done to clear the message and continue printing Clearing jams 234 ...

Страница 235: ...to clear the message and continue printing For non touch screen printer models press to confirm Change paper source to custom string load orientation Try one or more of the following Load the correct size and type of paper in the tray then specify the paper size and type in the Paper menu on the printer control panel and then touch Finished changing paper Touch Reset active bin to reset the active...

Страница 236: ...ive tray for a linked set of trays Cancel the print job Check tray x connection Try one or more of the following Turn off the printer and then turn it back on If the error occurs a second time then 1 Turn off the printer 2 Unplug the power cord from the electrical outlet 3 Remove the indicated tray 4 Reattach the tray 5 Connect the power cord to a properly grounded electrical outlet 6 Turn the pri...

Страница 237: ... one or more of the following Replace the defective flash memory card From the printer control panel touch Continue to ignore the message and continue printing Cancel the current print job Disk full 62 Try one or more of the following From the printer control panel touch Continue to clear the message and continue processing Delete fonts macros and other data stored in the printer hard disk Install...

Страница 238: ...ting For non touch screen printer models press to confirm Imaging unit nearly low 84 xy If necessary select Continue on the printer control panel to clear the message and continue printing For non touch screen printer models press to confirm Imaging unit very low x estimated pages remain 84 xy You may need to replace the imaging unit very soon For more information see the Replacing supplies sectio...

Страница 239: ...Make sure the paper size and type are specified in the Paper menu on the printer control panel Make sure that the paper size is correctly set For example if Multipurpose Feeder Size or MP Feeder Size is set to Universal then make sure the paper is large enough for the data being printed Cancel the print job Insert hole punch box Insert the hole punch box into the finisher and then touch Continue t...

Страница 240: ...nded electrical outlet 5 Turn the printer back on Cancel the print job Reset the active bin Insufficient memory for Flash Memory Defragment operation 37 Try one or more of the following From the printer control panel touch Continue to stop the defragmentation and continue printing Delete fonts macros and other data in the printer memory Install additional printer memory Insufficient memory some He...

Страница 241: ...urrent job Load paper source with custom type name paper orientation Try one or more of the following Load the tray or feeder with the correct size and type of paper To use the tray that has the correct size or type of paper select Finished loading paper on the printer control panel For non touch screen printer models press to confirm Note If the printer finds a tray that has the correct size and ...

Страница 242: ...feeder when Continue or is selected then the printer automatically overrides the request and then prints from an automatically selected tray Cancel the current job Load manual feeder with custom type name paper orientation Try one or more of the following Load the multipurpose feeder with the correct size and type of paper Depending on your printer model touch Continue or press to clear the messag...

Страница 243: ...mark support Web site at http support lexmark com or contact customer support and then report the message If necessary select Continue to clear the message and continue printing For non touch screen printer models press to confirm Maintenance kit nearly low 80 xy For more information visit the Lexmarksupport Web site at http support lexmark comor contact customer support and then report the messag...

Страница 244: ... unpredictable results if third party supplies or parts are used Imaging component usage beyond the intended life may damage your Lexmark printer or associated components Warning Potential Damage Use of third party supplies or parts can affect warranty coverage Damage caused by the use of third party supplies or parts may not be covered by the warranty To accept any and all of these risks and to p...

Страница 245: ...ol panel touch Continue to clear the message and continue printing For more information visit http support lexmark com or contact customer support Reattach bin x Try one or more of the following Turn off the printer and then turn it back on Reattach the indicated bin 1 Turn off the printer 2 Unplug the power cord from the electrical outlet 3 Remove the indicated bin 4 Reattach the bin 5 Connect th...

Страница 246: ...ins Reinstall missing or unresponsive cartridge 31 xy Try one or more of the following Check if the toner cartridge is missing If missing install the toner cartridge For information on installing the cartridge see the Replacing supplies section of the User s Guide If the toner cartridge is installed then remove the unresponsive toner cartridge and then reinstall it Note If the message appears afte...

Страница 247: ...onfirm Remove paper from all bins Bins have reached their capacity Remove paper from all bins to clear the message and continue printing If removing the paper does not clear the message then select Continue on the printer control panel For non touch screen printer models press to confirm Remove paper from bin x Remove paper from the specified bin The printer automatically detects paper removal and...

Страница 248: ...d Notes The x and y values are the xy of the error code shown on the printer control panel The x and y values must match for printing to continue Replace imaging unit 0 estimated pages remain 84 xy Replace the imaging unit to clear the message and continue printing For more information see the instruction sheet that came with the supply or see the Replacing supplies section of the User s Guide Not...

Страница 249: ... disk From the printer control panel touch Do not restore if you do not want to restore any of the print jobs Serial option x error 54 Try one or more of the following From the printer control panel touch Continue to continue printing Check that the serial cable is properly connected and is the correct one for the serial port Check that the serial interface parameters protocol baud parity and data...

Страница 250: ...om the printer control panel navigate to Network Ports USB Buffer Auto Note The printer discards any data received through the USB port Supply needed to complete job Do either of the following Install the missing supply to complete the job Cancel the current job Too many bins attached 58 1 Turn off the printer 2 Unplug the power cord from the electrical outlet 3 Remove the extra bins 4 Connect the...

Страница 251: ... Replace it with a supported paper size Unformatted flash detected 53 Try one or more of the following From the printer control panel touch Continue to stop the defragmentation and continue printing Format the flash memory Note If the error message remains then the flash memory may be defective and needs to be replaced Unsupported disk Remove the unsupported printer hard disk and then insert a sup...

Страница 252: ...ck if the printer is in Sleep mode or Hibernate mode Is the printer in Sleep mode or Hibernate mode Press the Sleep button to wake the printer from Sleep mode or Hibernate mode Go to step 3 Step 3 Check if one end of the power cord is plugged into the printer and the other to a properly grounded electrical outlet Is the power cord plugged into the printer and a properly grounded electrical outlet ...

Страница 253: ...n the printer and the other to the computer print server option or other network device Is the printer cable securely attached to the printer and the computer print server option or other network device Go to step 9 Connect the printer cable securely to the printer and the computer print server option or other network device Step 9 Makesuretoinstallallhardwareoptionsproperlyandremoveanypacking mat...

Страница 254: ...he Held Jobs folder and then verify that your print job is listed b Resend the print job For more information see Printing confidential and other held jobs on page 73 or Printing confidential and other held jobs on page 120 Did the jobs print The problem is solved Go to step 2 Step 2 Do one or more of the following Delete the print job and then resend it If you are printing PDF files then generate...

Страница 255: ...the printer control panel is blinking green Note A green blinking light indicates that the printer is busy Is the indicator light blinking green Wait until the printer is ready then view the held jobs list and then print the documents Go to step 3 Step 3 a Check for an error message on the display b Clear the message Does the error message still appear Go to step 4 The problem is solved Step 4 Che...

Страница 256: ...ported by the tray b Resend the print job Did the job print from the correct tray or on the correct paper The problem is solved Go to step 2 Step 2 a From the Paper menu on the printer control panel set the paper size and type to match the paper loaded in the tray b Resend the print job Did the job print from the correct tray or on the correct paper The problem is solved Go to step 3 Step 3 a Depe...

Страница 257: ...Step 3 Reduce the complexity of the print job by eliminating the number and size of fonts the number and complexity of images and the number of pages in the job Did the job print and collate correctly The problem is solved Contact customer support Multiple language PDF files do not print Action Yes No Step 1 a Check ifthe printoptions for thePDFoutputareset to embed all fonts b Generate a new PDF ...

Страница 258: ...nter memory b Resend the print job Did the job print The problem is solved Go to step 4 Step 4 a Disable the Page Protect feature From the printer control panel navigate to Settings General Settings Print Recovery Page Protect Off b Resend the print job Did the job print The problem is solved Go to step 5 Step 5 Install additional printer memory and then resend the print job Did the job print The ...

Страница 259: ...h the printer b Resend the print job Do the jobs print The problem is solved Go to step 5 Step 5 a Turn off the printer wait for about 10 seconds and then turn the printer back on b Resend the print job Do the jobs print The problem is solved Go to step 6 Step 6 a Remove and then reinstall the printer software For more information see Installing the printer on page 33 Note The printer software is ...

Страница 260: ...der does not automatically detect the paper size You must set the size from the Paper Size Type menu Action Yes No Step 1 a Open the trays and then check if they contain paper of the same size and type Check if the paper guides are in the correct positions for the size of the paper loaded in each tray Check if the paper size indicators on the paper guides are aligned with the paper size indicators...

Страница 261: ...of the paper Make sure the paper is below the maximum paper fill indicator Check if you are printing on a recommended paper size and type Check if the paper or specialty media meets specifications and is not damaged b Insert the tray properly Note Press the paper stack down while inserting the tray Does the tray operate properly The problem is solved Go to step 2 Step 2 Turn off the printer then w...

Страница 262: ... wait for about 10 seconds and then turn on the printer Does the internal option operate correctly The problem is solved Go to step 2 Step 2 Check if the internal option is properly installed in the controller board a Turnofftheprinterusingthepowerswitch andthenunplugthepower cord from the electrical outlet b Makesurethe internaloption is installedintheappropriateconnector in the controller board ...

Страница 263: ... list Go to step 2 Check if the internal print server is supported by the printer Note An internal print server from another printer may not work with this printer Step 2 Check the cable and the internal print server connection Use the correct cable and then check if it is securely connected to the internal print server Does the internal print server operate correctly The problem is solved Contact...

Страница 264: ...river The problem is solved Contact customer support Internal Solutions Port does not operate correctly Action Yes No Step 1 Make sure the Internal Solutions Port ISP is installed a Install the ISP For more information see Installing an Internal Solutions Port on page 16 b Print a menu settings page and then check if the ISP is listed in the Installed Features list Is the ISP listed in the Install...

Страница 265: ...ce card Note A USB or parallel interface card from another printer may not work on this printer Step 2 Check the cable and the USB or parallel interface card connection Use the correct cable and then make sure it is securely connected to the USB or parallel interface card Does the USB or parallel interface card operate correctly The problem is solved Contact customer support Paper feed problems Ja...

Страница 266: ...ms still occur frequently Go to step 2 The problem is solved Step 2 a Load paper from a fresh package Note Paper absorbs moisture due to high humidity Store paper in its original wrapper until you use it b Resend the print job Do paper jams still occur frequently Go to step 3 The problem is solved Step 3 a Review the tips on avoidingjams For more information see Avoiding jams on page 214 b Follow ...

Страница 267: ...ter Go to step 2 Select a font that is supported by the printer Step 2 Check if the fonts installed on the computer are supported by the printer Are the fonts installed on the computer supported by the printer The problem is solved Contact customer support Clipped pages or images Leading edge Trailing edge ABCDE ABCDE ABCDE Action Yes No Step 1 a Move the width and length guides in the tray to the...

Страница 268: ...tep 4 a Reinstall the imaging unit 1 Remove the toner cartridge 2 Remove the imaging unit Warning Potential Damage Do not expose the imaging unit to direct light for more than 10 minutes Extended exposure to light may cause print quality problems 3 Install the imaging unit and then the cartridge b Resend the print job Is the page or image clipped Contact customer support The problem is solved Comp...

Страница 269: ...gray background disappear from the prints The problem is solved Go to step 2 Step 2 Reinstall the imaging unit and the toner cartridge a Remove the toner cartridge b Remove the imaging unit Warning Potential Damage Do not expose the imaging unit to direct light for more than 10 minutes Extended exposure to light can cause print quality problems c Install the imaging unit and then the cartridge d R...

Страница 270: ...ved Step 3 a Redistribute the toner in the imaging unit 1 Remove the toner cartridge and then the imaging unit 2 Firmly shake the imaging unit Warning Potential Damage Do not expose the imaging unit to direct light for more than 10 minutes Extended exposure to light may cause print quality problems 3 Reinstall the imaging unit and then the cartridge b Resend the print job Do horizontal voids appea...

Страница 271: ...e paper loaded in the tray Does the paper size match the paper loaded in the tray Go to step 3 Do one or more of the following Specify the paper size from the tray settings to match the paper loaded in the tray Change the paper loaded in the tray to match the paper size specified in the tray settings Step 3 a Depending on your operating system specify the paper size from Printing Preferences or fr...

Страница 272: ...tch the paper loaded in the tray Step 3 a Depending on your operating system specify the paper type and weight from Printing Preferences or from the Print dialog b Resend the print job Is the paper still curled Go to step 4 The problem is solved Step 4 a Remove the paper from the tray and then turn it over b Resend the print job Is the paper still curled Go to step 5 The problem is solved Step 5 a...

Страница 273: ...Preferences or from the Print dialog b Resend the print job Do print irregularities still appear Go to step 4 The problem is solved Step 4 Check if the paper loaded in the tray has texture or rough finishes Are you printing on textured or rough paper From the printer control panel set the paper texture in the Paper menu to match the paper loaded in the tray Go to step 5 Step 5 a Load paper from a ...

Страница 274: ...ollowing Specify the paper type texture and weight from the tray settings to match the paper loaded in the tray Change the paper loaded in the tray to match the paper type texture and weight specified in the tray settings Step 3 a Depending on your operating system specify the paper type texture and weight from Printing Preferences or from the Print dialog b Resend the print job Is the print still...

Страница 275: ...asethetoner darkness Note 8 is the factory default setting b Resend the print job Is the print still too light Go to step 2 The problem is solved Step 2 From the printer control panel set the paper type texture and weight in the Paper menu to match the paper loaded in the tray Is the tray set to the type texture and weight of the paper loaded Go to step 3 Change the paper type texture and weight t...

Страница 276: ...Go to step 6 The problem is solved Step 6 a Redistribute the toner in the imaging unit 1 Remove the toner cartridge and then the imaging unit 2 Firmly shake the imaging unit Warning Potential Damage Do not expose the imaging unit to direct light for more than 10 minutes Extended exposure to light may cause print quality problems 3 Install the imaging unit and then the cartridge b Resend the print ...

Страница 277: ...tep 2 The problem is solved Step 2 a Redistribute the toner in the imaging unit 1 Remove the toner cartridge and then the imaging unit 2 Firmly shake the imaging unit Warning Potential Damage Do not expose the imaging unit to direct light for more than 10 minutes Extended exposure to light may cause print quality problems 3 Reinstall the imaging unit and then the cartridge b Resend the print job I...

Страница 278: ... print job Is the printer printing solid black pages Contact customer support The problem is solved Repeating defects appear on prints Action Yes No Step 1 a Replace the imaging unit if the distance between the defects is equal to any of the following 47 8 mm 1 88 in 96 8 mm 3 81 in 28 5 mm 1 12 in b Resend the print job Do repeating defects still appear on prints Go to step 2 The problem is solve...

Страница 279: ...d in the tray Is the tray set to the type and weight of the paper loaded Go to step 3 Change the paper loaded in the tray to match the paper type and weight specified in the tray settings Step 3 a Depending on your operating system specify the paper type and weight from Printing Preferences or from the Print dialog b Resend the print job Do shadow images still appear on prints Go to step 4 The pro...

Страница 280: ...ay or feeder from Printing Preferences or the Print dialog b Resend the print job Do streaked horizontal lines appear on prints Go to step 2 The problem is solved Step 2 From the printer control panel set the paper type and weight in the Paper menu to match the paper loaded in the tray Do the paper type and weight match the type and weight of the paper in the tray Go to step 3 Change the paper typ...

Страница 281: ...nes appear on prints ABCDE ABCDE ABCDE Leading edge Trailing edge Action Yes No Step 1 a Depending on your operating system specify the paper type texture and weight from Printing Preferences or from the Print dialog b Resend the print job Do streaked vertical lines appear on prints Go to step 2 The problem is solved Step 2 From the printer control panel set the paper texture type and weight in th...

Страница 282: ...cal lines appear on prints Go to step 5 The problem is solved Step 5 Replace the imaging unit and then resend the print job Do streaked vertical lines appear on prints Contact customer support at http support lexmar k com or your service representative The problem is solved Toner fog or background shading appears on prints ABCDE ABCDE ABCDE Action Yes No Step 1 a Reinstall the imaging unit 1 Remov...

Страница 283: ...paper type texture and weight Do the paper type texture and weight match the paper loaded in the tray Go to step 2 Specify the paper type texture and weight from the tray settings to match the paper loaded in the tray Step 2 Resend the print job Does the toner still rub off Contact customer support The problem is solved Toner specks appear on prints Action Yes No Replace the imaging unit and then ...

Страница 284: ...y b Resend the print job Is the print quality still poor Contact customer support The problem is solved Uneven print density Action Yes No Replace the imaging unit and then resend the print job Is the print density uneven Contact customer support The problem is solved Vertical voids appear on prints Leading edge Trailing edge Action Yes No Step 1 a Make sure your software program is using a correc...

Страница 285: ... 4 The problem is solved Step 4 a Redistribute the toner in the imaging unit 1 Remove the toner cartridge and then the imaging unit 2 Firmly shake the imaging unit Warning Potential Damage Do not expose the imaging unit to direct light for more than 10 minutes Extended exposure to light may cause print quality problems 3 Reinstall the imaging unit and then the cartridge b Resend the print job Do v...

Страница 286: ...ear in the log Go to step 2 Contact customer support Step 2 Resolve the error Is the application working now The problem is solved Contact customer support Embedded Web Server does not open Action Yes No Step 1 Make sure the printer IP address is correct View the printer IP address From the printer home screen From the TCP IP section in the Network Ports menu By printing a network setup page or me...

Страница 287: ... have already taken to find a solution You need to know your printer model type and serial number For more information see the label at the back of the printer The serial number is also listed on the menu settings page Lexmark has various ways to help you solve your printing problem Visit the Lexmark Web site at http support lexmark com and then select one of the following Tech Library You can bro...

Страница 288: ...s Any reference to a product program or service is not intended to state or imply that only that product program or service may be used Any functionally equivalent product program or service that does not infringe any existing intellectual property right may be used instead Evaluation and verification of operation in conjunction with other products programs or services except those expressly desig...

Страница 289: ...cel OLIVE Apple Chancery Apple Computer Inc Arial The Monotype Corporation plc CG Times Based on Times New Roman under license from The Monotype Corporation plc is a product of Agfa Corporation Chicago Apple Computer Inc Clarendon Linotype Hell AG and or its subsidiaries Eurostile Nebiolo Geneva Apple Computer Inc GillSans The Monotype Corporation plc Helvetica Linotype Hell AG and or its subsidia...

Страница 290: ... The WEEE logo signifies specific recycling programs and procedures for electronic products in countries of the European Union We encourage the recycling of our products If you have further questions about recycling options visit the Lexmark Web site at www lexmark com for your local sales office phone number India E Waste notice This product complies with the India E Waste Management and Handling...

Страница 291: ...5 C 34 to 95 F 8 to 80 RH Laser notice The printer is certified in the U S to conform to the requirements of DHHS 21 CFR Chapter I Subchapter J for Class I 1 laser products and elsewhere is certified as a Class I laser product conforming to the requirements of IEC 60825 1 Class I laser products are not considered to be hazardous The printer contains internally a Class IIIb 3b laser that is nominal...

Страница 292: ...g sperren er satt ut av spill Unngå eksponering for laserstrålen NIEBEZPIECZEŃSTWO niewidzialne promieniowanie laserowe podczas usuwania kaset i blokady Należy unikać naświetlenia promieniem lasera ОПАСНО Невидимое лазерное излучение при извлеченных картриджах и снятии блокировки Избегайте воздействия лазерных лучей Pozor Nebezpečenstvo neviditeľného laserového žiarenia pri odobratých kazetách a o...

Страница 293: ...product in all countries or regions 3 days The amount of time the printer waits after a job is printed before it enters Hibernate mode can be modified between one hour and one month Off mode If this product has an off mode which still consumes a small amount of power then to completely stop product power consumption disconnect the power supply cord from the electrical outlet Total energy usage It ...

Страница 294: ...r Lexmark or ship it prepaid and suitably packaged to a Lexmark designated location You are responsible for loss of or damage to a product in transit to the Remarketer or the Lexmark designated location When warranty service involves the exchange of a product or part the item replaced becomes the property of the Remarketer or Lexmark The replacement may be a new or repaired item The replacement it...

Страница 295: ...nce or nonperformance of Lexmark or a Remarketer for this product under this limited warranty you may recover actual damages up to the limit set forth in the following paragraph Lexmark s liability for actual damages from any cause whatsoever will be limited to the amount you paid for the product that caused the damages This limitation of liability will not apply to claims by you for bodily injury...

Страница 296: ...p at the IETF for Suite B Cryptographic Suites for IPSec implemented in the product or service The use of this product or service is subject to the reasonable non discriminatory terms in the Intellectual Property Rights IPR Disclosure of Certicom Corp at the IETF for Algorithms for Internet Key Exchange version 1 IKEv1 implemented in the product or service Federal Communications Commission FCC com...

Страница 297: ...f the Member States relating to electromagnetic compatibility safety of electrical equipment designed for use within certain voltage limits the ecodesign of energy related products and on the restrictions of use of certain hazardous substances in electrical and electronic equipment The manufacturer of this product is Lexmark International Inc 740 West New Circle Road Lexington KY 40550 USA The aut...

Страница 298: ...ment Cet appareil a été conçu pour fonctionner uniquement avec l antenne fournie L utilisation de toute autre antenne est strictement interdite par la réglementation d Industry Canada En application des réglementations d Industry Canada l utilisation d une antenne de gain supérieur est strictement interdite Pour empêcher toute interférence radio au service faisant l objet d une licence cet apparei...

Страница 299: ...er Richtlinie 1999 5 EG befindet Ελληνική ΜΕ ΤΗΝ ΠΑΡΟΥΣΑ Η LEXMARK INTERNATIONAL INC ΔΗΛΩΝΕΙ ΟΤΙ ΑΥΤΟ ΤΟ ΠΡΟΪΟΝ ΣΥΜΜΟΡΦΩΝΕΤΑΙ ΠΡΟΣ ΤΙΣ ΟΥΣΙΩΔΕΙΣ ΑΠΑΙΤΗΣΕΙΣ ΚΑΙ ΤΙΣ ΛΟΙΠΕΣ ΣΧΕΤΙΚΕΣ ΔΙΑΤΑΞΕΙΣ ΤΗΣ ΟΔΗΓΙΑΣ 1999 5 ΕΚ English Hereby Lexmark International Inc declares that this type of equipment is in compliance with the essential requirements and other relevant provisions of Directive 1999 5 EC Español ...

Страница 300: ...ntygar Lexmark International Inc att denna produkt står i överensstämmelse med de väsentliga egenskapskrav och övriga relevanta bestämmelser som framgår av direktiv 1999 5 EG Model specific information The following information applies only to the M5170 printer model Federal Communications Commission FCC compliance information statement This product has been tested and found to comply with the lim...

Страница 301: ...nnium Tower III 1095 Budapest HUNGARY A declaration of conformity to the requirements of the Directives is available upon request from the Authorized Representative This product satisfies the Class A limits of EN 55022 and safety requirements of EN 60950 1 Radio interference notice Warning This is a product that complies with the emission requirements of EN55022 Class A limits and immunity require...

Страница 302: ...nçu pour fonctionner uniquement avec l antenne fournie L utilisation de toute autre antenne est strictement interdite par la réglementation d Industry Canada En application des réglementations d Industry Canada l utilisation d une antenne de gain supérieur est strictement interdite Pour empêcher toute interférence radio au service faisant l objet d une licence cet appareil doit être utilisé à l in...

Страница 303: ...exington KY 40550 USA The authorized representative is Lexmark International Technology Hungária Kft 8 Lechner Ödön fasor Millennium Tower III 1095 Budapest HUNGARY A declaration of conformity to the requirements of the Directives is available upon request from the Authorized Representative This product may be used in the countries indicated in the table below AT BE BG CH CY CZ DE DK EE EL ES FI F...

Страница 304: ...9 5 EK būtiskajām prasībām un citiem ar to saistītajiem noteikumiem Lietuvių Šiuo Lexmark International Inc deklaruoja kad šis produktas atitinka esminius reikalavimus ir kitas 1999 5 EB direktyvos nuostatas Malti Bil preżenti Lexmark International Inc jiddikjara li dan il prodott huwa konformi mal ħtiġijiet essenzjali u ma dispożizzjonijiet oħrajn relevanti li jinsabu fid Direttiva 1999 5 KE Nede...

Страница 305: ...31 Cartridge low 88 xy 235 Cartridge nearly low 88 xy 235 Cartridge very low x estimated pages remain 88 xy 235 Change paper source to custom string load orientation 235 Change paper source to custom type name load orientation 235 Change paper source to paper size load orientation 236 Change paper source to paper type paper size load orientation 236 Check tray x connection 236 checking an unrespon...

Страница 306: ...rator settings 75 121 checking the status of parts 77 124 checking the status of supplies 77 124 copying settings to other printers 76 123 modifying confidential print settings 76 122 networking settings 75 121 problem accessing 286 Embedded Web Server Administrator s Guide where to find 75 83 121 130 emission notices 290 296 297 298 300 301 302 Empty the hole punch box 238 emptying the hole punch...

Страница 307: ... Insufficient memory some held jobs will not be restored 37 240 internal options 11 internal print server troubleshooting 263 Internal Solutions Port changing port settings 38 installing 16 troubleshooting 264 IP address of computer finding 46 91 IP address printer finding 46 91 IPv6 menu 158 J jams accessing 216 avoiding 214 understanding messages 216 jams clearing behind rear door 221 222 in dup...

Страница 308: ...rk x menu 154 Network x software error 54 244 Network Card menu 156 Network Reports menu 156 network settings Embedded Web Server 75 121 network setup page printing 77 124 Networking Guide where to find 75 121 noise emission levels 290 noise printer reducing 78 Non Lexmark supply type see User s Guide 33 xy 244 non volatile memory 80 127 erasing 81 128 Not enough free space in flash memory for res...

Страница 309: ...lash drive 255 held jobs do not print 254 incorrect characters print 256 incorrect margins on prints 271 jammed pages are not reprinted 265 job prints from wrong tray 256 job prints on wrong paper 256 jobs do not print 258 Large jobs do not collate 257 multiple language PDF files do not print 257 paper curl 272 paper frequently jams 266 print job takes longer than expected 258 tray linking does no...

Страница 310: ...aper orientation 242 Load manual feeder with custom string paper orientation 242 Load manual feeder with custom type name paper orientation 242 Load manual feeder with paper size paper orientation 242 Load manual feeder with paper type paper size paper orientation 243 Load staples 243 Maintenance kit low 80 xy 243 Maintenance kit nearly low 80 xy 243 Maintenance kit very low x estimated pages rema...

Страница 311: ...ponsive imaging unit 31 xy 247 Remote Operator Panel setting up 49 94 Remove defective disk 61 247 Remove packaging material area name 247 Remove paper from linked set bin name 247 Remove paper from all bins 247 Remove paper from bin x 247 Remove paper from standard output bin 247 removing printer hard disk 25 repeat print jobs 72 119 printing from a Macintosh computer 73 120 printing from Windows...

Страница 312: ...ing 202 replacing 204 206 toner cartridges recycling 201 toner darkness adjusting 70 116 Too many bins attached 58 250 Too many disks installed 58 250 Too many flash options installed 58 251 Too many trays attached 58 251 touch screen buttons using 45 88 transparencies loading 63 109 tips 132 Tray x paper size unsupported 251 trays linking 68 69 114 115 unlinking 68 69 114 115 troubleshooting an a...

Страница 313: ...option in slot x 55 251 Unsupported USB hub please remove 238 USB port 31 printer control panel 42 86 USB port x disabled 56 252 USB parallel interface card troubleshooting 265 User s Guide using 7 using Forms and Favorites 69 115 using Hibernate mode 79 126 using Quiet mode 125 using recycled paper 199 using the printer control panel 42 86 using the touch screen buttons 45 88 Utilities menu 190 V...

Отзывы: