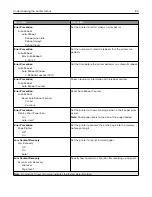


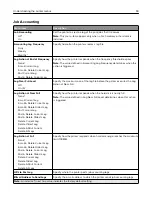

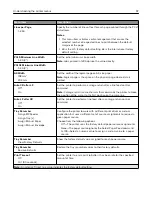


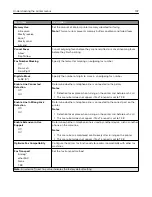


Job Accounting
Menu item
Description
Job Accounting
Off*
On
Set the printer to create a log of the print jobs that it receives.
Note:
This menu item appears only when a flash memory or hard disk is
installed.
Accounting Log Frequency
Daily
Weekly
Monthly*
Specify how often the printer creates a log file.
Log Action at End of Frequency
None*
E
‑
mail Current Log
E
‑
mail & Delete Current Log
Post Current Log
Post & Delete Current Log
Specify how the printer responds when the frequency threshold expires.
Note:
The value defined in Accounting Log Frequency determines when this
action is triggered.
Log Near Full Level
Off
On (5)*
Specify the maximum size of the log file before the printer executes the Log
Action at Near Full.
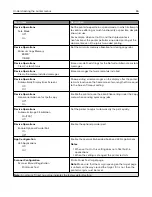
Log Action at Near Full
None*
E
‑
mail Current Log
E
‑
mail & Delete Current Log
E
‑
mail & Delete Oldest Log
Post Current Log
Post & Delete Current Log
Post & Delete Oldest Log
Delete Current Log
Delete Oldest Log
Delete All But Current
Delete All Logs
Specify how the printer responds when the hard disk is nearly full.
Note:
The value defined in Log Near Full Level determines when this action
is triggered.
Log Action at Full
None*
E
‑
mail & Delete Current Log
E
‑
mail & Delete Oldest Log
Post & Delete Current Log
Post & Delete Oldest Log
Delete Current Log
Delete Oldest Log
Delete All But Current
Delete All Logs
Specify how the printer responds when hard disk usage reaches the maximum
limit (100MB).
URL to Post Log
Specify where the printer posts job accounting logs.
E
‑
mail Address to Send Logs
Specify the e
‑
mail address to which the printer sends job accounting logs.
Note:
An asterisk (*) next to a value indicates the factory default setting.
Understanding the printer menus
94
Содержание CX920
Страница 164: ... Scanner glass Scanner glass pad 3 Close the scanner cover Maintaining the printer 164 ...
Страница 167: ...2 Remove and then empty the hole punch box 3 Insert the hole punch box 4 Close the door Maintaining the printer 167 ...
Страница 172: ...5 Insert the new toner cartridge 6 Remove the waste toner bottle Maintaining the printer 172 ...
Страница 177: ...8 Insert the waste toner bottle and then close the door Maintaining the printer 177 ...
Страница 189: ...Replacing the ADF separator roller 1 Turn off the printer 2 Remove the ADF separator pad Maintaining the printer 189 ...
Страница 192: ...2 Open door B 3 Remove the ADF pick and feed rollers 4 Unpack the new pick and feed rollers Maintaining the printer 192 ...
Страница 194: ...2 Remove the empty staple cartridge 3 Unpack the new staple cartridge Maintaining the printer 194 ...
Страница 207: ... Below the fuser area Duplex area Clearing jams 207 ...
Страница 212: ...2 Open door J Clearing jams 212 ...
Страница 214: ... Areas H1 and H2 Area H6 Clearing jams 214 ...
Страница 218: ...2 Remove the staple cartridge holder 3 Remove the loose staples Clearing jams 218 ...
Страница 220: ...2 Remove the staple cartridge holder 3 Remove the loose staples Clearing jams 220 ...
Страница 222: ...2 Remove the staple cartridge holder 3 Remove the loose staples Clearing jams 222 ...
Страница 272: ...6 Remove the controller board shield 7 Unpack the printer hard disk Upgrading and migrating 272 ...
Страница 276: ...6 Remove the controller board shield Upgrading and migrating 276 ...
Страница 279: ...4 Remove the controller board shield Upgrading and migrating 279 ...
Страница 281: ...8 Attach the thumbscrews 9 Connect the wireless print server to the controller board Upgrading and migrating 281 ...
Страница 285: ...7 Connect the tray connector to the printer 8 Open trays 2 and 3 Upgrading and migrating 285 ...
Страница 290: ...9 Remove the stabilizing feet from the tray Upgrading and migrating 290 ...
Страница 294: ...17 Secure the tray cable with the clamp Upgrading and migrating 294 ...
Страница 295: ...18 Connect the tray cable to the printer 19 Attach the tray cable cover Upgrading and migrating 295 ...
Страница 296: ...20 Slide the tray until it clicks into place 21 Attach the stabilizing feet to the printer Upgrading and migrating 296 ...
Страница 301: ...7 Remove the paper guides 8 Attach the sensor cover Upgrading and migrating 301 ...
Страница 307: ...8 Attach the finisher to the printer Upgrading and migrating 307 ...


