


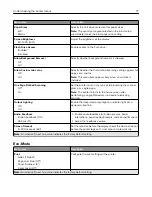
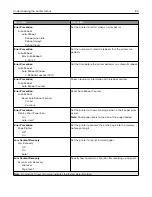


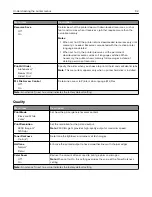


Power Management
Menu item
Description
Sleep Mode Profile
Print from Sleep Mode
Stay awake after printing
Enter Sleep Mode after printing*
Set the printer to stay in Ready mode or return to Sleep mode
after printing.
Timeouts
Sleep Mode
1–120 minutes (15*)
Set the idle time before the printer begins operating in Sleep
mode.
Timeouts
Hibernate Timeout
Disabled
1 hour
2 hours
3 hours
6 hours
1 day
2 days
3 days*
1 week
2 weeks
1 month
Set the time before the printer turns off.
Timeouts
Hibernate Timeout on Connection
Hibernate
Do Not Hibernate*
Set Hibernate Timeout to turn off the printer while an active
Ethernet connection exists.
Schedule Power Modes
Schedules
Add New Schedule
Schedule the printer when to enter Sleep or Hibernate mode.
Note:
An asterisk (*) next to a value indicates the factory default setting.
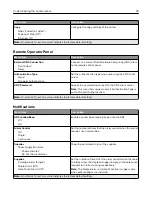
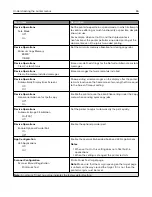
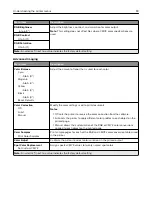
Information Sent to Lexmark
Menu item
Description
Information Sent to Lexmark
Supplies and Page Usage
Device Performance
None*
Send printer usage and performance information to Lexmark.
Note:
Information Send Time appears only when you select any of the settings in
Information Sent to Lexmark, except None.
Information Send Time
Start Time
Stop Time
Note:
An asterisk (*) next to a value indicates the factory default setting.
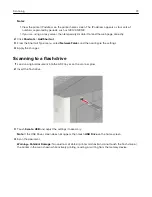
Understanding the printer menus
81
Содержание CX920
Страница 164: ... Scanner glass Scanner glass pad 3 Close the scanner cover Maintaining the printer 164 ...
Страница 167: ...2 Remove and then empty the hole punch box 3 Insert the hole punch box 4 Close the door Maintaining the printer 167 ...
Страница 172: ...5 Insert the new toner cartridge 6 Remove the waste toner bottle Maintaining the printer 172 ...
Страница 177: ...8 Insert the waste toner bottle and then close the door Maintaining the printer 177 ...
Страница 189: ...Replacing the ADF separator roller 1 Turn off the printer 2 Remove the ADF separator pad Maintaining the printer 189 ...
Страница 192: ...2 Open door B 3 Remove the ADF pick and feed rollers 4 Unpack the new pick and feed rollers Maintaining the printer 192 ...
Страница 194: ...2 Remove the empty staple cartridge 3 Unpack the new staple cartridge Maintaining the printer 194 ...
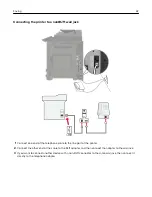
Страница 207: ... Below the fuser area Duplex area Clearing jams 207 ...
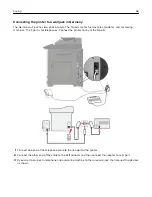
Страница 212: ...2 Open door J Clearing jams 212 ...
Страница 214: ... Areas H1 and H2 Area H6 Clearing jams 214 ...
Страница 218: ...2 Remove the staple cartridge holder 3 Remove the loose staples Clearing jams 218 ...
Страница 220: ...2 Remove the staple cartridge holder 3 Remove the loose staples Clearing jams 220 ...
Страница 222: ...2 Remove the staple cartridge holder 3 Remove the loose staples Clearing jams 222 ...
Страница 272: ...6 Remove the controller board shield 7 Unpack the printer hard disk Upgrading and migrating 272 ...
Страница 276: ...6 Remove the controller board shield Upgrading and migrating 276 ...
Страница 279: ...4 Remove the controller board shield Upgrading and migrating 279 ...
Страница 281: ...8 Attach the thumbscrews 9 Connect the wireless print server to the controller board Upgrading and migrating 281 ...
Страница 285: ...7 Connect the tray connector to the printer 8 Open trays 2 and 3 Upgrading and migrating 285 ...
Страница 290: ...9 Remove the stabilizing feet from the tray Upgrading and migrating 290 ...
Страница 294: ...17 Secure the tray cable with the clamp Upgrading and migrating 294 ...
Страница 295: ...18 Connect the tray cable to the printer 19 Attach the tray cable cover Upgrading and migrating 295 ...
Страница 296: ...20 Slide the tray until it clicks into place 21 Attach the stabilizing feet to the printer Upgrading and migrating 296 ...
Страница 301: ...7 Remove the paper guides 8 Attach the sensor cover Upgrading and migrating 301 ...
Страница 307: ...8 Attach the finisher to the printer Upgrading and migrating 307 ...


