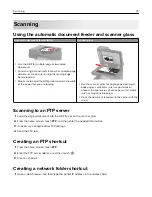


Menu item
Description
Device Operations
Safe Mode
Off*
On
Set the printer to operate in a special mode, in which it attempts
to continue offering as much functionality as possible, despite
known issues.
For example, when set to On, and the duplex motor is
nonfunctional, the printer performs one
‑
sided printing of the
documents even if the job is two
‑
sided printing.
Device Operations
Minimum Copy Memory
80 MB*
100 MB
Set the minimum memory allocation for storing copy jobs.
Device Operations
Clear Custom Status
Erase user
‑
defined strings for the Default or Alternate custom
messages.
Device Operations
Clear all remotely
‑
installed messages
Erase messages that were remotely installed.
Device Operations
Automatically Display Error Screens
Off
On*
Show existing error messages on the display after the printer
remains inactive on the home screen for a length of time equal
to the Screen Timeout setting.
Device Operations
Honor orientation on fast path copy
Off*
On
Enable the printer to use the orientation setting under the Copy
menu when sending quick copy jobs.
Device Operations
Automatic Image Stabilization
On (700)*
Off
Set the printer to adjust automatically the print quality.
Device Operations
Enable Optional Parallel Port
On
Off*
Enable the optional parallel port.
App Configuration
LES Applications
Off
On*
Enable the Lexmark Embedded Solutions (LES) applications.
Notes:
•
When set to On, this setting does not affect built
‑
in
applications.
•
When the setting is changed, the printer restarts.
Scanner Configuration
Scanner Manual Registration
Print Quick Test
Print a Quick Test target page.
Note:
Make sure that the margin spacing on the target page
is uniform all the way around the target. If it is not, then the
printer margins must be reset.
Note:
An asterisk (*) next to a value indicates the factory default setting.
Understanding the printer menus
86
Содержание CX920
Страница 164: ... Scanner glass Scanner glass pad 3 Close the scanner cover Maintaining the printer 164 ...
Страница 167: ...2 Remove and then empty the hole punch box 3 Insert the hole punch box 4 Close the door Maintaining the printer 167 ...
Страница 172: ...5 Insert the new toner cartridge 6 Remove the waste toner bottle Maintaining the printer 172 ...
Страница 177: ...8 Insert the waste toner bottle and then close the door Maintaining the printer 177 ...
Страница 189: ...Replacing the ADF separator roller 1 Turn off the printer 2 Remove the ADF separator pad Maintaining the printer 189 ...
Страница 192: ...2 Open door B 3 Remove the ADF pick and feed rollers 4 Unpack the new pick and feed rollers Maintaining the printer 192 ...
Страница 194: ...2 Remove the empty staple cartridge 3 Unpack the new staple cartridge Maintaining the printer 194 ...
Страница 207: ... Below the fuser area Duplex area Clearing jams 207 ...
Страница 212: ...2 Open door J Clearing jams 212 ...
Страница 214: ... Areas H1 and H2 Area H6 Clearing jams 214 ...
Страница 218: ...2 Remove the staple cartridge holder 3 Remove the loose staples Clearing jams 218 ...
Страница 220: ...2 Remove the staple cartridge holder 3 Remove the loose staples Clearing jams 220 ...
Страница 222: ...2 Remove the staple cartridge holder 3 Remove the loose staples Clearing jams 222 ...
Страница 272: ...6 Remove the controller board shield 7 Unpack the printer hard disk Upgrading and migrating 272 ...
Страница 276: ...6 Remove the controller board shield Upgrading and migrating 276 ...
Страница 279: ...4 Remove the controller board shield Upgrading and migrating 279 ...
Страница 281: ...8 Attach the thumbscrews 9 Connect the wireless print server to the controller board Upgrading and migrating 281 ...
Страница 285: ...7 Connect the tray connector to the printer 8 Open trays 2 and 3 Upgrading and migrating 285 ...
Страница 290: ...9 Remove the stabilizing feet from the tray Upgrading and migrating 290 ...
Страница 294: ...17 Secure the tray cable with the clamp Upgrading and migrating 294 ...
Страница 295: ...18 Connect the tray cable to the printer 19 Attach the tray cable cover Upgrading and migrating 295 ...
Страница 296: ...20 Slide the tray until it clicks into place 21 Attach the stabilizing feet to the printer Upgrading and migrating 296 ...
Страница 301: ...7 Remove the paper guides 8 Attach the sensor cover Upgrading and migrating 301 ...
Страница 307: ...8 Attach the finisher to the printer Upgrading and migrating 307 ...


