


Supported flash drives and file types
Flash drives
•
Lexar JumpDrive S70 (16GB and 32GB)
•
SanDisk Cruzer (16GB and 32GB)
•
PNY Attache (16GB and 32GB)
Notes:
–
The printer supports high
‑
speed USB flash drives with full
‑
speed standard.
–
USB flash drives must support the File Allocation Table (FAT) system.
File types
Documents
•
PDF (version 1.7 or earlier)
•
HTML
•
XPS
•
Microsoft file formats (.doc, .docx, .xls, .xlsx, .ppt, .pptx)
Images
•
.dcx
•
.gif
•
.JPEG or .jpg
•
.bmp
•
.pcx
•
.TIFF or .tif
•
.png
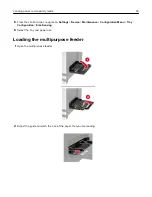
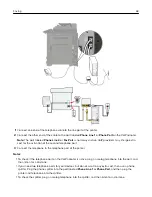
Configuring confidential jobs
1
From the control panel, navigate to:
Settings
>
Security
>
Confidential Print Setup
2
Configure the settings.
Use
To
Max Invalid PIN
Set the number of times an invalid PIN can be entered.
Note:
When the limit is reached, the print jobs for that user name are deleted.
Confidential Job
Expiration
Set the expiration time for confidential print jobs.
Note:
Confidential held jobs are stored in the printer until they are released or
deleted manually.
Repeat Job Expiration
Set the expiration time for a repeat print job.
Note:
Repeat held jobs are stored in the printer memory for reprinting.
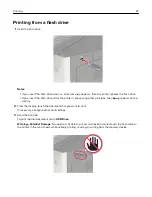
Printing
48
Содержание CX920
Страница 164: ... Scanner glass Scanner glass pad 3 Close the scanner cover Maintaining the printer 164 ...
Страница 167: ...2 Remove and then empty the hole punch box 3 Insert the hole punch box 4 Close the door Maintaining the printer 167 ...
Страница 172: ...5 Insert the new toner cartridge 6 Remove the waste toner bottle Maintaining the printer 172 ...
Страница 177: ...8 Insert the waste toner bottle and then close the door Maintaining the printer 177 ...
Страница 189: ...Replacing the ADF separator roller 1 Turn off the printer 2 Remove the ADF separator pad Maintaining the printer 189 ...
Страница 192: ...2 Open door B 3 Remove the ADF pick and feed rollers 4 Unpack the new pick and feed rollers Maintaining the printer 192 ...
Страница 194: ...2 Remove the empty staple cartridge 3 Unpack the new staple cartridge Maintaining the printer 194 ...
Страница 207: ... Below the fuser area Duplex area Clearing jams 207 ...
Страница 212: ...2 Open door J Clearing jams 212 ...
Страница 214: ... Areas H1 and H2 Area H6 Clearing jams 214 ...
Страница 218: ...2 Remove the staple cartridge holder 3 Remove the loose staples Clearing jams 218 ...
Страница 220: ...2 Remove the staple cartridge holder 3 Remove the loose staples Clearing jams 220 ...
Страница 222: ...2 Remove the staple cartridge holder 3 Remove the loose staples Clearing jams 222 ...
Страница 272: ...6 Remove the controller board shield 7 Unpack the printer hard disk Upgrading and migrating 272 ...
Страница 276: ...6 Remove the controller board shield Upgrading and migrating 276 ...
Страница 279: ...4 Remove the controller board shield Upgrading and migrating 279 ...
Страница 281: ...8 Attach the thumbscrews 9 Connect the wireless print server to the controller board Upgrading and migrating 281 ...
Страница 285: ...7 Connect the tray connector to the printer 8 Open trays 2 and 3 Upgrading and migrating 285 ...
Страница 290: ...9 Remove the stabilizing feet from the tray Upgrading and migrating 290 ...
Страница 294: ...17 Secure the tray cable with the clamp Upgrading and migrating 294 ...
Страница 295: ...18 Connect the tray cable to the printer 19 Attach the tray cable cover Upgrading and migrating 295 ...
Страница 296: ...20 Slide the tray until it clicks into place 21 Attach the stabilizing feet to the printer Upgrading and migrating 296 ...
Страница 301: ...7 Remove the paper guides 8 Attach the sensor cover Upgrading and migrating 301 ...
Страница 307: ...8 Attach the finisher to the printer Upgrading and migrating 307 ...


