


Poor copy quality
Action
Yes
No
Step 1
a
Clean the scanner glass and the ADF glass with a damp, soft,
lint
‑
free cloth. If your printer has a second ADF glass inside the
ADF, then also clean that glass.
For more information, see
“Cleaning the scanner” on page
b
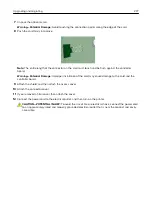
Make sure that the document or photo is loaded facedown on
the upper left corner of the scanner glass.
c
Copy the document or photo.
Is the copy quality satisfactory?
The problem is
solved.
Go to step 2.
Step 2
a
Check the quality of the original document or photo.
b
Adjust the scan quality settings.
c
Copy the document or photo.
Is the copy quality satisfactory?
The problem is
solved.
Contact
Scan job was not successful
Action
Yes
No
Step 1
Check the cable connections.
a
Make sure that the Ethernet or USB cable is securely connected
to the computer and the printer.
b
Resend the scan job.
Is the scan job successful?
The problem is
solved.
Go to step 2.
Step 2
Check the file you want to scan.
a
Make sure that the file name is not already used in the
destination folder.
b
Make sure that the document or photo you want to scan is not
open in another application.
c
Resend the scan job.
Is the scan job successful?
The problem is
solved.
Go to step 3.
Troubleshooting
263
Содержание CX920
Страница 164: ... Scanner glass Scanner glass pad 3 Close the scanner cover Maintaining the printer 164 ...
Страница 167: ...2 Remove and then empty the hole punch box 3 Insert the hole punch box 4 Close the door Maintaining the printer 167 ...
Страница 172: ...5 Insert the new toner cartridge 6 Remove the waste toner bottle Maintaining the printer 172 ...
Страница 177: ...8 Insert the waste toner bottle and then close the door Maintaining the printer 177 ...
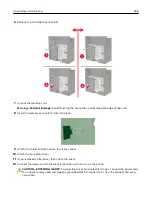
Страница 189: ...Replacing the ADF separator roller 1 Turn off the printer 2 Remove the ADF separator pad Maintaining the printer 189 ...
Страница 192: ...2 Open door B 3 Remove the ADF pick and feed rollers 4 Unpack the new pick and feed rollers Maintaining the printer 192 ...
Страница 194: ...2 Remove the empty staple cartridge 3 Unpack the new staple cartridge Maintaining the printer 194 ...
Страница 207: ... Below the fuser area Duplex area Clearing jams 207 ...
Страница 212: ...2 Open door J Clearing jams 212 ...
Страница 214: ... Areas H1 and H2 Area H6 Clearing jams 214 ...
Страница 218: ...2 Remove the staple cartridge holder 3 Remove the loose staples Clearing jams 218 ...
Страница 220: ...2 Remove the staple cartridge holder 3 Remove the loose staples Clearing jams 220 ...
Страница 222: ...2 Remove the staple cartridge holder 3 Remove the loose staples Clearing jams 222 ...
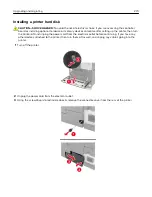
Страница 272: ...6 Remove the controller board shield 7 Unpack the printer hard disk Upgrading and migrating 272 ...
Страница 276: ...6 Remove the controller board shield Upgrading and migrating 276 ...
Страница 279: ...4 Remove the controller board shield Upgrading and migrating 279 ...
Страница 281: ...8 Attach the thumbscrews 9 Connect the wireless print server to the controller board Upgrading and migrating 281 ...
Страница 285: ...7 Connect the tray connector to the printer 8 Open trays 2 and 3 Upgrading and migrating 285 ...
Страница 290: ...9 Remove the stabilizing feet from the tray Upgrading and migrating 290 ...
Страница 294: ...17 Secure the tray cable with the clamp Upgrading and migrating 294 ...
Страница 295: ...18 Connect the tray cable to the printer 19 Attach the tray cable cover Upgrading and migrating 295 ...
Страница 296: ...20 Slide the tray until it clicks into place 21 Attach the stabilizing feet to the printer Upgrading and migrating 296 ...
Страница 301: ...7 Remove the paper guides 8 Attach the sensor cover Upgrading and migrating 301 ...
Страница 307: ...8 Attach the finisher to the printer Upgrading and migrating 307 ...


