


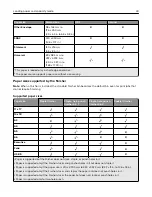


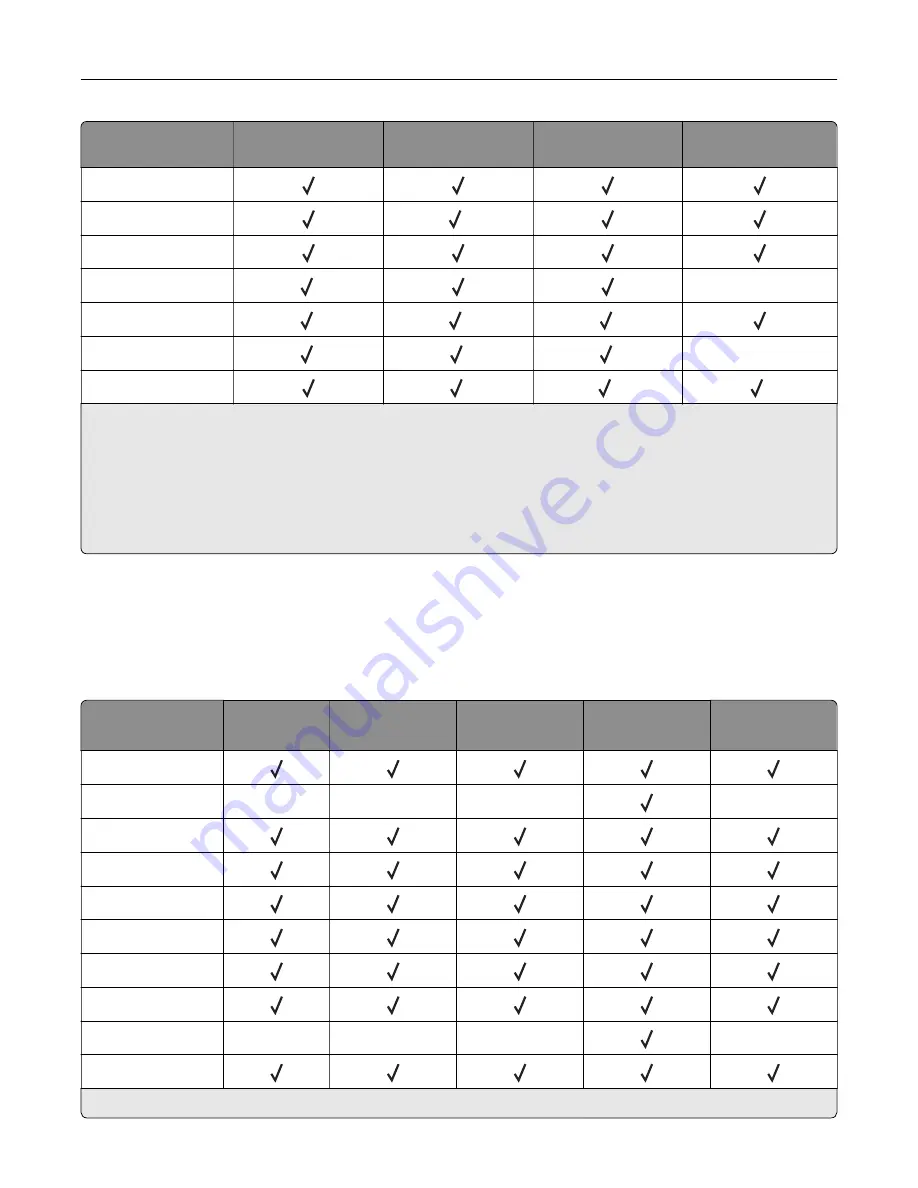
Paper size
Staple finisher
Staple, hole punch
finisher bin 1
Staple, hole punch
finisher bin 2
Booklet finisher
JIS B4
Legal
6
Letter
Oficio
1
X
SRA3
1
3
1
Statement
1
1
1
X
Universal
1
5
3
1
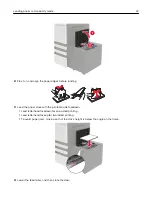
Paper is supported but the finisher does not stack, staple, or punch holes in it.
2
Paper is supported only if the finisher stacks and punches holes in it but does not staple it.
3
Paper is supported only if the paper size is 210 x 279.4 mm to 320 x 457.2 mm (8.27 x 11 in. to 12.6 x 18 in.).
4
Paper is supported only if the finisher stacks and staples the paper but does not punch holes in it.
5
Paper is supported only if the finisher stacks the paper but does not staple or punch holes in it.
6
Paper is supported only for two
‑
hole punch.
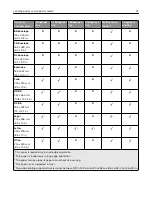
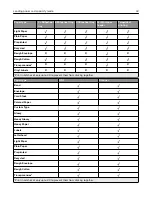
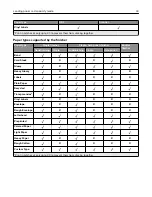
Supported paper types
Paper types supported by the printer
Note:
Labels, transparencies, envelopes, and card stock always print at reduced speed.
Paper type
2 x 500
‑
sheet
tray
2500
‑
sheet tray
3000
‑
sheet tray
Multipurpose
feeder
Two
‑
sided
printing
Bond
Envelope
X
X
X
X
Card Stock
Colored Paper
Custom Type
Glossy
Heavy Glossy
Heavy Paper
Labels
X
X
X
X
Letterhead
1
Print in batches of only up to 20 to prevent them from sticking together.
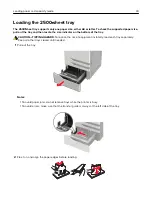
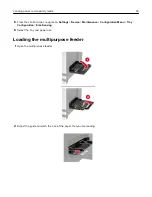
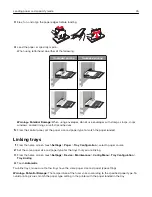
Loading paper and specialty media
41
Содержание CX920
Страница 164: ... Scanner glass Scanner glass pad 3 Close the scanner cover Maintaining the printer 164 ...
Страница 167: ...2 Remove and then empty the hole punch box 3 Insert the hole punch box 4 Close the door Maintaining the printer 167 ...
Страница 172: ...5 Insert the new toner cartridge 6 Remove the waste toner bottle Maintaining the printer 172 ...
Страница 177: ...8 Insert the waste toner bottle and then close the door Maintaining the printer 177 ...
Страница 189: ...Replacing the ADF separator roller 1 Turn off the printer 2 Remove the ADF separator pad Maintaining the printer 189 ...
Страница 192: ...2 Open door B 3 Remove the ADF pick and feed rollers 4 Unpack the new pick and feed rollers Maintaining the printer 192 ...
Страница 194: ...2 Remove the empty staple cartridge 3 Unpack the new staple cartridge Maintaining the printer 194 ...
Страница 207: ... Below the fuser area Duplex area Clearing jams 207 ...
Страница 212: ...2 Open door J Clearing jams 212 ...
Страница 214: ... Areas H1 and H2 Area H6 Clearing jams 214 ...
Страница 218: ...2 Remove the staple cartridge holder 3 Remove the loose staples Clearing jams 218 ...
Страница 220: ...2 Remove the staple cartridge holder 3 Remove the loose staples Clearing jams 220 ...
Страница 222: ...2 Remove the staple cartridge holder 3 Remove the loose staples Clearing jams 222 ...
Страница 272: ...6 Remove the controller board shield 7 Unpack the printer hard disk Upgrading and migrating 272 ...
Страница 276: ...6 Remove the controller board shield Upgrading and migrating 276 ...
Страница 279: ...4 Remove the controller board shield Upgrading and migrating 279 ...
Страница 281: ...8 Attach the thumbscrews 9 Connect the wireless print server to the controller board Upgrading and migrating 281 ...
Страница 285: ...7 Connect the tray connector to the printer 8 Open trays 2 and 3 Upgrading and migrating 285 ...
Страница 290: ...9 Remove the stabilizing feet from the tray Upgrading and migrating 290 ...
Страница 294: ...17 Secure the tray cable with the clamp Upgrading and migrating 294 ...
Страница 295: ...18 Connect the tray cable to the printer 19 Attach the tray cable cover Upgrading and migrating 295 ...
Страница 296: ...20 Slide the tray until it clicks into place 21 Attach the stabilizing feet to the printer Upgrading and migrating 296 ...
Страница 301: ...7 Remove the paper guides 8 Attach the sensor cover Upgrading and migrating 301 ...
Страница 307: ...8 Attach the finisher to the printer Upgrading and migrating 307 ...


