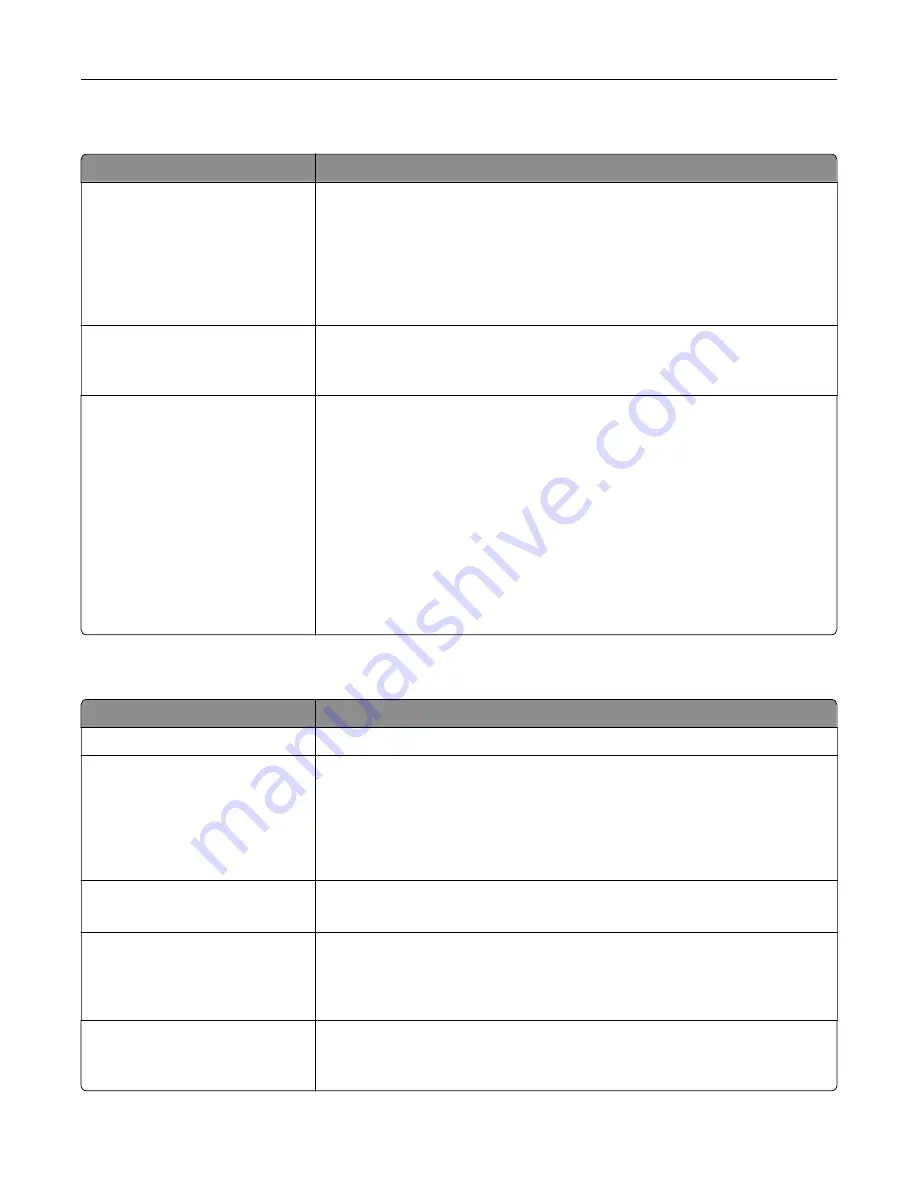
Security Audit Log menu
Use
To
Export Log
Let an authorized user export the audit log.
Notes:
•
To export the audit log from the printer control panel, attach a flash drive
to the printer.
•
The audit log can be downloaded from the Embedded Web Server and
saved on a computer.
Delete Log
Yes
No
Specify whether or not audit logs are deleted.
Note:
Yes is the factory default setting.
Configure Log
Enable Audit
Yes
No
Enable Remote Syslog
No
Yes
Remote Syslog Facility
0–23
Severity of Events to Log
0–7
Specify how and whether or not audit logs are created.
Notes:
•
Enable Audit determines if events are recorded in the secure audit log
and remote syslog. No is the factory default setting.
•
Enable Remote Syslog determines if logs are sent to a remote server. No
is the factory default setting.
•
Remote Syslog Facility determines the value used to send logs to the
remote syslog server. 4 is the factory default setting.
•
If the security audit log is activated, then the severity value of each event
is recorded. 4 is the factory default setting.
Set Date and Time menu
Use
To
Current Date and Time
View the current date and time settings for the printer.
Manually Set Date and Time
Enter the date and time.
Notes:
•
Date/Time is set in YYYY-MM-DD HH:MM:SS format.
•
Manually setting the date and time sets “Enable NTP” (Network Time
Protocol) to On.
Time Zone
Select the time zone.
Note:
GMT is the factory default setting.
Automatically Observe DST
On
Off
Set the printer to use the applicable daylight saving time (DST) start and end
times associated with the printer Time Zone setting.
Note:
On is the factory default setting and uses the applicable Daylight
Saving Time associated with the Time Zone setting.
Enable NTP
On
Off
Enable Network Time Protocol, which synchronizes the clocks of devices on a
network.
Note:
On is the factory default setting.
Understanding the printer menus
91
Содержание C2132
Страница 1: ...C2132 User s Guide June 2017 www lexmark com Machine type s 5027 Model s 639...
Страница 5: ...Embedded Web Server does not open 206 Contacting customer support 207 Notices 208 Index 219 Contents 5...
Страница 133: ...2 Open the top door 1 2 3 Remove the toner cartridges 1 2 Maintaining the printer 133...
Страница 138: ...16 Insert the waste toner bottle 17 Insert the right side cover Maintaining the printer 138...
Страница 142: ...2 Open the top door 1 2 3 Remove the toner cartridges 1 2 Maintaining the printer 142...
Страница 152: ...Settings General Settings Factory Defaults Restore Now Managing the printer 152...
Страница 156: ...Below the fuser In the fuser access door 3 Close the front door Clearing jams 156...


