


13
Brand/Flavor Import
1. Using the
Tower Brand Management Software
, create the
necessary
.brand
file, complete with new brand name and
images.
Video/Screen Saver Import
1.
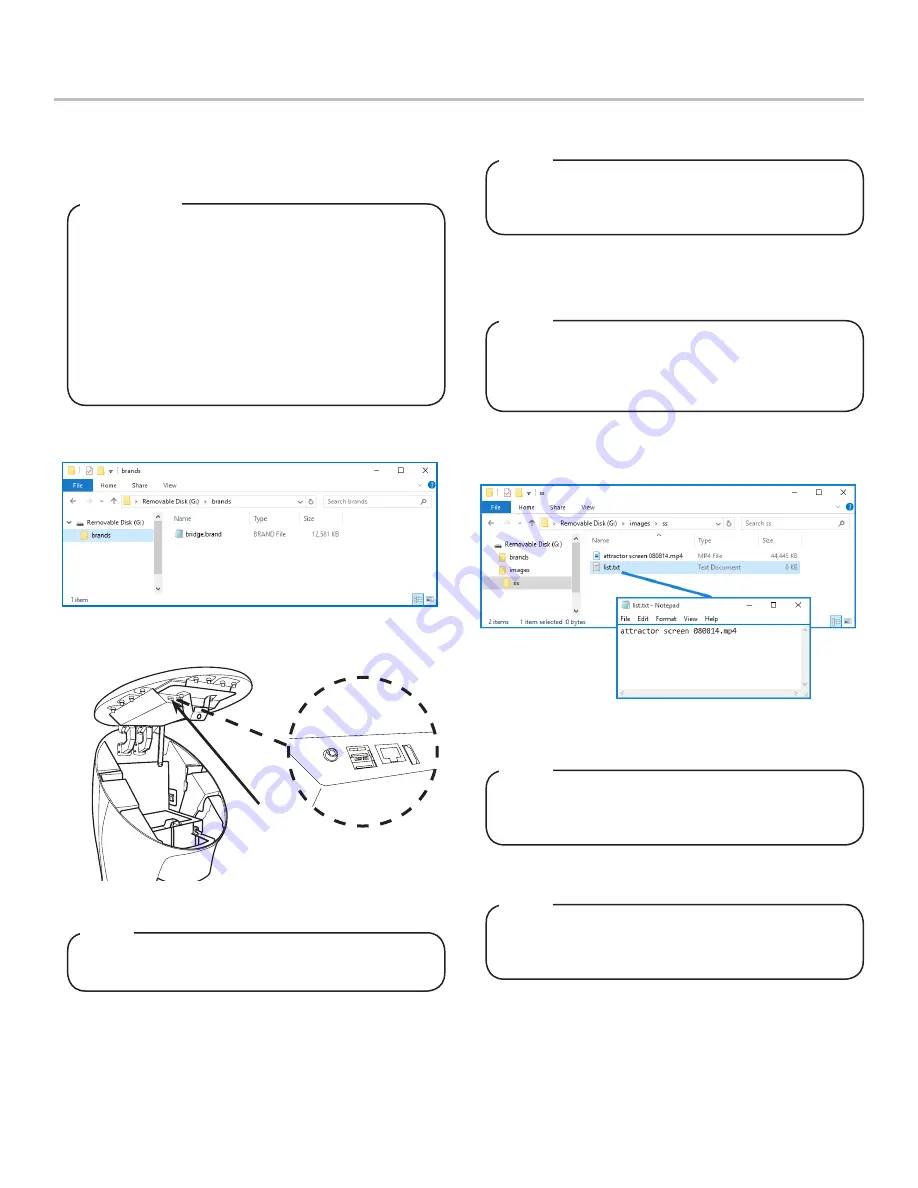
Create a USB Drive with the new video file in a folder struc-
ture named “images\ss”.
2. Create a USB drive with the created
.brand
file in a folder
named “brands” as shown in the image below.
4. From the Service Menu, in the “Update from USB” section,
press the
Brands
button.
5. Once the Brands button turns green then the updated brands
will be available.
Any data imported to the Bridge Tower will completely
replace all existing content. For example: If the user
wishes to add new brands to the existing brands
library, the user must upload both the existing brand
file as well as the new brand file(s).
For information on the Tower Brand Management
Software visit lancercorp.com, contact your Lancer
Customer Service Rep, or scan the code above to
access the Tower Brand Management Software
Instruction Sheet (Lancer Part Number: 28-2855).
IMPORTANT
A. USB Port
A
There will be a check mark next to the Brands button if
the USB drive has the brand files in the correct place.
NOTE
To upload new flavors to the Bridge Tower User Inter
-
face, create the flavor
.brand
file and put into a folder
named “flavors”, then repeat steps 2-5.
NOTE
3. Plug the USB into the Bridge Tower port located underneath
the head of the tower.
2. Create a
.txt
file in any editor software (ex: Notepad on
Windows machines) that contains the name of the video file
and is named “list.txt” as shown in the image below.
4. From the Service Menu, in the “Update from USB” section,
press the
Videos
button.
5. Once the
Videos
button turns green, cycle the power to the
Bridge Tower then the updated videos will be available.
The video file must be in a .mp4 format and the dimen
-
sions of the video must be 768 px x 600 px for “Self-
Serve mode” and 768 px x 768 px for “Crew Serve”
mode.
NOTE
Multiple videos can be uploaded at one time, just add
the name of each video to the “list.txt” file, one
filename per line.
NOTE
There will be a check mark next to the Videos button if
the USB drive has the video and text files in the correct
place.
NOTE
3.
Once both the video file and list.txt file are in the “ss” folder
on the USB Drive, plug in the drive into the Bridge Tower port
located underneath the head of the tower.
DATA MANAGEMENT


