background image

10-34

Troubleshooting > Troubleshooting

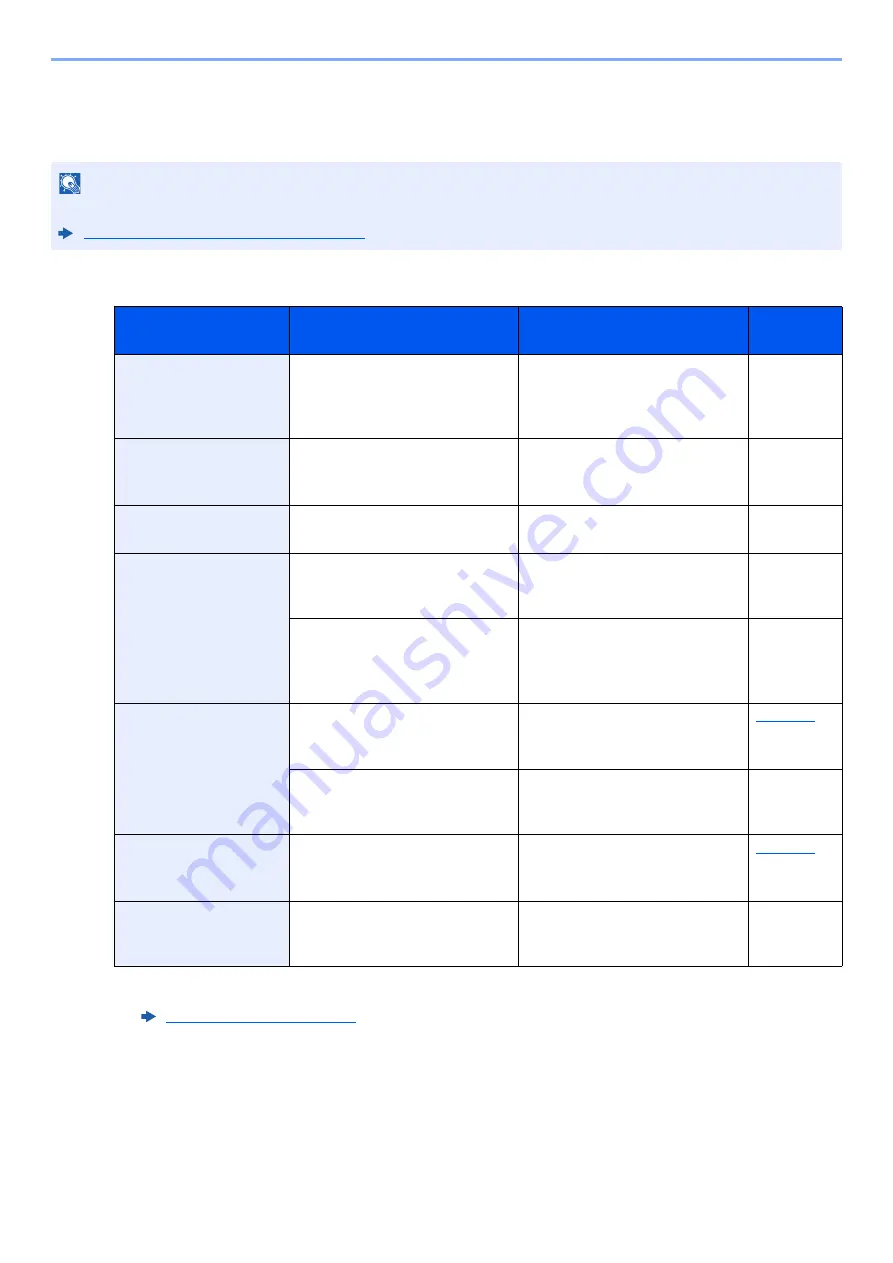
Responding to Messages

If the touch panel or the computer displays any of these messages, follow the corresponding procedure.

A

NOTE

When contacting us, the serial number will be necessary. To check the serial number, refer to the following:

Display for Device Information (page 2-20)

Message

Checkpoints

Corrective Actions

Reference 

Page

Acceptable fold count 
exceeded.

Is the acceptable number of 
sheets exceeded?

Select [

Continue

] to print using 

Fold per acceptable number of 
sheets. Select [

Cancel

] to 

cancel the job.

Acceptable staple 
count exceeded.

*1

*1 When Auto Error Clear is set to [

On

], processing resumes automatically after a set amount of time 

elapses. For details on Auto Error Clear, refer to the following:

Auto Error Clear (page 8-79)

Is the acceptable number of 
sheets exceeded?

Select [

Continue

] to print 

without using Staple. Select 
[

Cancel

] to cancel the job.

Access point was not 
detected.

Check if the access point has 
been set correctly.

Activation error.

Failed to activate the 
application. Contact 
administrator.

Expansion Authentication is 
disabled. Turn the power switch 
off and on. If the error exists, 
contact administrator.

Add paper in cassette 
#.

Is the indicated cassette out of 
paper?

Load paper.
Select the available paper. 
Select [

Continue

] to print.

page 3-2

Are five or less envelopes 
loaded in the cassette?

Pull the cassette and loosen the 
paper length and width guides 
slightly.

Add paper in 
Multipurpose tray.

Is the paper of the selected size 
loaded in the multipurpose tray?

Load paper.
Select the available paper. 
Select [

Continue

] to print.

page 5-6

Adjusting Scanner.

The machine is under the 
adjustment to maintain its 
quality. Please wait.

Содержание TASKalfa 7353ci

Страница 1: ...kyoceradocumentsolutions com Operation Guide TASKalfa 8353ci TASKalfa 7353ci ...

Страница 2: ...toner containers which have passed rigorous quality control testing to maintain quality The use of non genuine toner containers may cause failure We will not be liable for any damages caused by the use of third party supplies in this machine A label is affixed to our genuine supplies as shown below Checking the Equipment s Serial Number The equipment s serial number is printed in the location show...

Страница 3: ...7779 1 8 EK1 ITB 2000 1 8 Wireless Connection Mexico only 1 8 Security Precautions when Using Wireless LAN If equipped 1 8 Limited Use of This Product If equipped 1 9 Legal Information 1 10 Energy Saving Control Function 1 16 Automatic 2 Sided Print Function 1 16 Resource Saving Paper 1 16 Environmental benefits of Power Management 1 16 Energy Star ENERGY STAR Program 1 16 2 Installing and Setting...

Страница 4: ...3 Weekly Timer Settings 2 43 Power Off Timer models for Europe 2 43 Quick Setup Wizard 2 44 Installing Software 2 47 Software on DVD Windows 2 47 Installing Software in Windows 2 48 Uninstalling the Software 2 54 Installing Software in Mac Computer 2 55 Setting TWAIN Driver 2 57 Setting WIA Driver 2 59 Checking the Counter 2 60 Additional Preparations for the Administrator 2 61 Sending Documents t...

Страница 5: ...Banner Printing 4 9 Canceling Printing from a Computer 4 15 Printing from the Handheld Device 4 16 Printing by AirPrint 4 16 Printing by Google Cloud Print 4 16 Printing by Mopria 4 16 Printing with Wi Fi Direct 4 16 Printing with NFC 4 17 Printing Data Saved in the Printer 4 18 Specifying the Job Box from a Computer and Storing the Job 4 18 Printing Documents from Private Print Box 4 19 Deleting ...

Страница 6: ...before Sending 5 28 Sending Document to Folder on an FTP Server 5 28 Scanning using TWAIN or WIA 5 30 Configuring Settings before Sending 5 30 Scanning Document Using Application 5 30 Scanning Document stored in a Custom Box 5 31 Configuring Settings before Sending 5 31 Scanning Document Stored in a Box 5 31 Useful Sending Method 5 32 WSD Scan 5 33 Installing the Driver 5 33 Executing WSD scan 5 3...

Страница 7: ...ustom Box 5 65 Job Box 5 66 Outputting Repeat Copy Jobs 5 66 Form for Form Overlay 5 66 Operating using Removable USB Drive 5 68 Printing Documents Stored in Removable USB Drive 5 68 Saving Documents to USB Drive Scan to USB 5 70 Check the USB Drive Information 5 71 Removing USB Drive 5 71 Using the Internet Browser 5 72 Launching and Exiting the Browser 5 72 Using the Browser Screen 5 73 Manual S...

Страница 8: ...tice 6 73 File Name Entry 6 74 Priority Override 6 74 Repeat Copy 6 75 OHP Backing Sheet 6 76 DP Read Action 6 77 Skip Blank Page 6 77 2 sided Book Original Book Original 6 78 Sending Size 6 79 File Format 6 80 File Separation 6 85 Scan Resolution 6 85 E mail Subject Body 6 86 Send and Print 6 86 Send and Store 6 86 FTP Encrypted TX 6 87 File Size Confirmation 6 87 Delete after Printed 6 87 Delete...

Страница 9: ...of User Login Administration 9 2 Managing the Job Account from PC 9 2 Managing the Users to Use TWAIN for Scanning 9 2 Managing the Users to Use WIA for Scanning 9 2 Managing the Users to Send Faxes from a PC 9 2 Enabling User Login Administration 9 3 Setting User Login Administration 9 5 Authentication Security 9 5 Adding a User Local User List 9 8 Changing User Properties 9 12 User Login Adminis...

Страница 10: ...g 10 1 Regular Maintenance 10 2 Cleaning 10 2 Cleaning Glass Platen 10 2 Cleaning inside of the Document Processor 10 2 Cleaning Slit Glass 10 3 Cleaning Separator 10 4 Cleaning Transfer Roller 10 5 Toner Container Replacement 10 7 Replace the Waste Toner Box 10 11 Loading Paper 10 13 Replacing Staples 4 000 sheet Finisher 10 14 Replacing Staples 100 sheet Staple Finisher 10 16 Replacing Staples F...

Страница 11: ...r in the Mailbox 10 99 Remove any jammed paper in the Document Processor 10 100 Remove any jammed paper in the 4 000 sheet Finisher 100 sheet Staple Finisher Inner 10 101 Remove any jammed paper in the 4 000 sheet Finisher 100 sheet Staple Finisher Tray A 10 103 Remove any jammed paper in the 4 000 sheet Finisher 100 sheet Staple Finisher Tray B 10 106 Remove any jammed paper in the Folding Unit 4...

Страница 12: ...eet 11 24 4 000 sheet Finisher 11 25 100 sheet Staple Finisher 11 26 Punch Unit For 4 000 sheet 100 sheet Staple Finisher 11 26 Mailbox For 4 000 sheet Finisher 11 27 Folding Unit For 4 000 sheet Finisher 11 27 Folding Unit For 100 sheet Staple Finisher 11 28 Banner Tray 11 29 Glossary 11 30 Index Index 1 ...

Страница 13: ...ta USB drive Output Data Application Security Input Data FAX Operation Guide This function serves a variety of purposes including saving data in the machine and on a USB drive Printing Data Saved in the Printer page 4 18 Creating a New Custom Box page 5 56 You can expand the machine functions according to your needs Application page 5 14 You can apply the various machine security levels to your sp...

Страница 14: ...ts and finishing and copy the desired number of sheets without scanning the original again if you are satisfied with the result If you want to make changes you can change the settings and copy only one sheet again Proof Copy page 5 21 Optimize your office workflow Scan originals of different sizes at a time Mixed Size Originals It is useful when preparing conference materials You can set the diffe...

Страница 15: ... Mode You can set appropriate Energy Saver Recovery Level depending on the operation In addition the machine can automatically be switched into Sleep and recovered at a specified time for each day of the week Energy Saver Function page 2 41 Reduce paper use Paper Saving Printing You can print originals on both sides of the paper You can also print multiple originals onto one sheet Program page 5 1...

Страница 16: ...ooklet from sheet originals Facing page two sided copies of originals can be folded down the center to create a booklet The cover page can be printed onto colored paper or heavy paper Booklet page 6 51 Create attractive documents Print a stamp on copies Text Stamp Bates Stamp It is useful when adding text or date that is not included in originals You can add desired text and date as a stamp Text S...

Страница 17: ...rd disk SSD Data Security page 8 72 Prevent loss of finished documents Private Print Temporarily saving print jobs in the main unit document box and outputting them when in front of the device can prevent documents from being taken by others Printing Data Saved in the Printer page 4 18 Strengthen security Log in by ID card Card Authentication You can log in simply by touching an ID card You don t ...

Страница 18: ...s possible to install the unit without worrying about the network wiring In addition Wi Fi Direct etc are supported Configuring the Wireless Network page 2 34 Setting Wi Fi Direct page 2 38 Configuring NFC page 2 40 Use functions more efficiently Use USB drive USB Drive It is useful when you need to print documents outside your office or you cannot print documents from your PC You can print the do...

Страница 19: ...by specifying the special paper size or type the machine skips the error job and perform the next job Error Job Skip page 8 79 Perform remote operation Command Center RX You can access to the machine remotely to print send or download data Administrators can configure the machine behavior or management settings Command Center RX page 2 63 ...

Страница 20: ...ws For details refer to the following Color Selection page 6 35 Color mode Description Reference image Reference page Before After Auto Color Automatically recognizes whether a document being scanned is color or black white page 6 35 Full Color Scans a document in full color page 6 35 Grayscale Scans a document in grayscale page 6 36 Single Color Prints in any desired color page 6 35 Black White S...

Страница 21: ...re vivid One Touch Image Adjust Landscape Photo Blue page 6 38 Adjust the green landscape Example Change to yellowgreen One Touch Image Adjust Landscape Photo Green page 6 38 Produce overall image vividly One Touch Image Adjust Vivid page 6 39 Program Vivid Copy page 5 11 Remove dark background or bleed through from the original such as a newspaper Program Newspaper Copy page 5 11 Clearly reproduc...

Страница 22: ...quality precisely Emphasize or blur the image outline Example Emphasize the image outlines Sharpness page 6 40 Adjust the difference between dark and light parts of the image Contrast page 6 40 Darken or lighten the background the area with no texts or images of a document Example Lightening the background Background Density page 6 41 Prevent bleed through in 2 sided originals Prevent Bleed throug...

Страница 23: ... to use basic functions of the machine how to use convenient features how to perform routine maintenance and what to do when problems occur For safe use of the machine Safety Guide Provides safety and cautionary information for installation environment and use of the machine Be sure to read this guide before using the machine Safety Guide TASKalfa 8353ci TASKalfa 7353ci Indicates the space require...

Страница 24: ...nd Center RX User Guide Explains how to access the machine from a Web browser on your computer to check and change settings Print data from a computer Printer Driver User Guide Explains how to install the printer driver and use the printer function Directly print a PDF file KYOCERA Net Direct Print Operation Guide Explains how to print PDF files without launching Adobe Acrobat or Reader Monitor th...

Страница 25: ...uch as placing originals making copies sending documents and using document boxes 6 Using Various Functions Explains convenient functions that are available on the machine 7 Status Job Cancel Explains how to check the status of a job and the job history and how to cancel jobs being printed or waiting to print Also explains how to check paper and toner levels how to check the device status and how ...

Страница 26: ...move from the current page to the previously displayed page This is convenient when you want to return to the page from which you jumped to the current page Click an item in the Table of Contents to jump to the corresponding page CAUTION Indicates that personal injury or mechanical damage may result from insufficient attention to or incorrect compliance with the related points NOTE Indicates suppl...

Страница 27: ...ngs Select Sound System Menu Counter key Common Settings Sound Select Next of Job Accounting Settings Select Change of Job Accounting Job Accounting Settings Next Job Accounting Change User Login Job Accounting Next User Login Setting Close Status Next Unknown User Settings Next Job Accounting Setting m020168 User Login Job Accounting Job Accounting Setting Change Job Accounting Close Status Next ...

Страница 28: ...n the following icons are used to indicate original and paper placement orientations on the touch panel Orientation Setting Position X Length Y Width Icons on the touch panel Indicated size in this Guide 1 1 Original paper sizes that can be used vary depending on the function and source tray For details refer to the following Specifications page 11 19 Vertical orientation Original Original Origina...

Страница 29: ...tation page 6 24 Collate Offset page 6 26 Fold page 6 25 Staple Punch Staple page 6 27 Punch page 6 29 Paper Output page 6 31 ID Card Copy page 6 32 Color Image Quality Density page 6 32 Original Image page 6 33 EcoPrint page 6 34 Color Selection page 6 35 Color Balance page 6 36 Hue Adjustment page 6 37 One touch Image Adjust page 6 38 Sharpness page 6 40 Background Density Adj page 6 41 Saturati...

Страница 30: ... Chapters page 6 62 Image Repeat page 6 65 Text Stamp page 6 66 Bates Stamp page 6 69 Memo Page page 6 63 Poster page 6 64 Advanced Setup Continuous Scan page 6 72 Auto Image Rotation page 6 72 Negative Image page 6 73 Mirror Image page 6 73 Job Finish Notice page 6 73 File Name Entry page 6 74 Priority Override page 6 74 Repeat Copy page 6 75 OHP Backing Sheet page 6 76 DP Read Action page 6 77 S...

Страница 31: ...page 6 18 Mixed Size Originals page 6 21 2 sided Book Original Book Original page 6 78 Original Orientation page 6 24 Sending Size page 6 79 File Format page 6 80 File Separation page 6 85 Long Original page 6 88 Color Image Quality Density page 6 32 Original Image page 6 33 Scan Resolution page 6 85 FAX TX Resolution refer to FAX Operation Guide Color Selection page 6 35 Sharpness page 6 40 Backg...

Страница 32: ...le Name Entry page 6 74 i FAX Subject Body refer to FAX Operation Guide FAX Direct Transmission refer to FAX Operation Guide FAX Polling RX refer to FAX Operation Guide Send and Print page 6 86 Send and Store page 6 86 FTP Encrypted TX page 6 87 Text Stamp page 6 66 Bates Stamp page 6 69 File Size Confirmation page 6 87 FAX TX Report refer to FAX Operation Guide Skip Blank Page page 6 77 E mail Su...

Страница 33: ...sity page 6 32 Original Image page 6 33 Scan Resolution page 6 85 Color Selection page 6 35 Sharpness page 6 40 Background Density Adj page 6 41 Zoom page 6 43 Centering page 6 46 Border Erase Full Scan page 6 49 Continuous Scan page 6 72 Job Finish Notice page 6 73 File Name Entry page 6 74 Erase Shadowed Area page 6 59 Skip Blank Page page 6 77 Contrast page 6 40 Erase Colors page 6 43 Program p...

Страница 34: ... Notice page 6 73 File Name Entry page 6 74 Delete after Printed page 6 87 Priority Override page 6 74 EcoPrint page 6 34 Zoom page 6 43 Fold page 6 25 Text Stamp page 6 66 Bates Stamp page 6 69 Color Balance page 6 36 Hue Adjustment page 6 37 One touch Image Adjust page 6 38 Saturation page 6 41 Trapping page 6 42 Color Image Quality Density page 6 32 Original Image page 6 33 Color Selection page...

Страница 35: ... page 6 86 i FAX Subject Body refer to FAX Operation Guide FTP Encrypted TX page 6 87 Delete after Transmitted page 6 87 Zoom page 6 43 File Separation page 6 85 Text Stamp page 6 66 Bates Stamp page 6 69 File Size Confirmation page 6 87 FAX TX Report refer to FAX Operation Guide Color Image Quality Density page 6 32 Original Image page 6 33 Resolution page 6 85 Color Selection page 6 35 Sharpness...

Страница 36: ... Open Join page 5 66 Move Copy page 5 62 Delete page 5 65 Store File page 5 58 Search Name page 5 52 Page Selection page 5 52 Detail page 5 52 Preview page 5 55 Search Name page 5 52 Search No page 5 52 Add Edit Box page 5 56 ...

Страница 37: ...xxxvi Menu Map Job Box Private Print Stored Job page 4 19 page 4 20 Quick Copy Proof and Hold page 4 21 page 4 22 Repeat Copy page 6 75 Form for Form Overlay page 5 66 Job Box ...

Страница 38: ...e page 6 73 Priority Override page 6 74 EcoPrint page 6 34 Fold page 6 25 Text Stamp page 6 66 Bates Stamp page 6 69 Encrypted PDF Password page 6 89 JPEG TIFF Print page 6 89 XPS Fit to Page page 6 89 Color Image Quality Color Selection page 6 35 Delete page 5 53 Detail page 5 52 Open page 5 52 Add a new folder page 5 70 Up page 5 69 USB Drive Information page 5 71 Remove USB Drive page 5 71 Prev...

Страница 39: ... 6 33 Scan Resolution page 6 85 Color Selection page 6 35 Sharpness page 6 40 Background Density Adj page 6 41 Zoom page 6 43 Centering page 6 46 Border Erase Full Scan page 6 49 Continuous Scan page 6 72 Job Finish Notice page 6 73 File Name Entry page 6 74 Erase Shadowed Area page 6 59 Skip Blank Page page 6 77 Contrast page 6 40 Text Stamp page 6 66 Bates Stamp page 6 69 File Format page 6 80 F...

Страница 40: ...xxxix Menu Map or Printing Jobs page 7 3 Sending Jobs page 7 5 Storing Jobs page 7 6 Device Communication page 7 13 Paper Supplies page 7 14 Status Job Cancel S Status Job Cancel I ...

Страница 41: ...e 8 10 Default Screen page 8 10 Sound Buzzer page 8 10 FAX Speaker Volume refer to FAX Operation Guide FAX Monitor Volume refer to FAX Operation Guide Keyboard Layout page 8 11 Original Paper Settings Custom Original Size page 8 11 Custom Paper Size page 8 12 Media Type Setting page 8 12 Default Paper Source page 8 12 Auto Detect Original Size page 8 13 Media for Auto Color page 8 13 Media for Aut...

Страница 42: ...n page 8 19 Function Defaults Orig Orientation Copy page 8 19 Orig Orient Send Store page 8 19 Original Image Copy page 8 19 Org Image Send Store page 8 19 FAX TX Resolution refer to FAX Operation Guide Scan Resolution page 8 19 Color Selection Copy page 8 19 Color Select Send Store page 8 19 File Format page 8 20 Backgrnd Density Copy page 8 20 BackgrndDens Send Store page 8 20 Prevent Bleed thru...

Страница 43: ...page 8 22 Skip Blank Page Copy page 8 22 Skip Blank Page Send Store page 8 22 File Separation page 8 22 Continuous Scan Copy page 8 22 Continuous Scan FAX refer to FAX Operation Guide Continuous Scan Send Store page 8 22 Trapping page 8 22 Separator Paper Source page 8 22 Erase Shadowed Areas Copy page 8 22 Erase Shadowed Areas Send page 8 23 Erase Shadowed Areas Store page 8 23 Optional Keyboard ...

Страница 44: ...Action page 8 36 Auto Paper Selection page 8 36 Auto Priority page 8 36 Paper Size for Small Original page 8 36 Preset Limit page 8 36 Reserve Next Priority page 8 36 Quick Setup Registration page 8 36 Org Size of Undetected Org page 8 36 Send Quick Setup Registration page 8 37 Dest Check before Send page 8 37 Color Type page 8 37 Entry Check for New Dest page 8 37 Default Screen page 8 37 Send an...

Страница 45: ... 8 43 FAX refer to FAX Operation Guide Printer Emulation page 8 43 Color Setting page 8 44 Gloss Mode page 8 44 EcoPrint page 8 44 Toner Save Level EcoPrint page 8 44 Override A4 Letter page 8 44 Duplex page 8 44 Copies page 8 44 Orientation page 8 44 Form Feed Timeout page 8 44 LF Action page 8 44 CR Action page 8 44 Job Name page 8 45 User Name page 8 45 Paper Feed Mode page 8 45 MP Tray Priorit...

Страница 46: ...b Finish Notice Setting refer to FAX Operation Guide RX Result Report Type refer to FAX Operation Guide Sending Log History Auto Sending page 8 49 Sending Log History page 8 49 Destination page 8 49 Job Log Subject page 8 49 SSFC Log Subject page 8 49 Personal Information page 8 49 Login History Settings Login History page 8 50 Auto Sending page 8 50 Destination page 8 50 Subject page 8 50 Log Res...

Страница 47: ...twork Settings TCP IP Setting page 8 58 LAN Interface page 8 60 Bonjour page 8 60 IPSec page 8 60 Protocol Settings SMTP E mail TX page 8 60 POP3 E mail RX page 8 60 FTP Client Transmission page 8 60 FTP Server Reception page 8 60 SMB Client Transmission page 8 61 NetBEUI page 8 61 WSD Scan page 8 61 WSD Print page 8 61 i FAX page 8 61 DSM Scan page 8 61 ThinPrint page 8 61 LPD page 8 62 Raw page ...

Страница 48: ... 8 65 Proxy page 8 65 Ping page 8 66 Restart Network page 8 66 IP Filter IPv4 page 8 66 IP Filter IPv6 page 8 66 Optional Network Basic page 8 67 Wireless Network page 8 68 Primary Network Client page 8 70 Security Level page 8 70 Interface Block Setting USB Host page 8 71 USB Device page 8 71 USB Drive page 8 71 Optional Interface 1 page 8 71 Optional Interface 2 page 8 71 Data Security Hard Disk...

Страница 49: ...s Book page 8 78 One Touch Key page 8 78 User Login Job Accounting User Login Setting User Login page 9 3 Authentication Security User Account Lockout Set page 9 5 Password Policy Settings page 9 7 Local User List page 9 8 Local Authorization page 9 19 Group Authorization Set Group Authorization page 9 20 Group List page 9 21 Guest Authorization Set Guest Authorization page 9 23 Guest Property pag...

Страница 50: ...Timer Energy Saver Date Time page 8 78 Date Format page 8 78 Time Zone page 8 78 Auto Panel Reset page 8 79 Auto Error Clear page 8 79 Low Power Timer page 8 79 Panel Reset Timer page 8 79 Sleep Timer page 8 79 Interrupt Clear Timer page 8 79 Error Job Skip page 8 79 Error Clear Timer page 8 79 Unusable Time refer to FAX Operation Guide Sleep Rules models for Europe page 8 80 Sleep Level models ex...

Страница 51: ... 8 83 System Initialization page 8 83 Display Brightness page 8 83 Silent Mode page 8 83 Memory Diagnostics page 8 83 Auto Color Correction page 8 83 Color Registration page 8 83 Calibration Cycle page 8 83 Tone Curve Adjustment page 8 83 Calibration page 8 84 Developer Refresh page 8 84 Laser Scanner Cleaning page 8 84 First Print Position page 8 84 Contrast Copy page 8 84 Send Box page 8 84 Corr...

Страница 52: ...1 7 Compliance and Conformity 1 7 Radio Tag Technology 1 8 Other precautions for users in California the United States 1 8 Legal Restriction on Copying Scanning 1 8 EN ISO 7779 1 8 EK1 ITB 2000 1 8 Wireless Connection Mexico only 1 8 Security Precautions when Using Wireless LAN If equipped 1 8 Limited Use of This Product If equipped 1 9 Legal Information 1 10 Energy Saving Control Function 1 16 Au...

Страница 53: ...tention are indicated inside the symbol General warning Warning of high temperature The symbol indicates that the related section includes information on prohibited actions Specifics of the prohibited action are indicated inside the symbol Warning of prohibited action Disassembly prohibited The symbol indicates that the related section includes information on actions which must be performed Specif...

Страница 54: ...asters when this machine is moved after installation the floor material may be damaged During copying some ozone is released but the amount does not cause any ill effect to one s health If however the machine is used over a long period of time in a poorly ventilated room or when making an extremely large number of copies the smell may become unpleasant To maintain the appropriate environment for c...

Страница 55: ...contact a physician If you do happen to get toner in your eyes flush them thoroughly with water If there is any remaining tenderness contact a physician If toner does happen to get on your skin wash with soap and water Do not attempt to force open or destroy parts which contain toner Other precautions Return the exhausted toner container and waste toner box to your dealer or service representative...

Страница 56: ...on emitted inside this machine is hermetically sealed within the protective housing and external cover In the normal operation of the product by user no radiation can leak from the machine This machine is classified as Class 1 laser product under IEC EN 60825 1 2014 Regarding CLASS 1 laser products information is provided on the rating label ...

Страница 57: ...CDRH Act A laser product related act was implemented on Aug 2 1976 by the Center for Devices and Radiological Health CDRH of the U S Food and Drug Administration FDA This act prohibits the sale of laser products in the U S without certification and applies to laser products manufactured after Aug 1 1976 The label shown below indicates compliance with the CDRH regulations and must be attached to la...

Страница 58: ...ence by one or more of the following measures Reorient or relocate the receiving antenna Increase the separation between the equipment and receiver Connect the equipment into an outlet on a circuit different from that to which the receiver is connected Consult the dealer or an experienced radio TV technician for help The use of a non shielded interface cable with the referenced device is prohibite...

Страница 59: ...zung im unmittelbaren Gesichtsfeld am Bildschirmarbeitsplatz vorgesehen Um störende Reflexionen am Bildschirmarbeitsplatz zu vermeiden darf dieses Produkt nicht im unmittelbaren Gesichtsfeld platziert werden Wireless Connection Mexico only The operation of this equipment is subject to the following two conditions 1 it is possible that this equipment or device may not cause harmful interference and...

Страница 60: ...ct medical equipment When using this product in a medical institution or in the vicinity of medical instruments either use this product according to the instructions and precautions provided by the administrator of the institution or those provided on the medical instruments Radio waves transmitted from this product may affect automatic control equipment including automatic doors and fire alarms W...

Страница 61: ... Palatino and Times are registered trademarks of Linotype GmbH ITC Avant Garde Gothic ITC Bookman ITC ZapfChancery and ITC ZapfDingbats are registered trademarks of International Typeface Corporation ThinPrint is a trademark of Cortado AG in Germany and other countries UFST MicroType fonts by Monotype Imaging Inc are installed in this machine This machine contains the software having modules devel...

Страница 62: ...e OpenSSL Project for use in the OpenSSL Toolkit http www openssl org THIS SOFTWARE IS PROVIDED BY THE OpenSSL PROJECT AS IS AND ANY EXPRESSED OR IMPLIED WARRANTIES INCLUDING BUT NOT LIMITED TO THE IMPLIED WARRANTIES OF MERCHANTABILITY AND FITNESS FOR A PARTICULAR PURPOSE ARE DISCLAIMED IN NO EVENT SHALL THE OpenSSL PROJECT OR ITS CONTRIBUTORS BE LIABLE FOR ANY DIRECT INDIRECT INCIDENTAL SPECIAL E...

Страница 63: ...you return to Monotype Imaging Under the terms of this License Agreement you have the right to use the Fonts on up to three printers If you need to have access to the fonts on more than three printers you need to acquire a multiuser license agreement which can be obtained from Monotype Imaging Monotype Imaging retains all rights title and interest to the Software and Typefaces and no rights are gr...

Страница 64: ...e or promote products derived from this software without specific prior written permission THIS SOFTWARE IS PROVIDED BY THE COPYRIGHT HOLDERS AND CONTRIBUTORS AS IS AND ANY EXPRESS OR IMPLIED WARRANTIES INCLUDING BUT NOT LIMITED TO THE IMPLIED WARRANTIES OF MERCHANTABILITY AND FITNESS FOR A PARTICULAR PURPOSE ARE DISCLAIMED IN NO EVENT SHALL THE COPYRIGHT OWNER OR CONTRIBUTORS BE LIABLE FOR ANY DI...

Страница 65: ... free irrevocable except as stated in this section patent license to make have made use offer to sell sell import and otherwise transfer the Work where such license applies only to those patent claims licensable by such Contributor that are necessarily infringed by their Contribution s alone or by combination of their Contribution s with the Work to which such Contribution s was submitted If You i...

Страница 66: ...e the Work including but not limited to damages for loss of goodwill work stoppage computer failure or malfunction or any and all other commercial damages or losses even if such Contributor has been advised of the possibility of such damages 9 Accepting Warranty or Additional Liability While redistributing the Work or Derivative Works thereof You may choose to offer and charge a fee for acceptance...

Страница 67: ...initiatives or carrying recognised ecolabels which meet EN 12281 2002 or an equivalent quality standard be used This machine also supports printing on 64 g m2 paper Using such paper containing less raw materials can lead to further saving of forest resources EN12281 2002 Printing and business paper Requirements for copy paper for dry toner imaging processes Your sales or service representative can...

Страница 68: ...gin Logout 2 29 Login 2 29 Logout 2 30 Default Settings of the Machine 2 31 Setting Date and Time 2 31 Network Setup 2 32 Configuring the Wired Network 2 32 Configuring the Wireless Network 2 34 Setting Wi Fi Direct 2 38 Configuring NFC 2 40 Energy Saver Function 2 41 Low Power Mode 2 41 Sleep 2 42 Auto Sleep 2 42 Sleep Rules models for Europe 2 42 Sleep Level Energy Saver models except for Europe...

Страница 69: ...3 9 Handles 10 Main Power Switch 11 Multipurpose Tray 12 Right Cover 1 13 Right Cover 1 Lever 14 USB Memory Slot 15 Original Eject Table 16 Original Stopper 17 Original Table 18 Cleaning Cloth Compartment 19 Original Width Guides 20 Slit Glass 21 Upper Left Cover 22 Upper Left Tray 23 Lower Left Tray 24 Front Cover 25 Platen 26 Original Size Indicator Plates 2 3 4 5 11 14 15 17 19 20 9 26 24 25 9 ...

Страница 70: ... 29 Paper Width Guide 30 Paper Width Adjusting Tab 31 Right Cover 4 32 Right Cover 4 Lever 33 Right Cover 3 34 Right Cover 3 Lever 35 Support Tray Section of the Multipurpose Tray 36 Multipurpose Tray 37 Paper Width Guide 38 Right Cover 2 39 Right Cover 2 Handle 40 Right Tray 29 30 31 33 37 27 28 32 34 35 36 38 39 40 ...

Страница 71: ...rs Interior 1 USB Interface Connector 2 USB Port 3 Network Interface Connector 4 Option Interface Slot 5 Waste Toner Box Cover 6 Waste Toner Box 7 Toner Container Cover 8 Toner Container Black 9 Toner Container Magenta 10 Toner Container Cyan 11 Toner Container Yellow 2 11 10 9 8 3 4 1 6 7 5 4 ...

Страница 72: ...With Optional Equipments Attached 1 Tray 1 to 7 tray 1 is the top tray 2 Tray A 3 Tray B 4 Tray C 5 Folding Tray Optional Equipment page 11 2 6 Side Feeder Top Tray 7 Cassette 5 8 Cassette 6 9 Cassette 7 10 Control Section of the Finisher Manual Staple page 5 74 5 1 3 2 5 7 10 9 4 9 8 7 6 8 7 3 2 4 ...

Страница 73: ... 2 34 Connection Environment Function Necessary Cable Connect a LAN cable to the machine Printer Scanner Network FAX 1 1 Function available when using optional FAX kit For more information on using the Network FAX refer to the FAX Operation Guide LAN cable 10BASE T 100BASE TX 1000BASE T Connect a USB cable to the machine Printer USB 2 0 compatible cable Hi Speed USB compliant max 5 0 m shielded IM...

Страница 74: ...ing Cables Connecting LAN Cable 1 Connect the cable to the machine 1 Remove the covers from the machine in order from the top 2 Connect the LAN cable to the network interface connector IMPORTANT Make sure that the power to the machine is turned off Power Off page 2 11 ...

Страница 75: ...g Cables 3 Insert the cord into the groove 4 Attach the covers in order from the bottom taking care not to pinch the cord 5 Connect the other end of the cable to the hub or the PC 2 Power on the machine and configure the network Network Setup page 2 32 ...

Страница 76: ... Cable 1 Connect the cable to the machine 1 Remove the covers from the machine in order from the top 2 Connect the USB cable to the USB interface connector located on the left side of the body IMPORTANT Make sure that the power to the machine is turned off Power Off page 2 11 ...

Страница 77: ...e bottom taking care not to pinch the cord 5 Connect the other end of the cable to the PC 2 Power on the machine Connecting the Power Cable 1 Connect the cable to the machine Connect one end of the supplied power cable to the machine and the other end to a power outlet IMPORTANT Only use the power cable that comes with the machine ...

Страница 78: ... machine will be left unused for an extended period e g overnight turn it off at the power switch If the machine will not be used for an even longer period of time e g vacation remove the power plug from the outlet as a safety precaution IMPORTANT If using the products equipped with the fax function note that turning the machine off at the power switch disables fax transmission and reception Remov...

Страница 79: ...r accessing the hard disk SSD Also it lights when there is a sending job FAX using delayed transmission 3 Attention indicator Lights or blinks when an error occurs and a job is stopped 4 Energy Saver key Puts the machine into Sleep Mode Recovers from Sleep if in Sleep Mode 5 Touch Panel Displays icons for configuring machine settings Adjusting the Operation Panel Angle The angle of the operation p...

Страница 80: ...Returns settings to their default states 7 Numeric Keypad key Displays numeric keys on the touch panel 8 Interrupt key Displays the Interrupt Copy screen 9 System Menu Counter key Displays the System Menu screen 10 Authentication Logout key Authenticates user switching and exits the operation for the current user i e log out 11 Screen area Displays the screen of each function Assigning Functions t...

Страница 81: ...tons to switch between desktop pages NOTE You can also switch views by touching the screen and moving the finger sideways i e swiping 4 Taskbar Displays task icons 5 Status Icon Error The icon is displayed during network startup or error 6 Status Icon Wi Fi The icon is displayed when Wi Fi is connected When Wi Fi is not connected is displayed Status Icon Security level Low is displayed when the se...

Страница 82: ...gs by logging in with administrator privileges or as a user with privileges to configure this setting The factory default login user name and login password are set as shown below Item Description Customize Desktop Specify the function icons to display on the desktop 1 Select Add to display the screen for selecting the function to display Select the function to display and OK Select an icon and Pr...

Страница 83: ...B Drive screen page 5 68 FAX Box 2 Displays the FAX Box screen Refer to the FAX Operation Guide FAX Memory RX Box 2 Displays the FAX Memory RX Box screen Refer to the FAX Operation Guide Internet Browser Displays the Internet Browser screen page 5 72 Send to Me E mail 3 3 Displayed when user login administration is enabled Displays the Send screen The E mail address of the logged in user is set as...

Страница 84: ...e 8 7 Wi Fi Direct Wi Fi Direct is set and a list of information relating to the machine that can use the network appears page 8 53 System Menu 1 Displays the System Menu screen page 8 2 Help 1 Displays the Help screen page 2 27 Program 1 Displays the program list screen page 5 11 Incoming FAX Log 2 2 Displayed only on products with the fax function installed Displays the Incoming FAX Log screen R...

Страница 85: ...f user login administration is enabled you can only change the settings by logging in with administrator privileges or as a user with privileges to configure this setting The factory default login user name and login password are set as shown below Function Description Reference page None No function has been assigned Copy Displays the Copy screen page 5 19 Send Displays the Send screen page 5 23 ...

Страница 86: ...is set as the destination page 5 62 Internet Browser Displays the Internet Browser screen page 5 72 ID Card Copy Displays the ID Card Copy screen page 6 32 Program Calls up the registered program The icon will change according to the function of the program page 5 11 Application Name Displays the selected applications page 5 14 1 Displayed only on products with the fax function installed 2 Display...

Страница 87: ...rk FAX 2 2 Displayed only on products with the fax function installed You can check the local fax number local fax name local fax ID and other fax information Soft Ver Capability Security You can check the software version and performance and security information on the machine Option You can check information on the options that are used 1 Shows an image of the output paper 2 Original Shows the o...

Страница 88: ...e Originals Original Orientation Collate Offset Staple Punch Paper Output Quick Setup Advanced Setup Program 100 A4 A4 Original Zoom Paper Preview Color Image Quality Org Paper Finishing Layout Edit c0102 Preview Proof Copy Fold Copies ID Card Copy Tab Function key Select or to scroll up and down System Menu Close Status 1 2 m01010101 Quick Setup Wizard Cassette MP Tray Settings Home Send FAX Repo...

Страница 89: ...l Preview has been selected For functions that cannot be changed when using proof copy Cannot be used because an option is not installed NOTE If a key that you wish to use is grayed out the settings of the previous user may still be in effect In this case select the Reset key and try again If the key is still grayed out after the Reset key is selected it is possible that you are prohibited from us...

Страница 90: ...p ID Card Copy Program 100 A4 A4 Preview Original Zoom Paper Preview Proof Copy c010101_01 Staple Punch Normal 0 Color Selection Paper Selection Auto Zoom 100 Off 1 sided 1 sided Duplex Off Combine Copies Color Image Quality Org Paper Finishing Quick Setup Layout Edit Advanced Setup Program 100 A4 A4 Cancel Original Zoom Paper Preview Detail c010101_03 Staple Punch Normal 0 Color Selection Paper S...

Страница 91: ... preview image with the new settings Depending on the function you are using even if you scan a multi page original only the first page can be previewed Function Description Drag With the finger touching the touch panel slide the finger to move the position of the displayed preview Pinch in Pinch out With two fingers touching the touch panel widen or tighten the space between the two fingers to zo...

Страница 92: ...plex Off Combine Copies Color Image Quality Org Paper Finishing Quick Setup Layout Edit Advanced Setup ID Card Copy Program 100 A4 A4 Preview Original Zoom Paper Preview Proof Copy c010101_01 Staple Punch Normal 0 Color Selection Paper Selection Auto Zoom 100 Off 1 sided 1 sided Duplex Off Combine Copies abcd efg com Status Destination Detail Address Book Folder Path Entry E mail Addr Entry 1 100 ...

Страница 93: ...r Detail Address Book Sort Addr Book 0001 0002 0005 0004 0003 ABCD abcd efg com TUVW tuvw xyz com Group1 Group2 Group3 Name 1 2 i FAX FAX ABC DEF JKL MNO PQRS TUV WXYZ GHI 0 9 Add Edit Address Book s02010101 Member 3 Member 2 Member 4 Status Address Book Cancel OK Group E mail Dest Search Name Search No No Type Name Detail Folder Detail Address Book Sort Addr Book 0001 0002 0005 0004 0003 ABCD Ent...

Страница 94: ... that appears after step 1 of Setting Procedure is performed will appear 4 Displays the Help list 5 Closes the Help screen and returns to the original screen 6 Scrolls up and down when the help text cannot be displayed in its entirety on a single screen Status Cancel OK Paper Selection Add Shortcut Paper Set Auto MP Tray MP Tray 100 A4 A4 Original Zoom Paper c020102 Preview A4 A3 B4 A5 Copies Plai...

Страница 95: ... the touch panel You can also control the screen using the numeric key corresponding to the number in circle Example Press the 2 key on the numeric key pad to zoom Control the functions according to the display on the screen NOTE This function can be used on the Home screen and on the functions that were registered via Copy Send Quick Setup To configure any functions that are not displayed on the ...

Страница 96: ... as shown below You will be unable to login if you forget your login user name or login password In this event login with administrator privileges and change your login user name or login password Character Entry Method page 11 9 NOTE Keys can be selected to enter the number with the numeric keys on the operation panel If Network Authentication is selected as the user authentication method authent...

Страница 97: ... name login password entry screen Users are automatically logged out in the following circumstances When the machine enters the sleep state When the auto panel reset function is activated NOTE If a user password is required an input screen will be displayed Simple Login Settings page 9 28 Status Select the user to login 01 No Keyboard Login A 02 B 03 C 1 2 04 05 06 07 08 09 10 11 12 lg0601 Authent...

Страница 98: ...TE For settings that are configurable from System Menu refer to the following Setup and Registration System Menu page 8 1 NOTE To make changes after this initial configuration refer to the following Date Timer Energy Saver page 8 78 The correct time can be periodically set by obtaining the time from the network time server Command Center RX User Guide Item Description Time Zone Set the time differ...

Страница 99: ...iguring Connections on the Web Page For the equipped network interface the connection can be set by using Command Center RX For the optional IB 50 the connection can be set by using the dedicated Web page Command Center RX User Guide IB 50 Operation Guide Setting the Connection by Using the Setup Utility of IB 50 This is the setup tool included in the CD of IB 50 You can use it on Windows IB 50 Op...

Страница 100: ...to IP Enter 0 0 0 0 in IP Address When setting the DNS server In the following cases set the IP address of DNS Domain Name System server When using the host name with DHCP setting set to Off When using the DNS server with IP address that is not assigned by DHCP automatically Select Auto DHCP or Manual When Manual is selected you can enter static DNS server information in the Primary and Secondary ...

Страница 101: ... is the setup tool included in the CD of IB 51 You can use it on both Windows and Mac OS IB 51 Operation Guide Configuring Connections on the Web Page For the IB 35 the connection can be set from the Command Center RX Command Center RX User Guide For the IB 51 the connection can be set on the dedicated Web page IB 51 Operation Guide NOTE The Wireless Network Interface Kit IB 35 is an option for so...

Страница 102: ...king Accept in the license dialog box depending on your region a message about resource and energy conservation may appear Read the message and click OK 4 Select Maintenance 5 Wi Fi Setup Tool Run NOTE Installation on Windows must be done by a user logged on with administrator privileges If the Welcome to the Found New Hardware Wizard dialog box displays select Cancel If the autorun screen is disp...

Страница 103: ...nfigured Wireless LAN Connection by Using Wi Fi Direct 1 Display the screen System Menu Counter key System Network Network Next Wi Fi Direct Settings Next Wi Fi Direct Change 2 Configure the settings On OK 3 Restart the network System Menu Counter key System Network Network Next Restart Network Start Yes 4 Connect a computer or a handheld device with the machine 5 Insert the DVD NOTE Only one mach...

Страница 104: ...me to search the machine 4 Select the machine Next 5 Select Use the device settings on Authentication mode and enter the login user name and password Login user name and Password are both Admin 6 Configure the communication settings Next 7 Change the settings of access point as necessary Next The network is configured NOTE Installation on Windows must be done by a user logged on with administrator...

Страница 105: ...ld device If a confirmation message appears on the operation panel of the machine select Yes The network between this machine and the handheld device is configured Connecting to Computers or Handheld Devices Unsupported Wi Fi Direct Here we ll explain the procedures for connecting to iOS handheld devices 1 Display the screen System Menu Counter key System Network Network Next Wi Fi Direct Settings...

Страница 106: ...ystem Network Network Next Restart Network Start Yes 4 Home key Wi Fi Direct 5 Press the push button on the computer or handheld device and select Push Button on the screen of operation panel simultaneously The network between this machine and the computer or handheld device is configured IMPORTANT You can connect up to three handheld devices at the same time using Wi Fi Direct setting When the de...

Страница 107: ...ndheld device supporting NFC to this machine The configuration methods are as follows Configuring Connections on the Web Page You can set NFC from the Command Center RX Command Center RX User Guide Configuring the Connection from the Operation Panel on This Machine Configure the NFC from the System Menu NFC page 8 75 This section presents an example for configuring the NFC from the System Menu 1 D...

Страница 108: ...ed to as Low Power Mode Low power mode will be displayed on the screen The amount of time before entering Low Power Mode 2 minutes default setting If print data is received during Low Power Mode the machine automatically wakes up and starts printing Also when fax data arrives while the machine is in Low Power Mode the machine automatically wakes up and starts printing To resume perform one of the ...

Страница 109: ...me from Low Power Mode is as follows 39 seconds or less Note that ambient environmental conditions such as ventilation may cause the machine to respond more slowly Auto Sleep Auto Sleep automatically switches the machine into Sleep if left idle for a preset time The amount of time before entering Sleep is as follows For Europe 20 minutes default setting Except for Europe 45 minutes default setting...

Страница 110: ...de For EnergySaver RecoveryLevel Full Recovery Normal Recovery or Power Saving Recovery can be selected The factory default is Normal Recovery For more information on Energy Saver Mode settings refer to the following Energy Saver Setup page 2 45 EnergySaver RecoveryLevel page 8 80 Weekly Timer Settings Set the machine to automatically sleep and wake up at times specified for each day For more info...

Страница 111: ...ion Local FAX Name Port 1 Port 2 1 Local FAX Number Port 1 Port 2 1 Local FAX ID TTI 3 Sound FAX Speaker Volume FAX Monitor Volume Job Finish Buzzer 4 Rings Rings Normal 4 Rings TAD 4 Rings FAX TEL 4 5 Paper Source Output Paper Source Settings Specify by Media Type 5 Specify by Cassette 6 Paper Output Port 1 Port 2 1 Reduced RX Size 6 Redial Retry Times Power Off Setup Show Power Off Message E mai...

Страница 112: ...ecify by Media Type 6 This function is displayed when Paper Source Settings is set to Specify by Cassette 7 This function is displayed when the Wireless Network Interface Kit IB 35 is installed The Wireless Network Interface Kit is an option for some models Contact your dealer or our sales or service representatives for detail IB 35 Wireless Network Interface Kit page 11 6 8 This function is displ...

Страница 113: ...ce difficulty configuring the settings refer to the following Help Screen page 2 27 Control Description End Exits the wizard Settings configured so far are applied Previous Returns to the previous item Skip Advances to the next item without setting the current item Next Advances to the next screen Back Returns to the previous screen Complete Register the settings and exit the wizard ...

Страница 114: ...strictions on the machine features and option features that can be used with this driver FAX Driver This makes it possible to send a document created in a computer software application as a fax via the machine Kyocera TWAIN Driver This driver enables scanning on the machine using a TWAIN compliant software application Kyocera WIA Driver WIA Windows Imaging Acquisition is a function of Windows that...

Страница 115: ...bout resource and energy conservation may appear Read the message and click OK After installation is successful Set Duplex as default appears and is selected on the Finished page The driver is set to duplex mode by default 3 Select Express Install NOTE Installation on Windows must be done by a user logged on with administrator privileges If the Welcome to the Found New Hardware Wizard dialog box d...

Страница 116: ...llation IMPORTANT If Wi Fi or Wi Fi Direct is enabled be sure to specify the IP address for the port name Installation may fail if the host name is specified NOTE The machine cannot be detected unless it is on If the computer fails to detect the machine verify that it is connected to the computer via a network or USB cable and that it is turned on and click Reload If the Windows security window ap...

Страница 117: ...ing Custom Install 1 Insert the DVD 2 Display the screen After clicking Accept in the license dialog box depending on your region a message about resource and energy conservation may appear Read the message and click OK After installation is successful Set Duplex as default appears and is selected on the Finished page The driver is set to duplex mode by default Setting TWAIN Driver page 2 57 NOTE ...

Страница 118: ...nabled be sure to specify the IP address for the port name Installation may fail if the host name is specified NOTE The machine cannot be detected unless it is on If the computer fails to detect the machine verify that it is connected to the computer via a network or USB cable and that it is turned on and click Reload If the desired device does not appear select Add custom device to directly selec...

Страница 119: ...nstalled 4 Click Install When you click Install a screen asking for your cooperation with data collection will be displayed Select one of the answer choices and click OK NOTE To install Status Monitor on Windows versions preceding Windows 8 1 it is necessary to install Microsoft NET Framework 4 0 beforehand 2 3 1 ...

Страница 120: ...rint a test page click the Print a test page checkbox and select the machine Click Finish to exit the wizard If a system restart message appears restart the computer by following the screen prompts This completes the printer driver installation procedure If you are installing the TWAIN driver continue by configuring the following Setting TWAIN Driver page 2 57 ...

Страница 121: ...t the computer by following the screen prompts This completes the software uninstallation procedure NOTE Uninstallation on Windows must be done by a user logged on with administrator privileges NOTE In Windows 8 1 click Search in charms and enter Uninstall Kyocera Product Library in the search box Select Uninstall Kyocera Product Library in the search list In Windows 7 click Start button on the Wi...

Страница 122: ... the printer driver installation If a USB connection is used the machine is automatically recognized and connected If an IP connection is used the settings below are required NOTE Installation on Mac OS must be done by a user logged on with administrator privileges When printing from a Macintosh computer set the machine s emulation to KPDL or KPDL Auto Printer page 8 43 If connecting by Bonjour en...

Страница 123: ...nd then select the driver in Use 3 The selected machine is added 4 Select the printer added newly and click the Options Supplies to select the options equipped with the machine NOTE When using an IP connection click the IP icon for an IP connection and then enter the host name or IP address The number entered in Address will automatically appear in Name Change if needed 1 2 1 2 4 3 2 1 3 4 ...

Страница 124: ...nfigure TWAIN Driver NOTE In Windows 8 1 click Search in charms and enter TWAIN Driver Setting in the search box Select TWAIN Driver Setting in the search list In Windows 7 select Start button on the Windows All Programs Kyocera and then TWAIN Driver Setting TWAIN Driver screen appears 1 Enter the machine name 2 Select this machine from the list 3 Enter the machine s IP address or host name 4 Set ...

Страница 125: ...2 58 Installing and Setting up the Machine Installing Software 3 Finish registering NOTE Click Delete to delete the added machine Click Edit to change names ...

Страница 126: ... as this machine from WIA Drivers and click Properties 2 Configure WIA Driver NOTE In Windows 8 1 click Search in charms and enter View scanners and cameras in the search box Select View scanners and cameras in the search list then the Scanners and Cameras screen appears In Windows 7 click Start button on the Windows and enter Scanner in Program and File Search Click View scanners and cameras in t...

Страница 127: ... 60 Installing and Setting up the Machine Checking the Counter Checking the Counter Check the number of sheets printed and scanned 1 Display the screen System Menu Counter key Counter 2 Check the counter ...

Страница 128: ...nfigure all settings therefore please change the login user name and password In addition this machine is equipped with user authentication function which can be configured to limit the access to this machine to only those who have a registered login name and password User Authentication and Accounting User Login Job Accounting page 9 1 NOTE Protection of confidential information by TPM This produ...

Страница 129: ... Data Encryption Overwrite Operation Guide Encryption 1 PDF Encryption Functions page 6 82 Completely delete the data on the machine before disposing of the machine Data Sanitization page 8 73 Record the operation history of users Login History Settings page 8 50 Device Log History Settings page 8 51 Secure Comm Error Log page 8 52 Protect the transmission from interception and wiretapping IPP ove...

Страница 130: ... are distinguished case sensitive Login User Name Admin Login Password Admin Setting Description Administ rator General User Device Information The machine s structure can be checked Job Status Displays all device information including print and scan jobs storing jobs scheduled jobs and job log history Document Box Add or delete document boxes or delete documents within a document box 1 1 The logg...

Страница 131: ...the function Select a category from the navigation bar on the left of the screen NOTE If the screen There is a problem with this website s security certificate is displayed configure the certificate Command Center RX User Guide You can also continue the operation without configuring the certificate NOTE To fully access the features of the Command Center RX pages enter the User Name and Password an...

Страница 132: ...e home screen Identification Wired Network 3 Log in with administrator privileges The factory default setting for the default user with administrator privileges is shown below Upper case and lower case letters are distinguished case sensitive Login User Name Admin Login Password Admin 4 Click Security Settings 2 Configure the Security Settings From the Security Settings menu select the setting you...

Страница 133: ...with administrator privileges The factory default setting for the default user with administrator privileges is shown below Upper case and lower case letters are distinguished case sensitive Login User Name Admin Login Password Admin 4 From the Device Settings menu click System 2 Specify the host name Enter the device information and then click Submit IMPORTANT After changing the setting restart t...

Страница 134: ...to limit the size of E mails Item E mail Size Limit in E mail Send Settings The procedure for specifying the SMTP settings is explained below 1 Display the screen Display the SMTP Protocol screen 1 Launch your Web browser 2 In the address or location bar enter the machine s IP address or the host name Click in the following order to check the machine s IP address and the host name Device Informati...

Страница 135: ...d Setting up the Machine Command Center RX 2 Configure the settings Set SMTP E mail TX to On in the Send Protocols 3 Display the screen Display the E mail Settings screen From the Function Settings menu click E mail 1 2 ...

Страница 136: ...ss POP3 POP3 Protocol You don t need to set the following items when you only enable the function of sending e mail from the machine Set the following items if you want to enable the function of receiving e mail on the machine Command Center RX User Guide Check Interval Run once now Domain Restriction POP3 User Settings E mail Send Settings E mail Size Limit Enter the maximum size of E mail that c...

Страница 137: ...ith administrator privileges The factory default setting for the default user with administrator privileges is shown below Upper case and lower case letters are distinguished case sensitive Login User Name Admin Login Password Admin 4 From the Address Book menu click Machine Address Book 5 Click Add 2 Populate the fields 1 Enter the destination information Enter the information for the destination...

Страница 138: ...in the following order to check the machine s IP address and the host name Device Information in the home screen Identification Wired Network 3 From the Document Box menu click Custom Box 4 Click Add 2 Configure the Custom Box 1 Enter the box details Enter the information for the custom box you want to register For details on the fields to populate refer to the following 2 Click Submit Command Cen...

Страница 139: ...the following order to check the machine s IP address and the host name Device Information in the home screen Identification Wired Network 3 From the Document Box menu click Custom Box 4 Click the number or name of the Custom Box in which the document is stored 2 Print the document 1 Select the document you wish to print Select the checkbox of the document to be printed 2 Click Print 3 Configure s...

Страница 140: ...Migrating the Address Book The Address Book registered on the machine can be backed up or migrated using the KYOCERA Net Viewer on the included DVD For details on operating the KYOCERA Net Viewer refer to the following KYOCERA Net Viewer User Guide Backing Up Address Book Data to PC 1 Launch the KYOCERA Net Viewer 2 Create a backup 1 Right click on the model name from which you want to back up the...

Страница 141: ...ing Data from Our Other Products 3 Select destination device group and click Next 4 Select Device Address Book and click Next 5 Select Create from device and remove the checkmark from Overwrite settings on target device and then click Next 1 2 1 2 1 2 3 ...

Страница 142: ...ecify the location to save the file enter the file name and then click Save For Save as type make sure to select XML File NOTE If the Admin Login screen appears enter the Admin Login and Login Password and then click OK The default settings are as follows Upper case and lower case letters are distinguished case sensitive Login User Name Admin Login Password Admin 1 2 ...

Страница 143: ... Please note that selecting Finish will write the data to the machine s Address Book Writing Address Book Data to the Machine 1 Launch the KYOCERA Net Viewer 2 Load the Address Book data 1 Right click on the model name to which you want to transfer the Address Book and select Advanced Set multiple devices 2 Select Custom Mode and click Next 1 2 1 2 ...

Страница 144: ...ice group and click Next 4 Select Device Address Book and click Next 5 Select Create from file and remove the checkmark from Overwrite settings on target device and then click Next Selecting the Overwrite settings on target device checkbox will overwrite the machine s Address Book from entry No 1 1 2 1 2 1 2 3 ...

Страница 145: ...hine Transferring Data from Our Other Products 6 Click Browse and select the backup Address Book file and then click Next 7 Click Finish The write process of the Address Book data starts 8 Once the write process is complete click Close 1 2 ...

Страница 146: ...et Finisher 3 15 Folding Unit For 100 sheet Staple Finisher 3 16 Preparation for Sending a Document to a Shared Folder in a PC 3 17 Making a note of the computer name and full computer name 3 17 Making a note of the user name and domain name 3 18 Creating a Shared Folder Making a Note of a Shared Folder 3 19 Configuring Windows Firewall 3 22 Turn off password protected sharing Windows 10 only 3 27...

Страница 147: ...paper after loading in the multipurpose tray or cassettes back in the paper storage bag Leaving paper in the cassette for a long time may cause a discoloration of paper by heat from the cassette heater If the machine will not be used for a prolonged period protect all paper from humidity by removing it from the cassettes and sealing it in the paper storage bag IMPORTANT If you copy onto used paper...

Страница 148: ...ter R Letter Legal Statement R 12 18 Oficio II Folio 8K 16K R 16K Plain Rough Vellum Recycled Preprinted Bond Color Prepunched Letterhead Thick Coated High Quality Custom 1 to 8 500 sheets 80 g m2 page 3 4 6 Cassette 6 Plain Rough Vellum Recycled Preprinted Bond Color Prepunched Letterhead Thick High Quality Custom 1 to 8 7 Cassette 7 8 Cassette 6 A4 B5 Letter 1 500 sheets 80 g m2 page 3 8 9 Casse...

Страница 149: ...represent the Cassette 1 1 Pull the cassette completely out of the machine 2 Adjust the paper length guide to the paper size required NOTE Do not pull out more than one cassette at a time NOTE Cassette 1 or Cassette 2 only When using 12 18 size paper move the paper length guide to the extreme left and lay it down ...

Страница 150: ...ing up After removing new paper from its packaging fan the paper before loading it in the cassette Precaution for Loading Paper page 3 2 Before loading the paper be sure that it is not curled or folded Paper that is curled or folded may cause paper jams Ensure that the loaded paper does not exceed the level indicator see illustration above If paper is loaded without adjusting the paper length guid...

Страница 151: ... Loading Paper 6 Be sure that the paper length and width guides rest securely against the paper If there is a gap readjust the guides to fit the paper 7 Press the paper width guide lock to lock 8 Gently push the cassette back in ...

Страница 152: ... Counter Cassette MP Tray Settings Cassette 1 Next 11Configure the function Select the paper size and paper type NOTE For Cassette 5 6 and 7 insert a sheet of the required paper size and type as shown in the illustration Cassette 1 to 7 page 8 7 NOTE Paper size can be automatically detected and selected refer to the following Paper Selection page 6 19 Cassette 1 to 7 page 8 7 ...

Страница 153: ... cassette size 1 Rotate the Paper Size Guide A clamp and remove Pull the Paper Size Guide A up and out 2 Insert the Paper Size Guide A into the slot bottom of cassette for the paper size to be used Make sure that the top of the Paper Size Guide A matches the paper size to be used attach the clamp and rotate the clamp to lock it Gently try moving the Paper Size Guide A to verify that it is fixed 1 ...

Страница 154: ...per size A4 Insert the Paper Size Guide B into the slot marked A4 on the bottom of the cassette and lock the hook it will make a click sound Gently try moving the Paper Size Guide B to verify that it is fixed B5 Open the Paper Size Guide B as shown insert into the slot marked B5 on the bottom of the cassette and lock the hook it will make a click sound Gently try moving the Paper Size Guide B to v...

Страница 155: ... the Paper Size Guide C 3 Load paper 1 Paper Size Guide C IMPORTANT Load the paper with the print side facing up After removing new paper from its packaging fan the paper before loading it in the cassette Precaution for Loading Paper page 3 2 Before loading the paper be sure that it is not curled or folded Paper that is curled or folded may cause paper jams Ensure that the loaded paper does not ex...

Страница 156: ...red paper size and type as shown in the illustration 6 Display the screen System Menu Counter Cassette MP Tray Settings Cassette 3 Next 7 Configure the function Select the paper size and paper type NOTE For Cassette 6 and 7 insert a sheet of the required paper size and type as shown in the illustration Cassette 1 to 7 page 8 7 ...

Страница 157: ...aper size changed to B5 or Letter contact your service representative IMPORTANT Load the paper with the print side facing down After removing new paper from its packaging fan the paper before loading it in the cassette Precaution for Loading Paper page 3 2 Before loading the paper be sure that it is not curled or folded Paper that is curled or folded may cause paper jams Ensure that the loaded pap...

Страница 158: ...ack in 4 Insert the indication on the sheet so as to match the size and type of paper to be placed 5 Display the screen System Menu Counter Cassette MP Tray Settings Cassette 5 Next Media Type Change 6 Configure the function Select the paper type Cassette 1 to 7 page 8 7 ...

Страница 159: ...f multiple sheets are sent simultaneously when using the Side Feeder 500 sheet 3 or Large Capacity Side Feeder 500 1 500 sheet 2 they are output to the Top Tray of the Side Feeder NOTE The tray confirmation screen will be displayed if you attempt to output paper with the right tray closed Output tray capacity is as follows 70 sheets 64 g m2 80 g m2 NOTE Load the paper correctly Side Feeder Top Tra...

Страница 160: ...ting number of sets exceeding the storage limit in the folding unit detach the folding tray In case of ejecting to the folding tray In case of ejecting more than the limit of the folding tray NOTE Refer to the following for maximum number for storage of folding unit Folding Unit For 4 000 sheet Finisher page 11 27 ...

Страница 161: ...ng nunmber of sets exceeding the storage limit in the folding unit store them in the sub tray In case of ejecting to the folding tray In case of ejecting more than the limit of the folding tray NOTE Refer to the following for maximum number for storage of folding unit Folding Unit For 100 sheet Staple Finisher page 11 28 ...

Страница 162: ...e computer name and full computer name 1 Display the screen Click Start button on the Windows and then select Windows System Control Panel System and Security and System 2 Check the computer name Check the computer name and full computer name Screen example Computer name PC001 Full computer name PC001 abcdnet com After checking the computer name click the Close button to close the System Propertie...

Страница 163: ...and Command Prompt In Windows 8 1 click Search in charms and enter Command Prompt in the search box Select Command Prompt in the search list In Windows 7 from Start button on the Windows select All Programs or Programs Accessories and then Command Prompt The Command Prompt window appears 2 Check the domain name and user name At the Command Prompt enter net config workstation and then press Enter C...

Страница 164: ...p in System Properties configure the settings below to limit folder access to a specific user or group 1 Open up a window in File Explorer and select View Options and then File Explorer Options In Windows 8 1 select Settings in charms on Desktop and select Control Panel Appearance and Personalization and then Folder Options In Windows 7 from Start button on the Windows select Control Panel Appeara...

Страница 165: ...Folder in a PC 2 Configure permission settings 1 Right click the scannerdata folder select Properties and click Sharing and Advanced Sharing 2 Select the Share this folder checkbox and click the Permissions button 3 Make a note of the Share name 4 Click the Add button 1 2 1 2 ...

Страница 166: ...not the same as the domain name If the text after the first dot in the full computer name that you made a note of does not appear in From this location click the Locations button select the text after the dot and click the OK button Example abcdnet com Making a note of the user name and domain name page 3 18 2 Enter the user name that you made a note of on page in the text box and click the OK but...

Страница 167: ...ystem and Security and Allow an app through Windows Firewall NOTE Log on to Windows with administrator privileges NOTE If the User Account Control dialog box appears click the Continue button 1 Select the Security tab 2 Select the user you entered If the user does not appear on Group or user names click Edit button to add user in a similar way of configuration of permission settings 3 Make sure th...

Страница 168: ... a Shared Folder in a PC 2 Select the File and Printer Sharing checkbox 2 Add a port 1 Click Start button on the Windows and then select Windows System Control Panel System and Security and Check firewall status 2 Select Advanced settings 3 Select Inbound Rules 1 2 3 ...

Страница 169: ...ore Use Preparation for Sending a Document to a Shared Folder in a PC 4 Select New Rules 5 Select Port 6 Select TCP as the port to apply the rule to Then select Specific local ports and enter 445 then click Next 1 2 2 1 3 ...

Страница 170: ...ration for Sending a Document to a Shared Folder in a PC 7 Select Allow the connection and click the Next button 8 Make sure all checkboxes are selected and click the Next button 9 Enter Scan to SMB in Name and click Finish 1 2 1 2 1 2 ...

Страница 171: ...ll If the User Account Control dialog box appears click the Continue button 2 Configure the settings In Windows 7 1 In Windows 7 from Start button on the Windows select Control Panel System and Security and then Allow a program through Windows Firewall If the User Account Control dialog box appears click the Continue button 2 Configure the settings Configuring Windows Firewall page 3 22 Configurin...

Страница 172: ...0 only If it is not possible to access the shared folder that you specified the settings for operating system may be changed Follow the steps below to confirm and change the settings 1 Right click Start button and select Settings 2 Select Network Internet 3 Select Sharing options 4 Select Turn on network discovery in Network discovery ...

Страница 173: ...a PC 5 Select Turn on file and printer sharing in File and printer sharing 6 Click of All Networks and select Turn off password protected sharing in Password protected sharing NOTE It is recommended to set a password for the user account Regarding security ask your network administrator ...

Страница 174: ...e shared folder is easily recorded in the address book of this machine with a sequence of actions Can also be registered on the One Touch Keys 1 Insert the DVD 2 Display the screen After clicking Accept in the license dialog box depending on your region a message about resource and energy conservation may appear Read the message and click OK NOTE Log in to Windows with administrator privileges If ...

Страница 175: ...ext The address book of the device appears NOTE The machine cannot be detected unless it is on If the computer fails to detect the machine verify that it is connected to the computer via a network cable and that it is turned on and click Refresh If user administration is valid on this machine the user authentication screen appears Log in with administrator privileges or as a user with execution au...

Страница 176: ...efault folder name is Scan NOTE Clicking on Edit after selecting the registered address allows you to change the content of the registration Unchecking the Show fax capable addresses check box will hide the address containing the fax NOTE Click Edit to change the desktop folder name Selecting Select an existing folder and address allows you to select an existing folder that is already set as a sha...

Страница 177: ... One Touch key click Yes 8 Select a One Touch Key with no registered destination and click Submit 9 Click Close 10Click Finish to exit the Scan to Folder Setup Tool 1 Enter the name for display in the address book 2 Display the folder name and path to the shared folder 3 Shared folders can be selected from a PC on the network 4 Display the user name of the selected PC 5 Enter the password correspo...

Страница 178: ...ey Edit Destination Address Book Add Edit Add Contact Next 2 Add the name 1 Select Address Number Change 2 Use or the numeric keys to enter an address number 1 to 2500 To have the number assigned automatically enter 0000 3 Select OK The screen shown in step 1 reappears NOTE Registering and editing of the Address Book can also be done in Command Center RX Registering Destinations page 2 70 Editing ...

Страница 179: ...splayed on the Address Book and select OK The screen shown in step 1 reappears 3 Add the address E mail Address E mail Address Change Enter the E mail address OK NOTE Refer to the following for details on entering characters Character Entry Method page 11 9 NOTE Refer to the following for details on entering characters Character Entry Method page 11 9 ...

Страница 180: ...re name domain name and user name enter the information that you noted when you created the shared folder For details on creating shared folders refer to the following Preparation for Sending a Document to a Shared Folder in a PC page 3 17 Item Description Max No of Characters Host Name 1 1 You can also specify the port number Enter the following format separated by a colon Host name port number o...

Страница 181: ...port number To enter the IPv6 address enclose the address in brackets Example 2001 db8 a0b 12f0 10 21 If the port number is not specified in Host Name the default port number is 21 Host name or IP address of FTP server Up to 70 characters Path 2 2 When the FTP server is based on Linux UNIX the path including the sub folder is combined by the slash not using the back slash Path for the file to be s...

Страница 182: ... more destinations to add repeat Steps 2 to 3 NOTE To add a group you need individually added destinations Register one or more individual destinations as needed before proceeding Up to 100 destinations for the E mail 500 destinations for the FAX 100 destinations for the i FAX and a total of 10 destinations for the FTP and SMB can be registered per group NOTE Address Number is an ID for a group Yo...

Страница 183: ...Address Number and destination type and address 2 Save Yes Register the changed destination Add a destination to a group 1 Change Name and Address Number 2 Member Add 3 After you have completed the changes Save Yes Register the changed destination To delete any destination from the group 1 Member Select the delete destination Delete Yes 2 After you have completed the changes Save Yes Register the ...

Страница 184: ...ns contacts you added to the Address Book 1 Display the screen 1 System Menu Counter key Edit Destination Address Book Add Edit 2 Select a destination or group to delete 2 Delete Yes Delete the contact or group NOTE Destinations can be sorted or searched by destination name or address number Specifying Destination page 5 43 ...

Страница 185: ...estination Change The Address Book appears NOTE Refer to the following for use of One Touch Key Specifying Destination page 5 43 You can add One Touch keys and change their settings on Command Center RX Registering Destinations page 2 70 If registering and editing of the One Touch Keys is restricted to administrators you can edit the One Touch Keys by logging in with administrator privileges Edit ...

Страница 186: ...Add Edit 2 Select a new destination contact or group Selecting Detail shows the detailed information of the selected destination 3 OK Save Yes Add the destination to the One Touch Key Deleting the Destination to the One Touch Key 1 Display the screen 1 System Menu Counter key Edit Destination One Touch Key Add Edit 2 Select a One Touch Key number 0001 to 1000 to edit Selecting No or the Quick No S...

Страница 187: ...Specifying the Job Box from a Computer and Storing the Job 4 18 Printing Documents from Private Print Box 4 19 Deleting the Documents Stored in the Private Print Box 4 19 Printing Document from Stored Job Box 4 20 Deleting the Documents Stored in the Stored Job Box 4 20 Printing Document from Quick Copy Box 4 21 Deleting the Documents Stored in the Quick Copy Box 4 21 Printing Document from Proof ...

Страница 188: ...ing booklet printing combine mode poster printing and scaling Finishing tab This tab lets you configure settings related to finishing of printed media including binding and stapling Imaging tab This tab lets you configure settings related to the quality of the print results Publishing tab This tab lets you create covers and inserts for print jobs and put inserts between sheets of OHP film Job tab ...

Страница 189: ... Windows System Control Panel and View devices and printers 2 Right click the printer driver icon of the machine and click the Printer properties menu of the printer driver 3 Click the Preferences button on the General tab 4 Select the default settings and click the OK button 2 Profiles Printer driver settings can be saved as a profile Saved profiles can be recalled at any time so it s a convenien...

Страница 190: ...lect the machine from the Printer menu and click the Properties button 2 Select the Basic tab NOTE To print the document from applications install the printer driver on your computer from the supplied DVD Product Library In some environments the current settings are displayed at the bottom of the printer driver When printing the cardstock or envelopes load the cardstock or envelopes in the multipu...

Страница 191: ...uded in print sizes of the machine such as cardstock or envelopes the paper size needs to be registered To print on the special paper such as thick paper or transparency click Media type menu and select the media type 4 Click OK button to return to the Print dialog box 3 Start printing Click the OK button Printing on Non standard Sized Paper page 4 6 ...

Страница 192: ... View devices and printers 2 Right click the printer driver icon of the machine and click the Printer properties menu of the printer driver 3 Click the Preferences button on the General tab 2 Register the paper size 1 Click the Basic tab 2 Click the Page Size button 3 Click the New button NOTE To execute printing at the machine set the paper size and type in the following Original Paper Settings p...

Страница 193: ... Save button 7 Click the OK button 8 Click the OK button 3 Display the print settings screen Click File and select Print in the application 4 Select the paper size and type of non standard size paper 1 Select the machine from the Printer menu and click the Properties button 2 Select the Basic tab 8 1 2 ...

Страница 194: ... special paper such as thick paper or transparency click Media type menu and select the media type 4 Select the paper source in the Source menu 5 Click OK button to return to the Print dialog box 5 Start printing Click the OK button NOTE If you loaded a postcard or envelope select Cardstock or Envelope in the Media type menu ...

Страница 195: ...ect the machine from the Printer menu and click the Properties button 2 Select the Basic tab 3 Click the Page Size button Max number of sheets 1 sheet manual feed 10 sheets when optional banner tray is attached 1 1 When the banner tray option is used up to 10 sheets of banner paper can be fed continuously For details refer to the follows Using the Banner Tray Option page 4 12 Paper width 210 mm to...

Страница 196: ...registered 3 Enter the name of the paper 4 Click the Save button 5 Click the OK button 4 Configure the print paper size 1 Click Print size menu and select the paper size registered in step 3 2 Click Source menu and select Multipurpose tray 3 Click Media type menu and select Plain 4 Click the OK button NOTE When banner printing a resolution of 600 dpi is set 5 3 4 6 7 1 2 3 ...

Страница 197: ...ted when printing multiple banner sheets IMPORTANT If an output tray that cannot be used for banner printing such as Mailbox option is selected in the printer driver the output tray automatically changes to a tray that can be used After pressing Continue support the paper with both hands so that it feeds in correctly After printing starts catch the paper when it is output so that it does not fall ...

Страница 198: ...nter driver is the same as that of using the multipurpose tray Using the Multipurpose Tray page 4 9 1 Open the multipurpose tray Open the multipurpose tray until it stops Do not extend the support tray section of the multipurpose tray 2 Attach the banner tray 1 Release the paper width guide lock on the banner tray and open to the maximum width NOTE The paper length supported in banner tray is 488 ...

Страница 199: ...des of the multipurpose tray and press into place 3 Load paper 1 Open the paper width guides on the multipurpose tray to the maximum width Make sure that the banner tray is attached so that the paper width guides on the banner tray are outside the paper width guides on the multipurpose tray 2 Load banner paper so that it passes under the paper clamp bar Opening ...

Страница 200: ...y and lock IMPORTANT If there is a gap between the paper and the paper width guides readjust the guides to fit the paper in order to prevent skewed feeding and paper jams IMPORTANT Remove the paper when banner printing finishes or when you are not using the banner tray NOTE The print confirmation screen can be set in System Menu to not appear when the banner tray is attached This will allow contin...

Страница 201: ... printing do the following 1 Double click the printer icon displayed on the taskbar at the bottom right of the Windows desktop to display a dialog box for the printer 2 Click the file for which you wish to cancel printing and select Cancel from the Document menu NOTE When canceling printing from this machine refer to the following Canceling Jobs page 5 22 ...

Страница 202: ...on printing function included in Android 4 4 or later products Mopria Print Service needs to be installed and enabled in advance For details on how to use refer to a Web site of Mopria Alliance Printing with Wi Fi Direct Wi Fi Direct is a wireless LAN standard that Wi Fi Alliance has been established This is one of the functions of the wireless LAN without a wireless LAN access point or wireless L...

Страница 203: ... Printing with NFC When the Wi Fi and Wi Fi Direct has been configured in advance the network between this machine and handheld device will be configured by simply tapping an NFC tag Configuring the Wireless Network page 2 34 Setting Wi Fi Direct page 2 38 ...

Страница 204: ...n a Box and printing it You can print the documents from the following boxes Printing Documents from Private Print Box page 4 19 Printing Document from Stored Job Box page 4 20 Printing Document from Quick Copy Box page 4 21 Printing Document from Proof and Hold Box page 4 22 Specifying the Job Box from a Computer and Storing the Job 1 Click File and select Print in the application The Print dialo...

Страница 205: ...lect the creator of the document Open 2 Print the document 1 Select the document to print Print 2 Enter the password 3 Specify the number of copies to print as desired 4 Select Start Print Printing starts Upon completion of printing the Private Print job is automatically deleted Deleting the Documents Stored in the Private Print Box 1 Display the screen 1 Home key Job Box 2 Private Print Stored Jo...

Страница 206: ...tored Job Open 3 Select the creator of the document Open 2 Print the document 1 Select the document to print Print 2 Specify the number of copies to print as desired 3 Select Start Print Printing starts Deleting the Documents Stored in the Stored Job Box 1 Display the screen 1 Home key Job Box 2 Private Print Stored Job Open 3 Select the creator of the document Open 2 Delete the document 1 Select ...

Страница 207: ...y the screen 1 Home key Job Box 2 Quick Copy Proof and Hold Open 3 Select the creator of the document Open 2 Print the document 1 Select the document to print Print 2 Specify the number of copies to print as desired 3 Select Start Print Printing starts Deleting the Documents Stored in the Quick Copy Box 1 Display the screen 1 Home key Job Box 2 Quick Copy Proof and Hold Open 3 Select the creator o...

Страница 208: ...int the remaining copies use the touch panel You can change the number of copies to print 1 Display the screen 1 Home key Job Box 2 Quick Copy Proof and Hold Open 3 Select the creator of the document Open 2 Print the document 1 Select the document to print Print 2 Specify the number of copies to print as desired 3 Select Start Print Printing starts Deleting the Documents Stored in the Proof and Ho...

Страница 209: ...elect Exit in the menu to exit the Status Monitor Exit automatically The Status Monitor automatically shuts down after 7 minutes if it is not being used Quick View State The status of the printer is displayed using icons Detailed information is displayed when the Expand button is clicked Detailed information is displayed by clicking on each icon tab NOTE When you activate Status Monitor check the ...

Страница 210: ...s is displayed Select a job on the job list and it can be canceled using the menu displayed with a right click Paper Tray Status Tab Information is displayed about the paper in the printer and about the amount of paper remaining Toner Status Tab The amount of toner remaining is displayed 1 Status icon 2 Job list 1 2 ...

Страница 211: ...mand Center RX If the printer is connected to a TCP IP network and has its own IP address use a web browser to access the Command Center RX to modify or confirm the network settings This menu is not displayed when using USB connection Command Center RX User Guide Notification This sets the display of the Status Monitor Status Monitor Notification Settings page 4 26 www kyoceradocumentsolutions com...

Страница 212: ...s 1 Select Enable event notification If this setting is set to Off then the Status Monitor will not start up even when printing is executed 2 Select an event to use with the text to speech function in Available events 3 Click Sound file Text to Speech column Click the browse button to notify the event by sound file When customizing the message texts to read on the screen aloud enter the texts in t...

Страница 213: ...ith File Management Utility 5 37 Configuring Settings before Sending 5 37 Using FMU Connection to Scan an Original 5 37 Sending to Different Types of Destinations Multi Sending 5 38 Send to Me E mail 5 39 Configuring Settings before Sending 5 39 Sending a Document to the Mail Address of the Logged In User 5 39 Using a FAX Server to Send FAX Server Send 5 40 Canceling Sending Jobs 5 42 Handling Des...

Страница 214: ...dstock on the platen NOTE A5 is detected as A4 R Set the paper size to A5 by using the function key on the touch panel Original Size page 6 18 For details on Original Orientation refer to the following Original Orientation page 6 24 NOTE For the procedure for feeding envelopes or cardstock refer to the following Loading Envelopes or Cardstock in the Multipurpose Tray page 5 9 1 Put the scanning si...

Страница 215: ...nt processor open as there is a danger of personal injury IMPORTANT Do not push the document processor forcefully when you close it Excessive pressure may crack the platen glass When placing books or magazines on the machine do so with the document processor in the open position ...

Страница 216: ...h folds Straighten the folds before loading Failure to do so may cause the originals to jam Carbon paper Crumpled paper 1 Adjust the original width guides Detail Document Processor Weight 35 to 220 g m2 duplex 50 to 220 g m2 Sizes smaller than B6 R are 50 to 105 g m2 1 side duplex Sizes Maximum A3 Ledger 11 69 17 297 432 mm Long sized 11 69 86 62 297 2 200 mm to Minimum A6 R Statement R 4 13 5 82 ...

Страница 217: ...t Original size B4 Legal or more NOTE For details on Original Orientation refer to the following Original Orientation page 6 24 IMPORTANT Confirm that the original width guides exactly fit the originals If there is a gap readjust the original width guides The gap may cause the originals to jam Ensure that loaded originals do not exceed the level indicator Exceeding the maximum level may cause the ...

Страница 218: ... sheets Envelope DL Envelope C5 Envelope 10 Envelope 9 Envelope 6 3 4 Envelope Monarch Kakugata 2 Youkei 4 Youkei 2 Younaga 3 Nagagata 3 10 sheets OHP film 10 sheet Coated 10 sheets Banner paper 488 1 mm 19 22 to a maximum of 1 220 mm 48 1 sheet manual feed 10 sheets when optional banner tray is attached Index tab dividers 15 sheets IMPORTANT If you are using a paper weight of 106 g m2 or more set...

Страница 219: ...st the multipurpose tray size Paper sizes are marked on the multipurpose tray 3 Load paper Insert the paper along the paper width guides into the tray until it stops After removing new paper from its packaging fan the paper before loading it in the multipurpose tray Precaution for Loading Paper page 3 2 ...

Страница 220: ...per left over in the tray from a previous job before loading the paper If there is just a small amount of paper left over in the multipurpose tray and you want to add more first remove the left over paper from the tray and include it with the new paper before loading the paper back into the tray If there is a gap between the paper and the paper width guides readjust the guides to fit the paper in ...

Страница 221: ... 1st page is at the back 1 Oufuku hagaki Return postcard 2 Hagaki Cardstocks 3 Portrait form envelopes Open the flap 4 Landscape form envelopes Close the flap IMPORTANT Use unfolded Oufuku hagaki Return postcard How to load envelopes orientation and facing will differ depending on the type of envelope Be sure to load it in correctly otherwise printing may be done in the wrong direction or on the w...

Страница 222: ...er Load paper in the tray For the procedure for printing refer to the following Printer Driver User Guide Index paper must meet the following conditions Item Description Paper size A4 Letter Paper weight 136 to 256 g m2 Number of tabs 1 to 15 Length of tabs 30 mm or less 1 1 2 2 3 3 1 1 2 2 3 3 1 1 2 2 3 3 1 1 2 2 3 3 1 1 2 2 3 3 1 12 23 3 1 1 2 2 3 3 1 1 2 2 3 3 1 1 2 2 3 3 1 1 2 2 3 3 1 1 2 2 3 ...

Страница 223: ...y a newspaper article or other originals printed on a colored substrate This adjusts the image quality so that the color of the substrate or the text on the reverse side will not show on the copy Copying Functions Color Black White Prevent Bleed thru On Background Density Adj Auto Technical Drawing Copy Use this when you want to copy a drawing that contains shapes drawn with lines and graphics Use...

Страница 224: ...Program in the Home screen or the key of the registered program Selecting the key of the registered program will recall the program If you selected Program proceed to step 1 2 2 Select the key for the program number you want to recall Select No or the Quick No Search key on the numeric keypad to enter the program number 01 to 50 directly for recalling NOTE Up to 50 functions combining copying and ...

Страница 225: ...e key s corresponding to the program number 01 to 50 to change 2 Select Edit to change the program number and program name 3 Save Yes Deleting Programs 1 Display the screen 1 Home key Program 2 Select Edit 2 Delete the program 1 Select the key s corresponding to the program number 01 to 50 to delete 2 Delete Yes NOTE Program can be pressed in each function to call up the program registered for the...

Страница 226: ...pplication to be installed Install You can view detailed information on the selected application by selecting Detail NOTE You can install applications and certificates on the machine The number of applications you can run may vary according to the type of application Uninstalling Applications page 5 16 NOTE If the user authentication screen appears enter your login user name and login password and...

Страница 227: ...Select Yes 3 Select the application icon in the Home screen Select the application icon The application will start up NOTE To install another application repeat steps 2 3 and 2 4 To remove the USB drive select Remove USB Drive and wait until the message USB Drive can be safely removed appears Then remove the USB drive NOTE If the user authentication screen appears enter your login user name and lo...

Страница 228: ...ou need to login as an administrator or as a user with privileges to carry out this setting The factory default login user name and login password are set as shown below NOTE Select x on the screen if you want to exit the already activated application The procedure for exiting some applications may differ NOTE If the user authentication screen appears enter your login user name and login password ...

Страница 229: ...gister the shortcuts 1 Select the setting you want to add 2 Select Add Shortcut 3 Select the keys corresponding to the shortcut number 01 to 06 to register 4 Enter the shortcut name Save The shortcut is registered NOTE If you select a shortcut number already registered the currently registered shortcut can be replaced with a new one Status Cancel OK Memo Page Add Shortcut Off Layout B Original Ori...

Страница 230: ...he screen 2 Edit the shortcut 1 Select Edit 2 Select the shortcut key you want to edit 3 Select Shortcut No Change or Shortcut Name Change Change the settings OK 4 Save Yes Deleting Shortcuts 1 In the setup screen of each function select Add Shortcut in the bottom of the screen 2 Delete the shortcut 1 Select Edit 2 Select the shortcut key you want to delete Delete this Shortcut Yes ...

Страница 231: ...s To configure the settings for functions select the function key Loading Originals page 5 2 NOTE Select Preview to show a preview image Original Preview page 2 22 About Functions Available on the Machine page 6 2 Color Image Quality Org Paper Finishing Quick Setup Layout Edit Advanced Setup ID Card Copy Program 100 A4 A4 Preview Original Zoom Paper Preview Proof Copy c010101_01 Staple Punch Norma...

Страница 232: ...ob is printed If Reserve Next Priority is set to Off Reserve Next will appear Select Reserve Next and configure the necessary settings for the copy job Reserve Next Priority page 8 36 Color Image Quality Org Paper Finishing Quick Setup Layout Edit Advanced Setup Program 100 A4 A4 Preview Original Zoom Paper Preview Proof Copy c010101_04 Staple Punch Normal 0 Color Selection Paper Selection Auto Zo...

Страница 233: ...he machine and configure the copy settings 2 Select Proof Copy 3 Check Check contents and finishing Modify copy settings according to results All functions except for functions whose keys are grayed out on the touch panel can be corrected To perform a proof copy again select Proof Copy 4 Press the Start key Remaining sheets are copied Color Image Quality Org Paper Finishing Quick Setup Layout Edit...

Страница 234: ...here is a job is being scanned The copy job is canceled When there is a job printing or on standby Canceling job screen appears The current print job is temporarily interrupted Select the job you wish to cancel Cancel Yes NOTE If the machine is left unused for 60 seconds in interrupt copy mode interrupt copying is automatically cancelled and printing resumes You can change the delay until interrup...

Страница 235: ...e available Send as E mail E mail Addr Entry Sends a scanned original image as an E mail attachment Sending Document via E mail page 5 24 Send to Folder SMB Stores a scanned original image in a shared folder of any PC Sending Document to Desired Shared Folder on a Computer Scan to PC page 5 25 Send to Folder FTP Stores a scanned original image in a folder of an FTP server Sending Document to Folde...

Страница 236: ...destination E mail address OK Up to 256 characters can be entered To enter multiple destinations select Next Destination and enter the next destination Up to 100 E mail addresses can be specified You can register the entered E mail address in the Address Book by selecting Add Address Book You can also replace the information for a previously registered destination Destinations can be changed later...

Страница 237: ...er and make a note of a shared folder Configure the Windows firewall Sending Document to Desired Shared Folder on a Computer When transmitting using wireless LAN select the interface dedicated to the send function in advance Primary Network Client page 8 70 1 Home key Send 2 Place the originals 3 In the basic screen for sending select Folder Path Entry 4 Enter the destination information 1 Select ...

Страница 238: ...elected shared folder is set Select the folder from the Search Results list Character Entry Method page 11 9 Item Detail Max characters Host Name 1 1 You can also specify the port number Enter the following format separated by a colon Host name port number or IP address port number To enter the IPv6 address enclose the address in brackets Example 2001 db8 a0b 12f0 10 445 If the port number is not ...

Страница 239: ... multiple destinations select Next Destination and enter the next destination You can specify a combine total of up to 10 SMB and FTP destination folders You can register the entered information in the Address Book by selecting Add to Address Book 6 Select OK Destinations can be changed later 7 Select the functions Select tabs to display other functions 8 Press the Start key Sending starts NOTE If...

Страница 240: ...ings page 8 60 Sending Document to Folder on an FTP Server When transmitting using wireless LAN select the interface dedicated to the send function in advance Primary Network Client page 8 70 1 Home key Send 2 Place the originals 3 In the basic screen for sending select Folder Path Entry 4 Enter the destination information 1 Select FTP 2 Select the key of each item enter the destination data OK Lo...

Страница 241: ...st Name 1 1 You can also specify the port number Enter the following format separated by a colon Host name port number or IP address port number To enter the IPv6 address enclose the address in brackets Example 2001 db8 a0b 12f0 10 21 If the port number is not specified in Host Name the default port number is 21 Host name or IP address of FTP server Up to 70 characters Path 2 2 When the FTP server...

Страница 242: ...Scanning Document Using Application This subsection explains how to scan an original using TWAIN The WIA driver is used in the same way 1 Display the screen 1 Activate the TWAIN compatible application software 2 Select the machine using the application and display the dialog box 2 Configure the scan settings Select scanning settings in the dialog box that opens 3 Place the originals 4 Scan the ori...

Страница 243: ...document If a password has been set for the box the password entry screen appears Enter the password and click the OK button When you select a box the document files in the Custom Box appear in Document List 2 Set how to display the document data Click the Setting button to select each item 3 Click OK button 3 Scan the originals 1 Select the document data to be scanned from Document List Enter the...

Страница 244: ...gement Utility Scans a document using the settings of File Management Utility and saves it to a specified network folder or PC Scanning with File Management Utility page 5 37 Scanning using the FAX server A scanned original is send via a FAX server Using a FAX Server to Send FAX Server Send page 5 40 Sending to different types of destinations Multi sending Sends to different types of destination E...

Страница 245: ...en View devices and printers 2 Install the driver Click Add a device Select the machine s icon and then click Next When the machine s icon is displayed in Printers on the Devices and Printers screen the installation is completed For Windows 7 1 Display Network in the Start menu Click Start button on the Windows and then select Network NOTE To use WSD Scan confirm that the computer used for WSD sca...

Страница 246: ...rk settings select WSD Scan and go to step 4 4 Scan the originals Procedure using this machine 1 From Operation Panel Next 2 Select the destination computer OK Select Reload to reload the computer list You can view information on the selected computer by selecting Detail 3 Set the type of original file format etc as desired 4 Press the Start key Sending begins and the software installed on the com...

Страница 247: ...elow The machine is connected to an Active Directory on the network that the scan process can reference DSM Scan LDAP and HTTP are set to On in Network SSL is set to On in Network Network Authentication is set in Executing DSM Scan 1 Home key Send 2 Place the originals Protocol Settings page 8 60 Security Settings page 8 65 Enabling User Login Administration page 9 3 NOTE If the Active Directory t...

Страница 248: ...eload to reload the computer list To check the settings select Detail 6 Change the settings and add destinations as needed Only E mail addresses can be added as destinations In the send base screen select Detail Edit Destination and then Address Book or E mail Addr Entry and add a destination In some scan processes it may not be possible to change settings or add destinations 7 Press the Start key...

Страница 249: ...on you must install File Management Utility on your computer and configure settings for the multifunction machine to be used scanning conditions and the file save location To install File Management Utility refer to the following Installing Software page 2 47 Using FMU Connection to Scan an Original 1 Make sure that File Management Utility is running on the computer or server on which File Managem...

Страница 250: ...f items are restricted for the following sending options E mail Up to 100 Folders SMP FTP Total of 10 SMB and FTP i FAX Up to 100 Also depending on the settings you can send and print at the same time Procedures are the same as used in specifying the destinations of respective types Continue to enter E mail address or folder path so that they appear in the destination list Press the Start key to s...

Страница 251: ...fore Sending To use this function configure the followings To use this function the function icon must be displayed in the home screen Editing the Home Screen page 2 15 An E mail address must be set in user login for the user who logs in Adding a User Local User List page 9 8 Sending a Document to the Mail Address of the Logged In User 1 Select Home key 2 Select Send to Me E mail ...

Страница 252: ...try 2 Enter the FAX number OK Destinations can be changed later Checking and Editing Destinations page 5 47 Selecting from the Address Book 1 Select Address Book 2 Specify the destination OK Choosing from the Address Book page 5 43 Destinations can be changed later Checking and Editing Destinations page 5 47 NOTE A FAX server is required to use this function For information about the FAX server co...

Страница 253: ... the destination OK Choosing from the Address Book page 5 43 Destinations can be changed later Checking and Editing Destinations page 5 47 5 Select the functions Select tabs to display other functions Send page 6 5 6 Press the Start key Sending starts NOTE For details on the External Address Book refer to the following Command Center RX User Guide ...

Страница 254: ... send screen displayed 2 Cancel a job When there is a job is being scanned Job Cancel appears When there is a job sending or on standby Canceling job screen appears Select the job you wish to cancel Cancel Yes NOTE Selecting the Stop key will not temporarily stop a job that you have already started sending ...

Страница 255: ...Book 2 Select the destinations Select the checkbox to select the desired destination from the list The selected destinations are indicated by a checkmark in the check box To use an address book on the LDAP server select Addr Book Ext Address Book You can change the order in which the destinations are listed by selecting Name or No from the Sort Choosing from the Address Book page 5 43 Command Cent...

Страница 256: ... 4 Advanced search by destination Advanced search by type of registered destination E mail Folder SMB FTP FAX i FAX or Group FAX Only when the optional FAX Kit is installed i FAX Only when the optional Internet FAX Kit is activated You can set this function up so that destination types are selected when the address book is displayed For details refer to the following Narrow Down page 8 77 Confirma...

Страница 257: ...a Destination on One Touch Key One Touch Key page 3 40 NOTE If you entered the speed dial in 1 to 3 digit select OK Status Destination Detail Address Book Folder Path Entry E mail Addr Entry No 1 100 AAA BBB CCC DDD FFF GGG HHH III JJJ 0004 0003 0005 0001 0002 0006 0007 0008 0009 0010 1 1 i FAX Addr Entry FAX No Entry WSD Scan DSM Scan Destination EEE Detail Edit Delete Dest History Chain Direct O...

Страница 258: ...ory 2 Select the destinations Select an address from the list displayed Select of Job Type to display only selected type of jobs Select Detail to display the detailed information of the destination 3 Select OK aaa aaa com 14 47 1 2 ἣ Detail Completed Status Result User Name Destination Type Accept Time Job Type All Select a destination Destination History OK s021601 Cancel 14 45 14 40 14 28 14 27 ...

Страница 259: ...ied Select a destination and select Delete to remove the destination from the list Specifying Destination page 5 43 NOTE When selecting On for Entry Check for New Destination the confirmation screen appears Enter the same destination again and select OK Entry Check for New Dest page 8 37 When selecting On for Destination Check before Send the confirmation screen appears after pressing the Start ke...

Страница 260: ...ed destination To delete the destination select the destination you want to delete Delete Yes To add the destination select Cancel and then return to the destination screen 2 Select Check NOTE Be sure to confirm all destination by displaying them on the touch panel You cannot select Check unless you have confirmed all destination Check Cancel Status Check the destination list through the last page...

Страница 261: ...he destination list 2 Press the Start key Sending starts NOTE When the last sending included FAX folders and E mail destinations they are also displayed If necessary add or delete the destination NOTE When On is selected in Dest Check before Send a destination confirmation screen is displayed when you press the Start key Confirmation Screen of Destinations page 5 48 Recall information is canceled ...

Страница 262: ...hine How to use the FAX Function How to use the FAX Function On products with a FAX function it is possible to use the FAX function The optional FAX Kit is required in order to make use of FAX functionality FAX Operation Guide ...

Страница 263: ...m Overlay Box These Job Boxes cannot be created or deleted by a user Repeat Copy Box Repeat Copy feature stores the copied original document data in the Job Box and allows you to print additional copies later By default up to 32 documents can be stored When power is turned off all stored jobs will be deleted Outputting Repeat Copy Jobs page 5 66 Form for Form Overlay Box Image Overlay feature copi...

Страница 264: ... boxes Box List NOTE Word Excel and PowerPoint will be saved in a Microsoft Office 2007 or later file format NOTE In the following explanation it is assumed that user login administration is enabled For details on User Logon privileges refer to the following Editing Custom Box page 5 57 1 Listing the boxes by owner in alphabetical order 2 Listing the boxes by name in alphabetical order 3 Listing t...

Страница 265: ...ent 9 Listing the documents by size in ascending descending order 1 Selecting more than one document at a time 2 Highlighting a document to display its details with Detail 3 Selecting documents by checking checkboxes 4 Prints sends joins moves copies or deletes the selected documents 5 Saves the document in the open box NOTE You can select multiple documents by pressing the respective document che...

Страница 266: ...Highlight the box whose box details you wish to check and select Detail Edit 3 Check the box details To edit details select Change of the detail you wish to edit Edit the detail as desired and select OK 4 If you have changed the details select Save and then select Yes in the confirmation screen If you do not change the details select No 5 Select Close The display returns to the default Document Bo...

Страница 267: ...select any page of the open document and print send or copy to USB drive Selecting a page page 5 55 5 In multiple page documents you can use these buttons to change pages 6 In multiple page documents you can change pages by entering the desired page number NOTE Preview of the document in the USB drive is displayed in Black White even if is a color document The preview display can be controlled by ...

Страница 268: ...ly assigned Box Name Enter a box name consisting of up to 32 characters Character Entry Method page 11 9 Owner 1 Set the owner of the box Select the owner from the user list that appears Permission 2 Select whether to share the box Box Password User access to the box can be restricted by specifying a password to protect the box Entering a password is not mandatory Enter the same password of up to ...

Страница 269: ... new documents are stored To overwrite old documents select Permit To retain old documents select Prohibit Delete after Printed Automatically delete a document from the box once printing is complete To delete the document select On To retain the document select Off 1 Displayed when the user login administration is enabled 2 Not displayed when Owner is set to No Owner NOTE When you have logged in a...

Страница 270: ...tom box stores the print data which is sent from a PC For the operation of the printing from the PC refer to the following Printer Driver User Guide User Box Name Box Password Permission Auto File Deletion Overwrite Setting Delete after Printed Creating a New Custom Box page 5 56 NOTE When you have logged in as a user you can only delete a box whose owner is set to that user When you have logged i...

Страница 271: ... document was saved select Print As Is Select Start Print to start printing To change the print settings select Print after Change Settings and change the print settings After a document saved in the machine is selected the Use File Settings key may appear in the setting screen for the feature to be used To use the settings saved with the document select Use File Settings If you need to change the...

Страница 272: ...ings for functions select the function key By selecting tabs other selectable functions will be shown as a list 3 Press the Start key The original is scanned and the data is stored in the specified Custom Box Loading Originals page 5 2 Custom Box Store File Printing Send page 6 8 NOTE Enter up to 32 characters as the file name Select the Program tab when registering or recalling programs Registeri...

Страница 273: ...ing destinations refer to the following 4 Set the sending size original image etc as desired For the features that can be set refer to the following 5 Press the Start key Sending of the selected document begins NOTE If a custom box is protected by a password enter the correct password NOTE You cannot select and send multiple documents To deselect press the checkbox again and remove the checkmark N...

Страница 274: ...ress of the logged in user Send to the E mail address of the logged in user The procedure is as follows 1 Select Home key 2 Select Send to Me from BOX E mail Moving Documents in Custom Box 1 Display the screen Home key Custom Box Select the box Open 2 Move the documents 1 Select the document in the list that you want to move by selecting the checkbox The document is marked with a checkmark 2 Move ...

Страница 275: ...e key Custom Box Select the box Open 2 Copy the documents 1 Select the document in the list that you want to copy by selecting the checkbox The document is marked with a checkmark 2 Move Copy Copy to USB Drive Next select the destination of copy Next Copy OK The selected document is copied NOTE If a custom box is protected by a password enter the correct password NOTE To deselect select the checkb...

Страница 276: ...joined Highlight the document you want to rearrange and select Up or Down to move it to the correct place in the sequence 4 Next File Name Enter the file name for the joined document OK 5 Join Yes The documents are joined NOTE You can only join a document to other documents in the same custom box If necessary move the documents to be joined beforehand NOTE If a custom box is protected by a passwor...

Страница 277: ... 2 Delete the document 1 Select the document in the list that you want to delete by selecting the checkbox The document is marked with a checkmark 2 Delete Yes The document is deleted NOTE If a custom box is protected by a password enter the correct password NOTE Delete is disabled until a document is selected To deselect select the checkbox again and remove the checkmark ...

Страница 278: ...nt to print Print If the document is protected by a password enter the password using the numeric keys 2 Specify the number of copies to print as desired Start Print Printing begins The Repeat Copy box job will be deleted when the power switch is turned off Form for Form Overlay Image Overlay feature copies the original document overlaid with a form or image This Job Box is used to store the forms...

Страница 279: ...hine Job Box Deleting a Form Stored You can delete the form stored in the job box 1 Display the screen 1 Home key Job Box 2 Form for Form Overlay Open 2 Delete the forms Select the form to delete Delete Yes The form is deleted ...

Страница 280: ... image files in USB drive connected to the machine The following file types can be stored PDF file format TIFF file format JPEG file format XPS file format OpenXPS file format High compression PDF file format Word file format Excel file format PowerPoint file format Printing Documents Stored in Removable USB Drive 1 Plug the USB drive 1 Plug the USB drive into the USB Memory Slot NOTE Word Excel a...

Страница 281: ...or the features that can be selected refer to the following 4 Press the Start key Printing of the selected file begins NOTE If the message does not appear select USB Drive on the Home screen NOTE 1 000 documents can be displayed To return to a higher level folder select Up USB Drive Store File Printing Documents page 6 14 NOTE After a document saved in the machine is selected Use File Settings may...

Страница 282: ... USB drive USB Drive is recognized Displaying files Are you sure may appear Select Yes to display the USB Drive screen Displays the USB Drive screen 3 Store the document 1 Select the folder where the file will be stored Open 2 Select Store File NOTE The maximum number of the storable files is 1 000 Loading Originals page 5 2 NOTE If the message does not appear select USB Drive on the Home screen N...

Страница 283: ...n 1 In the USB Drive screen select USB Drive Information 2 Once you confirm the information select Close Removing USB Drive 1 Display the screen Home key USB Drive 2 Select Remove USB Drive Select OK and remove the USB drive after USB Drive can be safely removed is displayed USB Drive Store File Printing Documents page 6 14 IMPORTANT Be sure to follow the proper procedure to avoid damaging the dat...

Страница 284: ...starts up 2 Use the browser screen to browse web pages For information on how to use the browser screen refer to the following 3 To exit the browser select X Close and then select Yes in the exit confirmation screen NOTE To use the internet browser Internet Browser Setting must be set to On in Internet Internet page 8 85 Using the Browser Screen page 5 73 NOTE You can specify preferences such as t...

Страница 285: ...ternet Retrieval in page Displays a search menu in which you can select Retrieval in page or an Internet search site Search Internet Use the selected search site to search with the entered keyword Retrieval in page Search from the entered keyword in the currently displayed page You can continue your search by selecting SearchUp or SearchDown 10 Menu Displays the browser setup menu You can use this...

Страница 286: ...optional Document Finisher 4 000 sheet Finisher page 11 25 100 sheet Staple Finisher page 11 26 If there are no staples when manual stapling is performed the stapling position lamps and stapling position key LEDs all blink Add staples Replacing Staples 4 000 sheet Finisher page 10 14 Replacing Staples 100 sheet Staple Finisher page 10 16 Manual stapling cannot be executed when the machine is in op...

Страница 287: ...aple the paper Let go of the paper and then press the stapling key Stapling starts Stapling finishes and the output is delivered to tray Finishing the manual staple mode Press the stapling position key several times until the stapling position lamps turn off The shutter of the paper exit area closes It means that manual stapling is finished If no operation is performed for approx 10 seconds the ma...

Страница 288: ...lors 6 43 Zoom 6 43 Combine 6 46 Margin Centering Margin Centering 6 48 Border Erase Border Erase Full Scan 6 49 Booklet 6 51 Duplex 6 54 Cover 6 57 Form Overlay 6 58 Erase Shadowed Areas 6 59 Page 6 60 Insert Sheets Chapters 6 62 Memo Page 6 63 Poster 6 64 Image Repeat 6 65 Text Stamp 6 66 Bates Stamp 6 69 Continuous Scan 6 72 Auto Image Rotation 6 72 Negative Image 6 73 Mirror Image 6 73 Job Fin...

Страница 289: ...et in the document processor all at once page 6 21 Original Orientation Select the orientation of the original document top edge to scan correct direction page 6 24 Fold Fold the finished documents page 6 25 Collate Offset Offsets the output by page or set page 6 26 Staple Punch Staples or punches printed documents page 6 27 Paper Output Specify the output tray page 6 31 ID Card Copy Use this when...

Страница 290: ...u Hides background colors and image bleed through when scanning thin original page 6 42 Contrast You can adjust the contrast between light and dark areas of the image page 6 40 Trapping Remove hollow spaces in text and on images page 6 42 Erase Colors Erases colors in the source document page 6 42 Configure the settings for duplex printing and stamp Zoom Adjust the zoom to reduce or enlarge the im...

Страница 291: ...tinuous Scan Scans a large number of originals in separate batches and then produce as one job page 6 72 Auto Image Rotation When original and paper source size are the same but their orientation is different rotate image 90 degrees when copying page 6 72 Negative Image Inverts black and white portions of the image for printing page 6 73 Mirror Image Copies the mirrored image of the original page ...

Страница 292: ...entation Select the orientation of the original document top edge to scan correct direction page 6 24 Sending Size Select size of image to be sent page 6 79 File Format Specify the image file format Image quality level can also be adjusted page 6 80 File Separation Creates several files by dividing scanned original data page by specified number of pages and sends the files page 6 85 Long Original ...

Страница 293: ...AX Refer to the FAX Operation Guide Color Selection Select the color mode setting page 6 35 Sharpness Adjusts the sharpness of image outlines page 6 40 Background Density Adj Removes dark background from originals such as newspapers page 6 41 Prevent Bleed thru Hides background colors and image bleed through when scanning thin original page 6 42 Contrast You can adjust the contrast between light a...

Страница 294: ... when sending a document by i FAX Refer to the FAX Operation Guide FAX Direct Transmission Sends FAX directly without reading original data into memory Refer to the FAX Operation Guide FAX Polling RX Dial the destination and receive documents for Polling Transmission stored in the polling box Refer to the FAX Operation Guide Send and Print Prints a copy of the document being sent page 6 86 Send an...

Страница 295: ... 88 Prevent Bleed thru Hides background colors and image bleed through when scanning thin original page 6 42 Density Adjust density page 6 32 Original Image Select original image type for best results page 6 33 Scan Resolution Select fineness of scanning resolution page 6 85 Color Selection Select the color mode setting page 6 35 Sharpness Adjusts the sharpness of image outlines page 6 40 Backgrou...

Страница 296: ...te It is also available that send a notice when a job is interrupted page 6 73 File Name Entry Adds a file name page 6 74 Erase Shadowed Areas When scanning with the document processor open erase the extra shaded area page 6 59 Skip Blank Page When there are blank pages in a scanned document this function skips the blank pages and stores only pages that are not blank page 6 77 Contrast You can adj...

Страница 297: ...6 51 Duplex Prints 1 sided or open book originals to 2 sided or 2 sided or open book originals to 1 sided page 6 54 Cover Adds a cover to the finished documents page 6 57 Form Overlay Prints the original document overlaid with a form or image page 6 58 Page Adds page numbers to the finished documents page 6 60 Job Finish Notice Sends E mail notice when a job is complete It is also available that s...

Страница 298: ... in text and on images page 6 42 Configure the settings for density quality of copies and color balance Density Adjust density page 6 32 Original Image Select original image type for best results page 6 33 Color Selection Select the color mode setting page 6 35 Sharpness Adjusts the sharpness of image outlines page 6 40 Background Density Adj Removes dark background from originals such as newspape...

Страница 299: ...a job is interrupted page 6 73 File Name Entry Adds a file name page 6 74 E mail Subject Body Adds subject and body when sending a document page 6 86 i FAX Subject Body Adds subject and body when sending a document by i FAX Refer to the FAX Operation Guide FTP Encrypted TX Encrypts images when sending via FTP page 6 87 Delete after Transmitted Automatically deletes a document from the box once tra...

Страница 300: ...lution page 6 85 Color Selection Select the color mode setting page 6 35 Sharpness Adjusts the sharpness of image outlines page 6 40 Background Density Adj Removes dark background from originals such as newspapers page 6 41 Prevent Bleed thru Hides background colors and image bleed through when scanning thin original page 6 42 Contrast You can adjust the contrast between light and dark areas of th...

Страница 301: ...n scanning thin original page 6 42 Density Adjust density page 6 32 Original Image Select original image type for best results page 6 33 Scan Resolution Select fineness of scanning resolution page 6 85 Color Selection Select the color mode setting page 6 35 Sharpness Adjusts the sharpness of image outlines page 6 40 Background Density Adj Removes dark background from originals such as newspapers p...

Страница 302: ...unction skips the blank pages and stores only pages that are not blank page 6 77 Contrast You can adjust the contrast between light and dark areas of the image page 6 40 Text Stamp You can add a text stamp on the documents page 6 66 Bates Stamp You can add a bates stamp on the documents page 6 69 File Format Specify the image file format Image quality level can also be adjusted page 6 80 File Sepa...

Страница 303: ...n a job is complete It is also available that send a notice when a job is interrupted page 6 73 Priority Override Suspends the current job and gives a new job top priority page 6 74 EcoPrint EcoPrint saves toner when printing Use this function for test prints or any other occasion when high quality print is not required page 6 34 Fold Fold the finished documents page 6 25 Text Stamp You can add a ...

Страница 304: ... use the function Access to the function is indicated by icons Example Select the Org Sending Data Format tab in the Send screen to use the function Access to the function is indicated by icons Example Select the Functions tab in the Custom Box screen to use the function Access to the function is indicated by icons Example Select the Functions tab in the USB Drive screen to use the function Copy O...

Страница 305: ...K 216 340 mm Others Hagaki Cardstock Oufuku hagaki Return postcard Custom 1 to 4 1 1 For instructions on how to specify the custom original sizes Custom 1 to 4 refer to the following Custom Original Size page 8 11 Select from postcard or the custom sized originals Size Entry Metric X 50 to 432 mm in 1 mm increments Y 50 to 297 mm in 1 mm increments Enter the size not included in the standard sizes...

Страница 306: ...K Select from standard sizes except Standard Sizes 1 Inch models A3 1 2 A4 R 1 2 A4 1 2 A5 R 1 2 A6 R 1 2 B4 1 2 B5 R 1 2 B5 1 2 B6 R 1 2 Folio 1 2 8K 16K R 16K 216 340 mm Others 1 ISO B5 Envelope 10 Envelope 9 Envelope 6 Envelope Monarch Envelope DL Envelope C5 Envelope C4 Hagaki Cardstock 2 Oufuku Hagaki Return postcard Kakugata 2 Youkei 4 Youkei 2 Younaga 3 Nagagata 3 Select from special standa...

Страница 307: ...ected Note that if MP Tray is pressed at this point the settings will be canceled NOTE You can conveniently select in advance the size and type of paper that will be used often and set them as default MP Tray Setting page 8 8 If the specified size of paper is not loaded in the paper source cassette or multipurpose tray a confirmation screen appears When Auto is selected and the same size of paper ...

Страница 308: ...idth of set original Top Page Direction Long Edge Left Short Edge Left Select the original orientation of the first page Item Value Description Off Mixed Size Copies Originals are detected individually for size and copied to the same size paper as originals Same Size Copies Top Page Direction Long Edge Left Short Edge Left Select the original orientation of the first page Item Value Description Mi...

Страница 309: ...ns of originals are as follows A3 B4 A4 B5 B4 A4 R B5 A4 R B5 R Folio Example A3 B4 A4 B5 Item Value Description Off Mixed Size Originals Same Width Scans and stores multiple sheets of the same width using the document processor Different Width Scans and stores multiple sheets of different width using the document processor NOTE When mixing the original sizes as using the following combination mak...

Страница 310: ...that can be placed in the document processor up to 30 sheets When mixing the original sizes as using the following combination make sure to set Auto Detect Original Size to On for Folio A4 R B5 R and Folio Auto Detect Original Size page 8 13 IMPORTANT When placing originals of different width arrange the originals so that their left sides and top sides are aligned and place the originals in alignm...

Страница 311: ...tapling Punch optional feature 2 sided Book Original Text Stamp Bates Stamp NOTE If On is selected in the setting for Original Orientation in System Menu the selection screen for original orientation appears when you select any of the above functions Orientation Confirmation page 8 19 Item Image Top Edge on Top Top Edge on Left Auto NOTE The default setting for Original Orientation can be changed ...

Страница 312: ...h Tri Fold Inside R to L B to T L to R T to B Outside R to L B to T L to R T to B NOTE Folding requires the optional 4 000 sheet Finisher or 100 sheet Staple Finisher and the folding unit For details on paper sizes and numbers of sheets that can be folded refer to the following Folding Unit For 4 000 sheet Finisher page 11 27 Folding Unit For 100 sheet Staple Finisher page 11 28 Copy Org Paper Fin...

Страница 313: ...must be loaded in a different orientation in a different paper tray The paper sizes supported in Offset A4 B5 Letter and 16K 1 If Off is selected for Collate setting Each Page appears When On is selected Each Set appears With Document Finisher Option Printed copies are segregated after each set of copies or after each page 1 NOTE The optional Document Finisher is required 4 000 sheet Finisher page...

Страница 314: ...he staple position For details on original orientation and staple position refer to the following Original Orientation and Punch Hole Position page 6 30 Top Right 2 staples Left 2 staples Top 2 staples Right Saddle Stitch Select whether to fold the finished documents in two with staples in the center When placing originals be sure to place the cover page at the bottom For details on saddle stitchi...

Страница 315: ...and Letter R 8K and 16K Original orientation Paper orientation Top Edge on Left Paper orientation Cassette paper load direction Cassette paper load direction NOTE One position staple is not slanted for the following paper sizes B5 R 16K R NOTE Number of sheets that can be stapled up to 30 sheets When performing Mixed Size Stapling refer to the following Mixed Size Originals page 6 21 A3 A4 B4 B5 L...

Страница 316: ... punching Item Value Description Punch Off 2 holes Left Select the position of punch holes For details on original orientation and position of punch holes refer to the following Original Orientation and Punch Hole Position page 6 30 2 holes Top 2 holes Right 3 holes Left 3 holes Top 3 holes Right 4 holes Left 4 holes Top 4 holes Right Original Orientation Top Edge on Top Top Edge on Left Auto Sele...

Страница 317: ...ginal Orientation and Punch Hole Position Image Original orientation Original Print results Glass platen Document processor NOTE The inch model provides two hole and three hole punching The metric model provides two hole and four hole punching ...

Страница 318: ...her Tray C Delivery to the Tray C of the optional Document Finisher Item Description Right Tray Outputs to the Right Tray of the machine Tray A Delivery to the Tray A of the optional Document Finisher Tray B Delivery to the Tray B of the optional Document Finisher Tray C Delivery to the Tray C of the optional Document Finisher Tray 1 to 7 Delivery to tray 1 to 7 tray 1 is the uppermost tray of the...

Страница 319: ...rance card When you scan the front and back of the card both sides will be combined and copied onto a single sheet Value Off On Density Adjust density Value 4 Lighter to 4 Darker Copy Org Paper Finishing Copy Color Image Quality Send Color Image Quality Custom Box Functions Color Image Quality USB Drive Functions ...

Страница 320: ...st for photos printed in a magazine etc Photo Paper Best for photos taken with a camera Text Light Text Fine Line Off Best for documents that are mostly text and were originally printed on this machine On Sharply renders pencil text and fine lines Highlighter Enhancement Off On Normal On Bright Select On Normal to reproduce the color of the text and markings made with highlighter pen If the colors...

Страница 321: ...est for photos taken with a camera Text 1 1 The setting for OCR can be configured When Text OCR is selected scanning produces an image that is suitable for OCR This function is only available when Color Selection is set to Black and White Color Selection page 6 35 Sharply renders pencil text and fine lines Select Text Text Fine Line or Text OCR Highlighter Enhancement Off On Normal On Bright Selec...

Страница 322: ...lor Color Gray 1 1 Not displayed when printing from USB drive The color of the stored document is automatically detected A color document is printed in full color and a black white document is printed in grayscale Auto Color Color B W 1 The color of the stored document is automatically detected A color document is printed in full color and a black white document is printed in black white Full Colo...

Страница 323: ... Automatically recognizes whether the document is color or black and white and scan color documents in Full Color and black and white documents in Black and White Full Color Scans the document in full color Grayscale Scans the document in grayscale Produces a smooth detailed image Black White Scans the document in black and white Item Value Description Off On Cyan 5 to 5 Select or on each side of ...

Страница 324: ...adjust the hue Individual Select individual colors to adjust the hue Select Red Magenta Blue Yellow Green or Cyan and then select or to adjust the hue NOTE This feature is used with full color and auto color copying These adjustments are especially useful on rich color images Copy Color Image Quality Custom Box Functions When adjusting yellow to more green blue to more magenta the part Original Wh...

Страница 325: ...color Item Before After Description Off Portrait Photo Color Shade Portrait 1 Gives skin color a warm rosy look Portrait 2 Gives skin color a tanned look Portrait 3 Gives skin color a whiter look Landscape Photo Blue Color Shade Blue 1 Makes blue more vivid Blue 2 Makes blue a true blue without any green Blue 3 Gives blue a greenish emerald green tint Landscape Photo Green Color Shade Green 1 Make...

Страница 326: ...ases contrast for a more pronounced image Smooth Reduces contrast for a softer image Light Makes overall color lighter and less vivid for a bright and light feel Dark Makes overall color darker for a heavier feel NOTE Select from one of the 9 available One Touch Image Adjust types Multiple selections are not possible Item Before After Description ...

Страница 327: ...ontrast You can adjust the contrast between light and dark areas of the image Item Value Description All 1 to 3 Sharpen Emphasizes the image outline 1 to 3 Blur Blurs the image outline Can weaken a Moire 1 effect 1 Patterns that are created by irregular distribution of halftone dots Text Fine Line 0 to 3 Normal Sharpen Makes letters and lines appear sharper Only text and fine lines are emphasized ...

Страница 328: ...to Automatically adjusts the background density based on the original Manual Select 1 to 5 Lighter Darker to adjust the background density manually NOTE This feature is used with full color and auto color Saturation is disabled if Auto Color detects black and white originals Item Description 1 to 3 Grayish Results in paler color 1 to 3 Vivid Results in more vivid color Copy Color Image Quality Sen...

Страница 329: ...or drift IMPORTANT Before setting Trapping execute calibration Set Trapping only if blank areas are not improved Calibration page 10 60 If Trapping is set the outline may be highlighted Item Value Description Off On Light Medium Heavy Set Trapping Level A higher level eliminates more blank areas Copy Color Image Quality Send Color Image Quality Custom Box Functions Color Image Quality USB Drive Fu...

Страница 330: ...cription Off On Yellow Red Cyan Magenta Green Blue Black Select the colors to erase You can select up to 6 colors Color Range 1 Narrower to 5 Wider Choose a range of colors to erase If you select 5 Wider and specify yellow greens close to yellow and even reds will also be erased NOTE If you select only Black you cannot set the Color Range Copy Color Image Quality Send Color Image Quality Custom Bo...

Страница 331: ...50 25 Min 25 to 400 in 1 increments Select a preset ratio Select Auto to use Auto Zoom Select or to change the displayed magnification as desired Select Keys to use the numeric keys for entry Metric Asia Pacific Auto 400 Max 200 A5 A3 141 A4 A3 B5 B4 122 A4 B4 A5 B5 115 B4 A3 B5 A4 100 86 A3 B4 A4 B5 81 B4 A4 B5 A5 70 A3 A4 B4 B5 50 25 Min 25 to 400 in 1 increments Inch Auto 400 Max 200 STMT Ledge...

Страница 332: ...ect the orientation of the original document top edge to scan correct direction Select Original Orientation to choose orientation of the originals either Top Edge on Top or Top Edge on Left Then press OK Item Description 100 Reproduces the original size Auto Reduces or enlarges original to sending storing size NOTE To reduce or enlarge the image select the paper size sending size or storing size P...

Страница 333: ...nal document top edge to scan correct direction Select Original Orientation to choose orientation of the originals either Top Edge on Top or Top Edge on Left Then select OK 4 in 1 Layout Right then Down Left then Down Down then Right Down then Left Select the page layout of scanned originals Border Line None Solid Line Dotted Line Positioning Mark Select the boundary line type Select Border Line t...

Страница 334: ... Right then Down Left then Down Down then Right Down then Left NOTE The paper sizes supported in Combine mode A3 A4 R A4 A5 R B4 B5 R B5 Folio 216 340 mm Ledger Letter R Letter Legal Statement R Oficio II 8K 16K R and 16K When placing the original on the platen be sure to copy the originals in page order ...

Страница 335: ...is selected an appropriate margin is applied automatically on the rear page depending on a margin specified for the front page and a binding orientation When Manual is set you can set a different margin than the front on the back Set the margin in the screen that is displayed The setting selections are the same as for the front Original Orientation Top Edge on Top Top Edge on Left Auto Select the ...

Страница 336: ... Full Scan Border Erase Sheet Border Erase Book Individual Border Erase Erase the black frame created in the original Erasing width is fixed Scan originals without white margins No border erase Erase the black frame created in the original Erasing width can be adjusted Erases black borders around the edges and in the middle of the original such as a thick book You can specify the widths individual...

Страница 337: ...e as Front Page or Do Not Erase Border Erase Book Border Metric 0 mm to 50 mm in 1 mm increments Inch 0 00 to 2 00 in 0 01 increments Set the border erase width 2 Set the value by selecting or Select Keys to use the numeric keys for entry Gutter Back Page Same as Front Page Do Not Erase For 2 sided originals select Back Page and then select Same as Front Page or Do Not Erase Individual Border Eras...

Страница 338: ...g NOTE Using the optional 4 000 sheet Finisher and the folding unit enables you to saddle stitch your copies fold them in two with staples in the center Supported paper sizes are A3 A4 R B4 Ledger Letter R Legal Oficio II and 8K Type of original Original size Paper size One sided original Two sided original All 1 1 Except for custom sized originals A3 A4 R A4 B4 B5 R B5 Ledger Letter R Letter Lega...

Страница 339: ... to choose orientation of the originals either Top Edge on Top or Top Edge on Left Then press OK 2 sided Booklet Original Binding Left Right Binding Top Select the binding direction of originals Finishing Binding Left Binding Right Binding Top Select the binding orientation of copies Cover Off Cover Front Cover Print Setting Not Print Front Only Back Only Duplex Select whether to add the cover Sel...

Страница 340: ...ng Not Print Front Only Back Only Duplex Select whether to add the cover Select the printing method for the cover to be inserted Select Cover and then Cover and specify the print setting for the cover to be inserted Select from Not Print Back Only Front Only and Duplex and press OK Cover Back Cover Print Setting Not Print Front Only Back Only Duplex Staple Fold Off Fold Only Saddle Stitch To fold ...

Страница 341: ...nd on the top edge facing the same orientation when turning the pages Copies each side of a two sided original onto two individual sheets Place originals in the document processor The following binding options are available Binding Left Right Images on the second sides are not rotated Binding Top Images on the second sides are rotated 180 degrees Produces two sided copies from two sided originals ...

Страница 342: ...ook to One sided mode A4 R A4 B5 R B5 Letter R Letter 16K R and 16K Produces two sided copies from an open book original with facing pages NOTE The original sizes supported in Book to Two sided mode A3 A4 R A5 R B4 B5 R Ledger Letter R and 8K The paper sizes supported in Book to Two sided mode A4 R A4 A5 B5 R B5 Letter R Letter 16K R and 16K Item Value Description 1 sided 1 sided Disables the func...

Страница 343: ...ing Binding Left Right Binding Top Select the binding orientation of copies Original Orientation Top Edge on Top Top Edge on Left Auto Select the orientation of the original document top edge to scan correct direction Select Original Orientation to choose orientation of the originals either Top Edge on Top or Top Edge on Left Then select OK Book 1 sided 1 Original Binding Left Binding Right Select...

Страница 344: ...ver Item Value Description Off Front Cover Not Print Front Only Back Only 1 Duplex 1 1 This item appears when finishing is set to 2 sided in Duplex Duplex page 6 54 Different paper has to be inserted for the first page of the document Select Stop Printing Front Only Back Only or Duplex for the print setting of the inserted paper Front and Back Covers Front Cover Print Setting Not Print Front Only ...

Страница 345: ...al Image The form is placed on top of the document Original Image on Form The form is placed under the document Select Form 1 1 Form must be previously registered in Job Box Form for Form Overlay page 5 66 Select the form to be overlaid from Document Box Select Select Form to display the Document Box that store documents which can be used as a form Select the desired form from the list and select ...

Страница 346: ...canning with the document processor open erase the extra shaded area Value Off On NOTE In case the document processor is not opened sufficiently it might not be able to erase the shaded area Copy Layout Edit Send Advanced Setup Custom Box Functions USB Drive Functions ...

Страница 347: ... Detail to specify the detailed page number position using numeric values and to set the page number position Same as Front Page Mirror Front Page when a page number is placed on the back side of the paper in duplex printing 1st Page 1 to 10 To start page numbering from a page other than the first page select or in 1st Page to specify the starting page Select Keys to use the numeric keys for entry...

Страница 348: ...king the checkbox Font Courier Letter Gothic Set the font of page number Color Black Red Green Blue Cyan Magenta Yellow White Set the color of page number Density 10 to 100 in 10 increments Set the density of the color of page number Set the value by selecting or Display Pattern Transparent Clipping Overwrite Set the display method of page number Denominator 2 Auto Manual 1 to 999 The total number...

Страница 349: ...e tray Select the source of the paper for the separator Chapter Chapter Page 2 to 998 Enter the page numbers of the original document where you want to insert the chapters Select or to enter the page number Select Keys to use the numeric keys for entry Edit Change the configuration of the chapter page and separator The method of operation is the same as that of a new addition Delete Delete the pag...

Страница 350: ... the other half blank for notes Reduces images of two original pages for printing onto half of a page leaving the other half blank for notes Item Value Description Off Layout A Layout Left Top Right Bottom Select how to lay out the pages of scanned original Border Line None Solid Line Dotted Line Positioning Mark Select the boundary line type Select Border Line to select the page boundary line and...

Страница 351: ...t Auto Select the orientation of the original document top edge to scan correct direction Select Original Orientation to choose orientation of the originals either Top Edge on Top or Top Edge on Left Then select OK Item Value Description Off Copy Size Metric A0 A1 A2 Inch 34 44 22 34 17 22 Metric Select A0 A1 or A2 as finish size Copy is enlarged according to the selected paper size Inch Select 34...

Страница 352: ...t units can be changed in System Menu Measurement page 8 15 To set the area of the original to be repeated select On for Specify Repeat Area Select or to input the area of the original to be repeated Select Keys to use the numeric keys for entry Y1 Length from top left of platen to top edge of repeat area X1 Length from top left of platen to left edge of repeat area Y2 Height of repeat area X2 Wid...

Страница 353: ...tes refer to the following Text Text Stamp page 8 24 Stamp Method Each Print Page Each Original Page Select the stamp method Select Stamp Method and set the stamp method for text stamp Position Top Left Top Middle Top Right Middle Left Center Middle Right Bottom Left Bottom Middle Bottom Right Detail Set the stamp position to be printed Select Position and select the text stamp position Select Det...

Страница 354: ...Font Courier Letter Gothic Set the font of text stamp Color Black Red Green Blue Cyan Magenta Yellow White Set the color of text stamp Density 10 to 100 in 10 increments Set the density of text stamp color Set the value by selecting or Display Pattern Transparent Clipping Overwrite Set the display method of text stamp Original Orientation Top Edge on Top Top Edge on Left Auto Select the orientatio...

Страница 355: ...p angle Font Size Registered font sizes are displayed For details on registering font sizes refer to the following Font Text Stamp page 8 24 Set the font size of text stamp Character Border Off Circle Rectangle Underline Set the character border and underline Style None Bold Italic Bold Italic Set the font style of text stamp Select a font style by checking the checkbox Font Courier Letter Gothic ...

Страница 356: ... MM DD to set the date format To set Numbering select Numbering Default and set the starting sequence number 1 to 9999999 If you select Fixed Digit Number On you can set the number of digits of the serial number 1 to 7 digits Position Top Left Top Middle Top Right Middle Left Center Middle Right Bottom Left Bottom Middle Bottom Right Detail Set the stamp position to be printed Select Position and ...

Страница 357: ... stamp Color Black Red Green Blue Cyan Magenta Yellow White Set the color of the bates stamp Density 10 to 100 in 10 increments Set the density of bates stamp color Set the value by selecting or Display Pattern Transparent Clipping Overwrite Set the display method of the bates stamp Original Orientation Top Edge on Top Top Edge on Left Auto Select the orientation of the original document top edge ...

Страница 358: ...ition to be printed Select Position and select the bates stamp position Select Detail to specify the stamp position using numeric values Font Size Registered font sizes are displayed For details on registering font sizes refer to the following Font Bates Stamp page 8 24 Set the font size of bates stamp Style None Bold Italic Bold Italic Set the font style of bates stamp Select a font style by chec...

Страница 359: ...ginal and the loaded paper matches but the orientations are different Value Off On Item Description Next Copy On Back In duplex copying prints on the back side if the next page is to be printed on the front side Select Next Copy On Back to use this function Next Copy On Front In duplex copying prints on the front side if the next page is to be printed on the back side Select Next Copy On Front to ...

Страница 360: ...a single destination It will be possible to download the scan data in PC from the stored URL described in the text of the notice E mail of Job Finish Notice for Send to Folder SMB FTP or Storing Documents to a Custom Box This is a useful function in case if it is not possible to send receive a large amount of scan data due to the restriction of the mail attachment file size Item Description Off Ad...

Страница 361: ...a new job top priority The suspended job resumes after the other job is finished Value Off On Address Entry Enter E mail address directly Select E mail Address enter the address up to 256 characters and select OK Notify when interrupted Add a check mark if you require an e mail notification when a job is interrupted NOTE This function is not available if current job was an override Priority overri...

Страница 362: ...bs to retain in the document box is set to 0 zero this function cannot be used Repeat Copy Job Retention page 8 42 You can select Repeat Copy as the default setting Repeat Copy page 8 22 Giving a file name to a copy job will facilitate identification of the data when copying File Name Entry page 6 74 Repeat Copy The Repeat Copy jobs are stored in the Job Box Refer to Outputting Repeat Copy Jobs to...

Страница 363: ...tically set to Transparency If the optional 100 sheet Staple Finisher or 4 000 sheet Finisher is installed you may need to specify the output destination for finished copies Paper Output page 6 31 Outputs a blank backing sheet after printing to a transparency denotes transparency After printing to a transparency copies the same original image to the backing sheet paper denotes transparency IMPORTA...

Страница 364: ...aracters The machine detects blank pages saving unnecessary printing without the need to check for blank pages in the document Select Blank Pages Ruled Lines Blank Pages Only or Blank Pages Some Text in On Item Description Speed Priority Gives priority to scanning speed Quality Priority Gives priority to image quality at a slightly slower scan speed NOTE The originals with punched holes or origina...

Страница 365: ...Top Edge on Top Top Edge on Left Auto Select the orientation of the original document top edge to scan correct direction Select Original Orientation to choose orientation of the originals either Top Edge on Top or Top Edge on Left Then select OK Book 1 1 Top Edge on Top is set for Original Orientation Binding Binding Left Binding Right Select the binding orientation of originals Value Image 2 side...

Страница 366: ... Size or Standard Size Standard Sizes 2 Metric models Ledger Letter Legal Statement 11 15 Oficio II 8K 16K Inch models A3 A4 A5 A6 B4 B5 B6 Folio 8K 16K 216 340 mm Select from standard sizes except Standard Sizes 1 Others Hagaki Cardstock Oufuku hagaki Return postcard Select from Hagaki Cardstock Original size and sending size are the same different Original Size page 6 18 Specify as necessary Spe...

Страница 367: ...olor Grayscale Auto Color Color Black and White Full Color Grayscale Black and White TIFF JPEG Auto Color Color Grayscale Full Color Grayscale XPS Auto Color Color Grayscale Auto Color Color Black and White Full Color Grayscale Black and White OpenXPS High Comp PDF 1 2 Compression Ratio Priority Standard Quality Priority Auto Color Color Grayscale Auto Color Color Black and White Full Color Graysc...

Страница 368: ...uage page 8 21 If you do not set an original in the correct orientation the text of the document may not be recognized as characters In addition it may take some time to create the file Check the following The original orientation is correct When setting the originals with the mixed orientation at once On is selected for Auto Image Rotation If you frequently use the originals with the mixed orient...

Страница 369: ...for confirmation and select OK Password to Edit Print Document Off On Enter the password to edit the PDF file Select On enter a password up to 256 characters and then select Next Enter the password again for confirmation and select OK When you have entered the password and selected Detail to edit print document you can specifically limit the operation Printing Allowed Not Allowed Allowed Restricts...

Страница 370: ... and select OK When you have entered the password and selected Detail to edit print document you can specifically limit the operation Printing Allowed Not Allowed Disables the printing of PDF file Allowed Low Resolution only Can print the PDF file only in low resolution Allowed Can print the PDF file in original resolution Changes Allowed Not Allowed Disables the change to the PDF file Inserting D...

Страница 371: ...de from the table below OK 3 Press the Start key NOTE The scanned result may not be realized perfectly according to condition of the documents NOTE When you select Off the documents are converted into the Microsoft Office data scanned image Item Description Text Graphics Converts the scanned documents into the editable and searchable Microsoft Office data format Text Graphics w Scan Image Converts...

Страница 372: ... On Set file separation Select or to specify the number of pages Select Keys to use the numeric keys for entry Attach File to E mail All Files in 1 E mail 1 file per E mail Select how to attach the files to the E mail Select All files in 1 E mail to attach and send all files in a single E mail Select 1 file per E mail to attach and send 1 file per E mail NOTE The larger the number the better the i...

Страница 373: ... 256 characters and the body can include up to 500 characters Select Body 1 Body 2 or Body 3 to enter stored text for the body text For details on registering templates refer to the following E mail Subject Body page 8 21 NOTE When On is selected select the Custom Box in which the copy is to be stored If a password entry screen for the Custom Box appears enter the password You can view information...

Страница 374: ...er Printed Automatically deletes a document from the box once printing is complete Value Off On Delete after Transmitted Automatically deletes a document from the box once transmission is complete Value Off On NOTE Click Security Settings and then Network Security in the Command Center RX Be sure that SSL of Secure Protocol Settings is On and one or more effective encryption are selected in Client...

Страница 375: ...Oficio II 8K 16K Inch models A3 A4 A5 A6 B4 B5 B6 Folio 8K 16K 216 340 mm Select from standard sizes except Standard Sizes 1 Others Hagaki Cardstock Oufuku hagaki Return postcard Select from Hagaki Cardstock Original Size and the size you wish to store as are the same different Original Size page 6 18 Specify as necessary Specify as necessary Storing Size Select Same as Original Select the desired...

Страница 376: ... enlarges the image size to fit to the selected paper size when printing XPS file Value Off On NOTE For details on entering the password refer to the following Character Entry Method page 11 9 Item Description Paper Size Fits the image size to the selected paper size Image Resolution Prints at resolution of the actual image Print Resolution Fits the image size to the print resolution USB Drive Fun...

Страница 377: ... of Jobs 7 8 Checking Job History 7 9 Checking the Detailed Information of Histories 7 10 Sending the Log History 7 10 Job Operation 7 11 Pause and Resumption of Jobs 7 11 Canceling of Jobs 7 11 Priority Override for Waiting Jobs 7 11 Reordering Print Jobs 7 12 Device Communication 7 13 Checking the Remaining Amount of Toner and Paper Paper Supplies 7 14 ...

Страница 378: ...t either of Print Job Status Send Job Status Store Job Status or Scheduled Job to check the status Status Display Job status to be displayed Print Job Status Copy Printer FAX reception E mail reception Printing from Document Box Printing data from USB drive Application Job Report List Send Job Status FAX transmission i FAX transmission E mail Folder transmission Application Multiple destination Se...

Страница 379: ...cation Report List 4 Job Name Job Name or file name 5 User Name User Name for the executed job 6 Status Status of job InProcess The status before starting to print Printing Printing Waiting Print Waiting Pause Pausing print job or error Canceling Canceling the job 7 of Job Type Only selected type of jobs is displayed doc20151010091015 InProcess 000001 doc20151010091510 Waiting 000002 AAAAA AAAAA P...

Страница 380: ... page 7 11 11 Move Up In the list select the job that you want to move up the job queue and press this key Reordering Print Jobs page 7 12 12 Detail Select the job whose detailed information you want to display from the list and press this key Checking Detailed Information of Jobs page 7 8 You can select Change in Copies in the detailed information screen to change the number of copies that are pr...

Страница 381: ... Sending Waiting Waiting Sending Canceling Canceling the job Pause Pausing the job 7 of Job Type Only selected type of jobs is displayed 8 Cancel Select the job you want to cancel from the list and press this key 9 Priority Override Select the job to be overridden and press this key Only displayed when the optional fax kit is installed 10 Detail Select the job whose detailed information you want t...

Страница 382: ... 6 Status Status of job InProcess The status before starting to save such as during scanning originals Storing Storing Data Canceling Canceling the job Pause Pausing the job 7 of Job Type Only selected type of jobs is displayed 8 Cancel Select the job you want to cancel from the list and press this key 9 Detail Select the job whose detailed information you want to display from the list and press t...

Страница 383: ...e executed job 6 Start Time Time to start the scheduled job 7 Cancel Select the job you want to cancel from the list and press this key 8 Start Now Select the job you want to send immediately from the list and press this key 9 Detail Select the job whose detailed information you want to display from the list and press this key Checking Detailed Information of Jobs page 7 8 Status Scheduled Job Log...

Страница 384: ... Destination or Status Destination Status Destination is displayed when address is selected Select Detail to display the list Select or select a destination and select Detail Information on the selected job is displayed for checking 2 To exit from the detailed information select Close Details of the Status Screens page 7 3 Log abc def com 438 14 47 1 1 Status Detail InProcess Status User Name Dest...

Страница 385: ...YOCERA Net Viewer User Guide You can show the job log of all users or only your own job log Display Status Log page 8 31 This setting can also be changed from Command Center RX Command Center RX User Guide Screen Job histories to be displayed Print Job Log Copy Printer FAX reception i FAX reception E mail reception Printing from Document Box Job Report List Printing data from USB drive Application...

Страница 386: ...g History You can send the log history by E mail You can either send it manually as needed or have it sent automatically whenever a set number of jobs is reached Send Log History page 8 49 Displaying Job History Screen page 7 10 NOTE To check the information of the next previous page select or Status Log All Job No End Date Type doc20150125141427 User Name Result Completed 000080 01 25 14 14 Statu...

Страница 387: ...job in printing waiting status can be canceled 1 Display the screen Select the Status Job Cancel key 2 Select the job to be canceled from the list and select Cancel 3 Select Yes in the confirmation screen Priority Override for Waiting Jobs Priority Override function suspends the current job and prints the job in waiting first 1 Display the screen Select the Status Job Cancel key 2 Select Printing ...

Страница 388: ... output priority 1 Display the screen Select the Status Job Cancel key 2 Select Printing Jobs 3 Select the job to be assigned a higher priority and select Move Up The priority of the selected job is increased by 1 To further raise the job s priority select Move Up again Each time you select Move Up the priority increases by 1 ...

Страница 389: ... cover etc is displayed Printer Error information such as paper jam or out of toner and status such as waiting or printing are displayed FAX Port 1 FAX Port 2 i FAX FAX Memory RX Box The information such as sending receiving and dialing is displayed USB Drive The usage and capacity of the USB drive connected to this machine are displayed Select Format to format USB drive Select Remove to safely re...

Страница 390: ...t the Status Job Cancel key 2 Select Paper Supplies 2 Check the status The items you can check are described below Toner Information The amount of toner remaining is shown in levels And you can check the status of waste toner box Paper Status You can check the size orientation type and remaining amount of paper in each paper source The amount of paper remaining is shown in levels Others You can ch...

Страница 391: ...gs 8 4 Counter 8 7 Cassette MP Tray Settings 8 7 Common Settings 8 10 Home 8 35 Copy 8 36 Send 8 37 Document Box USB Drive 8 42 FAX 8 43 Printer 8 43 Report 8 47 System Network 8 53 Edit Destination 8 77 User Login Job Accounting 8 78 User Property 8 78 Date Timer Energy Saver 8 78 Adjustment Maintenance 8 82 Internet 8 85 Application 8 85 ...

Страница 392: ... the settings and exits 3 Returns to the previous screen without making any changes Date Timer Energy Saver Change Date Time Close Status Date Format Time Zone Auto Panel Reset Low Power Timer Sleep Timer Auto Error Clear Panel Reset Timer Change Change Change Change Change Change Change 1 2 m02015701 System Menu Close Status 1 2 m01010101 Quick Setup Wizard Cassette MP Tray Settings Home Send FAX...

Страница 393: ...n with administrator privileges or as a user with privileges to configure each setting The factory default login user name and login password are set as shown below If function default settings have been changed the Reset key can be selected in each function screen to immediately change the settings Model Name Login User Name Login Password TASKalfa 7353ci 7300 7300 TASKalfa 8353ci 8300 8300 ...

Страница 394: ...originals and paper page 8 11 Measurement Select inch or metric for the unit for paper dimensions page 8 15 Error Handling Select whether to cancel or continue the job when error has occurred page 8 16 Paper Output Select the output tray respectively for copy jobs print jobs from Document Box computers and FAX RX data page 8 18 Orientation Confirmation Check the orientation of original page 8 19 C...

Страница 395: ...irect Printing from Web Set whether to allow Direct Printing from Command Center RX page 8 35 Home Configure settings for Home screen page 8 35 Copy Configures settings for copying functions page 8 36 Send Configures settings for sending functions page 8 37 Document Box USB Drive Configures settings related to the Custom Box Job Box Sub Address Box and Polling Box For details on FAX Box and Pollin...

Страница 396: ...keyboard page 8 75 Restart Entire Device Restart the machine without turning the power switch off Use this to deal with any unstable operation by the machine Same as the computer restart page 8 75 Remote Services Settings Configures remote services settings page 8 75 NFC Set NFC Near Field Communication page 8 75 Remote Operation Operating device panel remotely from software Command Center RX or V...

Страница 397: ...alues Metric models A3 3 A4 R 3 A4 3 A5 R 3 B4 3 B5 R 3 B5 3 Folio 3 216 340 mm Inch models Ledger 3 Letter R 3 Letter 3 Legal 3 Statement R 3 12 18 3 Oficio II 3 Paper size is automatically detected in the cassette Standard Sizes 2 2 Select from standard sizes except Standard Sizes 1 Values Metric models Ledger 3 Letter R 3 Letter 3 Legal 3 Statement R 3 12 18 3 Oficio II 8K 16K R 16K Inch models...

Страница 398: ...elected Values Metric Inch Standard Sizes 1 Available options are as follows Values Metric models A3 1 A4 R 1 A4 1 A5 R 1 A6 R 1 B4 1 B5 R 1 B5 1 B6 R 1 Folio 216 340 mm Inch models Ledger 1 Letter R 1 Letter 1 Legal 1 Statement R 1 Executive 12 18 1 Oficio II Standard Sizes 2 Select from standard sizes except Standard Sizes 1 Values Metric models Ledger 1 Letter R 1 Letter 1 Legal 1 Statement R 1...

Страница 399: ... 3 Bond Cardstock Color Prepunched 3 Letterhead 3 Envelope Thick 106 to 300 g m2 Coated High Quality Index Tab Dividers Custom 1 8 1 Paper size is automatically detected in the multipurpose tray 2 To change to a media type other than Plain Media Type Setting page 8 15 3 To print on preprinted or prepunched paper or on letterhead Special Paper Action page 8 14 NOTE If the optional FAX Kit is instal...

Страница 400: ...played only when the optional FAX Kit is installed 2 Configure necessary settings for Internet Browser Internet page 8 85 3 The running application will be displayed Application page 5 14 Item Description Buzzer Set options for buzzer sound during the machine operations Volume Set the buzzer volume level Value 0 Mute 1 Minimum 2 3 Medium 4 5 Maximum Key Confirmation Emit a sound when the operation...

Страница 401: ...keyboard used to enter characters Value QWERTY QWERTZ AZERTY Item Description Custom Original Size Set up frequently used custom original size The custom size option is displayed on the screen to select original size To register a custom original size select On and enter the desired size Up to four custom original sizes can be added Value Metric X 50 to 432 mm in 1 mm increments Y 50 to 297 mm in ...

Страница 402: ...or each media type For Custom 1 8 settings for duplex printing and media type name can be changed Media Type Setting page 8 15 Default Paper Source Select the default paper source from Cassette 1 7 and multipurpose tray Value Cassette 1 to 7 Multipurpose Tray NOTE Cassette 5 to Cassette 7 are displayed when the following options are installed Cassette 5 When a Side Feeder 3 000 sheet Side Feeder 5...

Страница 403: ... type for auto paper selection when Auto is selected of Paper Selection If Plain is selected the paper source with plain paper loaded in the specific size is selected Select All Media Types for the paper source with any kind of paper loaded in the specific size Value All Media Types Plain Transparency Rough Vellum Labels Recycled Preprinted Bond Cardstock Color Prepunched Letterhead Envelope Thick...

Страница 404: ...Direction Speed Priority Show Paper Setup Message Set whether to display the confirmation screen for the paper setting when a new paper is set for each cassette Value Off On NOTE Cassette 5 to Cassette 7 are displayed when the following options are installed Cassette 5 When a Side Feeder 3 000 sheet Side Feeder 500 sheet 3 or Large Capacity Side Feeder 500 1 500 sheet 2 is installed Cassette 6 Whe...

Страница 405: ... m Heavy 5 1 257 g m to 300 g m Heavy 1 1 106 g m to 135 g m Extra Heavy 1 Transparencies Media Type Default Media Type Default Plain Normal 2 Prepunched Normal 2 Rough Normal 3 Letterhead Normal 2 Vellum Heavy 1 Envelope Heavy 3 Labels Heavy 2 Thick Heavy 3 Recycled Normal 2 High Quality Normal 2 Preprinted Normal 2 Coated Heavy 1 Bond Normal 3 Index Tab Dividers Heavy 4 Cardstock Heavy 4 Custom ...

Страница 406: ...et what to do when finishing stapling or offsetting capacity is exceeded during printing Value Ignore Printing continues without finishing Display Error Message to cancel printing is displayed NOTE Requires the optional Document Finisher Punch Waste Full Error Set what to do when the punch waste box becomes full during printing Value Ignore Printing continues without punching Display Error Message...

Страница 407: ...iginals or multiple stacked originals have been sent Value Ignore The setting is ignored and the job is printed Display Error Message to cancel printing is displayed Continue or Cancel Err Job Set which users can cancel or continue operations for jobs which were paused due to an error Value All Users Job Owner Only NOTE Administrator can cancel all jobs regardless of this setting Staple Waste Full...

Страница 408: ... Finisher Right Tray Outputs to the Right Tray of the machine Tray A Delivery to the Tray A of the optional Document Finisher Tray B Delivery to the Tray B of the optional Document Finisher Tray C Delivery to the Tray B of the optional Document Finisher with optional Mailbox Right Tray Outputs to the Right Tray of the machine Tray A Delivery to the Tray A of the optional Document Finisher Tray B D...

Страница 409: ...nce the color toner runs out Value Stop printing Print in Black White Item Description Orig Orientation Copy Set the original orientation defaults Value Top Edge on Top Top Edge on Left Auto Orig Orient Send Store Original Image Copy Set the default original document type for copying Value Text Photo Printer Text Photo Magazine Photo Printer Photo Magazine Photo Photo Paper Text Text Fine Line Gra...

Страница 410: ... increments NOTE To specify border erase widths around original set the value in Border To specify border erase widths in the middle of original set the value in Gutter Border Erase to Back Page Select the Border Erase Method for Back Page of a sheet Value Same as Front Page Do Not Erase Margin Default Set the default margin Value Metric Left Right 18 to 18 mm in 1 mm increments Top Bottom 18 to 1...

Страница 411: ...Additional Info None Date and Time Job No Job No Date and Time Date and Time Job No E mail Subject Body Set the subject and body automatically entered default subject and body when sending the scanned originals by E mail Three body messages can be registered and the initial template can be used to choose which body message is used Value Subject Up to 256 characters can be entered Body 1 to 3 Up to...

Страница 412: ...end all files in a single E mail 1 file per E mail Attach and send 1 file per E mail Cont Scan Copy Select the default Continuous Scan Copy setting Value Off On Continuous Scan FAX 1 FAX Operation Guide Cont Scan Send Store Select the default Continuous Scan Send Store setting Value Off On Trapping Select the default trapping level Value Off Light Medium Heavy Separator Paper Source Select the def...

Страница 413: ...ase Shadowed Areas Send Select the default Erase Shadowed Areas Send setting Value Off On Erase Shadowed Areas Store Select the default Erase Shadowed Areas Store setting Value Off On 1 Displayed only when the optional FAX Kit is installed Item Description ...

Страница 414: ...th Euro French German UK English Item Description Basic Configure settings for stamps Text Text Stamp Select Add Edit to edit the test string for a template Up to 8 templates can be registered Select Delete to delete a template Font Page Set the font size for page numbers when printing them Value Size 1 to 3 6 0 to 64 0 pt Font Bates Stamp When a bates stamp is used set the font sizes that can be ...

Страница 415: ...ates refer to the following Text Text Stamp page 8 24 Stamp Method Select the stamp method for the text stamp Value Each Print Page Each Original Page Position Set the text stamp position Value Top Left Top Middle Top Right Middle Left Center Middle Right Bottom Left Bottom Middle Bottom Right Detail NOTE Select Detail to specify the detailed stamp position using numeric values and to set the stam...

Страница 416: ...ition Font NOTE To set Text 1 or Text 2 select Change below and enter a maximum of 32 characters for the text string To set Date select Date Format and set the date display format To set Numbering select Numbering Default and set the starting sequence number 1 to 9999999 If you select Fixed Digit Number On you can set the number of digits of the serial number 1 to 7 digits Select Detail in Positio...

Страница 417: ...tring NOTE Templates that have been set will appear For details on registering templates refer to the following Text Text Stamp page 8 24 Position Set the text stamp position Value Top Left Top Middle Top Right Middle Left Center Middle Right Bottom Left Bottom Middle Bottom Right Detail NOTE Select Detail to specify the detailed stamp position using numeric values and to set the stamp angle Font ...

Страница 418: ...xt 1 Text 2 Date Format Numbering Default Position Font NOTE To set Text 1 or Text 2 select Change below and enter a maximum of 32 characters for the text string To set Date select Date Format and set the date display format To set Numbering select Numbering Default and set the starting sequence number 1 to 9999999 If you select Fixed Digit Number On you can set the number of digits of the serial ...

Страница 419: ...g NOTE Templates that have been set will appear For details on registering templates refer to the following Text Text Stamp page 8 24 Position Set the text stamp position Value Top Left Top Middle Top Right Middle Left Center Middle Right Bottom Left Bottom Middle Bottom Right Detail NOTE Select Detail to specify the detailed stamp position using numeric values and to set the stamp angle Font Set ...

Страница 420: ...e display format To set Numbering select Numbering Default and set the starting sequence number 1 to 9999999 If you select Fixed Digit Number On you can set the number of digits of the serial number 1 to 7 digits Select Detail in Position to specify the detailed stamp position using numeric values NOTE Only displayed when the optional 4 000 sheet Finisher or 100 sheet Staple Finisher is installed ...

Страница 421: ...ing low This notification is used for event report Status Monitor SNMP Trap Value Off On NOTE If On is selected set the amount of remaining toner to alert The setting range is 5 to 100 in 1 increments Item Description Offset One Page Documents Set whether one page documents are sorted Value Off On NOTE This function is displayed when an optional Sheet Finisher is installed Item Description Display...

Страница 422: ...int Pages x Copies Total Printed Pages Color Black White Printing Jobs Column 2 Value Job Name User Name Print Pages x Copies Total Printed Pages Color Black White Sending Jobs Column 1 Value Job Name User Name Destination Original Pages Color Black White Sending Jobs Column 2 Value Job Name User Name Destination Original Pages Color Black White Storing Jobs Column 1 Value Job Name User Name Origi...

Страница 423: ...Screen Login Screen Home Screen Login screen and Home screen of user login administration Priority Show Displays the message on the message board Value Off On Title Enter a maximum of 30 characters for the title to display on the message board Body Enter a maximum of 300 characters for the body to display on the message board Delete Deletes the message board selected on the list Raise Priority Rai...

Страница 424: ...numeric keypad layout to display upon startup Value Floating Horizontal On the Right Item Description Prevent Light Reflection Prevent light reflection when using the Erase Shadowed Areas feature Value Off On Item Description Function Key 1 Value None Copy Send FAX Server FAX 1 Custom Box Job Box USB Drive FAX Box 1 FAX Memory RX Box 1 Send to Me E mail Send to Me from Box E mail Internet Browser ...

Страница 425: ...inting from Web Home System Menu Counter key Home Configure settings for Home screen Editing the Home Screen page 2 15 Item Description Clear Set after Job Started Set whether to reset function settings to their defaults after the job starts Value Clear Do Not Clear Item Description Direct Printing from Web Set whether to allow Direct Printing from Command Center RX Value Not Allowed Allowed Comma...

Страница 426: ...ed Value Off On Paper Size for Small Original Specify the paper size to be used for a case where the original is too small to be detected in the Auto Paper Selection mode Value Default Paper Source A4 R A4 A5 R A6 R B5 R B5 B6 R Letter R Letter Statement R Preset Limit Restrict the number of copies that can be made at one time Value 1 to 9999 copies Reserve Next Priority Specify whether the defaul...

Страница 427: ...nal Orientation File Format Density Original Image Scan Resolution FAX TX Resolution 1 Color Selection Zoom Continuous Scan Background Density Adj Dest Check before Send Select whether to display the confirmation screen of destinations after pressing the Start key when performing sending jobs Value Off On Color Type Set the color type when you send color documents Value RGB sRGB Entry Check for Ne...

Страница 428: ...Ultra Fine 300x300dpi 200x400dpi Super Fine 200x200dpi Fine 200x100dpi Normal File Format Select the file format of forwarded original File format for Send and Forward page 8 39 File Separation Set whether originals are divided into multiple files before being forwarded Value Off Each Page E mail Subject Enter a maximum of 256 characters for the subject of forwarded E mail Character Entry Method p...

Страница 429: ...dress of login user are used for SMTP authentication and e mail sender address Value Use System Settings Information set with SMTP Setting Sender Adr is used for SMTP authentication and E mail sender address information Use Login User Information Login User information is used for SMTP authentication and E mail sender address information NOTE If there is no e mail address set for the user who logg...

Страница 430: ...ff PDF A 1a PDF A 1b PDF A 2a PDF A 2b PDF A 2u Item Value Description Password to Open Document Off On Enter the password to open the PDF file Select Password enter a password up to 256 characters and then select OK Select Confirmation to enter the password again for confirmation and select OK Password to Edit Print Document Off On Enter the password to edit the PDF file Select Password enter a p...

Страница 431: ...and then select OK Select Confirmation to enter the password again for confirmation and select OK When you have entered the password to edit print document you can specifically limit the operation Detail Printing Allowed Not Allowed Disables the printing of PDF file Allowed Low Resolution only Can print the PDF file only in low resolution Allowed Can print the PDF file in original resolution Chang...

Страница 432: ... When 0 is set Quick Copy cannot be used Repeat Copy Job Retention To maintain free space on the hard disk you can set the maximum number of stored jobs Value number between 0 and 50 NOTE This function will not be displayed when the Data Security Function is activated When 0 is set Repeat Copy cannot be used Deletion of Job Retention This setting specifies that documents such as Private Printing Q...

Страница 433: ...n Collate Offset Staple Punch Duplex 2 Combine Delete after Printed Color Selection Value Off Key 1 to 6 Send Select the functions to be registered for Send Quick Setup Sending Size FAX TX Resolution File Format Delete after Transmitted Color Selection Value Off Key 1 to 6 1 Displayed only when the optional FAX Kit is installed 2 Display only when an optional Sheet Finisher is installed When a pun...

Страница 434: ...ize as the same size when printing Value Off A4 and Letter are not regarded as the same in size On A4 and Letter are regarded as the same in size The machine will use whichever size is in the paper source Duplex Select binding orientation for duplex mode Value 1 sided 2 sided Bind LongEdge 2 sided Bind ShortEdge Copies Set the default number of copies from 1 to 9 999 Value 1 to 9999 copies Orienta...

Страница 435: ...y then the paper feed will be from the MP tray regardless of what is set in the printer driver Auto Cassette Change Select the following actions when the paper runs out in the paper source while printing Value Off On NOTE When selecting Off the machine displays Add the following paper in cassette is a cassette number or Add the following paper in the multipurpose tray and stops printing Load the p...

Страница 436: ...cessed until the end due to your environment and the other reason Value EOJ End of Job The command recognized as a termination of the job data is regarded as one job until it is detected End of Network Session The data included in a network session at network connection is regarded as one job UEL Universal Exit Language The UEL included in the termination of the job data is regarded as one job unt...

Страница 437: ...rrent settings available memory space and optional equipment installed Font List Prints the font list allowing you to check the font samples installed in the machine Network Status Prints the network status allowing you to check the information including network interface firmware version network address and protocol Service Status Prints the service status More detailed information is available t...

Страница 438: ...Item Description Send Result Report Automatically print a report of transmission result when a transmission is complete E mail Folder Automatically print a report of transmission result when E mail or SMB FTP transmission is complete Value Off On Error Only FAX 1 1 Displayed only when the optional FAX Kit is installed FAX Operation Guide Attach Image of NW FAX 1 FAX Operation Guide Canceled before...

Страница 439: ...e setting range is 1 to 1 500 Send Log History You can also send the log history to the specified destinations manually Destination Set the destination to which log histories are sent Only E mail address can be set Job Log Subject Set the subject automatically entered when sending log histories by E mail Value Up to 256 characters SSFC Log Subject Enter the subject of the printed job history with ...

Страница 440: ...he destination to which login histories are sent E mail address only can be set as destination NOTE This function is displayed when Login History is set to On Subject Set the subject automatically entered when sending login histories by E mail Value Up to 256 characters NOTE This function is displayed when Login History is set to On Log Reset Resets the recorded login histories NOTE If the user au...

Страница 441: ...s set to On Destination Set the destination to which device log histories are sent E mail address only can be set as destination NOTE This function is displayed when Device Log History is set to On Subject Set the subject automatically entered when sending device log histories by E mail Value Up to 256 characters NOTE This function is displayed when Device Log History is set to On NOTE If the user...

Страница 442: ...estination Set the destination to which secure communication error log histories are sent E mail address only can be set as destination NOTE This function is displayed when Secure Communication Error Log History is set to On Subject Set the subject automatically entered when sending secure communication error log histories by E mail Value Up to 256 characters NOTE This function is displayed when S...

Страница 443: ...d The Wireless Network Interface Kit is an option for some models Contact your dealer or our sales or service representatives for detail IB 35 Wireless Network Interface Kit page 11 6 Item Description Wi Fi Direct Select whether to use Wi Fi Direct Value Off On Device Name Specify the device name NOTE Up to 32 characters can be entered This function is displayed when Wi Fi Direct is set to On IP A...

Страница 444: ... your dealer or our sales or service representatives for detail IB 35 Wireless Network Interface Kit page 11 6 Item Description Wi Fi Select whether to use Wi Fi Value Off On Item Description Connection Status Check the wireless LAN status Quick Setup If the machine will connect to an access point that supports the automatic wireless network setup connection settings can be configured by Quick Set...

Страница 445: ... authentication type Value Open WPA2 WPA PSK WPA2 PSK WPA2 WPA EAP WPA2 EAP Encryption Select encryption method The setting values vary depending on the Network Authentication setting Item Description Network Authentication Encryption Open Disable WEP WEP Key Up to 26 characters WEP Key Index 0 to 3 WPA2 WPA PSK Data Encryption AES Auto Preshared Key Up to 64 characters WPA2 PSK Data Encryption AE...

Страница 446: ...to On this function will be grayed out and the value cannot be entered Default Gateway Set the IP gateway address Value NOTE When DHCP is set to On this function will be grayed out and the value cannot be entered DHCP Select whether to use the DHCP IPv4 server Value Off On Auto IP Select whether to use Auto IP Value Off On DNS Server Set DNS server IPv4 Value Auto DHCP Manual When Manual is select...

Страница 447: ...eight groups consisting of four digit hexadecimal digits The groups are separated by colon Prefix Length 0 to 128 Default Gateway 128 bits address is expressed in eight groups consisting of four digit hexadecimal digits The groups are separated by colon NOTE This function is displayed when IPv6 is set to On To enter Default Gateway set RA Stateless to Off DHCP Select whether to use the DHCP IPv6 s...

Страница 448: ...Subnet Mask Set the IP subnet mask Value NOTE When DHCP is set to On this function will be grayed out and the value cannot be entered Default Gateway Set the IP gateway address Value NOTE When DHCP is set to On this function will be grayed out and the value cannot be entered DHCP Select whether to use the DHCP IPv4 server Value Off On Auto IP Select whether to use Auto IP Value Off On DNS Server S...

Страница 449: ...ss is expressed in eight groups consisting of four digit hexadecimal digits The groups are separated by colon Prefix Length 0 to 128 Default Gateway 128 bits address is expressed in eight groups consisting of four digit hexadecimal digits The groups are separated by colon NOTE This function is displayed when IPv6 is set to On To enter Default Gateway set RA Stateless to Off DHCP Select whether to ...

Страница 450: ...d then ON Item Description Bonjour Select whether to use Bonjour Value Off On Wi Fi Direct Set whether to enable this function for each network Value Disable Enable Wi Fi Wired Network Item Description IPSec Select whether to use IPSec Value Off On Item Description SMTP E mail TX Select whether to send E mail using SMTP Value Off On POP3 E mail RX Select whether to receive E mail using POP3 Value ...

Страница 451: ...Wi Fi Direct Set whether to enable this function for each network Value Disable Enable Wi Fi Wired Network i FAX Select whether to use i FAX Value Off On NOTE This function is displayed when the optional Internet FAX Kit is activated DSM Scan Select whether to use DSM scan 1 Value Off On ThinPrint Select whether to use ThinPrint To use the Thin Print protocol set the protocol to On The default por...

Страница 452: ... 1 Value Off On Wi Fi Direct Set whether to enable this function for each network Value Disable Enable Wi Fi Wired Network IPP over SSL To use the IPP protocol set IPP and SSL to On The default port number is 443 1 2 Value Off On NOTE When selecting On it also requires a certificate for SSL the default certificate is the self certificate of the machine Command Center RX User Guide Wi Fi Direct Set...

Страница 453: ...twork FAX driver Wi Fi Direct Set whether to enable this function for each network Value Disable Enable Wi Fi Wired Network Enhanced WSD over SSL Set whether to use our proprietary web services over SSL 1 2 Value Off On NOTE Selecting Off will disable the functionality of WIA TWAIN and Network FAX drivers Wi Fi Direct Set whether to enable this function for each network Value Disable Enable Wi Fi ...

Страница 454: ...s the self certificate of the machine Wi Fi Direct Set whether to enable this function for each network Value Disable Enable Wi Fi Wired Network Enhanced VNC over SSL This is set when starting up Command Center RX to use Remote Operation protected by SSL 1 2 The default port number is 9061 Value Off On NOTE The default setting is On When selecting On it also requires a certificate for SSL The defa...

Страница 455: ...l there are models where you need to restart the network or turn the machine OFF and then ON after changing the setting Item Description SSL Select whether to use SSL for communication Value Off On Item Description Proxy Set the proxy for connection to the Internet from an application Value Off On Use the Same Proxy Server for All Protocols Set whether the same proxy server is used for all protoco...

Страница 456: ... Description Restart Network Restarts the network Item Description IP Filter IPv4 Configure IP filters IP filters restrict access to the machine based on the IP addresses and protocols Specify the IP addresses or network addresses of the hosts to which access is granted from Command Center RX If nothing is specified on this page access from all hosts is allowed Value Off On Command Center RX User ...

Страница 457: ...ng page 8 58 Bonjour page 8 60 IPSec page 8 60 NetWare Use NetWare to receive documents See the Operation Guide for the optional network interface card for details Value Off On AppleTalk Selects whether to receive documents using AppleTalk 1 Value Off On 1 The setting will be changed after restarting the device or network LAN Interface Select the LAN Interface type 1 Value Auto 10Base Half 10Base ...

Страница 458: ...Select access points to which the machine can be connected enter the Preshared Key and start a connection Push Button Method If the access point supports the push button method wireless settings can be configured using the push button This setting executes push button and the connection is started by pressing the push button on the access point NOTE The push button method supports only the WPS PIN...

Страница 459: ...on Select network authentication type To select other options open the device home page from a computer Value Open Shared WPA PSK 1 WPA2 PSK 1 Encryption Select encryption method If the option other than Disable is selected enter the WEP key or the Preshared key The setting values vary depending on the Network Authentication setting Select Data Encryption When Network Authentication is set to Open...

Страница 460: ...he network authentication and connecting to external address book Value Wi Fi Wired Network Optional Network NOTE Wi Fi is displayed when the Wireless Network Interface Kit IB 35 is installed Optional Network is displayed when the optional Network Interface Kit IB 50 or Wireless Network Interface Kit IB 51 is installed You can set and use Wired Network or Wi Fi and Optional Network IB 50 or IB 51 ...

Страница 461: ... USB port USB host Value Unblock Block USB Device This locks and protects the USB interface connector USB Device Value Unblock Block USB Drive This locks and protects the USB memory slot Value Unblock Block NOTE This function is available when USB Host is set to Unblock Optional Interface 1 This locks and protects the optional interface slots Value Unblock Block NOTE You can set this feature for e...

Страница 462: ...eded data areas in the case of overwriting or all the data areas in the case of system initialization with specific numbers their complements and random numbers to prevent data restoration Data restoration is not possible even through a sophisticated restoration technique NOTE The 3 time Overwrite Method A may take more time than the 1 time Overwrite Method Security Password Customize the security...

Страница 463: ...t turn the power off while sanitizing the data If the power is turned off during data erasing erasing will be executed automatically when the power is restored however complete erasure cannot be guaranteed Run Immediately Data Sanitization will be performed Reserve a Sanitization Time Completely erase address and image data saved in the device at the scheduled time Value Off On If On is selected s...

Страница 464: ... settings Transmission histories Scheduled jobs Conditional reception forwarding settings Application program Application program added by a user or service representative Trial functions Item Description FAX Server Set whether to use FAX Server Value Off On Address Settings This specifies a prefix suffix and domain name to be attached to a destination NOTE This setting is available when FAX Serve...

Страница 465: ...tion panel screen of this product while operating the screen NFC System Menu Counter key System Network NFC Item Description Optional Function You can use the optional applications installed on this machine Applications page 11 7 Item Description Bluetooth Use Bluetooth keyboard Value Off On Search Device Select a keyboard Item Description Restart Entire Device Restart the machine without turning ...

Страница 466: ...gs for remote operation Value Off On If On is selected set the Use Restrictions Off Users without administrator privileges can also execute remote operation Use Password Enter the password then re enter it to confirm Administrator Only Only administrator can execute remote operation NOTE When selecting Administrator Only the remote operation using VNC software is unavailable ...

Страница 467: ...ch Key List All Prints One Touch List allowing you to check the destinations that have been registered on the One Touch Keys One Touch Key List FAX FAX Operation Guide Item Description Sort Select the default sort setting of the address for the address book Value No Name Narrow Down This procedure can be used to filter narrow down the types of destination listed when the address book is displayed ...

Страница 468: ...in with administrator privileges Value Off Administrator Only One Touch Key Restrict editing of the One Touch Key If you selected Administrator Only you can only edit the One Touch Key by logging in with administrator privileges Value Off Administrator Only Item Description Date Time Set the date and time for the location where you use the machine If you perform Send as E mail the date and time se...

Страница 469: ...95 seconds in 5 second increments NOTE This function is displayed when Auto Panel Reset is set to On Sleep Timer Set amount of time before entering Sleep Value 1 to 120 minutes 1 minute increments Interrupt Clear Timer Set the period after which the machine reverts to Normal mode when it has been set to Interrupt Copy mode and then left unused Value 5 to 495 seconds in 5 second increments Error Jo...

Страница 470: ...erface Kit or Fiery controller is installed Sleep Rules Select whether to use the Energy Saver mode for the following functions individually ID Card Reader 2 Application Value Off On NOTE When the machine has entered sleep mode with Energy Saver setting it does not wake from sleep mode when it receives print data from a PC connected by USB cable Also the ID card cannot be recognized EnergySaver Re...

Страница 471: ...or not the machine enters Power Off mode for the following function Select On to set the Power Off mode Network FAX 1 USB Cable USB Host NIC 3 Remote Diagnostics Application Value Off On NOTE Even when any of the functions is set to On if either FAX or NIC is set to Off the machine does not enter Power Off Mode Even when Network or USB Cable is set to Off if the machine does not communicate with t...

Страница 472: ...hem in the Document Box Adjustment can be made in 7 levels Value 3 Lighter 2 1 0 Normal 1 2 3 Darker Sharpness Adjustment Adjust the sharpness of the image outline Copy All Sharpen or blur overall image outlines during copying Adjustment can be made in 7 levels Value 3 Blur 2 1 0 1 2 3 Sharpen Text Fine Line Sharpen text fine line during copying Adjustment can be made in 4 levels Value 0 Normal 1 ...

Страница 473: ...k the machine memory Auto Color Correction This setting allows you to adjust the detection level used by the machine to determine whether the original is color or black and white in Auto Color Selection Mode Setting a lower value will result in more originals being identified as color while a larger value will tend to increase the number of originals being identified as black and white Value 1 Col...

Страница 474: ...printing by changing the default start position of the first print In addition the machine can automatically detect the appropriate position depending on your usage Value Standard Black White Priority Color Priority Auto Contrast You can increase or decrease the overall contrast Copy Increases or decreases the overall contrast of copies Value 3 Lower 2 1 0 Normal 1 2 3 Higher Send Box Increases or...

Страница 475: ...e the Internet browser Value Off On Browser Environment This specifies Internet browser preferences such as your home page setting and how pages are displayed Value Home page Enter the address for Home page Text Size Large Medium Small Display Mode Normal Just Fit Rendering Smart Fit Rendering Cookie Accept All Reject All Prompt before Accepting NOTE This function is not displayed when Internet Br...

Страница 476: ...Card Settings 9 31 PIN Code Authorization 9 32 Using User Login Administration 9 33 Login Logout 9 33 Overview of Job Accounting 9 34 To Manage the Number of Sheets Used on Jobs Printed from a PC 9 34 Managing the Scan Job Account by Using TWAIN 9 34 Managing the Scan Job Account by Using WIA 9 34 Managing the FAX Job Transmitted from a PC 9 34 Enabling Job Accounting 9 35 Job Accounting Access 9 ...

Страница 477: ...e machine from PCs Managing the Users to Use TWAIN for Scanning TWAIN driver settings on the PC are necessary to manage the users that use TWAIN for scanning Managing the Users to Scan Using TWAIN page 9 16 Managing the Users to Use WIA for Scanning WIA driver settings on the PC are necessary to manage the users that use WIA for scanning Managing the Users to Scan Using WIA page 9 17 Managing the ...

Страница 478: ... number Item Descriptions Local Authentication User authentication based on user properties on the local user list stored in the machine Network Authentication User authentication based on Authentication Server Use a user property stored in Authentication Server to access the network authentication login page NOTE If the login user name entry screen appears during operations enter a login user nam...

Страница 479: ...ed in the home screen will appear Available Functions to Display on Desktop page 2 16 NOTE If the login user name and password are rejected check the following settings Network Authentication setting of the machine User property of the Authentication Server Date and time setting of the machine and the Authentication Server If you cannot login because of the setting of the machine login with any ad...

Страница 480: ...rrect password is entered repeatedly to login with that account 1 Display the screen 1 System Menu Counter key User Login Job Accounting 2 User Login Setting Next Authentication Security Next User Account Lockout Set Next NOTE If the login user name entry screen appears during operations enter a login user name and password and select Login For this you need to login as an administrator or as a us...

Страница 481: ...pecify how many login retries are allowed until the account is locked out 1 to 10 times Lockout Duration Specify how long the account is to be locked out until it is unlocked 1 to 60 minutes Lockout Target Specify the extent to which the account lockout is applied You can select from All or Remote Login Only Remote Login Only locks out all operations from outside the operation panel Locked out Use...

Страница 482: ...n as an administrator or as a user with privileges to carry out this setting The factory default login user name and login password are set as shown below Item Descriptions Password Policy Select whether or not password policy is enabled Value Off On Minimum password length Set the minimum password length of characters for password Value Off On 1 to 64 characters Password complexity Set the passwo...

Страница 483: ... Admin Login Password Admin Access Level Administrator Upper case and lower case letters are distinguished case sensitive It is recommended to periodically change the user name login user name and login password regularly for your security NOTE If the login user name entry screen appears during operations enter a login user name and password and select Login For this you need to login as an admini...

Страница 484: ...Name Add an account where the user belongs The user who registered his her account name can login without entering the account ID Overview of Job Accounting page 9 34 NOTE Select Name or ID from the Sort to sort the account list Select Search Name or Search ID to search by account name or account ID E mail Address The user can register his her E mail address The registered address will be automati...

Страница 485: ...olor Select whether or not use of the copy print function full color is prohibited Duplex Restriction Select whether only duplex printing is allowed Combine Restriction Specify whether only Combine is allowed EcoPrint Restriction Specify whether only EcoPrint is allowed Send Restriction Select whether or not use of the send function is prohibited FAX TX Restriction 3 Select whether or not use of t...

Страница 486: ...lt Screen for My Panel select the screen to display from Destination Machine Address Book or a registered external address book NOTE If simple login is enabled a confirmation screen appears when new registration is finished asking if you will configure simple login settings To configure simple login settings select Yes If you select No you will return to the user list screen For the procedure for ...

Страница 487: ...change the user information of the machine administrator you must log in with machine administrator authority You can only view user information if you log in as a regular user The factory default login user name and login password are set as shown below NOTE If the login user name entry screen appears during operations enter a login user name and password and select Login For this you need to log...

Страница 488: ...st to change a user property NOTE The default user with machine administrator rights cannot be deleted Adding a User Local User List page 9 8 Item Description User Name Changes the name shown on the user list Up to 32 characters can be entered Login User Name Displays the login user name that is entered at login Login Password Changes the password that is entered at login Up to 64 characters can b...

Страница 489: ...ing refer to the following Job Accounting Access page 9 36 Simple Login When simple login is enabled changes associated settings NOTE This function does not appear when Simple Login is set to Off or the user is not registered in Simple Login ID Card Information Displays the ID card information of the logged in user NOTE This function is displayed when the optional ID Card Authentication Kit is act...

Страница 490: ...nts as they appear in Windows 10 1 Display the screen 1 Click Start button on the Windows and then select Windows System Control Panel and View devices and printers 2 Right click the printer driver icon of the machine and click the Printer properties menu of the printer driver 3 Click Administrator on the Device Settings tab 2 Configure the settings 1 Select User Login on the User Login tab NOTE I...

Страница 491: ...n user names and printing is possible if the name is registered If the name is not registered the printing will be canceled for users with only user authority If the user has administrator privileges the screen to enter the user name and password will appear 3 Click OK Managing the Users to Scan Using TWAIN It is possible to manage the users that scan using TWAIN Setting TWAIN Driver To manage the...

Страница 492: ...indows and then select Windows System Control Panel Click the search box in the Control Panel and type Scanner in there Select View scanners and cameras in the search list The Scanners and Cameras screen is displayed 2 Select the same name as this machine from WIA Drivers and press Properties 2 Configure the settings 1 Select the checkbox beside Authentication on the Settings tab and enter Login U...

Страница 493: ...ear in Windows 10 1 Display the screen 1 Click Start button on the Windows and then select Windows System Control Panel and View devices and printers 2 Right click the printer driver icon of the machine and click the Printer properties menu of the printer driver 3 Click FAX TX Setting on the Printing Preferences window 2 Configure the settings 1 Select User Login on the Authentication tab NOTE In ...

Страница 494: ...empted 3 Click OK Local Authorization Select whether or not to use Local Authorization 1 Display the screen 1 System Menu Counter key User Login Job Accounting 2 User Login Setting Next Local Authorization Change 2 Off or On OK NOTE When using Local Authorization the user authentication type must be set to Local Authentication Enabling User Login Administration page 9 3 NOTE If the login user name...

Страница 495: ...p authorization settings Network Authentication must be selected for the authentication method in Enabling User Login Administration Select On for LDAP in Protocol Detail Enabling User Login Administration page 9 3 Protocol Settings page 8 60 NOTE If the login user name entry screen appears during operations enter a login user name and password and select Login For this you need to login as an adm...

Страница 496: ...he ID displayed on the group list between 1 and 4294967295 Group Name Enter the name displayed on the group list up to 32 characters Access Level Select Administrator or User for group access privileges Print Restriction Select whether or not to reject usage of print functions for the printer Applicable print functions are as follows Print from Box Print from USB Drive Print Report Print from PC P...

Страница 497: ...the FAX transmissions Storing Restr in Box Select whether or not to reject usage of storing in the document boxes Storing Restr in USB Drive Select whether or not to reject usage of storing in the USB drive 1 For Group ID specify PrimaryGroupID assigned by Active Directory of Windows If you are using Windows Server 2008 check Attribute Editor tab of user properties If you are using Windows Server ...

Страница 498: ...tion Enabling User Login Administration page 9 3 NOTE If the login user name entry screen appears during operations enter a login user name and password and select Login For this you need to login as an administrator or as a user with privileges to carry out this setting The factory default login user name and login password are set as shown below NOTE If the guest authorization setting is enabled...

Страница 499: ...creen appears during operations enter a login user name and password and select Login For this you need to login as an administrator or as a user with privileges to carry out this setting The factory default login user name and login password are set as shown below Item Descriptions User Name Enter the name displayed on the user list up to 32 characters The default setting is Guest User Access Lev...

Страница 500: ... of the copy print function is prohibited Copy Restriction Color Select whether or not use of the copy print function color is prohibited Copy Restriction Full Color Select whether or not use of the copy print function full color is prohibited Duplex Restriction Select whether only duplex printing is allowed Combine Restrict Specify whether only Combine is allowed EcoPrint Restriction Specify whet...

Страница 501: ...r a login user name and password and select Login For this you need to login as an administrator or as a user with privileges to carry out this setting The factory default login user name and login password are set as shown below Item Descriptions Server Name 1 Enter the LDAP server name or the IP address up to 256 characters If a server name is not entered user information will be acquired from t...

Страница 502: ... name may be the same as the server name entered in the network authentication 2 If using Active Directory of Windows displayName of Attribute may be used as Name 1 3 Name 2 can be left out When you assign displayName in Name 1 and department in Name 2 and if the value of displayName is Mike Smith and the value of department is Sales in Active Directory of Windows the user name appears as Mike Smi...

Страница 503: ...to the following Adding a User Local User List page 9 8 To use Simple Login User Login Administration must be enabled in Enabling User Login Administration Enabling User Login Administration page 9 3 When the guest authorization setting is enabled the Simple Login screen is not displayed NOTE If the login user name entry screen appears during operations enter a login user name and password and sel...

Страница 504: ...rs select Network User The procedure differs depending on the transmission method selected Specifying the user from local users Select the user to be set for simple login NOTE If the login user name entry screen appears during operations enter a login user name and password and select Login For this you need to login as an administrator or as a user with privileges to carry out this setting The fa...

Страница 505: ...main is set in network authentication select the Domain and select the domain where the user is registered 6 Password Change On or Off OK Icon Change 7 Select the user icon to be displayed and select OK 3 Register the user Select Save NOTE For details on entering characters refer to the following Character Entry Method page 11 9 Status User Name Domain OK Keys Simple Login Key User Enter login use...

Страница 506: ...user name entry screen appears during operations enter a login user name and password and select Login For this you need to login as an administrator or as a user with privileges to carry out this setting The factory default login user name and login password are set as shown below Item Descriptions Keyboard Login When ID card authentication is enabled select whether or not login by keyboard is al...

Страница 507: ...work authentication must be enabled and Ext must be selected for server type Enabling User Login Administration page 9 3 NOTE If the login user name entry screen appears during operations enter a login user name and password and select Login For this you need to login as an administrator or as a user with privileges to carry out this setting The factory default login user name and login password a...

Страница 508: ...Logout If user login administration is enabled the login user name and login password entry screen appears each time you use this machine Login If the login user name entry screen appears during operations log in by referring to the following Login page 2 29 Logout When the operations are complete select the Authentication Logout key to return to the login user name and login password entry screen...

Страница 509: ...nt by Using WIA To manage the scan job account by using WIA you need to configure the WIA driver settings on the computer connected to the machine Job Accounting for Scan Using WIA page 9 45 Managing the FAX Job Transmitted from a PC To manage the number of FAX jobs transmitted from the PC you need to configure the settings by using the FAX Driver on the PC Job Accounting for the FAX Transmitted f...

Страница 510: ...a login user name and password and select Login For this you need to login as an administrator or as a user with privileges to carry out this setting The factory default login user name and login password are set as shown below NOTE To disable job accounting select Off When the display returns to System Menu default screen logout is automatically executed and the screen to enter the Account ID app...

Страница 511: ...ry screen appears during operations enter a login user name and password and select Login For this you need to login as an administrator or as a user with privileges to carry out this setting The factory default login user name and login password are set as shown below NOTE To select Network network authentication must be enabled and Ext must be selected for server type Enabling User Login Adminis...

Страница 512: ...unt Name Enter the account name up to 32 characters Account ID Enter the account ID as many as eight digits between 0 and 99999999 Restriction This prohibits printing scanning or restricts the number of sheets to load Restricting the Use of the Machine page 9 38 NOTE If the login user name entry screen appears during operations enter a login user name and password and select Login For this you nee...

Страница 513: ...int Report Print from PC Print Restr Full Color Limits the number of pages used for full color printing Applicable print functions are as follows Print from Box Print from USB Drive Print Report Print from PC Scan Restriction Others Limits the number of sheets scanned excludes copying FAX TX Restriction Limits the number of sheets sent by fax This is displayed when the optional FAX Kit is installe...

Страница 514: ...striction can be applied in the following modes IMPORTANT Select Off Use Port 1 Only or Use Port 2 Only as the FAX Port Restriction setting Item Descriptions Off No restriction is applied Counter Limit Restricts the print counter in one page increments up to 9 999 999 copies Reject Usage Restriction is applied ...

Страница 515: ... account information 3 Save Yes The account information is changed NOTE If the login user name entry screen appears during operations enter a login user name and password and select Login For this you need to login as an administrator or as a user with privileges to carry out this setting The factory default login user name and login password are set as shown below NOTE Select Name or ID from the ...

Страница 516: ...unt 1 Select the account name you wish to delete 2 Delete Yes The account is deleted NOTE If the login user name entry screen appears during operations enter a login user name and password and select Login For this you need to login as an administrator or as a user with privileges to carry out this setting The factory default login user name and login password are set as shown below Model Name Log...

Страница 517: ...e elements as they appear in Windows 10 1 Display the screen 1 Click Start button on the Windows and then select Windows System Control Panel and View devices and printers 2 Right click the printer driver icon of the machine and click the Printer properties menu of the printer driver 3 Click Administrator on the Device Settings tab 2 Configure the settings 1 Select Job accounting on the Job Accoun...

Страница 518: ...ndows user name is searched in the Account IDs and printing is possible if the name is registered If the Account ID is not registered the screen for entering the Account ID will appear 3 Click OK Job Accounting for Scan Using TWAIN The number of jobs scanned by using TWAIN can be managed by Job Accounting Setting TWAIN Driver To manage the number of jobs scanned by using TWAIN you need to configur...

Страница 519: ...Authentication and Accounting User Login Job Accounting Job Accounting Local 2 Configure the settings 1 Click User Authentication Settings 2 Select the checkbox beside Account and enter the account ID 3 Click OK ...

Страница 520: ...ck the search box in the Control Panel and type Scanner in there Select View scanners and cameras in the search list The Scanners and Cameras screen is displayed 2 Select the same name as this machine from WIA Drivers and press Properties 2 Configure WIA Driver 1 Select the checkbox beside Account ID on the Settings tab and enter the Account ID 2 Click OK NOTE In Windows 8 1 click Search in charms...

Страница 521: ...ing preferences from the resulting pull down menu 3 Click FAX TX Setting in the Printing Preferences window 2 Configure the settings 1 Select Job Accounting on the Authentication tab 2 Set the Job Accounting Use Specific Account ID This option can be used to specify an account ID to use the same Account ID for every FAX job If this option is selected the user does not have to enter the Account ID ...

Страница 522: ... need to login as an administrator or as a user with privileges to carry out this setting The factory default login user name and login password are set as shown below Item Description Counter Limit When you add a new account you can change the default restrictions on the number of sheets used You can set any number from 1 to 9 999 999 The items that can be set differ depending on whether Individu...

Страница 523: ...f sheets used for scanning excludes copying FAX TX Restriction 1 Sets the default restriction on the number of sheets used for sending faxes Total selected for Copy Printer Count Print Restriction Total Sets the default restriction on the total number of sheets used for copying and printing Print Restr Full Color Sets the default restriction on the number of sheets used for full color printing Pri...

Страница 524: ...lt Setting Next Count by Paper Size Next Paper Size 1 to 5 Change 2 Configure the settings 1 Select On 2 Select the paper size 3 Select Media Type to specify media type 4 Select the media type and select OK 5 Select OK NOTE Paper size is available in five types 1 to 5 These types are specified in accounting reports Print Accounting Report page 9 53 NOTE If the login user name entry screen appears ...

Страница 525: ...is you need to login as an administrator or as a user with privileges to carry out this setting The factory default login user name and login password are set as shown below Item Descriptions Printed Pages Displays the number of pages copied and printed and the total number of pages used You can also use FAX 1 Count by Paper Size and Count by Duplex Combine to check the number of pages used Copy B...

Страница 526: ...for single color copying Copy Print Color Displays the total number of pages used for full color copying and printing Copy Print Total Displays the total number of pages used for copying and printing FAX 1 Displays the number of pages received Total Displays the total number of pages used Count by Paper Size Displays the number of pages used in the selected paper size as well as the number of page...

Страница 527: ... for which you want to check the count 1 Check the number of pages 1 Select the account to check the count 2 Select Detail 3 Select Check at the function to check the count The results will be displayed 4 Confirm the count and select Close NOTE Select Name or ID from the Sort to sort the account names Select Search Name or Search ID to search by account name or account ID To display an account oth...

Страница 528: ...Letter paper is loaded in the cassette 2 Display the screen 1 System Menu Counter key User Login Job Accounting 2 Job Accounting Setting Next Job Accounting Local Next 3 Print the report Print Accounting Report Next Yes Accounting report is printed NOTE If the login user name entry screen appears during operations enter a login user name and password and select Login For this you need to login as ...

Страница 529: ... login user name and password appears Enter a login user name and password to login If the user has already registered the account information the account ID entry would be skipped 2 Proceed to complete the rest of the steps Logout When the operations are complete select the Authentication Logout key to return to the account ID entry screen NOTE If you entered a wrong character select the Clear ke...

Страница 530: ...The next job will be prohibited in sending or in storing in the box Job stops when the counter reaches its limit Subsequently Printing scanning of the job continues but the subsequent job will be rejected Alert Only Job continues while displaying an alert message NOTE If the login user name entry screen appears during operations enter a login user name and password and select Login For this you ne...

Страница 531: ...ed page 9 50 Print Accounting Report page 9 53 1 Display the screen 1 System Menu Counter key User Login Job Accounting 2 Job Accounting Settings Next Copy Printer Count Change 2 Configure the settings Select Total or Individual OK NOTE If the login user name entry screen appears during operations enter a login user name and password and select Login For this you need to login as an administrator ...

Страница 532: ...Counter key User Login Job Accounting 2 Unknown User Setting Next Unknown ID Job 2 Configure the settings Select Permit or Reject Item Descriptions Permit The job is permitted to be printed Reject The job is rejected not printed NOTE If the login user name entry screen appears during operations enter a login user name and password and select Login For this you need to login as an administrator or ...

Страница 533: ...ator or as a user with privileges to carry out this setting The factory default login user name and login password are set as shown below Item Descriptions User Name Enter the name displayed on the user list up to 32 characters Account Name Register an account for a user whose ID is unknown Overview of Job Accounting page 9 34 NOTE Select Name or ID from the Sort to sort the account list Select Se...

Страница 534: ...der 500 1 500 sheet 2 10 77 Remove any jammed paper in Cassette 7 Large Capacity Side Feeder 500 1 500 sheet 2 10 80 Remove any jammed paper in the Multipurpose Tray 10 84 Remove any jammed paper in Right Cover 1 10 85 Remove any jammed paper in Right Cover 3 10 89 Remove any jammed paper in Right Cover 4 10 90 Remove any jammed paper in the Upper Left Tray 4 000 sheet Finisher Tray C 10 92 Remove...

Страница 535: ...t cloth dampened with alcohol or mild detergent Cleaning inside of the Document Processor Clean the dual scanning unit with the supplied cleaning cloth 1 Remove the cloth from the cleaning cloth compartment and open the document processor cover CAUTION For safety always unplug the power cord before cleaning the machine IMPORTANT Do not use thinner or other organic solvents IMPORTANT Do not use thi...

Страница 536: ... and the reading guide with the supplied cleaning cloth 1 Remove the cloth from the cleaning cloth compartment 2 Clean the slit glass surface and the reading guide IMPORTANT Clean the slit glass surface with the supplied cleaning cloth NOTE Dirt on the slit glass or the reading guide may cause black streaks to appear in the output ...

Страница 537: ... regularly at least monthly to ensure optimum printing quality 1 Tilt the operation panel upwards and open the front cover 2 Remove the cleaning brush 3 Open Right Cover 1 4 Clean the separator Clean dirt from the separator by moving the brush from side to side along the separator ...

Страница 538: ...ginal position 6 Put away the cleaning brush and close the front cover Cleaning Transfer Roller Clean the transfer roller regularly at least monthly to ensure optimum printing quality 1 Tilt the operation panel upwards and open the front cover 2 Remove the cleaning brush ...

Страница 539: ...sfer roller Clean dirt from the transfer roller by moving the brush from side to side along the roller while rotating the roller by turning the gear at the right end of the roller 5 Return the cover to the original position 6 Put away the cleaning brush and close the front cover ...

Страница 540: ... toner container release lever to the vertical position NOTE For the toner container always use a genuine toner container Using a toner container that is not genuine may cause image defects and product failure The memory chip in the toner container of this product stores information necessary for improving customer convenience operation of the recycling system for used toner containers and plannin...

Страница 541: ... Regular Maintenance 3 Remove the toner container 4 Put used toner container into the plastic waste bag 5 Remove the new toner container from the box 6 Tap the toner container IMPORTANT Do not touch the points shown below ...

Страница 542: ...10 9 Troubleshooting Regular Maintenance 7 Shake the toner container 8 Install the toner container 9 Turn the toner container release lever to the horizontal position 10Close the toner container cover ...

Страница 543: ... container cover or front cover does not close check that the new toner container is installed correctly Return the exhausted toner container to your dealer or service representative The collected toner container will be recycled or disposed in accordance with the relevant regulations ...

Страница 544: ...will be displayed Immediately replace the waste toner box Waste toner box is full 1 Open the waste toner box cover 2 Remove the Waste Toner Box 3 Put used Waste Toner Box into the plastic waste bag 4 Remove the new Waste Toner Box CAUTION Do not attempt to incinerate parts which contain toner Dangerous sparks may cause burns ...

Страница 545: ...nstall the Waste Toner Box 6 Close the waste toner box cover NOTE Return the exhausted waste toner box to your dealer or service representative The collected waste toner box will be recycled or disposed in accordance with the relevant regulations ...

Страница 546: ...ge 3 4 Loading in the Large Capacity Feeder page 3 8 Loading in the Side Feeder 3 000 sheet page 3 12 Loading Paper in the Multipurpose Tray page 5 6 NOTE If Show Paper Setup Message is set to On the confirmation screen for the paper setting will be displayed when a new paper is set If a paper is changed select Change and then change the settings of the paper Cassette 1 to 7 page 8 7 MP Tray Setti...

Страница 547: ...aples the following messages will be displayed The staple cartridge holder need to be replenished with staples Staple is empty 1 Open the finisher front cover 1 2 Remove the Staple Cartridge Holder A 3 Replace the staples NOTE If the Staple Unit runs out of staples contact your dealer or service representative 1 1 2 ...

Страница 548: ...10 15 Troubleshooting Regular Maintenance 4 Install the Staple Cartridge Holder A 5 Close the cover ...

Страница 549: ... staples the following messages will be displayed The staple cartridge holder need to be replenished with staples Staple is empty 1 Open the finisher front cover 1 2 Remove the Staple Cartridge Holder A 3 Replace the staples NOTE If the Staple Unit runs out of staples contact your dealer or service representative 1 1 2 ...

Страница 550: ...Staples Folding Unit When the Staple Unit runs out of staples the following messages will be displayed The staple cartridge holder need to be replenished with staples Staple is empty 1 Open the finisher front cover 1 and 2 NOTE If the Staple Unit runs out of staples contact your dealer or service representative ...

Страница 551: ...10 18 Troubleshooting Regular Maintenance 2 Remove the Staple Cartridge Holder B or C 3 Replace the staples 4 Install the Staple Cartridge Holder B or C 5 Close the covers C B 1 1 2 1 1 2 ...

Страница 552: ...messages will be displayed Empty the staple waste box Check the staple waste box Leave the power switch on the machine switched ON while performing this procedure 1 Open the finisher front cover 1 2 Remove the Staple Waste Box 3 Empty the Staple Waste Box NOTE Take care not to spill the staple waste when removing the box ...

Страница 553: ...10 20 Troubleshooting Regular Maintenance 4 Install the Staple Waste Box 5 Close the cover ...

Страница 554: ...ges will be displayed Empty the punch waste box Empty the punch waste box Leave the power switch on the machine switched ON while performing this procedure 1 Open the finisher front cover 1 2 Remove the Punch Waste Box 3 Empty the Punch Waste Box NOTE Take care not to spill the waste hole punch scraps when removing the box ...

Страница 555: ...10 22 Troubleshooting Regular Maintenance 4 Install the Punch Waste Box 5 Close the cover ...

Страница 556: ...Auto Panel Reset time short Set the Auto Panel Reset time to 30 seconds or more page 8 79 The screen does not respond when the power switch is turned on Is the machine plugged in Plug the power cord into an AC outlet Is the machine powered on Turn on the main power switch page 2 2 Pressing the Start key does not produce copies Is there a message on the screen Determine the appropriate response to ...

Страница 557: ...n ejected multi feed Load the paper correctly page 3 2 Printouts are wrinkled Is the paper loaded correctly Load the paper correctly page 3 4 Turn the orientation 180 degrees around in which the paper is positioned page 3 4 Clean the paper separator page 10 4 Is the paper damp Replace the paper with new paper page 3 4 Printouts are curled Turn the orientation 180 degrees around in which the paper ...

Страница 558: ...network under this restriction Change the settings of name resolution such as NetBEUI and DNS or network environment settings Command Center RX User Guide Select Wi Fi Wired Network or Optional Network as an unlimited use network on Primary Network Client page 8 70 Set to Wired Network or Wi Fi either one of On and set the other setting to Off page 8 60 Cannot print with USB drive USB drive not re...

Страница 559: ...h from Login User Name page 5 25 Has Login Password been entered properly Check the login password page 5 25 Have exceptions for Windows Firewall been configured properly Configure exceptions for Windows Firewall properly page 3 22 Do the time settings for the equipment domain server and data destination computer differ Set the equipment domain server and data destination computer to the same time...

Страница 560: ...the background of the scanned original too dark and the texts are difficult to recognize Set Background Density Adj to On or Manual and manually adjust the density lighter Otherwise set Density to darker level page 6 32 page 6 41 Is the text or image on the back of the original visible on the front Set Prevent Bleed through to On page 6 42 Cannot find the machine with WSD Did you search by specify...

Страница 561: ...sh page 10 60 Run Laser Scanner Cleaning page 10 60 Make sure the paper type setting is correct for the paper being used page 8 15 White background parts of the image appear to have a slight overall coloration Have you changed the density Select appropriate density level page 6 32 page 8 82 Run Calibration page 10 60 Copies have a moire pattern dots grouped together in patterns and not aligned uni...

Страница 562: ...are skewed Are the originals placed correctly When placing originals on the platen align them with the original size indicator plates page 5 2 When placing originals in the document processor align the original width guides securely before placing the originals page 5 4 Is the paper loaded correctly Check the position of the paper width guides page 3 4 Printed images have vertical lines Is the sli...

Страница 563: ... or shows white lines Open and then close the right cover Run Drum Refresh page 10 59 Run Developer Refresh page 10 60 Print on the back of the sheet is visible on the front Set Prevent Bleed through to On page 6 42 page 8 20 Symptom Checkpoints Corrective Actions Reference Page ...

Страница 564: ...d color copy paper into the paper tray Run Calibration page 10 60 Run Tone Curve Adjustment page 10 58 When making copies Adjust the color balance page 6 36 When printing from a computer Adjust the color using the printer driver Perform Tone Curve Adjustment in the System Menu is displayed Over long periods of use the effects of the ambient temperature and humidity can cause color output hues to v...

Страница 565: ...nter RX using Google Chrome 1 Display the screen System Menu Counter key System Network Network Protocol Settings 2 Set Enhanced VNC over SSL to On 3 Configure settings for remote operation 1 System Menu Counter key System Network Remote Operation Change On 2 Select Off Use Password or Administrator Only When you select Use Password enter the password in Password and Confirm Password then select O...

Страница 566: ...ated by a colon to start up the remote operation IP address port number Accessing Command Center RX page 2 64 NOTE If the user is logged in to the device the permission confirmation screen will be displayed on the operation panel Select Yes If pop up blocking of the browser occurs during connection of the Remote Operation select Always allow pop ups from https host name and click Done Perform Remo...

Страница 567: ...lowing Auto Error Clear page 8 79 Is the acceptable number of sheets exceeded Select Continue to print without using Staple Select Cancel to cancel the job Access point was not detected Check if the access point has been set correctly Activation error Failed to activate the application Contact administrator Expansion Authentication is disabled Turn the power switch off and on If the error exists c...

Страница 568: ... Select Continue to print scanned pages Select Cancel to cancel the job Broadcast error An error has occurred during broadcast transmission The job is canceled Select End Message Checkpoints Corrective Actions Reference Page Calibrating The machine is under the adjustment to maintain its quality Please wait Cannot Banner Print System stamp is set up Banner print cannot be carried out Job is cancel...

Страница 569: ...f the PC to which the scanned image is to be sent Host name Path Login user name NOTE If the sender is a domain user specify the domain name Login User ID Domain Name Example sa720XXXX km Login password Folder share permissions of the recipient Cannot fold this paper Did you select a paper size type that cannot be folded If the selected paper is not changed and Continue is selected fold is release...

Страница 570: ...ard In registration process the ID card information was not read correctly Hold again the ID card over the ID card reading part If the same message still appears the ID card may not be compatible with this product Change it to another ID card Cannot recognize Make sure your ID card has been registered Cannot staple at the specified position Have you selected a position that cannot be stapled If th...

Страница 571: ...iner Cover you can open the Toner Container Cover that you closed accidentally Checking the waste toner box Is the waste toner box full Replace the toner container Reuse the black K toner container as a waste toner box Handle the color toner containers according to the instructions supplied with them Select Next The instructions will be displayed NOTE If you select Open Toner Container Cover you c...

Страница 572: ...matically after a set amount of time elapses For details on Auto Error Clear refer to the following Auto Error Clear page 8 79 Failed to specify Job Accounting when processing the job externally The job is canceled Select End Failed to store job retention data The job is canceled Select End FAX box limit exceeded Follow the instructions on the screen and delete documents from the FAX box to make r...

Страница 573: ...Checkpoints Corrective Actions Reference Page Incorrect account ID 1 1 When Auto Error Clear is set to On processing resumes automatically after a set amount of time elapses For details on Auto Error Clear refer to the following Auto Error Clear page 8 79 The account ID was incorrect when processing the job externally The job is canceled Select End Incorrect box password The box password was incor...

Страница 574: ... amount of time elapses For details on Auto Error Clear refer to the following Auto Error Clear page 8 79 PostScript error has occurred The job is canceled Select End Message Checkpoints Corrective Actions Reference Page Machine failure Internal error has occurred Make a note of the error code displayed on the screen Call service Mailbox tray is full of paper Is the acceptable storage capacity exc...

Страница 575: ...details on Auto Error Clear refer to the following Auto Error Clear page 8 79 Message Checkpoints Corrective Actions Reference Page Non genuine toner installed Is the installed toner container our own brand We will not be liable for any damage caused by the use of third party supplies in this machine Message Checkpoints Corrective Actions Reference Page Paper jam If a paper jam occurs the machine ...

Страница 576: ...urred on Printing System Refer to Responding to Printing System Error for the error code and corrective actions page 10 52 Select Status Job Cancel key Is the Device Communication screen displayed An error has occurred on Printing System Select Printing Sys Err of the Device Communication screen and check error page 10 52 Message Checkpoints Corrective Actions Reference Page Regulating the tempera...

Страница 577: ...r cancel the delayed transmission and then perform the job again Select another cassette Is the cassette you selected correct The specified cassette is a fax special stage Select another valid cassette Select Continue to print Send Error 1 An error has occurred during transmission The job is canceled Select End Refer to Responding to Send Error for the error code and corrective actions page 10 49 ...

Страница 578: ...p and the location of staple depletion will be indicated on the screen Leave the machine on and follow the instructions to replace the staple case Select Continue to print without stapling Select Cancel to cancel the job page 10 14 page 10 16 page 10 14 page 10 16 page 10 17 Staple is empty Manual Staple Has staple cartridge holder A run out of staples Add staples to staple cartridge holder A page...

Страница 579: ...the password policy requirements and change the login password The job is canceled Select End page 9 7 page 9 8 The phone receiver is off the hook Put down the receiver The slit glass requires cleaning Clean the slit glass using the cleaning cloth supplied with the document processor page 10 3 The toner container is improperly installed The toner container is improperly installed or not installed ...

Страница 580: ...age Checkpoints Corrective Actions Reference Page Unknown Toner Installed PC C M Y K Does the installed toner container s regional specification match the machine s Install the specified container USB Drive error 1 Is writing to a USB drive prohibited An error occurred in the USB drive The job stopped Select End The error cord is as follows 01 Connect a USB drive that can be written to An error oc...

Страница 581: ... temperature Adjust the room temperature Print quality may be deteriorated Adjust the temperature and the humidity of your room Warning for low temperature Adjust the room temperature Print quality may be deteriorated Adjust the temperature and the humidity of your room Warning low memory Cannot start the job Try again later Waste toner box almost full It is almost time to replace the waste toner ...

Страница 582: ...Center RX SMTP login user name and login password POP3 login user name and login password E mail size limit page 2 67 Failed to send i FAX Check the following on the Command Center RX SMTP login user name and login password POP3 login user name and login password Refer to FAX Operation Guide Failed to send via FTP Check the FTP settings Login user name and login password NOTE If the sender is a do...

Страница 583: ...a FTP Check the following settings System Menu Counter key System Network Network TCP IP Settings Protocol Detail FTP Client Transmission page 8 58 Failed to send i FAX Select On of the i FAX settings on the Command Center RX page 2 67 1106 Failed to send the e mail Failed to send i FAX Check the sender address of SMTP on the Command Center RX page 2 67 1131 Failed to send via FTP Enable the SSL S...

Страница 584: ...ot operating properly The server is not operating properly Check the following of the FTP server Is FTP available The server is not operating properly Failed to send the e mail Failed to send i FAX Check the network The network cable is connected The hub is not operating properly The server is not operating properly 2201 2202 2203 2231 Failed to send the e mail Failed to send via FTP Failed to sen...

Страница 585: ... to connect to the Printing System Check the connection to the Printing System Printing System power Interface cable connection Is the power switch of Printing System turned ON Turn the power switch of Printing System on Is the power cable of Printing System plugged Turn the power switch of the machine off and check that the power cable of Printing System is correctly plugged After checking the po...

Страница 586: ...on to the Printing System Both machine and Printing System Firmware versions installed on the machine and Printing System Make a note of the error code displayed on the touch panel Call service 2010 2020 Failed to connect to the Printing System Check the connection to the Printing System Both machine and machine interface board Firmware versions installed on the machine and Printing System Make a ...

Страница 587: ... paper Item Description Reference Page Color Registration Procedure Correct the color position to resolve color drift page 10 54 Tone Curve Adjustment When the printed output tone may differ from the original perform this function to ensure consistency with the original tone page 10 58 Drum Refresh Remove image blur and white dots from the printout page 10 59 Calibration Calibrate the device to en...

Страница 588: ...facing up After removing new paper from its packaging fan the paper before loading it in the cassette Loading in the Cassettes page 3 4 Before loading the paper be sure that it is not curled or folded Paper that is curled or folded may cause paper jams Ensure that the loaded paper does not exceed the level indicator see illustration above If paper is loaded without adjusting the paper length guide...

Страница 589: ...the screen System Menu Counter key Adjustment Maintenance Color Registration Next Manual Next IMPORTANT Load the paper with the print side facing up After removing new paper from its packaging fan the paper before loading it in the cassette Loading in the Cassettes page 3 4 Before loading the paper be sure that it is not curled or folded Paper that is curled or folded may cause paper jams Ensure t...

Страница 590: ...ration B is the appropriate value From charts V 1 to V 5 read only the values from V 3 center 2 Select Color Registration Next 3 Select Change for the chart to be corrected 4 Select or to enter the values read from the chart Select to increase the value from 0 to 9 To decrease select By selecting the value changes from 0 to alphabetic letters going from A to I To move in the reverse direction sele...

Страница 591: ...justment 1 Load paper 2 Display the screen System Menu Counter key Adjustment Maintenance Tone Curve Adjustment Next 3 Adjust the tone curve 1 Select Start A pattern is printed Check that the number 1 is printed at the bottom of the pattern IMPORTANT Load the paper with the print side facing up After removing new paper from its packaging fan the paper before loading it in the cassette Loading in t...

Страница 592: ... to 3 is printed at the bottom of the pattern and repeat steps 2 to 3 twice to read pattern 2 and 3 in sequence 5 Select OK in the adjustment end confirmation screen Drum Refresh Remove image blur and white dots from the printout 1 Display the screen System Menu Counter key Adjustment Maintenance Drum Refresh Next 2 Perform the drum refresh Select Start Drum Refresh begins NOTE Drum Refresh cannot...

Страница 593: ...ning Select Start Laser Scanner Cleaning begins Developer Refresh Adjust the printed image that is too light or incomplete even though there is enough toner 1 Display the screen System Menu Counter key Adjustment Maintenance Developer Refresh Next 2 Perform the Developer Refresh Select Start Developer Refresh begins NOTE When correct toner overlapping is not ensured even after performing calibrati...

Страница 594: ...ch panel as well as the clearing instructions 1 Shows the location of a paper jam 2 Shows the previous step 3 Shows the next step 4 Shows the removal procedure ἣ JAM s Paper jam 1 5 1 Open cassette 1 2 Remove the paper To remove paper which is difficult to get access to the cassette can be removed 3 Close the cassette e011001 1 2 3 4 A B C F G H I J J J J L W O T N M P U U U U V Q S R K E D X X E ...

Страница 595: ...00 sheet 3 page 10 75 H Cassette 7 Large Capacity Side Feeder 500 1 500 sheet 2 page 10 80 I Multipurpose Tray page 10 84 J Right Cover 1 page 10 85 K Right Cover 3 page 10 89 L Right Cover 4 page 10 90 M Upper Left Tray 4 000 Sheet Finisher 100 sheet Staple Finisher Tray C page 10 92 N Lower Left Tray page 10 93 O Right Tray page 10 94 P Top Cover Right Cover 1 Side Feeder 500 sheet 3 Large Capac...

Страница 596: ...d you until it stops 2 Remove any jammed paper 3 Push Cassette 1 back in CAUTION Do not reuse jammed papers If the paper tears during removal be sure to remove any loose scraps of paper from inside the machine Scraps of paper left in the machine could cause subsequent jamming NOTE The cassette can be removed ...

Страница 597: ...d detach the side feeder 2 Open Right Cover 3 3 Remove any jammed paper 4 Pull Cassette 2 out toward you until it stops CAUTION Do not reuse jammed papers If the paper tears during removal be sure to remove any loose scraps of paper from inside the machine Scraps of paper left in the machine could cause subsequent jamming ...

Страница 598: ...ting Clearing Paper Jams 5 Remove any jammed paper 6 Push Right Cover 3 and Cassette 2 back in 7 If the optional side feeder is installed return the side feeder to the original position NOTE The cassette can be removed ...

Страница 599: ...d detach the side feeder 2 Open Right Cover 4 3 Remove any jammed paper 4 Pull Cassette 3 out toward you until it stops CAUTION Do not reuse jammed papers If the paper tears during removal be sure to remove any loose scraps of paper from inside the machine Scraps of paper left in the machine could cause subsequent jamming ...

Страница 600: ... return the side feeder to the original position Remove any jammed paper in Cassette 4 1 If the optional side feeder is installed detach the side feeder CAUTION Do not reuse jammed papers If the paper tears during removal be sure to remove any loose scraps of paper from inside the machine Scraps of paper left in the machine could cause subsequent jamming ...

Страница 601: ...oubleshooting Clearing Paper Jams 2 Open Right Cover 4 3 Remove any jammed paper 4 Pull Cassette 3 out toward you until it stops 5 Pull Cassette 4 out toward you until it stops 6 Pull out paper feed unit B1 B1 ...

Страница 602: ...10 69 Troubleshooting Clearing Paper Jams 7 Open cover B2 8 Remove any jammed paper 9 Push the paper feed unit Cassette 3 and Cassette 4 back in 10Return the cover to the original position B2 ...

Страница 603: ...position Remove any jammed paper in Cassette 5 Side Feeder 3 000 sheet 1 Detach the side feeder 2 Remove any jammed paper CAUTION Do not reuse jammed papers If the paper tears during removal be sure to remove any loose scraps of paper from inside the machine Scraps of paper left in the machine could cause subsequent jamming ...

Страница 604: ...10 71 Troubleshooting Clearing Paper Jams 3 Pull Cassette 5 out toward you until it stops 4 Remove any jammed paper 5 Return Cassette 5 and the side feeder to the original position ...

Страница 605: ... 1 500 sheet 2 1 Detach the side feeder 2 Remove any jammed paper 3 Open the side feeder top cover and the side feeder right cover 1 CAUTION Do not reuse jammed papers If the paper tears during removal be sure to remove any loose scraps of paper from inside the machine Scraps of paper left in the machine could cause subsequent jamming ...

Страница 606: ...10 73 Troubleshooting Clearing Paper Jams 4 Remove any jammed paper 5 Pull Cassette 5 out toward you until it stops 6 Remove any jammed paper ...

Страница 607: ...10 74 Troubleshooting Clearing Paper Jams 7 Return Cassette 5 and the covers to the original position 8 Return the side feeder to the original position NOTE The cassette can be removed ...

Страница 608: ...anation for Cassette 6 below 1 Detach the side feeder 2 Remove any jammed paper 3 Open the side feeder right cover 2 CAUTION Do not reuse jammed papers If the paper tears during removal be sure to remove any loose scraps of paper from inside the machine Scraps of paper left in the machine could cause subsequent jamming ...

Страница 609: ...10 76 Troubleshooting Clearing Paper Jams 4 Remove any jammed paper 5 Pull Cassette 6 out toward you until it stops 6 Remove any jammed paper NOTE The cassette can be removed ...

Страница 610: ...he original position Remove any jammed paper in Cassette 6 Large Capacity Side Feeder 500 1 500 sheet 2 1 Detach the side feeder CAUTION Do not reuse jammed papers If the paper tears during removal be sure to remove any loose scraps of paper from inside the machine Scraps of paper left in the machine could cause subsequent jamming ...

Страница 611: ...10 78 Troubleshooting Clearing Paper Jams 2 Remove any jammed paper 3 Open the side feeder right cover 2 4 Remove any jammed paper 5 Pull Cassette 6 out toward you until it stops ...

Страница 612: ...10 79 Troubleshooting Clearing Paper Jams 6 Remove any jammed paper 7 Return Cassette 6 and the cover to the original position 8 Return the side feeder to the original position ...

Страница 613: ...500 1 500 sheet 2 1 Detach the side feeder 2 Remove any jammed paper 3 Open the side feeder right cover 2 CAUTION Do not reuse jammed papers If the paper tears during removal be sure to remove any loose scraps of paper from inside the machine Scraps of paper left in the machine could cause subsequent jamming ...

Страница 614: ...81 Troubleshooting Clearing Paper Jams 4 Remove any jammed paper 5 Pull Cassette 6 out toward you until it stops 6 Pull Cassette 7 out toward you until it stops 7 Pull out side feeder paper feed unit B1 B1 ...

Страница 615: ...10 82 Troubleshooting Clearing Paper Jams 8 Open cover B2 9 Remove any jammed paper 10Push the paper feed unit Cassette 6 and Cassette 7 back in 11Return the cover to the original position B2 ...

Страница 616: ...10 83 Troubleshooting Clearing Paper Jams 12Return the side feeder to the original position ...

Страница 617: ...rpose Tray 1 Remove any jammed paper 2 Remove all the paper 3 Reload the paper CAUTION Do not reuse jammed papers If the paper tears during removal be sure to remove any loose scraps of paper from inside the machine Scraps of paper left in the machine could cause subsequent jamming ...

Страница 618: ...in Right Cover 1 1 Open Right Cover 1 2 Remove any jammed paper 3 Open the fuser cover A1 CAUTION The fixing unit is extremely hot Take sufficient care when working in this area as there is a danger of getting burned NOTE Remove the paper from the multipurpose tray A1 ...

Страница 619: ...10 86 Troubleshooting Clearing Paper Jams 4 Remove any jammed paper 5 Return the fuser cover to the original position 6 Open the multipurpose tray and Right Cover 2 7 Remove any jammed paper ...

Страница 620: ...10 87 Troubleshooting Clearing Paper Jams 8 Tilt the operation panel upwards and open the front cover 9 Pull out the bridge unit 10Open the bridge unit cover 11Remove any jammed paper ...

Страница 621: ...10 88 Troubleshooting Clearing Paper Jams 12Return the bridge unit to the original position 13Return the covers to the original position ...

Страница 622: ...lled detach the side feeder 2 Open Right Cover 3 3 Remove any jammed paper 4 Return the cover to the original position CAUTION Do not reuse jammed papers If the paper tears during removal be sure to remove any loose scraps of paper from inside the machine Scraps of paper left in the machine could cause subsequent jamming ...

Страница 623: ...n Remove any jammed paper in Right Cover 4 1 If the optional side feeder is installed detach the side feeder 2 Open Right Cover 4 CAUTION Do not reuse jammed papers If the paper tears during removal be sure to remove any loose scraps of paper from inside the machine Scraps of paper left in the machine could cause subsequent jamming ...

Страница 624: ...10 91 Troubleshooting Clearing Paper Jams 3 Remove any jammed paper 4 Return the cover to the original position 5 If the optional side feeder is installed return the side feeder to the original position ...

Страница 625: ...r Tray C 1 Open the upper left cover 2 Remove any jammed paper 3 Return the cover to the original position CAUTION Do not reuse jammed papers If the paper tears during removal be sure to remove any loose scraps of paper from inside the machine Scraps of paper left in the machine could cause subsequent jamming ...

Страница 626: ...Remove any jammed paper 2 Open Right Cover 1 3 Return the cover to the original position CAUTION Do not reuse jammed papers If the paper tears during removal be sure to remove any loose scraps of paper from inside the machine Scraps of paper left in the machine could cause subsequent jamming ...

Страница 627: ...move any jammed paper 2 Open Right Cover 1 3 Return the cover to the original position CAUTION Do not reuse jammed papers If the paper tears during removal be sure to remove any loose scraps of paper from inside the machine Scraps of paper left in the machine could cause subsequent jamming ...

Страница 628: ...the explanation for Side Feeder 500 sheet 3 below 1 Detach the side feeder 2 Remove any jammed paper 3 Open the side feeder top cover and the side feeder right cover 1 CAUTION Do not reuse jammed papers If the paper tears during removal be sure to remove any loose scraps of paper from inside the machine Scraps of paper left in the machine could cause subsequent jamming ...

Страница 629: ...10 96 Troubleshooting Clearing Paper Jams 4 Remove any jammed paper 5 Return the covers to the original position 6 Return the side feeder to the original position ...

Страница 630: ...t 2 See the explanation for Side Feeder 500 sheet 3 below 1 Detach the side feeder 2 Remove any jammed paper 3 Open the side feeder right cover 2 CAUTION Do not reuse jammed papers If the paper tears during removal be sure to remove any loose scraps of paper from inside the machine Scraps of paper left in the machine could cause subsequent jamming ...

Страница 631: ...10 98 Troubleshooting Clearing Paper Jams 4 Remove any jammed paper 5 Return the cover to the original position 6 Return the side feeder to the original position ...

Страница 632: ...lbox 1 Open the mailbox cover 2 Remove any jammed paper 3 Close the cover CAUTION Do not reuse jammed papers If the paper tears during removal be sure to remove any loose scraps of paper from inside the machine Scraps of paper left in the machine could cause subsequent jamming ...

Страница 633: ...move the originals from the Original Table 2 Open the document processor cover 3 Turn dial C to remove any jammed paper CAUTION If the paper tears during removal be sure to remove any loose scraps of paper from inside the machine Scraps of paper left in the machine could cause subsequent jamming C ...

Страница 634: ...on Remove any jammed paper in the 4 000 sheet Finisher 100 sheet Staple Finisher Inner 1 Open the finisher front cover 1 CAUTION Do not reuse jammed papers If the paper tears during removal be sure to remove any loose scraps of paper from inside the machine Scraps of paper left in the machine could cause subsequent jamming C ...

Страница 635: ...10 102 Troubleshooting Clearing Paper Jams 2 Open the conveyor guide D1 3 Remove any jammed paper 4 Return the conveyor guide D1 to the original position 5 Return the cover to the original position D1 ...

Страница 636: ... Finisher Tray A 1 Remove any jammed paper 2 Open the finisher front cover 1 3 Open the conveyor guide D6 CAUTION Do not reuse jammed papers If the paper tears during removal be sure to remove any loose scraps of paper from inside the machine Scraps of paper left in the machine could cause subsequent jamming D6 ...

Страница 637: ...10 104 Troubleshooting Clearing Paper Jams 4 Remove any jammed paper 5 Return the conveyor guide D6 to the original position 6 Open the conveyor guide D4 7 Turn knob D5 D4 D5 ...

Страница 638: ...10 105 Troubleshooting Clearing Paper Jams 8 Remove any jammed paper 9 Return the conveyor guide D4 to the original position 10Open the conveyor guide D1 11Remove any jammed paper D1 ...

Страница 639: ...ginal position Remove any jammed paper in the 4 000 sheet Finisher 100 sheet Staple Finisher Tray B 1 Remove any jammed paper CAUTION Do not reuse jammed papers If the paper tears during removal be sure to remove any loose scraps of paper from inside the machine Scraps of paper left in the machine could cause subsequent jamming ...

Страница 640: ...10 107 Troubleshooting Clearing Paper Jams 2 Open the finisher front cover 1 3 Open the conveyor guide D2 4 Turn knob D3 5 Remove any jammed paper D2 D3 ...

Страница 641: ...8 Troubleshooting Clearing Paper Jams 6 Return the conveyor guide D2 to the original position 7 Open the conveyor guide D1 8 Remove any jammed paper 9 Return the conveyor guide D1 to the original position D1 ...

Страница 642: ... the Folding Unit 4 000 sheet Finisher 1 Open the finisher front cover 1 and 2 2 Open the conveyor guide D7 CAUTION Do not reuse jammed papers If the paper tears during removal be sure to remove any loose scraps of paper from inside the machine Scraps of paper left in the machine could cause subsequent jamming D7 ...

Страница 643: ...10 110 Troubleshooting Clearing Paper Jams 3 Remove any jammed paper 4 Return the conveyor guide D7 to the original position 5 Open the conveyor guide D8 6 Remove any jammed paper D8 ...

Страница 644: ...111 Troubleshooting Clearing Paper Jams 7 Return the conveyor guide D8 to the original position 8 Remove paper from inside the finisher 9 Return the covers to the original position 10Lift the folding tray ...

Страница 645: ...10 112 Troubleshooting Clearing Paper Jams 11Remove any jammed paper 12Press the release lever to pull the folding unit out 13Open the folding unit left cover 14Turn dial D9 D9 ...

Страница 646: ...10 113 Troubleshooting Clearing Paper Jams 15Remove any jammed paper 16Return the folding unit left cover to the original position 17Open the folding unit top cover 18Turn dial D9 D9 ...

Страница 647: ...10 114 Troubleshooting Clearing Paper Jams 19Remove any jammed paper 20Return the folding unit top cover to the original position 21Return the folding unit to the original position ...

Страница 648: ... 1 Lift the folding tray 2 Remove any jammed paper 3 Press the release lever to pull the folding unit out CAUTION Do not reuse jammed papers If the paper tears during removal be sure to remove any loose scraps of paper from inside the machine Scraps of paper left in the machine could cause subsequent jamming ...

Страница 649: ...10 116 Troubleshooting Clearing Paper Jams 4 Open the folding unit left cover 5 Turn dial D9 6 Remove any jammed paper 7 Return the folding unit left cover to the original position D9 ...

Страница 650: ...10 117 Troubleshooting Clearing Paper Jams 8 Open the folding unit top cover 9 Turn dial D9 10Remove any jammed paper 11Return the folding unit top cover to the original position D9 ...

Страница 651: ...roubleshooting Clearing Paper Jams 12Return the folding unit to the original position 13Open the finisher front cover 1 and 2 14Remove paper from inside the finisher 15Return the covers to the original position ...

Страница 652: ...nisher 1 Open the finisher front cover 1 and 2 2 Open the conveyor guide D7 3 Remove any jammed paper CAUTION Do not reuse jammed papers If the paper tears during removal be sure to remove any loose scraps of paper from inside the machine Scraps of paper left in the machine could cause subsequent jamming D7 ...

Страница 653: ...0 Troubleshooting Clearing Paper Jams 4 Return the conveyor guide D7 to the original position 5 Open the conveyor guide D8 6 Remove any jammed paper 7 Return the conveyor guide D8 to the original position D8 ...

Страница 654: ...Troubleshooting Clearing Paper Jams 8 Remove paper from inside the finisher 9 Return the covers to the original position 10Lift the release lever to pull the folding unit out 11Open the folding unit top cover ...

Страница 655: ...10 122 Troubleshooting Clearing Paper Jams 12Turn dial D9 13Remove any jammed paper 14Open the folding unit conveyor guide 15Turn dial D9 D9 D9 ...

Страница 656: ...10 123 Troubleshooting Clearing Paper Jams 16Remove any jammed paper 17Lift the folding tray 18Remove any jammed paper 19Return the covers to the original position ...

Страница 657: ...lding Tray 100 sheet Staple Finisher 1 Lift the release lever to pull the folding unit out 2 Open the folding unit top cover CAUTION Do not reuse jammed papers If the paper tears during removal be sure to remove any loose scraps of paper from inside the machine Scraps of paper left in the machine could cause subsequent jamming ...

Страница 658: ...10 125 Troubleshooting Clearing Paper Jams 3 Turn dial D9 4 Remove any jammed paper 5 Open the folding unit conveyor guide 6 Turn dial D9 D9 D9 ...

Страница 659: ...10 126 Troubleshooting Clearing Paper Jams 7 Remove any jammed paper 8 Lift the folding tray 9 Remove any jammed paper 10Return the covers to the original position ...

Страница 660: ...10 127 Troubleshooting Clearing Paper Jams 11Return the folding unit to the original position 12Open the finisher front cover 1 and 2 13Remove paper from inside the finisher ...

Страница 661: ...10 128 Troubleshooting Clearing Paper Jams 14Return the covers to the original position ...

Страница 662: ...leshooting Clearing a Staple Jam Clearing a Staple Jam Clearing a Staple Jam of the 4 000 sheet Finisher 1 Open the finisher front cover 1 2 Open the conveyor guide D4 3 Turn knob D5 4 Remove any jammed paper D4 D5 ...

Страница 663: ... 130 Troubleshooting Clearing a Staple Jam 5 Return the conveyor guide D4 to the original position 6 Remove the Staple Cartridge Holder A 7 Remove the jammed staple 8 Install the Staple Cartridge Holder A ...

Страница 664: ...eshooting Clearing a Staple Jam 9 Return the cover to the original position Clearing a Staple Jam of the 100 sheet Staple Finisher 1 Open the finisher front cover 1 2 Open the conveyor guide D4 3 Turn knob D5 D4 D5 ...

Страница 665: ...10 132 Troubleshooting Clearing a Staple Jam 4 Remove any jammed paper 5 Return the conveyor guide D4 to the original position 6 Remove the Staple Cartridge Holder A 7 Remove the jammed staple ...

Страница 666: ...10 133 Troubleshooting Clearing a Staple Jam 8 Install the Staple Cartridge Holder A 9 Return the cover to the original position ...

Страница 667: ...oting Clearing a Staple Jam Clearing a Staple Jam of the Folding Unit 4 000 sheet Finisher 1 Open the finisher front cover 1 and 2 2 Remove paper from inside the finisher 3 Remove the Staple Cartridge Holder B or C C B ...

Страница 668: ...10 135 Troubleshooting Clearing a Staple Jam 4 Remove the jammed staple 5 Install the Staple Cartridge Holder B or C 6 Return the covers to the original position 7 Lift the folding tray ...

Страница 669: ...10 136 Troubleshooting Clearing a Staple Jam 8 Remove any jammed paper 9 Press the release lever to pull the folding unit out 10Open the folding unit left cover 11Turn dial D9 D9 ...

Страница 670: ...10 137 Troubleshooting Clearing a Staple Jam 12Remove any jammed paper 13Return the folding unit left cover to the original position 14Open the folding unit top cover 15Turn dial D9 D9 ...

Страница 671: ... 16Remove any jammed paper 17Return the folding unit top cover to the original position 18Return the folding unit to the original position Clearing a Staple Jam of the Folding Unit 100 sheet Staple Finisher 1 Open the finisher front cover 1 and 2 ...

Страница 672: ...0 139 Troubleshooting Clearing a Staple Jam 2 Remove paper from inside the finisher 3 Remove the Staple Cartridge Holder B or C 4 Remove the jammed staple 5 Install the Staple Cartridge Holder B or C C B ...

Страница 673: ...10 140 Troubleshooting Clearing a Staple Jam 6 Return the covers to the original position 7 Lift the release lever to pull the folding unit out 8 Open the folding unit top cover 9 Turn dial D9 D9 ...

Страница 674: ...10 141 Troubleshooting Clearing a Staple Jam 10Remove any jammed paper 11Open the folding unit conveyor guide 12Turn dial D9 13Remove any jammed paper D9 ...

Страница 675: ...10 142 Troubleshooting Clearing a Staple Jam 14Lift the folding tray 15Remove any jammed paper 16Return the covers to the original position 17Return the folding unit to the original position ...

Страница 676: ...per 11 13 Special Paper 11 15 Specifications 11 19 Machine 11 19 Copy Functions 11 21 Printer Functions 11 22 Scanner Functions 11 23 Document Processor 11 23 Side Feeder 500 sheet 3 11 24 Large Capacity Side Feeder 500 1 500 sheet 2 11 24 Side Feeder 3 000 sheet 11 24 4 000 sheet Finisher 11 25 100 sheet Staple Finisher 11 26 Punch Unit For 4 000 sheet 100 sheet Staple Finisher 11 26 Mailbox For ...

Страница 677: ...ipment Overview of Optional Equipment The following optional equipment is available for the machine 11 Copy tray D 1 MT 730 B 7 PF 7130 PF 730 2 DF 7110 10 Banner Guide A 3 DF 7130 5 BF 730 4 PH 7A PH 7C PH 7D 8 PF 7130 PF 740 9 PF 7120 6 BF 9100 ...

Страница 678: ...l Equipment Software option 21 Internet FAX Kit A 22 UG 33 23 UG 34 24 USB Keyboard 16 FAX System 12 17 IB 50 18 IB 51 14 DT 730 B 20 Card Authentication Kit B 19 IB 35 13 NK 7120 15 Keyboard Holder 10 12 Printing System 16 ...

Страница 679: ...t Folds printed output at the center or in tri fold to enable the creation of simple booklets Installs on the 100 sheet Staple Finisher 7 PF 7130 PF 730 Side Feeder 500 sheet 3 PF 7130 Multimedia Side Tray 500 sheet Same type of cassette as Cassette 1 on the machine and is attached to the Paper Feeder 500 sheet 2 or Large Capacity Feeder 1 500 sheet 2 PF 730 Paper Feeder 500 sheet 2 Two additional...

Страница 680: ...r management that reproduces the true color of the image by reading each machine s color display method and characteristics at the time of printing 13 NK 7120 Optional Numeric Keypad The numeric keypad is added to the operation panel If the optional numeric keypad is installed numeric keys do not appear on the touch panel 14 DT 730 B Document Table Place original or other documents when using the ...

Страница 681: ...o do so it is necessary to register ID card information on the previously registered local user list For more information about how to register this information refer to the following Card Authentication Kit B Operation Guide 21 Internet FAX Kit A Internet FAX Kit Activating the Internet FAX Kit sends and receives faxes via the Internet without using a phone line It can only be added when the FAX ...

Страница 682: ...plication Data Encryption Overwrite Internet FAX Kit Card Authentication Kit ThinPrint Option 1 1 This can be used on a trial basis for a limited time Emulation Upgrade Kit NOTE Restrictions such as the number of times the application can be used during the trial period differ depending on the application If you change the date time while using the trial version of an application you will no longe...

Страница 683: ...rted the Data Encryption Overwrite or Thin Print option and entered the license key turn the power OFF ON Icons of activated application are displayed in the Home screen NOTE If the user authentication screen appears enter your login user name and login password and select Login For this you need to login as an administrator or as a user with privileges to carry out this setting The factory defaul...

Страница 684: ...acters 2 Upper case Select to use upper case letters 3 Lower case Select to use lower case letters 4 No Symbol Select to enter numbers and symbols 5 Space Select to insert a space 6 Cancel Select to cancel entered characters and return to the screen before the entry 7 OK Select to finalize entry and return to the screen before the entry 8 Keyboard Select a character to enter 9 Backspace Select to ...

Страница 685: ...o view other numbers or symbols to enter Status Use the keyboard to enter Backspace Upper case Lower case No Symbol Space Cancel OK Lower case _ Q W E R T Y U I O P A S D F G H J K L Z X C V B N M Input characters Limit characters 0 128 k0101_01_al Status Use the keyboard to enter Backspace Upper case Lower case No Symbol Space Cancel OK Lower case 1 2 3 4 5 6 7 8 9 0 _ Input characters Limit char...

Страница 686: ...se the keyboard to enter Backspace Upper case Lower case No Symbol Space Cancel OK Lower case L _ Q W E R T Y U I O P A S D F G H J K L Z X C V B N M Input characters Limit characters 1 32 k0101_03_al Status Use the keyboard to enter Backspace Upper case No Symbol Space Cancel OK Lower case 1 2 3 4 5 6 7 8 9 0 q w e r t y u i o p a s d f g h j k l z x c v b n m _ List Input characters Limit charac...

Страница 687: ...y of paper Poor quality paper may result in unsatisfactory output Basic Paper Specifications that can be Used with This Machine The following table lists the specifications of paper that is supported with this machine Refer to the subsequent sections for further details We are not responsible for the problems occurred from the use of paper that does not conform to our specifications Criteria Speci...

Страница 688: ... grade of paper Paper that is too heavy or too light may be supplied incorrectly or cause paper jams which may cause excessive wear of the machine Mixed paper weight i e thickness may cause several sheets to be supplied at once accidentally and may also cause blurring or other printing problems if the toner fails to adhere correctly Moisture Content Paper moisture content is the ratio of moisture ...

Страница 689: ...eated with a coating to inhibit moisture Specially treated paper We do not recommend printing onto the following types of paper even if it conforms to the basic specifications When you use these kinds of paper purchase a small amount first as a sample to test Glossy paper Watermarked paper Paper with an uneven surface Perforated paper Paper Sizes that can be Used with This Machine Paper of the fol...

Страница 690: ...quality of special paper Thus special paper is more likely than regular paper to cause printing problems Before purchasing special paper in volume try testing a sample to ensure the print quality is satisfactory General precautions when printing onto special paper are given below Note that we are not responsible for any harm to the user or damage to the machine caused by moisture or specifications...

Страница 691: ...ffected by the force applied in the machine The carrier sheet bears the top sheet until the label is used This composition of labels may cause more problems The label surface must be covered completely with the top sheet Gaps between labels may cause peeling of labels resulting in a serious failure Some label paper has large margins on the top sheet When using such paper do not peel these margins ...

Страница 692: ...cause them to become wrinkled Thus keep the package sealed until you are ready to use them Keep the following points in mind Do not use envelopes with exposed adhesive In addition do not use the type of envelope in which the adhesive is exposed after the top layer is peeled off Serious damage may be caused if the paper covering the adhesive comes off in the machine Do not use envelopes with certai...

Страница 693: ...ifications page 11 12 Coated Paper Coated paper is created by treating the surface of the base paper with a coating that provides higher printing quality than plain paper Coated paper is used for particularly high quality printing The surface of high quality or medium quality paper is coated with special agents that improve ink adhesion by making the paper surface smoother These agents are used ei...

Страница 694: ...tterhead Envelope Thick High Quality Coated Index Tab Dividers Custom 1 to 8 Paper Size Cassette 1 2 A3 A4 A5 B4 B5 216 340 mm Ledger Letter Legal Statement 12 18 Oficio II Folio 8K 16K Custom 140 182 mm to 304 457 mm Cassette 3 4 A4 B5 Letter Multipurpose Tray A3 A4 A5 A6 B4 B5 B6 216 340 mm Ledger Letter Legal Statement Executive 12 18 Oficio II Folio 8K 16K ISO B5 Envelope 10 Envelope 9 Envelop...

Страница 695: ... 4 Operating Environment Temperature 10 to 32 5 C 50 to 90 5 F Humidity 10 to 80 Altitude 3 500 m 11 482 ft maximum Brightness 1 500 lux maximum Dimension W D H 29 53 32 37 48 59 750 822 1 234 mm Weight Approx 401 3 lb Approx 182 kg without toner container Space Required W D Using multipurpose tray 39 97 32 37 1 015 822 mm Power Source 120 V Specification Model 120 V 60 Hz 16 A 230 V Specification...

Страница 696: ...ts min 58 sheets min 41 sheets min 49 sheets min 49 sheets min 83 sheets min 58 sheets min 41 sheets min Full Color Copying 70 sheets min 49 sheets min 35 sheets min 42 sheets min 42 sheets min 70 sheets min 49 sheets min 35 sheets min First Copy Time A4 place on the platen feed from Cassette Black and White TASKalfa 7353ci 5 4 seconds or less TASKalfa 8353ci 4 8 seconds or less Color TASKalfa 735...

Страница 697: ...3ci 6 3 seconds or less TASKalfa 8353ci 6 1 seconds or less Resolution 1200 dpi 1200 dpi multi bit Operating System Windows 7 Windows 8 1 Windows 10 Windows Server 2008 R2 Windows Server 2012 R2 Windows Server 2016 Windows Server 2019 Mac OS 10 9 or later Interface USB Interface Connector 1 Hi Speed USB Network interface 1 10 BASE T 100 BASE TX 1000 BASE T IPv6 IPv4 IPSec 802 3a supported Optional...

Страница 698: ...nsmission System SMB SMTP FTP FTP over SSL USB TWAIN 2 WIA 2 WSD 2 Available Operating System Windows 7 Windows 8 1 Windows 10 Windows Server 2008 Windows Server 2008 R2 Windows Server 2012 Windows Server 2012 R2 Windows Server 2016 Windows Server 2019 Item Description Original Feed Method Automatic feed Supported Original Types Sheet originals Paper Size Maximum A3 Ledger 11 69 17 297 432 mm Long...

Страница 699: ... roller method No Sheets 500 sheets 80 g m2 1 cassette 1 500 sheets 80 g m2 2 cassettes No Sheets 550 sheets 64 g m2 1 cassette 1 750 sheets 64 g m2 2 cassettes Paper Size Cassette 5 A3 A4 R A4 A5 R B4 B5 R B5 216 340 mm Ledger Letter R Letter Legal Statement R 12 18 Oficio II Folio 8K 16K R 16K Cassette 6 7 A4 B5 Letter Supported Paper Paper weight 60 to 250 g m2 Media types Plain Recycled Thick ...

Страница 700: ...velope C4 Cardstock Oufuku hagaki Return postcard 200 sheets Supported Paper Weight Stapling 90 g m2 or less Stapling Maximum Number A3 B4 216 340 mm Ledger Legal 12 18 Oficio II 8K 30 sheets 52 to 105 g m2 2 cover sheet only 106 to 300 g m2 A4 R A4 B5 R B5 Letter R Letter 16K R 16K 65 sheets 52 to 90 g m2 55 sheets 91 to 105 g m2 2 cover sheet only 106 to 300 g m2 Media types Plain Preprinted Bon...

Страница 701: ...g m2 or less Stapling Maximum Number A3 B4 216 340 mm Ledger Legal 12 18 Oficio II 8K 50 sheets 52 to 90 g m2 35 sheets 91 to 105 g m2 2 cover sheet only 106 to 300 g m2 A4 R A4 B5 R B5 Letter R Letter 16K R 16K 100 sheets 52 to 90 g m2 70 sheets 91 to 105 g m2 2 cover sheet only 106 to 300 g m2 Media types Plain Preprinted Bond Recycled Letterhead Color Prepunched Thick Coated High Quality Custom...

Страница 702: ...heet 121 to 256 g m2 Saddle Stitch 20 sheets 60 to 90 g m2 13 sheets 91 to 105 g m2 1 cover sheet only 106 g m2 or heavier Tri Fold 5 sheets 60 to 90 g m2 3 sheets 91 to 120 g m2 Maximum Number for Storage 80 g m2 Bi Fold 5 sheets or less per set 30 sets 6 to 10 sheets per set 20 sets 11 to 20 sheets per set 10 sets Saddle Stitch 5 sheets or less per set 30 sets 6 to 10 sheets per set 20 sets 11 t...

Страница 703: ... m2 3 sheets 91 to 105 g m2 Maximum Number for Storage 80 g m2 Bi Fold 5 sheets or less per set 20 sets 6 to 10 sheets per set 10 sets 11 to 20 sheets per set 10 sets Saddle Stitch 5 sheets or less per set 25 sets 6 to 10 sheets per set 10 sets 11 to 20 sheets per set 10 sets Tri Fold 1 sheet per set 50 sets 2 to 5 sheets per set 25 sets Media types Bi Fold Plain Recycled Preprinted Bond Color Pre...

Страница 704: ...ray Paper length 210 to 304 8 mm 8 26 to 12 Paper width Max 1 220 0 mm 48 03 Paper Type Paper weight 136 to 163 g m2 Paper type Heavy 2 Dimensions W D H 15 78 15 67 7 63 400 6 397 8 193 6 mm Weight Approx 1 2 lbs Approx 0 5 kg NOTE Consult your dealer or service representative for recommended paper types ...

Страница 705: ...r for a specific period In Sleep mode power consumption is kept to a minimum Bonjour Bonjour also known as zero configuration networking is a service that automatically detects computers devices and services on an IP network Bonjour because an industry standard IP protocol is used allows devices to automatically recognize each other without an IP address being specified or DNS server being set Bon...

Страница 706: ... are thus lighter than normal Emulation The function to interpret and execute other printers page description languages The machine emulates operation of PCL6 KPDL3 PostScript 3 compatible Enhanced WSD Kyocera s proprietary web services FTP File Transfer Protocol A protocol to transfer files on the TCP IP network whether the Internet or an intranet Along with HTTP and SMTP POP FTP is now frequentl...

Страница 707: ...s Windows as a standard protocol for file sharing and printing services Outline font With outline fonts character outlines are represented with numerical expressions and fonts can be enlarged or reduced in different ways by changing the numeric values of those expressions Printing remains clear even if you enlarge fonts since the characters are defined with outlines represented with numerical expr...

Страница 708: ...y capacity total number of prints and scans and paper source settings Subnet Mask The subnet mask is a way of augmenting the network address section of an IP address A subnet mask represents all network address sections as 1 and all host address sections as 0 The number of bits in the prefix indicates the length of the network address The term prefix refers to something added to the beginning and ...

Страница 709: ...s equipped with USB 2 0 for high speed data transfer WIA Windows Imaging Acquisition A function to import images supported after Windows Me XP from digital cameras and other peripheral devices This function replaces what TWAIN used to do The feature is provided as a part of Windows functions and improves ease of operation so that you import images directly to My Computer without using any applicat...

Страница 710: ...B Background Density Adjustment 6 41 8 82 Default 8 20 Banner Printing 4 9 Banner Tray 11 5 Using 4 12 Bates Stamp 6 69 Bluetooth Settings 8 75 Bonjour 11 30 Settings 8 60 Booklet 6 51 Border Erase Border Erase Full Scan 6 49 C Cables 2 6 Calibration 10 60 Canceling Jobs 5 22 5 42 Canceling Printing 4 15 Card Authentication Kit 11 6 Cardstock 11 17 Cassette Loading Paper 3 4 Paper Size and Media T...

Страница 711: ... Size 9 49 Counter 2 60 Each Job Account 9 52 Print Accounting Report 9 53 Total Accounting 9 51 Unknown ID Job 9 57 Cover 6 57 Custom Box 5 51 11 30 Copying Documents 5 63 Creating a New Custom Box 5 56 Deleting Custom Box 5 58 Deleting Documents 5 65 Editing Custom Box 5 57 Joining Documents 5 64 Moving Documents 5 62 Printing Documents 5 59 Saving Scanned Documents 5 60 Send to Me from BOX E ma...

Страница 712: ... 5 44 Sort 8 77 Developer Refresh 8 84 10 60 Device 7 13 Device Information 2 20 DHCP 11 31 Settings 8 56 8 58 DHCP IPv6 11 31 Settings 8 57 8 59 Display Setting Screen 2 20 Display Status Log 8 31 Disposing of the Punch Waste 4 000 Sheet Finisher 10 21 Disposing of the Staple Waste 10 19 DNS Server IPv4 Settings 8 56 8 58 DNS Server IPv6 Settings 8 57 8 59 Document Box Basic Operation 5 52 Custom...

Страница 713: ...ay 6 58 Storing a Form 5 66 Front Cover 2 2 FTP 11 31 FTP Client Transmission Protocol Settings 8 60 FTP Encrypted TX 6 87 FTP Server Reception Protocol Settings 8 60 Function Key Assignment 2 18 8 34 Functions Key 2 21 G Glossary 11 30 Google Cloud Print 4 16 GPL LGPL 1 11 Grayscale 11 31 Group Authorization Settings 9 20 Group Authorization 9 20 Group List 9 21 Guest Authorization Set 9 23 Guest...

Страница 714: ...Default 8 21 K Keyboard Holder 11 5 Keyboard Layout 8 11 Knopflerfish License 1 13 KPDL 11 32 L Label 11 16 LAN Cable 2 6 Connecting 2 7 LAN Interface 8 60 Language 8 10 Large Capacity Feeder Loading Paper 3 8 Large Capacity Side Feeder 500 1 500 sheet 2 11 4 Laser Scanner Cleaning 8 84 10 60 LDAP Protocol Settings 8 63 Legal Information 1 10 Legal Restriction on Copying 1 8 Legal Restriction on S...

Страница 715: ...8 13 Custom Original Size 8 11 Loading Originals 5 2 Settings 8 11 Size xxvii 6 18 Original Eject Table 2 2 Original Image 6 33 Default 8 19 Original Loaded Indicator 2 2 Original Orientation 6 24 Default 8 19 Original Preview 2 22 Original Size 6 18 Original Size Indicator Plates 2 2 Original SSLeay License 1 11 Original Stopper 2 2 5 5 Original Table 2 2 Original Width Guides 2 2 Original Paper ...

Страница 716: ...64 PostScript 11 32 Power Cable Connecting 2 10 Power Management 1 16 Power Off 2 11 Power On 2 11 Power Switch 2 2 PPM 11 32 Precaution for Loading Paper 3 2 Precautions for Use 1 4 Preprinted Paper 11 18 Prevent Bleed thru 6 42 Default 8 20 Prevent Light Reflection 8 34 Primary Network Client 8 70 Print Report Configuration List 8 48 Data Sanitization Report 8 48 Font List 8 47 Network Status 8 ...

Страница 717: ...der Setup Tool for SMB 3 29 Security Level 8 70 Security Precautions when Using Wireless LAN 1 8 Send and Forward File format 8 39 PDF Encryption Functions 8 40 Send and Print 6 86 Send and Store 6 86 Send as E mail 5 24 11 33 Send Result Report 8 48 Send Settings 8 37 Broadcast 8 38 Color Type 8 37 Default Screen 8 37 Delete Destination History 8 39 Dest Check before Send 8 37 Destination History...

Страница 718: ...8 85 Cassette MP Tray Settings 8 7 Common Settings 8 10 Copy 8 36 Counter 2 60 Date Timer Energy Saver 8 78 Document Box USB Drive 8 42 Edit Destination 8 77 FAX 8 43 Home 2 14 Internet 8 85 Operation Method 8 2 Printer 8 43 Quick Setup Wizard 2 44 Report 8 47 Send 8 37 System Network 8 53 User Login Job Accounting 8 78 User Property 8 78 9 13 System Stamp 8 24 System Network 8 53 Bluetooth Settin...

Страница 719: ...Policy Settings 9 7 PIN Code Authentication 9 32 Printing 9 15 Simple Login Settings 9 28 TWAIN 9 16 User Account Lockout Setting 9 5 WIA 9 17 User Login Job Accounting 8 78 Job Accounting 9 34 Unknown User Settings 9 57 User Login 9 2 User Property 8 78 V VNC RFB Protocol Settings 8 64 VNC RFB over SSL Protocol Settings 8 64 W Waste Toner Box 2 4 Waste Toner Box Cover 2 4 Weekly Timer Settings 2 ...

Страница 720: ......

Страница 721: ...nue Takapuna Auckland New Zealand Phone 64 9 415 4517 Fax 64 9 415 4597 KYOCERA Document Solutions Asia Limited 13 F Mita Centre 552 566 Castle Peak Road Tsuen Wan New Territories Hong Kong Phone 852 2496 5678 Fax 852 2610 2063 KYOCERA Document Solutions China Corporation 8F No 288 Nanjing Road West Huangpu District Shanghai 200003 China Phone 86 21 5301 1777 Fax 86 21 5302 8300 KYOCERA Document S...

Страница 722: ... 216 339 0020 Fax 90 216 339 0070 is a trademark of KYOCERA Corporation KYOCERA Document Solutions Deutschland GmbH Otto Hahn Strasse 12 40670 Meerbusch Germany Phone 49 2159 9180 Fax 49 2159 918100 KYOCERA Document Solutions Austria GmbH Wienerbergstraße 11 Turm A 18 OG 1100 Wien Austria Phone 43 1 863380 Fax 43 1 86338 400 KYOCERA Document Solutions Nordic AB Borgarfjordsgatan 11 164 40 Kista Sw...

Страница 723: ...2019 6 2XNKDEN000 is a trademark of KYOCERA Corporation 2019 KYOCERA Document Solutions Inc ...

Отзывы: