background image

Using Printer Management Utility

12

12-71

User Authentication

Network user authentication settings for scan functions and box functions 
can be specified.

Note

In order for LDAP settings and network user authentication settings to 
be specified on this machine at the same time, the LDAP server and 
the server for network user authentication must be the same.

Procedure

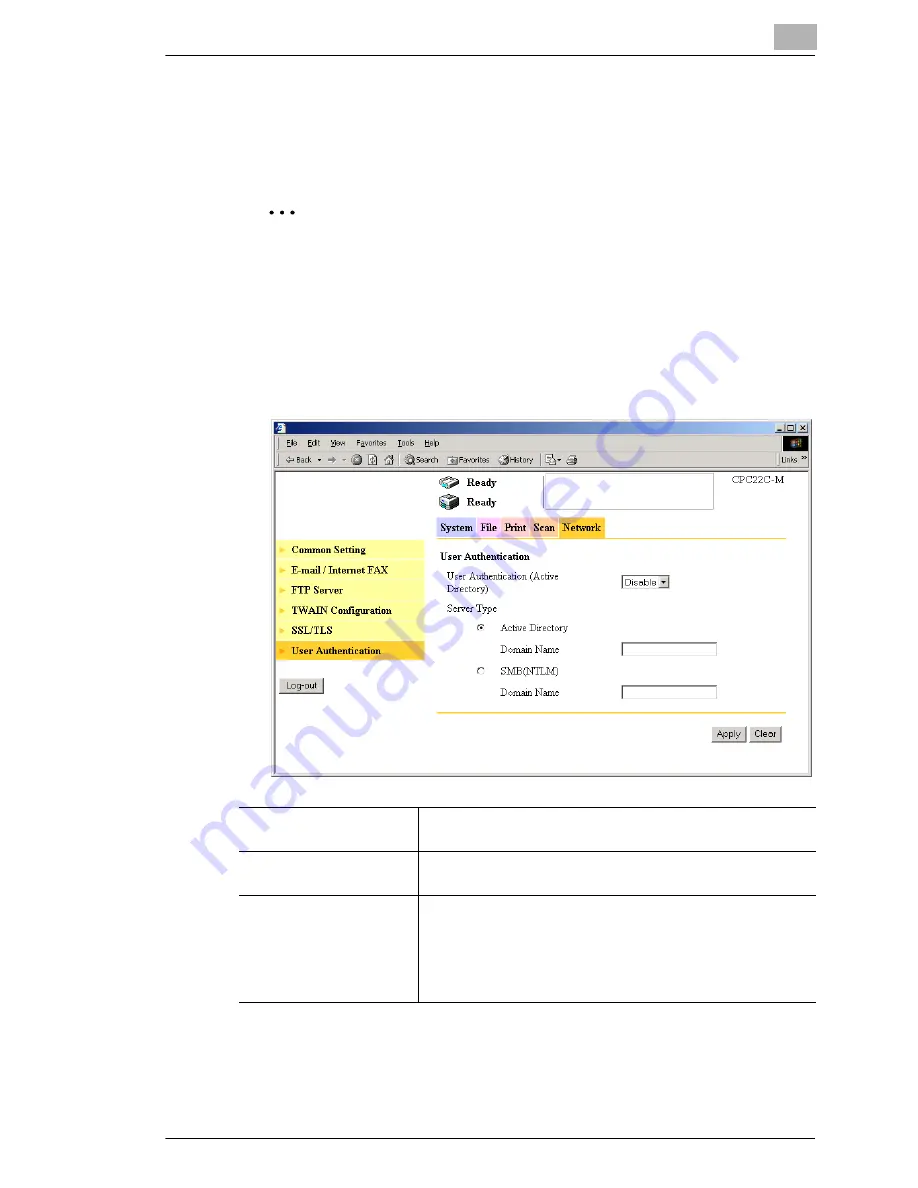
Click the “Network” tab, and then click 

User Authentication

 in the 

menu.

User Authentication

Set whether to perform user authentication.
Settings: “Enable” or “Disable”

Server Type

Select the server type.
Settings: “Active Directory” or “SMB (NTLM)”

Domain Name

If “User Authentication” is set to “Enable”, set the domain name 
of the selected server type.
Settings (for Active Directory): Up to 64 characters
Settings (for SMB (NTLM)): Up to 15 characters (alphanumeric 
characters and the following symbols: ! @ # $ % ^ & ( ) - _ ' { } 
. ~)

Содержание KM-4230

Страница 1: ...User s Guide Printer Controller ...

Страница 2: ...Network Connection 4 2 4 1 1 Installing the Printer Driver Using the Add Printer Wizard 4 2 4 2 When This Machine and the Computer are Connected Using a Parallel Connection 4 7 4 2 1 Installing the Printer Driver Using Plug and Play 4 7 4 2 2 Installing the Printer Driver Using the Add Printer Wizard 4 11 4 3 Uninstalling the Printer Driver 4 15 5 Setting Up the Printer Driver 5 1 Displaying the P...

Страница 3: ...5 17 5 11 Adding a Cover and or Interleaf When Printing 5 18 5 12 Printing to Suit the Paper Size 5 19 5 13 Items That Cannot Be Set Simultaneously 5 20 6 Network Printing in a Windows Environment 6 1 Network Connection Methods That Can Be Selected in Each Windows OS 6 1 6 2 Setting the IP Address for This Machine 6 2 6 3 Accessing Printer Management Utility 6 3 6 4 Windows Printing 6 4 6 4 1 Oper...

Страница 4: ... Printing From the Computer 6 22 7 Specifying Printer Settings From the Control Panel 7 1 Printer Setting Screen in Utility Mode 7 1 7 1 1 Default Setting Screen 7 2 7 1 2 Report Types Screen 7 7 7 2 Printer Setting Screen in Administrator Mode 7 8 8 Using the Scan Functions 8 1 Overview 8 1 8 1 1 Environment Required for the Scan Functions 8 2 8 1 2 Supported File Formats 8 3 8 1 3 File Name 8 4 ...

Страница 5: ... 8 45 8 8 Performing Scan to FTP Server Operations 8 46 8 8 1 Flow of Scan Operation 8 46 8 8 2 Registering FTP Servers 8 48 8 8 3 Setting the Proxy Server 8 51 8 8 4 Setting the Destination 8 52 8 9 Performing Scan to PC Operations 8 53 8 9 1 Flow of Scan Operation 8 53 8 9 2 Setting the FTP Application 8 54 8 9 3 Setting the Destination 8 54 8 10 Performing Scan to HDD Operations 8 55 8 10 1 Flo...

Страница 6: ... Searching the Scanner 9 6 10 Using the Box Functions 10 1 Overview 10 1 10 1 1 Environment Required for the Box Functions 10 2 10 2 Using the Box Functions 10 3 10 3 Selecting the File to be Forwarded 10 4 10 4 Specifying the Forward Destination 10 5 10 5 Specifying Settings on the MISC Screen 10 6 10 6 Checking the Transmission Settings 10 9 10 7 URL Notification Using E mail 10 10 10 8 Performi...

Страница 7: ...ing Pages with a Distribution Number 11 9 11 2 Job Operations on Printer Management Utility 11 10 12 Using Printer Management Utility 12 1 System Requirements 12 1 12 2 Accessing Printer Management Utility 12 1 12 2 1 Operation 12 1 12 3 Page Structure 12 2 12 4 Logging in to Administrator Mode 12 4 12 4 1 Cache Function of Web Browsers 12 5 12 5 User Mode 12 7 12 5 1 System Tab 12 7 12 5 2 Job Ta...

Страница 8: ... 7 13 7 1 Changing the Display Mode 13 7 13 7 2 Common Operations in the Main Window 13 9 13 8 Image Display Window 13 13 13 9 Backing Up and Restoring Image Data 13 16 13 9 1 Backing Up Image Data 13 16 13 9 2 Restoring Image Data 13 17 13 10 Creating Compact PDFs 13 19 13 11 If an Error Is Displayed 13 20 14 Troubleshooting 14 1 Unable To Print 14 1 14 2 Unable To Specify Desired Settings or Una...

Страница 9: ...Contents viii ...

Страница 10: ... PCL5c printer driver G Support of network protocols including TCP IP NetBEUI and IPX SPX G Direct printing over the network using Windows LPR or IPP printing G Transfer and notification over the network of image data scanned with this machine G Fax operations using the Internet Internet fax transmission reception G Forwarding image data stored in the hard disk of this machine G Specify settings f...

Страница 11: ... Netscape Communications logo Netscape Navigator Netscape Communicator and Netscape are trademarks of Netscape Communications Corporation G All other product and brand names are trademarks or registered trademarks of their respective companies or organizations BOX Utility G This software is based in part on the work of the Independent JPEG Group Compact VJE Copyright 1986 2003 VACS Corp Please not...

Страница 12: ...ion number Scan to HDD or Box functions the optional hard disk must be installed on this machine To use the Distribution function an additional 256 MB of RAM must be installed Computer IBM PC or compatible Operating System Windows 98 98SE Windows Me Windows 2000 Windows XP Windows NT 4 0 SP 6a or later or Windows Server 2003 RAM 64 MB or more Network Connection Connection Method Ethernet 10Base T ...

Страница 13: ...ions and machine setting from a computer 3 Connecting to a Computer Using this machine as a printer 4 Installing the Printer Driver 5 Setting Up the Printer Driver Connecting this machine to a network and performing network printing 6 Network Printing in a Windows Environment Specifying printer settings with this machine 7 Specifying Printer Settings From the Control Panel Using this machine as a ...

Страница 14: ...t this machine to a computer using a parallel connection the optional local interface kit is required 3 1 Using a Network Connection To use this machine in a network environment use a 10Base T 100Base TX cable Ethernet cable to connect this machine to the network Important Be sure to use a Category 5 or 5E cable that complies with the 10Base T 100Base TX standard Always use a 10Base T 100Base TX c...

Страница 15: ... to the 10Base T 100Base TX port on this machine and connect the other end of the cable to the network hub This machine is now connected to the network 3 When this machine is turned on LED1 will light up LED1 LINK Lights up if this machine is properly connected to the network LED2 ACT Blinks depending on the data reception status LED 1 LED 2 ...

Страница 16: ...o so may result in radio frequency interference Memo To install the printer driver using Plug and Play use the parallel cable to connect this machine to the computer when you install the printer driver refer to Installing the Printer Driver Using Plug and Play on page 4 7 Connection procedure 1 Turn this machine and the computer off 2 Connect one end of the parallel cable to the parallel port prin...

Страница 17: ...terface setting 1 Press the Utility key on this machine s control panel touch Admin Mode and then enter the administrator access code 2 Touch Printer Setting then Common Setting 3 Specify settings for the following I O Timeout Set the communication timeout 10 to 300 seconds Parallel Interface Set the mode to be used with the parallel interface Compatible Nibble or ECP ...

Страница 18: ...re for installing the printer driver on your computer Note To connect this machine to a computer using a parallel connection the optional local interface kit is required Connection method Refer to Network connection When This Machine and the Computer are Connected Using a Network Connection on page 4 2 For Windows 98 Me 2000 NT 4 0 on page 4 2 For Windows XP Server 2003 on page 4 4 Parallel connec...

Страница 19: ...up when the printer driver is installed For further details on IPP printing refer to IPP Printing Windows 2000 XP Server 2003 on page 6 8 For Windows 98 Me 2000 NT 4 0 1 While Windows is running load the CD ROM into the computer s CD ROM drive 2 In Windows click the Start button point to Settings and then click Printers 3 Double click the Add Printer icon The Add Printer Wizard starts up 4 Follow ...

Страница 20: ...xt button 7 Click the Have Disk button 8 Click the Browse button 9 Depending on the version of Windows that you are using specify the directory on the CD ROM that contains the printer driver and then click the OK button For Windows 98 CD ROM Driver English Printer Win9xME For Windows Me CD ROM Driver English Printer Win9xME For Windows 2000 CD ROM Driver English Printer Win2KXP For Windows NT 4 0 ...

Страница 21: ...appears in the Printers window 15 Remove the CD ROM from the CD ROM drive This completes the printer driver installation For Windows XP Server 2003 1 While Windows is running load the CD ROM into the computer s CD ROM drive 2 In Windows click the Start button and then click Printers and Faxes 3 For Windows XP click Add a printer on the Printer Tasks menu For Windows Server 2003 double click the Ad...

Страница 22: ...indows Environment Because it is necessary to specify other network settings in advance when installing the printer driver using a network connection install it using a local connection at this time 6 The Select Printer Port dialog box appears Select LPT1 here and then click the Next button 7 Click the Have Disk button 8 Click the Browse button 9 Specify the directory on the CD ROM Driver English ...

Страница 23: ...creen instructions to start the installation Note Perform a test print after the network settings have been specified 13 When installation is complete make sure that the icon of the installed printer appears in the Printers and Faxes window 14 Remove the CD ROM from the CD ROM drive This completes the printer driver installation ...

Страница 24: ...er icon and then install the printer driver refer to Installing the Printer Driver Using the Add Printer Wizard on page 4 11 For Windows 98 1 After using a parallel cable to connect this machine to the computer turn on the computer Note Do not disconnect and connect the cable while the computer is starting up 2 Insert the CD ROM into the computer s CD ROM drive 3 Turn this machine on The Add New H...

Страница 25: ... and connect the cable while the computer is starting up 2 Insert the CD ROM into the computer s CD ROM drive 3 Turn this machine on The Add New Hardware Wizard dialog box appears 4 Select Automatic search for a better driver Recommended and then click the Next button 5 Select Specify a Location and then click the Browse button 6 Specify the directory on the CD ROM Driver English Printer Win9xME t...

Страница 26: ...r a suitable driver for my device recommended and then click the Next button The Locate Driver Files dialog box appears 5 Select Specify a location and then click the Next button 6 Specify the directory on the CD ROM Driver English Printer Win2KXP that contains the printer driver for Windows 2000 and then click the OK button 7 Click the OK button and then proceed according to the on screen instruc...

Страница 27: ...he Next button 5 Under Search for the best driver in these locations select Include this location in the search and then click the Browse button 6 Specify the directory on the CD ROM Driver English Printer Win2KXP that contains the printer driver for Windows XP Server 2003 and then click the OK button 7 Click the Next button The Completing the Found New Hardware Wizard dialog box appears 8 Click t...

Страница 28: ...r s CD ROM drive 2 In Windows click the Start button point to Settings and then click Printers The Printers window appears 3 Double click the Add Printer icon The Add Printer Wizard starts up 4 Proced according to the on screen instructions 5 In the screen for selecting the printer connection select Local printer 6 Click the Next button 7 Click the Have Disk button 8 Click the Browse button ...

Страница 29: ...r Windows 2000 CD ROM Driver English Printer Win2KXP For Windows NT 4 0 CD ROM Driver English Printer WinNT40 10 Click the OK button The Printers list appears 11 Click the Next button 12 Specify the connected port Select LPT1 or LPT2 13 Follow the on screen instructions to perform the installation 14 When installation is complete make sure that the icon of the installed printer appears in the Prin...

Страница 30: ...ick Printers and Faxes 3 For Windows XP click Add a printer on the Printer Tasks menu For Windows Server 2003 double click the Add Printer icon The Add Printer Wizard starts up 4 Click the Next button 5 Select Local printer attached to this computer and then click the Next button Clear the Automatically detect and install my Plug and Play printer check box Windows XP Windows Server 2003 ...

Страница 31: ... English Printer Win2KXP that contains the printer driver for Windows XP Server 2003 and then click the OK button 10 Click the OK button 11 Click the Next button 12 Follow the on screen instructions to perform the installation 13 When installation is complete make sure that the icon of the installed printer appears in the Printers and Faxes window 14 Remove the CD ROM from the CD ROM drive This co...

Страница 32: ...Printers For Windows XP Server 2003 click the Start button and then click Printers and Faxes 2 In the Printers for Windows XP Server 2003 Printers and Faxes window select the icon of the printer that you want to delete 3 Press the Delete key on the computer keyboard to delete the printer driver 4 Follow the on screen instructions to perform the uninstallation When the printer driver has been delet...

Страница 33: ...4 Installing the Printer Driver 4 16 ...

Страница 34: ...on Memo To specify custom settings click Print in the menu of the application and then click the Properties button next to the printer name in the Print dialog box Settings specified here apply only to the current file 5 1 Displaying the Printer Driver Setup Dialog Box 5 1 1 Displaying the Printer Driver Setup Dialog Box in Windows 98 Me Display procedure 1 In Windows click the Start button point ...

Страница 35: ...aper Quality or Job Management tab perform the following procedures after selecting the icon in step 2 For Windows 2000 On the File menu click Printing Preferences For Windows NT 4 0 On the File menu click Document Defaults 5 1 3 Displaying the Printer Driver Setup Dialog Box in Windows XP Server 2003 Display procedure 1 In Windows click the Start button and then click Printers and Faxes 2 Select ...

Страница 36: ...lick this button to close the printer driver setup dialog box and apply any settings that have been changed Cancel Click this button to cancel any settings that have been changed and close the dialog box Apply Click this button to apply any settings that have been changed without closing the printer driver setup dialog box Help Click this button to display the help for each item on the currently d...

Страница 37: ... from the drop down list to restore the tab s default settings When an existing set of settings is selected from the drop down list the button changes to the Delete button Click the Delete button to delete the currently selected set Page Layout Printer Figure When Page Layout is selected a preview of the page layout as specified in the current printer driver settings is displayed and a preview ima...

Страница 38: ...ge 5 15 Hole Punching Documents on page 5 16 and Folding Documents on page 5 17 Item Description Original Document Size Specifies the size of the original document Custom paper sizes can also be specified Output Paper Size Specifies the output paper size An enlargement or reduction ratio can also be specified Refer to Printing to Suit the Paper Size on page 5 19 Copies Specifies the number of copi...

Страница 39: ...cription Store Job Specifies the job storage method Delete After Printing Deletes the job after it is printed Print and Hold Stores the job temporarily after it is printed Store to HDD Stores the job on the hard disk until it is deleted from this machine Store to Memory Stores the job in memory until it is deleted from this machine Proof and Print Prints only the first set of the job and stores th...

Страница 40: ...en click the Device Option Setting tab 2 From the Installable Options list select the device that you want to install and then click the Add button Check that the device the you selected is displayed in the Installed Options list Note If options installed on this machine are not set up in the Device Option Setting tab you will not be able to use them from the printer driver After an option is inst...

Страница 41: ...heck box is selected borders will be printed around each page 3 To change the printing order when an N up setting is selected click the N up Style button Then in the dialog box that appeared select one of the following modes Selecting Page Layout allows you to check the page layout and printing order Note When printing a job that contains pages of different sizes and orientations images may be mis...

Страница 42: ...settings Text Select the text to be printed as the watermark None CONFIDENTIAL TOP SECRET COPY DO NOT COPY DRAFT FINAL or PROOF 1st Page Only Select this check box to print the watermark only on the first page Edit Watermark Edit the text and position of the watermark When the text for the watermark is selected a preview of the watermark is displayed in the Page Layout preview box Printing pages w...

Страница 43: ...int image is displayed here 2 Watermark Select the desired watermark from the list of existing watermarks 3 New Click to create a new watermark A detailed settings dialog box appears 4 Edit Click to edit the text selected in the Watermark list 2 A detailed settings dialog box appears Refer to Specifying Detailed Settings for the Watermark on page 5 11 5 Delete Click to delete the text selected in ...

Страница 44: ...ame of the new watermark up to 20 characters 2 String Enter the text to be printed as the watermark up to 255 characters 3 Type Face Select the font for the text to be printed as the watermark from the fonts installed on the computer 4 Size Specify the size of the text Settings 8 points to 200 points 5 Style Specify the style of the text Bold Text will be printed in bold Italic Text will be printe...

Страница 45: ...0 horizontal counterclockwise 9 Position Specify the position where the watermark is printed Center The watermark is printed in the center of the page User Setting The position is defined by the numeric values entered in the Horizontal and Vertical boxes Setting value Horizontal 999 to 999 points Setting value Vertical 999 to 999 points specified in 1 point increments 72 points 1 inch The Position...

Страница 46: ... a document onto both sides of a page or in a booklet format two facing pages Note Duplex printing is available only if the optional duplex unit is installed on this machine Duplex Printing Booklet Printing Print data Printout Left Binding Top Binding Print data Printout Print data Printout ...

Страница 47: ...ion is disabled Top Binding The print images are printed on both sides of a single page so that the file margin is at the top Left Binding The print images are printed on both sides of a single page so that the file margin is at the left edge Booklet Left Binding The print images for 4 pages are printed on both sides of a single page so that the printout may be folded at its center to form a bookl...

Страница 48: ...rom the Staple drop down list select one of the following settings If the single staple finisher is installed on this machine OFF or Corner If the folding finisher is installed on this machine OFF Corner Top Side 2 Points Left Side 2 Points or Auto 2 Points Memo If the single staple finisher is installed on this machine up to 30 pages can be stapled at a time If the folding finisher is installed o...

Страница 49: ...he Setup tab 2 Click the Detail of Output Setting button to display the detailed settings dialog box 3 From the Punch and Punch Holes drop down lists select one of the following settings Punch OFF Top Side Punch Left Side Punch or Auto Punch Punch Holes 2 3 or 4 Note When using the hole punch function always select 4 from the Punch Holes drop down list No holes will be punched if 2 or 3 is selecte...

Страница 50: ...ailable only if optional folding finisher is installed on this machine Setting procedure 1 Click the Setup tab 2 Click the Detail of Output Setting button to display the detailed settings dialog box 3 From the Folding drop down list select one of the following settings OFF The folding function is disabled Crease Center Staple Produces booklets that are folded and stapled at the center Memo Up to 1...

Страница 51: ...nsparencies Note When using the OHP Interleaving function specify 1 in Copies box When printing on overhead projector transparencies only the multiple bypass tray or the 1st drawer can be set as the paper source The OHP Interleaving function cannot be used in combination with duplex printing For details on loading overhead projector transparencies into the paper source refer to the User s Manual s...

Страница 52: ...in the Original Document Size box is the same as that of the document created with the application 3 Select the Output Paper Size check box and then specify the size of the paper to be printed 4 When the Fit to Paper check box is selected the size of the document is automatically adjusted to the size of the paper selected for printing Note Make sure that paper of the size set in in the Output Pape...

Страница 53: ...ide x x x x x x A3 x x JIS B4 x x A4 x JIS B5 x x A5 x x x x JIS B6 x x x x x x x x A6 x x x x x x x x Postcard x x x x x x x x x 203 x 330 mm x x x 210 x 330 mm x x x 216 x 330 mm x x x 220 x 330 mm x x x Legal x x x Letter x Executive x x x x Invoice x x x x x Ledger x x 11 x 14 x x x Envelope B5 x x x x x x x x Envelope Com 10 x x x x x x x x Envelope C5 x x x x x x x x Envelope DL x x x x x x ...

Страница 54: ...ing Duplex Booklet N up Folding Cover Page Paper Source Manual Feed Tray x Tray 1 Tray 2 x x x x x x Tray 3 4 x x x x x x LCC x x x x x x x Output Setting OHP Interleaving x x x x x x x x Duplex x x x x x x Booklet x x x x x x x x Staple x x x x x x x x Punch x x x x x x Folding x x x x x x x Glossy Mode x x x x x x x Blank Possible combination x Not possible to combine ...

Страница 55: ...erleaving Job Management Distribution Number 6 Setup Staple Top Side 2 Points Setup Left Side Punch 7 Setup Staple Paper Uncollated 8 Setup Folding Paper Uncollated 9 Paper Output Paper Size Quality Download as Bitmap 10 Paper Scaling Quality Download as Bitmap 11 Paper Uncollated Job Management Proof and Print 12 Paper Uncollated Job Management Distribution Number 13 Quality Grayscale Quality Exp...

Страница 56: ...e setting up network printing refer to the procedure described in 4 Installing the Printer Driver and install the printer driver To perform network printing change the printer port for the installed printer driver to one for a network connection and then change the settings on this machine as necessary For an IPP connection it is necessary to start with the step for installing the printer driver N...

Страница 57: ...ngs for the following IP Address Set the IP address of this machine Subnet Mask Set the subnet mask for the network to which you are connecting Gateway Address Set the default gateway address for the network to which you are connecting Note Although the IP address is entered without using the DHCP server in the procedure described here it is also possible to automatically assign the IP address fro...

Страница 58: ... has been set to Enable it is recommended that the IP address assigned to this machine be fixed in the DHCP server settings 4 To apply the settings restart this machine turn it off then on again Turn this machine back on to enable the IP address 6 3 Accessing Printer Management Utility Setting the IP address for this machine enables you to access Printer Management Utility Use your Web browser to ...

Страница 59: ...is Machine Set the IP address on this machine For the setting procedure refer to Setting the IP Address for This Machine on page 6 2 Specify the settings described below for Windows printing in Printer Management Utility Setting procedure 1 Start up Printer Management Utility 2 Enter the administrator access code and log in to Administrator mode 3 On the Network tab click Common Setting and then c...

Страница 60: ...hen click Properties 3 On the Details tab click the Add Port button 4 Select Network and then click the Browse button In the network configuration window that appeared select the appropriate printer icon For Windows 2000 XP NT 4 0 Server 2003 1 For Windows 2000 NT 4 0 click the Start button point to Settings and then click Printers For Windows XP Server 2003 click the Start button and then click P...

Страница 61: ...rinters For Windows XP Server 2003 click the Start button and then click Printers and Faxes 2 Right click the icon of the installed printer and then click Properties 3 On the Ports tab click the Add Port button 4 In the Available Printer Ports list select Standard TCP IP Port and then click the New Port button 5 When the Add Standard TCP IP Printer Port Wizard starts up click the Next button 6 In ...

Страница 62: ...ct LPR Port and then click the New Ports button Note If LPR Port is not in the list click the Start button point to Control Panel and then click Network Then on the Service tab click the Add button and install the Microsoft TCP IP printing service 5 In the Name or address of server providing lpd box on the Add LPR Compatible Printer dialog box enter the IP address for this machine 6 In the Name of...

Страница 63: ...ine Specify the IP address for this machine For the setting procedure refer to Setting the IP Address for This Machine on page 6 2 Also specify the IPP printing settings in Printer Management Utility Printing can be performed with the default settings Setting procedure 1 Start up Printer Management Utility 2 Enter the administrator access code and log in to Administrator mode 3 On the Network tab ...

Страница 64: ...rted Specify print operations supported by IPP Then on the Print tab of Printer Management Utility specify the settings for IPP printing Setting procedure 1 In Administrator mode click IPP in the menu on the Print tab 2 Specify settings for the following Printer Name Specify the printer name up to 127 alphanumeric characters Printer Location Specify the printer location up to 127 alphanumeric char...

Страница 65: ...r Wizard starts up 4 Click the Next button 5 In the Local or Network Printer dialog box select Network printer and then click the Next button 6 In the Locate Your Printer dialog box select Connect to a printer on the Internet or on your intranet 7 In the URL field enter the URL for this machine in the following format and then click the Next button http IP_address_for_the_copier ipp Example If the...

Страница 66: ...printer as the default printer and then click the Next button 13 Click the Finish button to exit the Add Printer Wizard Once the settings for the printer have been specified you can use the printer in the same way as a default local printer Also if you set up the printer for sharing in Windows it can be used as a network printer by other Windows computers over the network ...

Страница 67: ...rt up Pconsole 3 From the Available Options list select Quick Setup and then click the Enter button 4 Enter the appropriate names in the Print server New printer New print queue and Print queue volume fields select Other Unknown from the Printer type field and then save the specified settings 5 Click the Esc button to quit Pconsole 6 Use the NetWare Server console to load PSERVER NLM Note For the ...

Страница 68: ...Auto Detect Select the frame type according to the network environment Bindery NDS Select Bindery Print Server Name Print server name created in step 4 Preferred File Server Name of the file server running PServer Print Queue Scan Rate 1 Change as necessary Mode NPrinter 8 Restart this machine turn it off then on again 9 Use the NetWare Server console to display the print server screen and then ch...

Страница 69: ...ent computer log on with Supervisor permissions to access the NetWare server where the PServer is registered 2 Start up Pconsole 3 From the Available Options list select Quick Setup and then click the Enter button 4 Enter the appropriate names in the Print server New printer New print queue and Print queue volume fields select Other Unknown from the Printer type field and then save the specified s...

Страница 70: ... to the network environment Bindery NDS Select Bindery Print Server Name Print server name created in step 4 Print Server Password Specify only when setting from the NetWare Server Preferred File Server Name of the file server that connects to PServer Print Queue Scan Rate 1 Change as necessary Mode PServer 7 Restart this machine turn it off then on again 8 Use the NetWare Server console to load M...

Страница 71: ...ffers the print service and then click Print Services Quick Setup on the Tools menu 4 Enter the appropriate names in the Print Server name Printer Name Print Queue Name and Print Queue Volume fields select Other Unknown from the Printer Type field and then save the settings Note For settings for the queue user rights printer notification option assignment of multiple queues and password items refe...

Страница 72: ...nable NetWare Select Enable Frame Type Select Auto Detect Selects the frame type according to the network environment Bindery NDS Select NDS Print Server Name Print server name created in step 4 Print Server Password Set only if set on the NetWare Server Preferred NDS Context Name of the tree node that PServer loads Preferred NDS Tree Enter 1 Change as necessary Mode Select NPrinter Printer Number...

Страница 73: ...NetWare server Setting procedure 1 Log on to NetWare as an administrator from a client computer 2 Start up NWadmin 3 Select either the organization or organizational unit container that offers the print service and then click Print Services Quick Setup non NDPS on the Tools menu 4 Enter the appropriate names in the Print Server name Printer Name Print Queue Name and Print Queue Volume fields selec...

Страница 74: ...ndery NDS Select NDS Print Server Name Print server name created in step 4 Print Server Password Set only if set on the NetWare Server Preferred NDS Context Name of context node connecting the PServer Preferred NDS Tree Name of the tree to which PServer logs on Print Queue Scan Rate Enter 1 Change as necessary Mode Select PServer 6 To apply the settings restart this machine turn it off then on aga...

Страница 75: ... Printer on the Create sub menu 4 In the NDPS Printer Name box enter the printer name 5 In the Printer Agent Source column select Create a New Printer Agent and then click the Create button 6 Check the printer agent name and then in the NDPS Manager Name box browse through the NDPS manager names and register one 7 In Gateway Types select Novell Printer Gateway and then register it 8 In the Configu...

Страница 76: ...double click Add printer For Windows XP click Add a printer on the Printer Tasks menu The Add Printer Wizard starts up 3 In the port settings browse the network and specify the name of the created queue or NDPS printer name 4 In the Printer Model list specify the directory on the CD ROM that contains the printer driver for the environment to be used For Windows 98 CD ROM Driver English Printer Win...

Страница 77: ...as been properly installed Test printing procedure 1 For Windows 98 Me 2000 NT 4 0 click the Start button point to Settings and then click Printers For Windows XP Server 2003 click the Start button and then click Printers and Faxes 2 Right click the icon for the installed printer and then click Properties 3 In the dialog box that appeared click the Print Test button or the Print Test Page button ...

Страница 78: ... 7 Specifying Printer Settings From the Control Panel 7 1 Printer Setting Screen in Utility Mode After pressing the Utility key on this machine s control panel the following screen appears Select Printer Setting to specify default settings and output reports ...

Страница 79: ... tab general default settings concerning the printer can be specified If a print job is sent with not all settings specified printing will be performed with the settings specified here Default Tray If this machine receives a print job where the paper source is not specified the paper source specified here will be used Select the desired paper drawer and then touch Enter ...

Страница 80: ...e desired paper size and then touch Enter Output If this machine receives a print job where double sided printing or the number of copies are not specified the settings specified here will be used 1 Touch Simplex or Duplex If Duplex is selected specify the binding method 2 To change the number of copies press the C clear key and then use the keypad to specify the number of copies 3 Touch Enter ...

Страница 81: ...the image orientation is not specified the image orientation specified here will be used Touch Portrait or Landscape and then touch Enter Lines per page Specify the default number of lines per page 1 Press the C clear key and then use the keypad to specify the number of lines between 5 and 128 lines 2 Touch Enter ...

Страница 82: ... 5 Font tab From the Font tab default settings concerning the font can be specified Typeface Specify the default font Select the desired font and then touch Enter Symbol Set Specify the default symbol set Select the desired symbol set and then touch Enter ...

Страница 83: ...alable Font press the C clear key and then use the keypad to specify the font size between 4 00 and 999 75 2 To specify a bitmap font size touch the key below Bitmap Font press the C clear key and then use the keypad to specify the font size between 0 44 and 99 00 3 Touch Enter Initialize To reset the printer settings to their defaults touch Initialize ...

Страница 84: ...this screen configuration information for this machine and a test page can be printed After touching Report Types the following screen appears Operating procedure 1 Select the report that you wish to print 2 Press the Start key in this machine s control panel The selected report is printed ...

Страница 85: ... s control panel touching Admin Mode then entering the administrator access code the following screen appears After touching Printer Setting the following screens appear Common Setting tab From the Common Setting tab various settings concerning the printer can be specified PDL Setting If the printer language only supports PCL this key is not available ...

Страница 86: ...imeout can be specified Use the keypad to specify the length of time in seconds until a connection times out between 10 and 300 seconds and then touch Enter Parallel Interface The mode for using a parallel interface can be specified Select the parallel interface mode and then touch Enter ...

Страница 87: ... can be specified Touch Gradation or Resolution and then touch Enter PCL Setting tab From the PCL Setting tab settings concerning PCL can be specified Overwrite A4 Letter If Letter or A4 size is selected but paper of the specified size is not loaded printing can continue with A4 or Letter size paper Touch Yes or No and then touch Enter ...

Страница 88: ...il on page 8 5 and Performing Scan to E Mail Operations on page 8 40 Scan to FTP Server Sends scanned data to an FTP server Refer to Scan to FTP Server on page 8 6 and Performing Scan to FTP Server Operations on page 8 46 Scan to PC Sends scanned data to a computer using FTP Refer to Scan to PC on page 8 7 and Performing Scan to PC Operations on page 8 53 Scan to HDD Sends scanned data to the opti...

Страница 89: ...r Limitations Scan to E mail Mail server on the network Mail client computer A maximum file size may be specified on the mail server Scan to FTP server FTP server on the network FTP client computer Scan to PC FTP server application on the receiving computer Client computer Scan to HDD Optional hard disk installed into this machine Web browser or BOX Utility Scan to Internet FAX Mail server on the ...

Страница 90: ...or tif for the TIFF format Note Depending on the specified Color Mode setting some file formats cannot be selected Refer to Scan Mode Screen on page 8 14 Note The file format cannot be selected with the Scan to Internet FAX operation With this operation the data is sent in the TIFF format Black Color Mode setting 200 200 dpi If multiple pages of a document are scanned when the JPEG format is selec...

Страница 91: ...nto two files and the files include pages 1 through 7 and pages 8 through 10 the two file names are assigned as follows device_name date time automatic_number P 1 7 extension device_name date time automatic_number P 8 10 extension Setting the device name 1 Start up Printer Management Utility 2 Enter the administrator access code and log in to Administrator mode 3 On the Scan tab click Scan in the ...

Страница 92: ...this machine as an attached file to an e mail address Suitable for sending low resolution data Requires a network environment with a mail server For the setup and operating procedures refer to Performing Scan to E Mail Operations on page 8 40 Mail Server Client Computer Client Computer ...

Страница 93: ...ication function which sends an e mail message containing information indicating the storage location of the image data refer to URL Notification Using E mail on page 8 23 A mail server is required for using the e mail notification function Possible to access FTP servers on the Internet via a proxy server In such case a proxy server is required For the setup and operating procedures refer to Perfo...

Страница 94: ...chine directly to a computer using FTP Requires an FTP server application on the computer and the application must be running when receiving the image data For the setup and operating procedures refer to Performing Scan to PC Operations on page 8 53 FTP server application Client Computer ...

Страница 95: ...ion function which sends an e mail message containing information indicating the storage location of the image data refer to URL Notification Using E mail on page 8 23 A mail server is required for using the e mail notification function Note To use this scan function an optional hard disk must be installed in this machine For the setup and operating procedures refer to Performing Scan to HDD Opera...

Страница 96: ...with the Black Color Mode setting in the TIFF format at 200 200 dpi Memo Before sending document data using Internet faxing check in advance whether the receiving side is capable of receiving Internet faxes For the setup and operating procedures refer to Performing Scan to Internet FAX Operations on page 8 64 Mail Server Device that supports Internet faxing Black TIFF format 200 200 dpi Printout ...

Страница 97: ...ts Internet faxing and prints out the data The following image data can be received G Black Color Mode setting TIFF format 200 200 dpi 200 100 dpi For the setup and operating procedures refer to Performing Internet FAX Reception Operations on page 8 72 Mail Server Device that supports Internet faxing Printout ...

Страница 98: ...de refer to 12 Using Printer Management Utility Using Printer Management Utility 1 Start up Printer Management Utility 2 Enter the administrator access code and log in to Administrator mode 3 On the Scan tab click Scan in the menu 4 Specify settings for the following Scan Device Name Enter the device name of this machine up to 36 characters The name entered here is the character string that is att...

Страница 99: ...pression Method for Monochrome TIFF Set the priority compression method of TIFF files to MH or MMR Send Scanned File Separation Set the division method in units of pages when the maximum size is exceeded for Scan to E mail and Scan to Internet FAX operations For e mail transmission refer to Binary Division and Scanned File Separation on page 8 43 For Scan to Internet FAX refer to Binary Division a...

Страница 100: ...creen 1 On this machine s control panel press the Scan key 2 If network user authentication is enabled a login screen appears In this case enter the network user name and password and then touch Login Memo For details on specifying settings for network user authentication refer to User Authentication on page 12 71 3 Touch the button for the desired screen Scan Mode Address Original Setting and MIS...

Страница 101: ...o TIFF When Black is selected the file format cannot be set to JPEG Resolution Specify the scan resolution Settings 200 dpi 300 dpi 400 dpi or 600 dpi Memo With the Scan to Internet FAX operation the resolution is set to 200 dpi Background Removal Enter the background removal settings for the scanned document Settings Auto or manual 5 maximum removal to 2 minimum removal 8 levels Scan Size Specify...

Страница 102: ...as temporary registration keys The temporary registration key is automatically cleared when this machine is turned off For the registration procedure refer to Temporary Registration on page 8 29 and Registering Recipient E Mail Addresses Using LDAP Search on page 8 33 One touch key Touch on the screen above to select an index or from the index list select an index and then touch Enter to display o...

Страница 103: ...e the destination can specified both by using one touch keys or temporary registration keys and by inputting the address 8 3 3 Original Setting Screen You can specify the type of document to be scanned Document Mode Specify the document scan mode Settings 1 2 or Book Copy Memo If Book Copy is selected be sure to also specify the scan method If Book Open is selected the document is scanned as one i...

Страница 104: ...ifferent sizes touch Mixed Original Separate Scan If Separate Scan is selected all data scanned before Finish in the machine s control panel is touched is treated as a single job 8 3 4 MISC Screen You can specify settings for the following parameters from the MISC screen E mail Notification Change Subject Change One Touch name Change Index Name Change send file name Delete One Touch name and Delet...

Страница 105: ...nsmitted If a notification address has not been assigned to the one touch key you can set the address with the E mail Notification function on the MISC screen 1 Touch E mail Notification on the MISC screen in Scan mode 2 Select the desired index index number or Temp Registration and then touch the key for the desired notification address Note The URL notification destination must be registered to ...

Страница 106: ... of the one touch key is changed Changing an index name You can change the name of an index 1 Touch Change Index Name on the MISC screen in Scan mode An index list is displayed 2 Select the index containing the name that you wish to change and then touch Enter 3 Change the index name up to 10 characters and then touch Enter The name of the index is changed Changing the name of the transmission fil...

Страница 107: ...you wish to delete and then touch Enter 4 On the confirmation screen touch Yes and then touch Enter The one touch key is deleted Deleting all one touch names in an index You can delete all one touch keys in a specified index 1 Touch Delete all One Touch names in index on the MISC screen in Scan mode An index list is displayed 2 Select the index containing the data that you wish to delete entirely ...

Страница 108: ...he Scan key on this machine s control panel to enter Scan mode 2 Set the default values in the Scan mode 3 On this machine s control panel press the Utility key 4 Touch Store 5 Touch Reset Mode 6 Touch Current Mode in Scan mode 7 Touch Enter If you select Factory Default and touch Enter you can reset the default settings of Scan mode to the factory default settings ...

Страница 109: ...ternet FAX three tabs are displayed as shown below On the Send screen you can check the file name and destination Touch Detail to check the e mail address of the destination For Internet FAX touch Set and then select a Reply to address from the one touch keys On the Subject From screen you can check the subject of the e mail and the sender s address From address Touch Change beside Subject to chan...

Страница 110: ...er name and password are not provided in the e mail notification If you need additional information for access check with your administrator A URL notification mail is sent for the following scan operations G When Scan to E mail is used and the mail size exceeds the maximum allowed by Maximum E mail Size refer to Specifying Scan to E mail Settings on page 8 41 In this case the image data is saved ...

Страница 111: ...he URL information is sent to the address registered for URL Notification E mail Address in the specified one touch key or temporary registration key However you can specify a mail destination separately from this machine s control panel Setup procedure 1 On this machine s control panel press the Scan key 2 On the Address screen select the destination for which the transmission method is set to Sc...

Страница 112: ...You can use the LDAP server search function and register the search result to one touch keys and temporary keys from this machine s control panel For the operating procedure refer to Registering Recipient E Mail Addresses Using LDAP Search on page 8 33 8 6 1 One Touch Key Registration If the one touch key is registered in advance you can immediately recall the transmission destination Since you do...

Страница 113: ...an to Internet FAX operations Destination Displays an icon indicating the transmission method for the one touch key Scan to E mail icon Scan to FTP Server Scan to PC icon Scan to HDD icon Scan to Internet FAX icon Not registered Delete button Deletes the selected one touch key 4 To register a new one touch key click an unregistered one touch box 5 Select the transmission method Scan to E mail File...

Страница 114: ...a comma Settings Up to 72 characters or up to 1800 characters when registering a group Destination Name Enter the name of the one touch key up to 12 characters Destination Server Select the FTP server that is used for Scan to FTP Server The drop down list displays FTP servers that were registered in Registering FTP Servers Refer to Registering FTP Servers on page 8 48 URL Notification Set whether ...

Страница 115: ...up to 64 characters If the PUBLIC box is selected a password is not necessary URL Notification Set whether to send an e mail notification containing information on the storage location of the scanned data Settings Yes or No URL Notification E mail Address Set the destination address for the URL notification To register multiple e mail addresses separate the addresses with a comma Settings Up to 72...

Страница 116: ...e LDAP search function from this machine s control panel to enter the temporary registration For details refer to Registering Recipient E Mail Addresses Using LDAP Search on page 8 33 Registration procedure 1 Start up Printer Management Utility 2 On the Scan tab in User mode click One Time Registration in the menu A temporary registration list is displayed One Time Registration area Displays One T...

Страница 117: ...the transmission destination address To register multiple e mail addresses separate the addresses with a comma Settings Up to 1800 characters Scan mode settings Document Mode Set the scan mode Settings Single Sided Double Sided Book Divide or Book Open Original Size Select the size of the scanned document Or specify an arbitrary size in unit of mm Resolution Select the scan resolution Settings 600...

Страница 118: ...ers on page 8 48 URL Notification Set whether to notify information indicating the storage location of the scanned data using e mail Settings Yes or No URL Notification E mail Address Set the destination address for the URL notification To register multiple e mail addresses separate the addresses with a comma Settings Up to 1800 characters Scan mode settings same as if Scan to E mail is selected D...

Страница 119: ...racters Scan mode settings same as if Scan to E mail is selected Destination Name Enter the name of the temporary registration key up to 12 characters Address To Set the destination mail address for Internet faxing To register multiple e mail addresses separate the addresses with a comma Settings Up to 1800 characters E mail Address Reply To Set the reply to address for Internet faxing up to 72 ch...

Страница 120: ... search function you must enable the LDAP search function from this machine s control panel Setup procedure 1 On this machine s control panel press the Utility key touch Admin Mode and then enter the administrator access code 2 Touch Admin Set then LDAP Search page 2 4 3 Touch Permit and then touch Enter Setting the LDAP server To use the LDAP function you must set the LDAP server using either Pri...

Страница 121: ...er address alphanumeric characters the first character cannot be a number for the server name SSL TLS Set whether to perform communications with the LDAP server using SSL TLS Port Number Set the port number used to communicate with the LDAP server Search Root Set the search start point of the LDAP search Settings Up to 255 characters Connection timeout Set the connection timeout for the LDAP serve...

Страница 122: ...ify settings for the Max Number of Searches and Connection Timeout parameters on the Others screen Authentication Method Set the LDAP authentication method If GSS SPNEGO is selected the DNS server in the TCP IP settings must be specified refer to page 12 50 Settings Anonymous Simple Digest MD5 CRAM MD5 or GSS SPNEGO Domain Name If the authentication method is set to GSS SPNEGO set the domain name ...

Страница 123: ... mode 2 Touch Address 3 Touch LDAP Search The LDAP search screen appears Memo For the operating procedures of a detailed search refer to Performing a detailed search on page 8 38 For the procedure to display the previous search result refer to Displaying the previous search results on page 8 39 4 Using the keypad and the keyboard in the touch panel enter the characters that you wish to search for ...

Страница 124: ... one touch To register all selected destinations to the keys in a single index touch Add addr to single index 7 Select the destination to be registered You can select multiple destinations Touch a selected destination to deselect it You can also make selections using the following methods More Info Displays detailed information about the destination Arrows beside the page number Displays the previ...

Страница 125: ...is registered to a one touch key temporary key If Add addr to single index was selected an index list is displayed Select the index in which you wish to register all of hte keys select the transmission mode E Mail Input or FAX Input and then touch Save All selected destinations are registered as one touch keys temporary keys in the index Performing a detailed search You can also perform a detailed...

Страница 126: ...tinations that end with the specified character string Don t use Searches for destinations that do not include the specified character string 7 As necessary specify information for the Full Name E mail Last Name and First Name fields 8 Touch Start Search The search result is displayed 9 The rest of the procedure is the same as the procedure starting with step 6 in Performing a standard search on p...

Страница 127: ...ntrol panel perform one touch key registration or temporary key registration You can also enter the e mail address directly from this machine s control panel in step 3 Registering Destinations in Advance on page 8 25 3 Using this machine s control panel specify the destination for the scanned data Setting the Destination on page 8 45 4 Using this machine s control panel set the scan mode and docum...

Страница 128: ...lick Send in the sub menu that appeared 4 Specify settings for the following SMTP Server Set the IP address of the SMTP server Port Number Set the port number of the SMTP server Normally use the default value of 25 SMTP Connection Timeout Set the connection timeout for the SMTP server Maximum E mail Size Set the maximum size of the transmitted mail Settings No Limitation 100 to 3000 KB in units of...

Страница 129: ...aration parameters can also be entered from this machine s control panel 1 On this machine s control panel press the Utility key touch Admin Mode and then enter the administrator access code 2 Touch Network Setting E Mail Internet then Send 3 Specify settings for the SMTP Server Timeout of SMTP Server and Mail Separation parameters ...

Страница 130: ...paration Yes and Binary Division Yes If the scanned data exceeds the Maximum E mail Size setting the data is divided in units of pages If the data size of each page after page division exceeds the Maximum E mail Size setting the data is divided further at the binary level so that the maximum size is not exceeded Scanned File Separation Yes and Binary Division No If the scanned data exceeds the Max...

Страница 131: ...tup procedure 1 Start up Printer Management Utility 2 Enter the administrator access code and log in to Administrator mode 3 On the Network tab click E mail Internet FAX and then click E mail in the sub menu that appeared 4 Specify settings for the following Subject Enter the subject of the e mail up to 64 characters Description Enter the text of the e mail up to 256 characters ...

Страница 132: ...tions can be selected Memo For the registration procedure of one touch keys and temporary keys refer to Registering Destinations in Advance on page 8 25 Directly entering the e mail address You can also enter the mail transmission destination address directly from this machine s control panel without using one touch keys or temporary registration keys 1 On this machine s control panel press the Sc...

Страница 133: ...e Proxy Server on page 8 51 3 Using Printer Management Utility perform one touch key registration or temporary key registration Registering Destinations in Advance on page 8 25 4 Using this machine s control panel specify the destination of the scanned data Setting the Destination on page 8 52 5 Using this machine s control panel set the scan mode and document designation Scan Mode Screen on page ...

Страница 134: ...nformation written in the e mail message and access the storage location of the scanned data You may need to enter a user name and a password to access the FTP server Memo Even if the URL notification destination was not specified when one touch keys or temporary registration keys were registered using Printer Management Utility you can specify the URL notification destination from this machine s ...

Страница 135: ... up to five FTP servers Using Printer Management Utility 1 Start up Printer Management Utility 2 Enter the administrator access code and log in to Administrator mode 3 On the Network tab click FTP Server and then click FTP Server Registration in the sub menu that appeared 4 If an unregistered box is selected a server registration page appears ...

Страница 136: ...P address of the FTP server Login Name Specify the name used to log in to the FTP server up to 32 alphanumeric characters Password Specify the password used to log in to the FTP server up to 64 alphanumeric characters Port Number Specify the FTP port number Normally use the default value of 21 Directory Set the destination directory for storing the scanned data on the FTP server up to 128 alphanum...

Страница 137: ...ctory parameters can also be entered from this machine s control panel 1 On this machine s control panel press the Utility key touch Admin Mode and then enter the administrator access code 2 Touch Network Setting then FTP Server 3 For servers 1 to 5 enter settings for the IP Address Login Name PIN and Directory parameters ...

Страница 138: ... Start up Printer Management Utility 2 Enter the administrator access code and log in to Administrator mode 3 On the Network tab click FTP Server and then click FTP Configuration in the sub menu that appeared 4 Specify settings for the following Proxy IP Address Enter the IP address of the proxy server when a proxy server is used Port Number Set the port number of the proxy server Normally use the...

Страница 139: ...d index index number or Temp Registration to display a one touch key list or temporary registration list 4 Touch the one touch key or temporary registration key to which the destination is assigned Only the settings whose transmission method was set to File Scan To FTP Server during registration can be used Memo For the registration procedure of one touch keys and temporary keys refer to Registeri...

Страница 140: ...ng this machine s control panel specify the destination of the scanned data Setting the Destination on page 8 54 5 Using this machine s control panel set the scan mode and document designation Scan Mode Screen on page 8 14 and Original Setting Screen on page 8 16 6 Set the document and then press the Start key on this machine s control panel The document is scanned The scanned data is sent to an a...

Страница 141: ... this machine s control panel press the Scan key 2 Touch Address 3 Select the desired index index number or Temp Registration to display a one touch key list or temporary registration list 4 Touch the one touch key or temporary registration key to which the destination is assigned Only the settings whose transmission method was set to File Scan To PC during registration can be used Memo For the re...

Страница 142: ... Functions 8 10 1 Flow of Scan Operation Procedure 1 Using Printer Management Utility create a user box for saving the scanned data Creating User Boxes on page 8 57 2 As necessary set the storage period for scanned data Setting the Storage Period of the Scanned Data on page 8 59 3 Using Printer Management Utility perform one touch key registration or temporary key registration Registering Destinat...

Страница 143: ...ed a password to access the user box A password is not required for the PUBLIC box If URL notification was specified Refer to the information written in the e mail message and access the storage location for the scanned data You will need a password to access the user box A password is not required for the PUBLIC box Memo Even if the URL notification destination was not specified when one touch ke...

Страница 144: ... 2 Creating User Boxes Creation procedure 1 Start up Printer Management Utility 2 On the File tab in User mode click User Directory in the menu A list of boxes is displayed 3 Click the Create button The Create User Directory page appears ...

Страница 145: ...Up to 199 user boxes can be created PUBLIC box and user box A user box is a storage location for scanned data created with the Scan to HDD operation The box name can be assigned arbitrarily The contents of a user box can only be viewed by entering the password that was specified at the time of registration A user box can be created arbitrarily using Printer Management Utility The public box is a s...

Страница 146: ...d disk Setup procedure 1 Start up Printer Management Utility 2 Enter the administrator access code and log in to Administrator mode 3 On the File tab click File Storage Life in the menu 4 Specify settings for the following File Storage Life Specify the storage period of the files on the hard disk Settings No File Time Limitation 1 day 2 days 3 days 4 days 5 days 6 days or 7 days ...

Страница 147: ...sired index index number or Temp Registration to display a one touch key list or temporary registration list 4 Touch the one touch key or temporary registration key to which the destination is assigned Only the settings whose transmission method was set to File Scan To HDD during registration can be used Memo For the registration procedure of one touch keys and temporary keys refer to Registering ...

Страница 148: ...3 Using the BOX Utility Retrieval procedure 1 Start up Printer Management Utility 2 On the File tab in User mode click User Directory in the menu 3 Click the box where the scanned data was saved PUBLIC box or a user box 4 If a user box is selected enter the password 5 A list of stored data is displayed Select the data that you wish to download and then click the Acquire Selected File button If the...

Страница 149: ...ine Delete All Files button Deletes all of the files currently displayed When this button is clicked a confirmation page appears If the OK button is clicked the files are deleted Change Directory Name button user box only Changes the name assigned to the user box When this button is clicked a page for changing the box name appears Change Directory Password button user box only Changes the password...

Страница 150: ... being accessed from Printer Management Utility BOX Utility or the control panel you cannot acquire files delete boxes files change the user box names or change passwords Even if you change the user box name or delete the box a user box specified as File Scan To HDD during one touch registration or temporary registration does not change If necessary change the one touch registration or temporary r...

Страница 151: ...ernet fax you must check in advance whether the recipient is capable of receiving Internet faxes Note If Scanned File Separation refer to Basic Setup of the Scan Functions on page 8 11 is enabled and multiple pages of the document are sent using Internet fax the data is divided in units of pages for transmission regardless of the maximum e mail size setting If a limitation exists in the attachment...

Страница 152: ...ntrol panel in step 3 Registering Destinations in Advance on page 8 25 3 Using this machine s control panel specify the destination of the scanned data Setting the Destination on page 8 70 4 Using this machine s control panel set the scan mode and document designation Scan Mode Screen on page 8 14 and Original Setting Screen on page 8 16 5 Set the document and then press the Start key on this mach...

Страница 153: ...Specify settings for the following SMTP Server Set the IP address of the SMTP server Port Number Set the port number of the SMTP server Normally use the default value of 25 SMTP Connection Timeout Set the connection timeout for the SMTP server Maximum E mail Size Set the maximum size of the transmitted mail Settings No Limitation 100 to 3000 KB in units of 100 KB Binary Division Set whether to div...

Страница 154: ...aration parameters can also be entered from this machine s control panel 1 On this machine s control panel press the Utility key touch Admin Mode and then enter the administrator access code 2 Touch Network Setting E Mail Internet then Send 3 Specify settings for the SMTP Server Timeout of SMTP Server and Mail Separation parameters ...

Страница 155: ... and Binary Division Yes If the scanned data exceeds the Maximum E mail Size setting the file is divided in units of pages If the data size of each page after page division exceeds the Maximum E mail Size setting the data is divided further at the binary level so that the maximum size is not exceeded Scanned File Separation Yes and Binary Division No If the scanned data exceeds the Maximum E mail ...

Страница 156: ... fax Setup procedure 1 Start up Printer Management Utility 2 Enter the administrator access code and log in to Administrator mode 3 On the Network tab click E mail Internet FAX and then click Internet FAX in the sub menu that appeared 4 Specify settings for the following Subject Enter the subject of the e mail up to 64 characters Description Enter the text of the e mail up to 256 characters ...

Страница 157: ...ch the destination is assigned Only the settings whose transmission method was set to Scan To Internet FAX during registration can be used Multiple destinations can be selected Memo For the registration procedure of one touch keys and temporary keys refer to Registering Destinations in Advance on page 8 25 Directly entering the e mail address You can also enter the Internet fax address directly fr...

Страница 158: ... Reply To address and the sender s address are specified the reply to address has priority If either address is entered the entered address is valid The sender s address From address and Reply To address are set using Printer Management Utility For the Sender s address From address refer to Basic Setup of the Scan Functions on page 8 11 For the Reply To address refer to Registering Destinations in...

Страница 159: ...If an Internet fax e mail is received the attached image data is printed The received Internet fax e mails on the mail server are collectively retrieved from the mail server and temporarily stored in this machine The stored data is printed one job at a time when all other ongoing jobs have been completed The e mails on the mail server are not cleared until the normal completion of printing is conf...

Страница 160: ...the sub menu that appeared 4 Specify settings for the following POP3 Server Set the IP address of the POP3 server POP3 Login Name Set the login name of the POP3 server up to 63 characters POP3 Password Set the password for logging in to the POP3 server up to 15 characters Mail Check Set whether to periodically check the mail server contents If No is selected e mails will not be received If Yes is ...

Страница 161: ...l Check parameters can also be entered from this machine s control panel 1 On this machine s control panel press the Utility key touch Admin Mode and then enter the administrator access code 2 Touch Network Setting E Mail Internet then Receive 3 Specify settings for the POP3 Server POP3 Login Name POP3 Password and Mail Check parameters ...

Страница 162: ...etwork tab click E mail Internet FAX and then click Print in the sub menu that appeared 4 Specify settings for the following Text Print Set whether to print the mail text when this machine receives an Internet fax e mail Internet FAX Print Size Set the print size for printing the received data Reduced default Select this setting when you wish to slightly reduce the size of the received data Full S...

Страница 163: ...ility can also be specified from this machine s control panel 1 On this machine s control panel press the Utility key touch Admin Mode and then enter the administrator access code 2 Touch Network Setting E Mail Internet then Print 3 Specify settings for the Text Print and Internet Fax Print Size parameters ...

Страница 164: ... configuration is required in this machine This function is available only when it is used over a network 9 1 Operating Environment The TWAIN driver operates in the following environments 9 2 Installing the TWAIN Driver Installation 1 On the supplied CD ROM open the folder Driver English TWAIN containing the TWAIN driver 2 Double click the Setup exe file to run the installation program 3 Carry out...

Страница 165: ...er the administrator access code and log in to Administrator mode 3 On the Network tab click TWAIN Configuration in the menu 4 Specify settings for the following Operation Lock Time Set the panel lock timeout for performing TWAIN scan operations from the computer Using this machine s control panel 1 On this machine s control panel press the Utility key touch Admin Mode and then enter the administr...

Страница 166: ...k Select Device on the File menu 3 Select the retrieval destination for the scanned data IP address port number In the retrieval destination list available TWAIN devices on the network appear To search for retrieval destinations click the Setting button and specify the conditions in the dialog box that appears Refer to Searching the Scanner on page 9 6 4 Click the OK button to open the scan dialog...

Страница 167: ...ce is set to ADF Settings Glass or ADF Duplex Set whether the scanned document is a duplex document Settings On or Off Separate Scan Specify the processing of multiple documents Low Density Adjustment Specify whether to remove the background Prescan button Perform a test scan Scan button Scan the data and import the data into the application Option button Open the Option dialog box Refer to Settin...

Страница 168: ...e Option Dialog Box Click the Option button in the Scan dialog box to open the dialog box shown below You can specify a range and perform clipping Drag the pointer to select the part of the image to be clipped and then click the Select button up to 5 areas can be specified ...

Страница 169: ... the scanners You can specify the following search conditions Broadcast Searches using the broadcast protocol Multicasting Searches using the multicasting protocol IP Port Base Specify the port number to be searched Broadcast Execute the search Max Hop for Search The number of hops to be searched is fixed at 0 You cannot change this value IP Port Base Specify the port number to be searched Multica...

Страница 170: ...ons on page 8 55 10 1 Overview The following box functions are available on this machine Use the appropriate type that matches your network environment and application Forward to E mail Forwards the image data in the box by attaching the data to an e mail message Refer to Performing Forward to E mail Operations on page 10 12 Forward to FTP Server Forwards the image data in the box to an FTP server...

Страница 171: ...nder a TCP IP network environment Environment Required to Forward Image Data Environment Required to Receive Image Data Other Limitations Forward to E mail Mail server on the network Mail client computer A maximum file size may be specified on the mail server Forward to FTP Server FTP server on the network FTP client computer Forward to PC FTP server application on the receiving computer Client co...

Страница 172: ...ns you must enable the box functions from this machine s control panel Setup procedure 1 On this machine s control panel press the Utility key touch Admin Mode and then enter the administrator access code 2 Touch Admin Set then Box Function page 2 4 3 Touch Permit and then touch Enter ...

Страница 173: ... network user authentication is enabled a login screen appears In this case enter the network user name and password and then touch Login 3 In the Select file to forward screen select the box PUBLIC box or user box containing the file that you wish to forward 4 If a user box is selected enter the password 5 Select the file that you wish to forward and then touch Enter The Select destination screen...

Страница 174: ...whose transmission method matches the forwarding method can be used Multiple forward destinations can be selected with the Forward to E mail operation Memo The registration procedure of one touch keys and temporary keys is the same as in Scan mode For the registration procedure refer to Registering Destinations in Advance on page 8 25 The LDAP search function can also be used in Box mode Directly ...

Страница 175: ...der to access the storage location of the image data When forwarding image data by selecting a one touch key refer to One Touch Key Registration on page 8 25 that has been registered for Forward to FTP Server and is assigned a notification address an e mail notification is transmitted If a notification address is not assigned to the one touch key you can set the address with the E mail Notificatio...

Страница 176: ...C screen in Box mode An index list is displayed 2 Select the index containing the one touch key that you wish to rename and then touch Enter 3 Select the one touch key that you wish to rename 4 Change the one touch key name up to 12 characters and then touch Enter The name of the one touch key is changed Changing an index name You can change the name of an index 1 Touch Change Index Name on the MI...

Страница 177: ...screen in Box mode An index list is displayed 2 Select the index containing the data that you wish to delete entirely and then touch Enter 3 On the confirmation screen touch Yes and then touch Enter All one touch keys in the index are deleted Deleting files in the box You can delete the files in the boxes on the hard disk Up to four files can be deleted at the same time 1 Touch Delete files in box...

Страница 178: ...n the Send screen you can check the box name file name and forward destination Touch Detail to check the e mail address of the destination G On the Subject From screen you can check the subject of the e mail and the sender s address From address Touch Change beside Subject to change the subject of the e mail Enter the subject up to 64 characters and then touch Enter G On the Message screen you can...

Страница 179: ...P server The user name and password are not provided in the e mail notification If you need additional information for access check with your administrator A URL notification mail is sent for the following data forwarding operations G When Forward to E mail is used and the mail size exceeds the maximum allowed by Maximum E mail Size refer to Specifying Scan to E mail Settings on page 8 41 In this ...

Страница 180: ...s registered for URL Notification E mail Address in the specified one touch key or temporary registration key However you can specify mail destinations separately from this machine s control panel Setup procedure 1 On this machine s control panel press the Box key 2 Select the file to be forwarded 3 On the Select destination screen select the destination for which the transmission method is set to...

Страница 181: ...r this machine s control panel perform one touch key registration or temporary key registration You can also enter the e mail address directly from this machine s control panel in step 3 Registering Destinations in Advance on page 8 25 3 Using this machine s control panel select the files to be forwarded Selecting the File to be Forwarded on page 10 4 4 Using this machine s control panel specify t...

Страница 182: ...n If an error occurs due to a mistake in the destination an error notification mail is sent to the sender s address From address The sender s address From address is set using Printer Management Utility Refer to Basic Setup of the Scan Functions on page 8 11 ...

Страница 183: ...on page set the proxy server Setting the Proxy Server on page 8 51 3 Using Printer Management Utility perform one touch key registration or temporary key registration Registering Destinations in Advance on page 8 25 4 Using this machine s control panel select the files to be forwarded Selecting the File to be Forwarded on page 10 4 5 Using this machine s control panel specify the forward destinati...

Страница 184: ...formation written in the e mail message and access the storage location of the image data You may need to enter a user name and a password to access the FTP server Memo Even if the URL notification destination was not specified when one touch keys or temporary registration keys were registered using Printer Management Utility you can specify the URL notification destination from this machine s con...

Страница 185: ...e 8 54 3 Start up the FTP application on the computer 4 Using this machine s control panel select the files to be forwarded Selecting the File to be Forwarded on page 10 4 5 Using this machine s control panel specify the forward destination of the image data Specifying the Forward Destination on page 10 5 6 On this machine s control panel press the Start key The image data in the box is forwarded ...

Страница 186: ...s cleared when this machine is turned off The job that is temporarily held in the memory can be recalled only when the reprint function is used on this machine Refer to Print and Hold on page 11 2 Store to HDD If the optional hard disk is installed the job is stored on the hard disk until it is deleted from this machine Refer to Store to HDD on page 11 3 Store to Memory The job is stored in the me...

Страница 187: ... driver 1 In the printer driver setup dialog box click the Job Management tab 2 Select Print and Hold from the Store Job drop down list Operations on this machine 1 From the control panel touch Job Control then Reprint to display the list of jobs held in the memory 2 Select the job that you wish to recall from the job list and then touch OK The job status changes to Waiting Print and the job is qu...

Страница 188: ...setup dialog box click the Job Management tab 2 Select Store to HDD from the Store Job drop down list Operations on this machine 1 From the control panel touch Job Control then HDD to display the list of jobs stored on the hard disk 2 From the job list select the job that you wish to recall from the hard disk to the memory and then touch Open Job The job is recalled to the memory and its status is...

Страница 189: ... Setting the printer driver 1 In the printer driver setup dialog box click the Job Management tab 2 Select Store to Memory from the Store Job drop down list Operations on this machine 1 From the control panel touch Job Control then Hold Job to display the stored job 2 Select the job you wish to print and then touch OK The job status changes to Waiting Print and the job is queued to be printed For ...

Страница 190: ...inter driver 1 In the printer driver setup dialog box click the Job Management tab 2 Select Proof and Print from the Store Job drop down list Operations on this machine 1 Touch Job Control then Hold Job on this machine s control panel to display the list of stored jobs 2 Check the printing of the proof copy If you wish to print the remaining copies select the job set to Proof and Print from the st...

Страница 191: ...e Password box Operations on this machine After sending a job with Lock Job selected unlock the job from this machine to start printing it For details refer to the User s Manual of this machine 1 From the control panel touch Job Control then Locked Jobs to display a list of locked jobs 2 From the list of locked jobs select the job that you wish to unlock 3 Using the keypad enter the 4 digit passwo...

Страница 192: ...ed on this machine s control panel and in Printer Management Utility Setup procedure 1 In the printer driver setup dialog box click the Job Management tab 2 Enter the user name in the User Name box under Job Owner up to 31 alphanumeric characters 3 Enter the job name in the Job Name box under Job Owner up to 31 alphanumeric characters Setting the default user name A default user name can be regist...

Страница 193: ... in the Access Number box 8 digits between 00000001 and 99999998 A default access number can be registered and used rather than entering an access number for each job 3 Send the job If the entered access number is a valid number on this machine the job is printed and counted as a job for the account If an error occurs If a print job is sent using an access number that is not available with the Cop...

Страница 194: ...ust be installed on this machine Procedure 1 In the printer driver setup dialog box click the Job Management tab 2 Select the Distribution Number check box under Distribution 3 To print the distribution number only on the first page select the 1st Page Only check box 4 Specify the color of the distribution number red blue or black from the Distribution Color list 5 Enter the starting distribution ...

Страница 195: ...s of the job being processed by this machine from Printer Management Utility You can also delete jobs and perform other operations For details refer to the following pages G Active Job Print on page 12 17 G Active Job Scan on page 12 19 G Job History Print on page 12 20 G Job History Scan on page 12 22 ...

Страница 196: ... key http IP_address_for_copier Example If the IP address of this machine is 192 168 0 10 http 192 168 0 10 The initial page of Printer Management Utility appears Memo Below is the URL after SSL TLS is enabled https IP_address_for_copier For the procedure to set the IP address of this machine refer to Setting the IP Address for This Machine on page 6 2 12 2 1 Operation Printer Management Utility o...

Страница 197: ...age 12 4 The configuration of the Printer Management Utility page is shown below Memo If you wish to change the display language of Printer Management Utility log in to Administrator mode and change the setting using Printer Management Utility Setting in the menu 1 Status Display The statuses of this machine s printer section and this machine s scanner section are displayed using icons and text Th...

Страница 198: ... G File G Print G Scan For details on each tab refer to the following sections 3 Menus Information and settings for the selected tab are listed The menus that appear vary depending on the tab that is selected 4 Information and Settings Display Details of the item selected from the menu are displayed 5 Administrator s Code Enter the administrator access code to log in to Administrator mode ...

Страница 199: ...of this machine you may not be able to log in to Administrator mode When logged in to Administrator mode if no operation is performed for a set length of time a timeout occurs and you will automatically be logged out from Administrator mode The timeout time is the time that is specified by the Time Panel Reset Timer item on the Administrator Settings page page 12 36 If the time is set within the r...

Страница 200: ...the help for the Web browser On Internet Explorer 1 From the Tools menu choose Internet Options 2 In the General tab click Settings under Temporary Internet files 3 Select Every visit to the page and click OK On Netscape 1 From the Edit menu choose Preferences 2 In the Category box choose Advanced and then Cache 3 Under Compare the page in the cache to the page on the network select Every time I v...

Страница 201: ...vent this problem from occurring disable the cache function of the Web browser by carrying out the procedure above or delete the temporary files by carrying out the procedure below Deleting temporary files You can avoid the problem by deleting temporary files using the procedure below after step 3 before logging into Administrator mode of Printer Management Utility again Note The menus and command...

Страница 202: ...d Summary This is the initial page that appears when you access http IP_address_for_copier with your Web browser You can also display this page by clicking Summary in the menu on the System tab The Summary page shows the current system configuration and status of this machine Device Status This area uses graphics and text to show the configuration of options installed in this machine ...

Страница 203: ... 16K Non standard paper sizes Displayed in unit of mm You can specify the paper size using A3 Wide Paper Size on the Administrator Settings page page 12 36 in Administrator mode Paper Type Displays the paper type that is set Plain Paper Thick 1 Thick 2 Thick 3 Envelope OHP 2nd side Plain Paper Thick 1 2nd Side Thick 2 2nd Side or Thick 3 2nd Side In addition if the paper properties are specified P...

Страница 204: ...b click Detail and then click Output Tray in the sub menu that appeared Output Tray Displays the trays for the option that is installed If single staple finisher is installed Top Tray Elevator Tray or Third Tray If folding finisher is installed Saddle Stack Tray or Elevator Tray Capacity Displays the capacity in terms of the number of pages of plain paper of the A4 Letter size Paper Displays the s...

Страница 205: ... installed on this machine Procedure Click the System tab click Detail and then click Hard Disk in the sub menu that appeared Total Space Displays the size of the installed hard disk System Resource Displays the amount of hard disk space used by the system User s Resource Displays the amount of hard disk space used by the user Free Space Displays the amount of free hard disk space ...

Страница 206: ...o in the sub menu that appeared Interface Info Type Displays the network type that can be used Ethernet 10Base T 100Base TX IP Address Displays the assigned IP address MAC Address Displays the MAC address of this machine Local I F This item appears only if the optional local interface kit is installed in this machine Type Displays the local interface IEEE1284 that can be used on this machine ...

Страница 207: ...Displays the paper cleaner and ozone filter information Ready Near Life or Life Fusing Unit Displays fusing unit information Ready Near Life or Life Transfer Roller Displays the transfer roller unit information Ready Near Life or Life Image Transfer Belt Unit Displays the image transfer belt unit information Ready Near Life or Life Toner Cartridge C M Y and Bk Displays the toner cartridge informat...

Страница 208: ...ly if the consumables are not installed Staple Cartridge Displays the staple cartridge information only when a finisher with a staple function is installed Ready or Empty Dust Box Displays the dust box information only when a finisher with a hole punch function is installed Ready or Full ...

Страница 209: ...es for each color mode Black Full Color Mono Color and Two Color and for the duplex mode 2 Sided Total Copy Printer Displays copy and print counter values for each color mode Black and Color Total Displays the total output counter value copy and print Copy Size Printer Size Copy Size Displays copy counter values for each color mode Black Full Color Mono Color and Two Color printed on large sized p...

Страница 210: ...Toner Coverage in the menu Copy Displays the total average usage ratio for each color of toner during copying with each color mode Printer Displays the total average usage ratio for each color of toner during printing with each color mode Copy Printer Displays the total average usage ratio for each color of toner during copying and printing with each color mode ...

Страница 211: ...t Displays the contact for directing inquiries about the product Contact Information Phone Displays the phone number that can be called for information on the product Internet Product Help Displays the URL of the Web page concerning the product Corporate Web Site Displays the URL of the manufacturer s Web site Supplies and Accessories Displays information about the contact for ordering consumables...

Страница 212: ...printer driver the user name is displayed Status Displays the job status Printing Waiting Printing Stopped Printing Stopped Error or Receiving Job Type Displays the print method of the job IPP Print Normal Print or Copy Received Time Displays the time that the job was received Estimated Job Complete Time Displays the estimated time of job completion Detail button Click this button to display a pag...

Страница 213: ...ayed If an error has occurred in this machine the error information is displayed Destination Displays the output tray of the job If single staple finisher is installed Top Tray Elevator Tray or Third Tray If folding finisher is installed Saddle Stack Tray or Elevator Tray File Name For a print job the file name is displayed Number of Pages Displays the number of pages per copy in the job Copy Disp...

Страница 214: ...Displays the destination of the job Detail button Click this button to display a page showing detailed information about the job Delete button When this button is clicked a confirmation page appears If the OK button is clicked the job is deleted Account Number If the Copy Track mode is set the access code is displayed Error Information Displays the detailed status of the job If the job status is S...

Страница 215: ...r Job Deleted by User Staple Canceled Punch Canceled Paper Fold Canceled or Mode Canceled Job Name If you specified a user name in the printer driver the user name is displayed File Name For a print job the file name is displayed Number of Pages Displays the number of pages per copy in the job Copy Displays the number of output copies in the job Detail button Click this button to display a page sh...

Страница 216: ...r Fold Canceled or Mode Canceled the error information is displayed If the job ended due to an error the error information is displayed Destination Displays the output tray of the job If single staple finisher is installed Top Tray Elevator Tray or Third Tray If folding finisher is installed Saddle Stack Tray or Elevator Tray Received Time Displays the time when the job was registered in this mach...

Страница 217: ...WAIN Destination Displays the destination of the job Number of Pages Displays the number of pages per copy in the job Detail button Click this button to display a page showing detailed information about the job Delete button Click this button to display the history for jobs that have been deleted by this machine or jobs that have been deleted by the user Complete button Click this button to displa...

Страница 218: ...menu Note The boxes may not appear in some cases such as when backup or restore is in progress using BOX Utility HDD Directories Displays the PUBLIC box and user box names that are registered Click a box name to display a list of files in the box To display files in boxes other than the PUBLIC box a password is required Create button Used to create new user boxes up to 199 boxes Click the Create b...

Страница 219: ...to 20 files are displayed on a page If there are more than 20 files these keys are used to view other pages Acquire Selected File button Downloads the selected files to the computer If the unauthorized access lock is enabled enter the password for the user box in the Password box Internet Explorer 6 SP1 or later recommended Delete Selected File button Deletes the selected files from this machine s...

Страница 220: ...can To HDD during one touch registration or temporary registration does not change If necessary change the one touch registration or temporary registration settings If a user box specified using one touch key registration or temporary registration is deleted and you check the registration information on Printer Management Utility it will appear as though the PUBLIC box is selected However the actu...

Страница 221: ...the menu Memo External Server Link uses anonymous to access the FTP server For the registration procedure of servers refer to Registering FTP Servers on page 8 48 and FTP Server FTP Server Registration on page 12 63 Server Address Of the FTP servers registered in Administrator mode only those that have External Server Link set to Yes are displayed Double click the server address to access the FTP ...

Страница 222: ...ope Com10 envelope C5 envelope DL or envelope Monarch Input Tray If this machine receives a print job with no specified input tray the default input tray specified here is used Settings Auto Tray 1 Tray 2 Tray 3 Tray 4 or LCT Orientation If this machine receives a print job with no specified orientation the default orientation specified here is used Settings Portrait or Landscape Output If this ma...

Страница 223: ...default symbol set Line Page Set the default number of lines per page Settings 5 to 128 Font Size Unit Set the default font size unit Settings Pitch or Point Font Size Scalable Font Set the default scalable font size Settings 4 00 to 999 75 in units of 0 25 Font Size Bit Map Font Set the default bitmap font size Settings 0 44 to 99 00 in units of 0 01 Override Set whether A4 paper is used if Lette...

Страница 224: ...Using Printer Management Utility 12 12 29 Font Information You can check the list of PCL fonts Procedure Click the Print tab and then click Font Information in the menu A list of PCL fonts is displayed ...

Страница 225: ...eport Types in the menu Note There are cases when reports cannot be printed such as when this machine is processing a job Configuration Select to print the device configuration information PCL Demo Page Select to print the PCL demo page PCL Font List Select to print the PCL font list Print button Select the report that you wish to print and then click the Print button to print the selected page ...

Страница 226: ...n tab and then click One Touch Key Registration in the menu Index Displays the assigned index names You can select an index and change the name Apply button Applies the index name change Sub Index Displays sub indexes in the index Select Grp group to register the destination in a group You can register groups for Scan to E mail and Internet FAX operations ...

Страница 227: ...be registered in an index is 120 for individuals and 15 for groups However the total number of 60 group registrations cannot be exceeded Destination Displays an icon indicating the transmission method for the one touch key Scan to E mail icon Scan to FTP Server Scan to PC icon Scan to HDD icon Scan to Internet FAX icon Not registered Delete button Deletes the selected one touch key ...

Страница 228: ...istrations can be registered in the areas of One Time Registration 1 to One Time Registration 8 Up to 15 destinations can be registered in each area One Time Registration area Displays One Time Registration 1 to One Time Registration 8 Destination Displays an icon indicating the transmission method for the temporary registration Scan to E mail icon Scan to FTP Server Scan to PC icon Scan to HDD ic...

Страница 229: ...until this machine enters Low Power Power Save mode Settings 10 to 240 minutes Disable Auto Low Power and Sleep mode when job is in memory Set whether this machine will enter Low Power Power Save mode if there are locked jobs or jobs in the memory Settings Yes or No Sleep Set whether this machine will enter Sleep mode Displayed only when the Disable Sleep Mode function on this machine is set to Ye...

Страница 230: ...py Top Tray Elevator Tray or Third Tray Print Top Tray Elevator Tray or Third Tray Internet FAX Top Tray Elevator Tray or Third Tray Intelligent Sorting Set the function that automatically selects Sort or Non Sort Settings Yes or No Criss Cross Set the function that performs crisscross sorting where the direction of each copy of the document is stacked alternately when paper in both the portrait a...

Страница 231: ...ze Set the paper size that this machine identifies as A3 Wide paper Settings 311 457 mm or 305 457 mm Auto Lock Job Delete Set whether to delete locked jobs when the time specified in the Lock Job Deletion Time box is reached Settings Yes or No Lock Job Deletion Time Set the time until locked jobs are deleted Settings 1 to 99 hours Allow printing after Copy Track error Set whether the job can be p...

Страница 232: ... values in the Year Month Day Time and Time Zone boxes Reprint Set whether to enable the reprint function Displayed only when the reprint function is enabled on this machine Settings Yes or No Panel Reset Timer Set whether the auto panel reset operation is performed for this machine Settings Yes or No Time Panel Reset Timer Set the time until the auto panel reset operation is performed for this ma...

Страница 233: ...ck the System tab and then click Printer Management Utility Setting in the menu Refresh Rate Set the refresh rate for Printer Management Utility pages Settings 30 to 7200 seconds Language Selection Set the display language of Printer Management Utility Settings US English UK English German French Italian Dutch Spanish Danish Czech or Japanese ...

Страница 234: ...enu Contact Enter the contact for directing inquiries about the product Contact Information Phone Enter the phone number that can be called for information on the product Internet Product Help Enter the URL of the Web page concerning the product Corporate Web Site Enter the URL of the manufacturer s Web site Supplies and Accessories Enter the contact for ordering consumables ...

Страница 235: ...n check the files in the boxes PUBLIC box or user box Procedure Click the File tab and then click User Directory in the menu Note The boxes may not appear in some cases such as when backup or restore is in progress using BOX Utility HDD Directories Displays the PUBLIC box and user box names that are registered Click a box name to display a list of files in the box ...

Страница 236: ...file was stored in the box File Size Displays the size of the file stored in the box Previous Next button Up to 20 files are displayed on a page If there are more than 20 files these keys are used to view other pages Delete Selected File button Deletes the selected files from this machine s hard disk When this button is clicked a confirmation page appears If the OK button is clicked the files are ...

Страница 237: ...ng one touch key registration or temporary registration is deleted and you check the registration information on Printer Management Utility it will appear as though the PUBLIC box is selected However the actual registration has not been changed Register the information again For a file list for a user box the following buttons are also displayed Change Directory Name button Changes the name assign...

Страница 238: ...on the hard disk Procedure Click the File tab and then click File Storage Life in the menu File Storage Life Specify the storage period for files on the hard disk Valid only for files saved to the hard disk using Scan to HDD Settings No File Time Limitation 1 day 2 days 3 days 4 days 5 days 6 days or 7 days ...

Страница 239: ...ttings Procedure Click the Print tab and then click Local I F in the menu Parallel Interface Set the communication mode This only appears when the optional local interface kit is installed in this machine Settings Compatible Nibble or ECP I O Timeout Set the connection timeout Settings 10 to 300 seconds ...

Страница 240: ... the menu Printer Name Set the printer name Settings Up to 127 characters alphanumeric characters only Printer Location Set the printer location Settings Up to 127 characters alphanumeric characters only Printer Manufacturer and Model Set the printer manufacturer information Settings Up to 127 characters alphanumeric characters only ...

Страница 241: ...s MH or MMR Priority Compression Method for Monochrome TIFF Select the priority compression method for TIFF files Settings MH or MMR Send Scanned File Separation Set the segmentation method in units of pages when the maximum size is exceed during Scan to E mail and Scan to Internet FAX operations Settings Yes or No For Scan to E mail refer to Binary Division and Scanned File Separation on page 8 4...

Страница 242: ...ck File Export in the sub menu that appeared Note Given that you change the user box name delete a box or change or delete FTP server settings and you do not make the corresponding change to the one touch registration key if you export and import the one touch key registration an error will occur when you import the data If an error occurs only a portion of the data is imported Execute button Read...

Страница 243: ...the sub menu that appeared A page for specifying the one touch key information file appears Note If there is one touch key that is selected from this machine s control panel the one touch key registration information is not overwritten Browse button Click this button to specify the one touch key information file Execute button Specify the file and then click this button to load the one touch key r...

Страница 244: ...at are included in the destination information when Scan to E mail is used Procedure Click the Scan tab and then click Prefix Suffix Registration in the menu Prefix Register the prefix for each data number Settings Up to 20 characters Suffix Register the suffix for each data number Settings Up to 64 characters ...

Страница 245: ... Address and DHCP parameters restart this machine turn it off then on again TCP IP IP Address Set the IP address for this machine Subnet Mask Set the subnet mask of the network to which this machine will be connected Gateway Address Set the default gateway address to which this machine will be connected RAW Port Number Default value 9100 DHCP Set whether a DHCP server is used Settings Enable or Di...

Страница 246: ... URI Displays the URL of the printer with which data can be printed using IPP Enable IPP Set whether to perform IPP printing Settings Enable or Disable Accept IPP Jobs Set whether to use the IPP reception function Settings Enable or Disable Operation Supported Specify the print operations to be supported by IPP Settings Print Job Validate Job Cancel Job Get Job Attributes Get Jobs or Get Print Att...

Страница 247: ...r NDS Settings Both NDS or Bindery Print Server Name Set the NetWare printer server name Settings Up to 63 characters alphanumeric characters only Print Server Password Set the NetWare printer server password Settings Up to 127 characters alphanumeric characters only Preferred File Server Set the preferred NetWare printer server Settings Up to 47 characters alphanumeric characters only Preferred N...

Страница 248: ...ck Common Setting and then click NetWare Status in the sub menu that appeared Print Queue Scan Rate Set the NetWare queue scan rate The default value is 1 second Settings 1 to 65535 seconds Mode Set the operation mode of the printer service Settings PServer or NPrinter Printer Number Set the NetWare printer number If set to 255 the number is automatically assigned Settings 0 to 255 NetWare Server ...

Страница 249: ...ice Name and WorkGroup Name parameters restart this machine turn it off then on again Enable Windows Printing Service Set whether to use the Windows printing service Settings Enable or Disable NetBIOS Name Set the NetBIOS name Settings Up to 15 characters alphanumeric characters only Printing Service Name Enter the printing service name Settings Up to 13 characters alphanumeric characters only Wor...

Страница 250: ...ab click Common Setting and then click LDAP in the sub menu that appeared LDAP Set whether to use the LDAP search function Settings Enable or Disable LDAP Server Address Enter the IP address or server name host name to set the LDAP server address Settings Alphanumeric characters only the first character cannot be a number for the server name SSL TLS Set whether to perform communications with the L...

Страница 251: ... Set the connection timeout for the LDAP server Settings 5 to 300 seconds Max No of E mail Searches Set the search upper limit for the LDAP search Settings 5 to 120 Authentication Method Set the authentication method If GSS SPNEGO is selected the DNS server in the TCP IP settings must be specified refer to page 12 50 Settings Anonymous Simple Digest MD5 CRAM MD5 or GSS SPNEGO Domain Name If the au...

Страница 252: ...gs Up to 63 characters POP3 Password Set the password for logging in to the POP3 server Settings Up to 15 characters Mail Check Set whether to periodically check the mail server contents If No is selected e mails will not be received automatically If Yes is selected set the interval for automatic reception Settings Yes or No 1 to 60 minutes Port Number Set the port number for the POP3 server Norma...

Страница 253: ...f 25 SMTP Connection Timeout Set the connection timeout for the SMTP server Settings 30 to 300 seconds Maximum E mail Size Set the maximum size of transmitted mails Settings No Limitation 100 to 3000 KB in units of 100 KB Binary Division Set whether to divide the e mail into multiple e mails binary unit when the e mail size exceeds the maximum e mail size Settings Yes or No For Scan to E mail refe...

Страница 254: ...xt of the e mail message for Scan to E mail operations Procedure On the Network tab click E mail Internet FAX and then click E mail in the sub menu that appeared Subject Enter the subject of the mail Settings Up to 64 characters Description Enter the text of the mail Settings Up to 256 characters ...

Страница 255: ...of the e mail message for Scan to Internet FAX operations Procedure On the Network tab click E mail Internet FAX and then click Internet FAX in the sub menu that appeared Subject Enter the subject of the mail Settings Up to 64 characters Description Enter the text of the mail Settings Up to 256 characters ...

Страница 256: ...int the mail text when this machine receives an Internet fax e mail Settings Yes or No Internet FAX Print Size Set the print size for printing the received data Settings Reduced Full Size or A4 Letter Reduced default Select this setting when you wish to slightly reduce the size the received data Full Size Select this setting to print the received data in full size A4 Letter Select this setting whe...

Страница 257: ... then click FTP Configuration in the sub menu that appeared Proxy IP Address Enter the IP address of the proxy server when one is used Port Number Set the port number of the proxy server Normally use the default value of 21 FTP Connection Timeout Set the connection timeout for the FTP server Settings 5 to 300 seconds Passive Mode Set the passive mode Settings Enable or Disable ...

Страница 258: ...You can register FTP servers Procedure 1 On the Network tab click FTP Server and then click FTP Server Registration in the sub menu that appeared 2 To register a new FTP server click an unregistered box To change the settings for an FTP server that is already registered click it ...

Страница 259: ...ame used to log in to the FTP server Settings Up to 32 characters alphanumeric characters only Password Enter the password used to log in to the FTP server Settings Up to 64 characters alphanumeric characters only Port Number Specify the FTP port number Normally use the default value of 21 Directory Set the destination directory for storing the scanned data on the FTP server To specify the default...

Страница 260: ...iguration You can specify TWAIN scan settings Procedure Click the Network tab and then click TWAIN Configuration in the menu Operation Lock Time Set the panel lock timeout for performing TWAIN scan operations from the computer Settings 30 to 300 seconds ...

Страница 261: ...k the Network tab and then click SSL TLS in the menu The following page appears if no certificate has been created If a certificate has been created refer to Page showing the settings on page 12 68 Next button To create a certificate select Create a Self Signed Certificate and then click the Next button A page used to create a self signed certificate appears For details refer to Creating a Self Si...

Страница 262: ...the state province name used when creating a certificate Settings Up to 127 characters Country Set the country name in ISO3166 code used when creating a certificate Settings 2 characters Australia AU Belgium BE Canada CA China CN Czech Republic CZ Denmark DK France FR Germany DE Italy IT Japan JP Netherlands NL Russian Federation RU Spain ES United Kingdom UK United States US Validity Start Date D...

Страница 263: ...reating a self signed certificate while The certificate has been created is displayed the message Connection uses SSL TLS appears at the top section If this message appears do not click the OK button under the message If you do you will be logged out from Administrator mode but this machine s control panel will be locked You will not be able to copy or print until the timeout occurs Page showing t...

Страница 264: ...om Administrator mode If Set Encryption Strength and Enable Disable of SSL TLS was selected the setup page appears Refer to Enabling Disabling SSL TLS and Setting Encryption Strength on page 12 70 Create a Self Signed Certificate Select to create a certificate Delete Certificate Select to delete the installed certificate This setting appears only when there is an installed certificate Set Encrypti...

Страница 265: ... the Apply button If enable disable condition of SSL TLS was changed click the OK button and log out once from Administrator mode If the enable disable condition of SSL TLS was not changed the specified SSL TLS information is displayed SSL TLS Select whether to enable or disable the SSL TLS function Settings Enable or Disable Encryption Strength Select the encryption strength ...

Страница 266: ...ser authentication must be the same Procedure Click the Network tab and then click User Authentication in the menu User Authentication Set whether to perform user authentication Settings Enable or Disable Server Type Select the server type Settings Active Directory or SMB NTLM Domain Name If User Authentication is set to Enable set the domain name of the selected server type Settings for Active Di...

Страница 267: ...Management Utility 12 72 Memo If user authentication is enabled a page for entering the network user name and password appears when the Scan or Box key on this machine is pressed in order to enter Scan mode or Box mode ...

Страница 268: ... list of thumbnails of the image data G Print the selected image data G Easily send image data using e mail FTP or SMB G Collectively back up or restore images administrator only 13 1 System Requirements Computer IBM PC or compatible Pentium II 450 MHz with 128 MB or more Pentium III 1 GHz with 256 MB or more recommended Operating System Windows 98SE Windows Me Windows 2000 Windows XP or Windows N...

Страница 269: ...ns BOX Utility on the supplied CD ROM the BoxUtility folder 2 Double click the Setup exe file to run the installation program 3 Complete the installation according to the instructions that appear 4 If a computer restart confirmation screen appears restart the computer File Format Supported Functions JPEG Color mode Full color or grayscale You can specify the compression ratio TIFF Color mode Black...

Страница 270: ...ou must enable the box functions from this machine s control panel Setup procedure 1 On this machine s control panel press the Utility key touch Admin Mode and then enter the administrator access code 2 Touch Admin Set then Box Function page 2 4 3 Touch Permit and then touch Enter ...

Страница 271: ...e BOX Utility 2 On the Setup menu click Register MFP Controller The setup dialog box below appears 3 Click the New Registration button 4 Enter the registration name in the Name box up to 16 characters and the IP address of the copier in the Host box Memo The following symbols cannot be used in the box name For the procedure to set the IP address of this machine refer to Setting the IP Address for ...

Страница 272: ...The registration is deleted Editing registrations 1 In the Registered list select the registration that you wish to edit 2 Enter the registration name in the Name box up to 16 characters and the IP address of the copier in the Host box 3 Click the OK button The changed registration is saved Changing the display order of registrations 1 In the Registered list select the registration whose display o...

Страница 273: ...ecting MFP drop down list displays the registration names that were entered in Registering the Copier refer to Registering the Copier on page 13 4 3 Click the Connect button The connection is established and the boxes on the copier hard disk appear 4 Select the box containing the image data that you wish to view If a user box is selected enter the password for the box in the Password box 5 Click t...

Страница 274: ...elect the display mode Icons Details or Thumbnails from the View menu Or click the display mode icon on the toolbar Icon display mode Detailed display mode Thumbnail display mode Icon display mode In icon display mode the image data files are displayed as icons G Move the mouse pointer over an icon to display its file name file format file size and date of registration G From the menu that appears...

Страница 275: ... click the title Name Size Type or Received at the top of the list Thumbnail display mode In thumbnail display mode the thumbnails of the images are displayed G Move the mouse pointer over the thumbnail to display the file name file format file size date of registration image size and number of pages For a PDF file the image size and the number of pages are displayed only if Adobe Acrobat is insta...

Страница 276: ...y the image in another window Select the file that you wish to view and then click Open on the Command menu The image is displayed in the image display window For details on the operation of the image display window refer to Image Display Window on page 13 13 Memo PDF files are displayed using Adobe Acrobat or Adobe Acrobat Reader Opening the file using the assigned application You can open a file...

Страница 277: ...sort the order of the displayed image data On the Arrange Icons sub menu of the View menu select the order in which the image data is to be sorted The list is sorted as specified Refreshing You can refresh the list information for the image data On the View menu click Refresh You can also click on the toolbar The image data list is refreshed Changing the file name of the image data You can change ...

Страница 278: ... or the image display window You can specify the storage location of the temporary file set the cache or delete the temporary file Note You cannot open the setup dialog box while connected to a copier Drop the connection to copier and open the setup dialog box 1 On the Setup menu click Temporary File Setting The Temporary Files Setting dialog box appears 2 Specify settings for the following Delete...

Страница 279: ...menu click Display Setting Set the display in the setup dialog box Amount of disk space to use Specify the upper limit for the file size of temporary files in MB Enable cache setting Set whether to use the image downloaded from the copier as a cache file If it is used as a cache file images that have been opened before will open faster Use cache for the next startup as well Set whether to use the ...

Страница 280: ...on the Command menu You can perform the operations described below in the image display window Saving the image file On the File menu click Save As The file save dialog box appears Displaying the print preview You can display a preview sample before printing the displayed image On the File menu click Print Preview The print preview screen appears ...

Страница 281: ...nformation including the file name file type size date of creation and resolution is displayed Expanding or reducing the image You can expand or reduce the displayed image On the View menu click an expansion reduction setting Zoom In Zoom Out Fit in Window Fit Width or an expansion reduction ratio Displaying images containing multiple pages TIFF files may contain multiple pages of images For these...

Страница 282: ...d commands using the icons on the toolbar of the image display window No Function 1 Save As 2 Print 3 Show Image Information 4 Zoom In 5 Zoom Out 6 Fit in Window 7 Fit Width 8 First Page 9 Previous Page 10 Next Page 11 Last Page 12 Go To Page 1 2 3 4 5 6 7 8 9 10 11 12 ...

Страница 283: ...nto the copier refer to Restoring Image Data on page 13 17 Backup procedure 1 On the Tool menu in the main window click Backup The Backup dialog box appears 2 If multiple copiers are registered select the copier to be connected from the Connect drop down list The Connect drop down list displays the registration names that were entered in Registering the Copier refer to Registering the Copier on pa...

Страница 284: ...registration name year month day and time Note You cannot use the copier control panel while the backup operation is in progress After the backup operation is complete the control panel is unlocked You cannot execute the backup operation when another user is connected to the copier using the BOX Utility or when there are copy jobs print jobs or scan jobs on the copier 13 9 2 Restoring Image Data Y...

Страница 285: ...arts When the restore operation is complete a message appears Note If image data files with same file names exist on the copier the files are overwritten during the restore operation The date time of creation of image data files that have been restored are set to the date time when the restore operation was performed You cannot execute the restore operation when another user is connected to the co...

Страница 286: ...e is reduced when a file is converted into compact PDF it can reduce the load on the network or hard disk when the file is sent as an e mail attachment or when the file is saved to your computer Procedure 1 On the main window select a PDF file you wish to convert into compact PDF You can do this from any display mode icons details or thumbnails 2 On the Command menu click Convert To CompactPDF The...

Страница 287: ... 10512 10525 10530 Not enough memory Please close other applications 118 119 126 10104 BOX Utility setting is incorrect Please install again 120 122 Link the file to your selected application 123 Cannot open because the file format is incorrect 125 Cannot use BOX Utility with this operating system 252 The number of registered copiers has reached its maximum Please delete unused copiers from the re...

Страница 288: ...OX Utility 13 13 21 1301 1308 1401 1403 10001 10002 10101 10102 10501 10503 10504 10515 10524 10701 21000 21011 22000 22024 23000 23013 25001 25200 The operation did not succeed Please try again Error Code Action ...

Страница 289: ...13 Using the BOX Utility 13 22 ...

Страница 290: ...tart printing although processing of the print job was completed on the computer An error has occurred in this machine Check this machine s control panel The network cable or printer cable is disconnected Check that the printer cable or network cable is connected properly The printer driver selected for printing is not compatible with the printer controller Check the printer name selected in the P...

Страница 291: ...n of functions have been specified Check the settings and specify the functions correctly Print is not performed as specified Incorrect settings have been specified Check each setting in the printer driver A combination of functions although possible in the printer driver is not possible with this machine The paper size orientation and other settings specified in the application have priority over...

Страница 292: ...ched Printed pages may be fed out without being punched if the paper is loaded into the paper source with an incorrect orientation Check the orientation setting The hole punch position is not as expected The orientation setting is not correct Check the punch position on Page Layout of the printer driver setup dialog box The folding function cannot be specified Folding finisher must be installed in...

Страница 293: ...l hard disk and an optional 256 MB memory must be installed on this machine In addition the hard disk must be added in the Device Option Setting tab of the printer driver Add the necessary options Add the hard disk in the Device Option Setting tab of the printer driver Symptom Probable Cause Action ...

Страница 294: ... 2 Ethernet 802 3 Ethernet II Ethernet SNAP Supported protocols TCP IP IPX SPX NetBEUI Compatible Computers IBM PC or compatible Compatible Operating Systems Windows 98 98SE Me 2000 XP NT 4 0 or Server 2003 Compatible Web Browsers Internet Explorer 5 5 or later JavaScript enabled Netscape Communicator 4 5 or later JavaScript enabled Utility Printer Management Utility Built into the printer control...

Страница 295: ...ifications 15 2 Scan Functions Item Specifications Remark Scan Speed 35 pages minute Resolution 600 600 dpi Color RGB 256 variations Grayscale 256 variations Scan File Formats TIFF PDF MH MMR and JPEG and JPEG ...

Страница 296: ... 61 8 62 Active Job Print 12 17 Scan 12 19 Add addr to single index 8 37 Add Port 6 5 6 6 6 7 Add Printer Wizard 4 2 4 11 Add to destination 8 37 Address 8 13 Address Input 8 16 8 70 10 5 Address screen 8 15 Admin Set Box Function 10 3 13 3 LDAP Search 8 33 Administrator mode 12 4 12 34 Administrator Settings 12 36 Administrator s Code 12 3 12 4 Authentication Method 8 35 Authentication screen 8 3...

Страница 297: ...3 1 Install 13 2 Broadcast 9 6 C cache function 12 5 Change Directory Name 8 62 Change Directory Password 8 62 Change Index Name 8 19 10 7 Change One Touch name 8 19 10 7 Change send file name 8 19 Change Subject 8 18 10 7 Check LDAP Settings 8 35 Collate 5 5 Color Mode 8 14 Color File 8 14 Color Grayscale Compression Level 8 12 Common Setting 3 4 6 2 IPP 6 8 12 51 LDAP 8 34 12 55 NetWare Configur...

Страница 298: ...ult Set PCL Setting 12 28 Setting 12 27 Default User Name 5 6 11 7 Delete After Printing 11 1 Delete All Files 8 62 Delete all One Touch names in index 8 20 10 8 Delete Directory 8 62 Delete files in box 10 8 Delete One Touch name 8 20 10 8 Delete Selected File 8 62 Description 8 44 8 69 destination 8 45 8 52 8 54 8 60 8 70 10 5 Detail Consumable 12 12 Hard Disk 12 10 Input Tray 12 8 Interface Inf...

Страница 299: ...e 8 16 Domain Name 8 35 Download as Bitmap 5 5 Duplex 9 4 duplex printing 5 13 Duplex Booklet 5 5 5 14 E Easy Set 5 4 ECP 3 4 Edge Frame Erase 8 14 Edit Watermark 5 9 5 10 E mail 8 44 12 59 E mail Internet FAX E mail 8 44 12 59 Internet FAX 8 69 12 60 Print 8 75 12 61 Receive 8 73 12 57 Send 8 41 8 66 12 58 E mail Address 8 12 E mail Notification 8 18 8 24 10 6 10 11 E Mail Internet Print 8 76 Rec...

Страница 300: ...ize 8 62 File Storage Life 8 59 12 43 File tab 12 23 12 40 file to be forwarded 10 4 finisher 5 15 5 16 5 17 Fit to Paper 5 19 Folding 5 17 folding finisher 5 15 5 16 5 17 Font Information 12 29 forward destination 10 5 Forward to E mail 10 1 10 12 Forward to FTP Server 10 1 10 14 Forward to PC 10 1 10 16 From address 8 12 8 45 8 71 10 13 FTP application 8 54 FTP Configuration 8 51 12 62 FTP Conne...

Страница 301: ...t 3 4 image display window 13 13 Index 8 26 index 8 15 Index List 8 15 Input Tray 12 8 Install BOX Utility 13 2 install printer driver 4 1 TWAIN driver 9 1 Installable Options 5 7 Installed Options 5 7 Interface Info 12 11 Internet FAX 8 69 12 60 Internet FAX Print Size 8 75 Internet Fax Print Size 8 76 Internet FAX Reception 8 10 8 72 IP Address 6 2 8 49 8 50 IP address 6 2 IP Port Base 9 6 IPP 6...

Страница 302: ...LDAP search 8 33 LDAP server 8 33 LDAP Server Address 8 34 8 35 Limitations on Function Combinations 5 21 Limitations on Other Combinations 5 22 Limitations on Paper Size and Function Combinations 5 20 Local I F 12 44 local interface kit 3 3 Lock Job 11 1 11 6 logging in to Administrator mode 12 4 Log in 12 4 Login Name 8 35 8 49 8 50 Log out 12 4 Low Density Adjustment 9 4 LPR Port 6 7 LPR printi...

Страница 303: ... Name 6 5 NetWare 6 12 NetWare 4 x bindery emulation 6 12 6 14 NetWare 4 x remote printer mode 6 16 NetWare 4 x 5 x 6 print server mode 6 18 NetWare 5 x 6 Novell Distributed Print Services NDPS 6 20 NetWare Configuration 12 52 NetWare Status 12 53 network connection 3 1 4 2 network printing 6 1 Network Setting Common Setting 6 2 E Mail Internet 8 42 8 67 8 74 8 76 FTP Server 8 50 LDAP 8 35 Twain 9...

Страница 304: ...Time for TWAIN 9 2 Operation Supported 6 9 Option 9 4 Option dialog box 9 5 Orientation 5 5 Original Direction 8 17 Original Document Size 5 5 5 19 Original Setting 8 13 Original Setting screen 8 16 Others screen 8 35 Output Paper Size 5 5 5 19 Output Setting 5 5 Output Tray 12 9 P Page Layout 5 4 Paper Size 9 4 paper size 5 19 Paper Source 5 5 Paper tab 5 5 parallel connection 3 3 4 7 Parallel In...

Страница 305: ...2 20 12 61 Print and Hold 11 1 11 2 print job management 11 1 Print tab 12 27 12 44 Print Test 6 22 Print Test Page 6 22 printer controller 1 1 printer driver common controls 5 3 install 4 1 setup dialog box 5 1 uninstall 4 15 Printer Figure 5 4 Printer Location 6 9 Printer Management Utility 12 1 Printer Management Utility Setting 12 38 Printer Manufacturer and Model 6 9 Printer Name 6 9 Printer ...

Страница 306: ...8 25 registering FTP servers 8 48 registering the copier 13 4 Reply To address 8 71 Report Types 12 30 Reset Mode 8 21 Resolution 5 5 8 14 9 4 Restore 13 17 restoring image data 13 17 retrieving images using TWAIN 9 3 retrieving the scanned data 8 61 Retype Password 8 58 S Scan 8 4 8 11 9 4 12 19 12 22 12 46 scan function 8 1 Scan Mode 8 13 Scan Mode screen 8 14 Scan Setting 8 12 Scan Size 8 14 Sc...

Страница 307: ...8 67 12 58 Send screen 8 22 10 9 Separate Scan 8 17 9 4 Setting 12 27 setting device options 5 7 Setup tab 5 5 single staple finisher 5 15 SMTP Connection Timeout 8 41 8 66 SMTP Server 8 41 8 42 8 66 8 67 specifications 15 1 SSL TLS 8 34 8 35 12 66 standard search 8 36 Standard TCP IP Port 6 6 stapling documents 5 15 Starting Number 11 9 status display 12 2 Store 8 21 Store Job 5 6 11 1 Store to H...

Страница 308: ...r 8 42 8 67 Toner Coverage 12 15 troubleshooting 14 1 TWAIN 9 1 Twain 9 2 TWAIN Configuration 9 2 12 65 TWAIN driver 9 1 install 9 1 U uninstall printer driver 4 15 URL notification using e mail 8 23 10 10 Use Printer Font 5 5 Use Proxy 8 49 User Authentication 12 71 user authentication 8 13 user box 8 57 8 58 User Directory 8 57 8 61 12 23 12 40 User Directory Name 8 58 User mode 12 2 12 7 User N...

Страница 309: ...16 Index 16 14 User s Choice 1 12 34 User s Choice 2 12 35 W Watermark 5 5 watermark 5 9 Web browser 12 5 Windows Configuration 6 4 12 54 Windows printing 6 4 WorkGroup Name 6 5 ...

Страница 310: ...The information contained in this manual is subject to change without notice to incorporate improvements made on the product or products the manual covers 4036 7708 01F 2004 2 ...

Отзывы: