43
Adjust the trim position before operating the robot. Trim adjustment refers to correcting
slight deviations in servo origins that were not perceived during assembly.
The trim position is a pose in which only the trim is adjusted with the robot in its basic
position.
The KXR-R4LL standard is the robot with its arms extended. In the Hello̲KXR-R4LL
(Vx.xx) project, the Trim Adjustment tab (explained below) is preset so that KXR-R4LL
assumes the trim position. The next process involves adjusting deviations in each servo
motor from the trim position.
In this process, put the robot in a completely upright position with bilateral symmetry. If
you run a motion with the trim out of alignment, the robot will not function properly or
topple over easily, so make sure to perform the process carefully.
■ Trim Adjustment
Types of Positions
●
Neutral Position:
The state in which all servos are positioned to their Neutral (origin) position. This is used for
confirmation after assembly.
●
Trim Position:
The pose where only the trim is adjusted from the Neutral Position. This becomes the robot's
basic posture. It is the upright standing posture for
KXR-R4LL
, and is used when adjusting trim.
● Home Position:
The first and last position when motions are run. When the motion is completed,
the robot returns to the home position, so if it stops partway through, check for
motions that could not be performed, malfunctions or other such trouble.
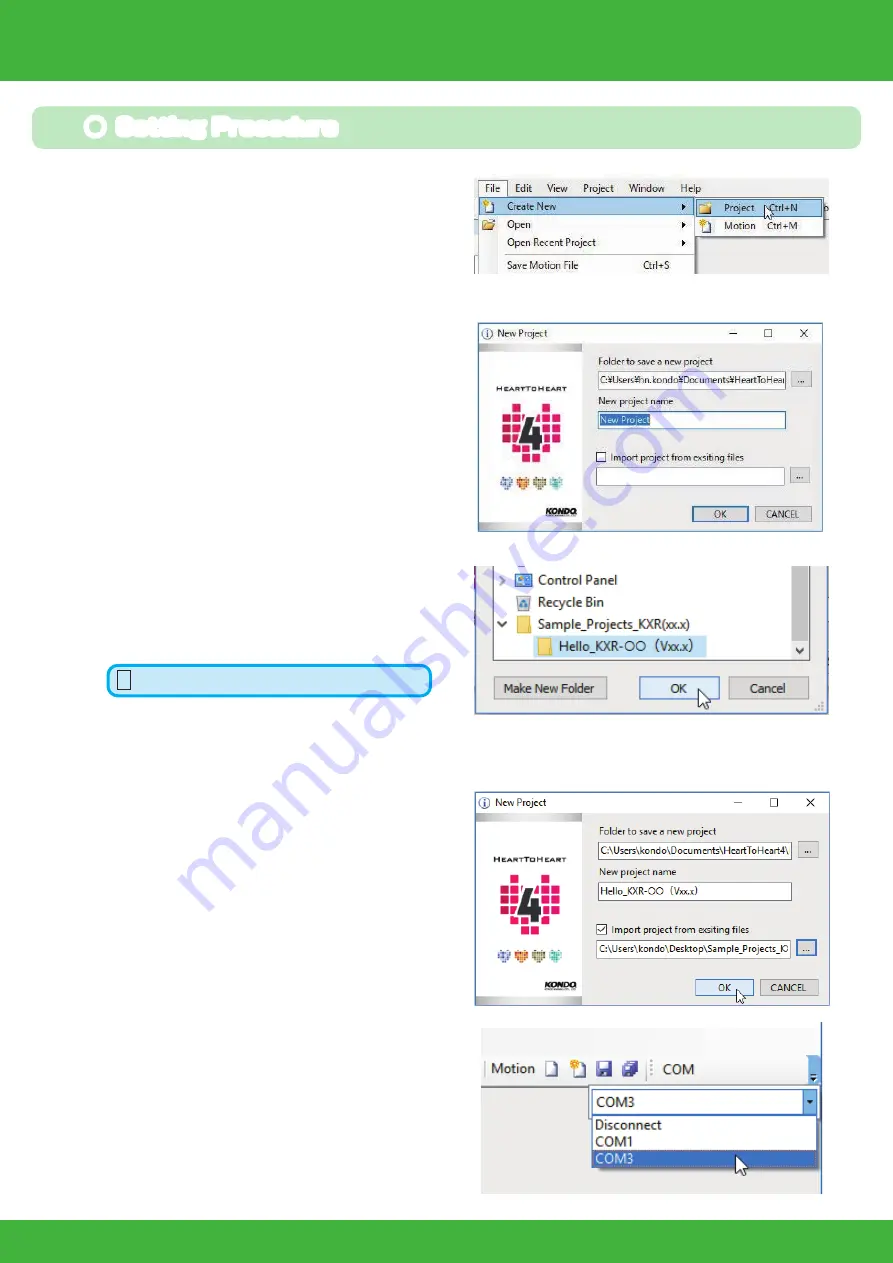
● Setting Procedure
1.
Click “File” -> “New” -> “Project” .
2.
Click on the Project Import button.
3.
Select the “Hello_KXR(Vxx.x)" project in the
Sample_projects (Vxx.x) folder that was
copied onto the computer above.
4.
When the project is imported, the new proj-
ect name in the New Project window be-
comes the same as the name of the folder
that was imported.
If no change is made, press "OK".
5.
Assign the Communication Port (COM)
number to be used.
This will typically be
the COM number used for the KO Driver.
In the initial state, there is a pull-down switch next
to the COM button. When the button layout or
window size is changed, the pull-down design will
also change.
Hello̲KXR-R4LL(Vxx.x)
Trim Adjustment 2
Содержание KXR-R4LL
Страница 28: ...28 Body Assembly 2 Joining Body Attach all four areas 200mm x4 KXR R4LL...
Страница 31: ...31 Attach the cable 120mm 120mm Wheel Leg Assemble 4 sets Wheel leg KXR R4LL...
Страница 37: ...37 Complete Assembly completed The following will explain how to mount the battery and run motions KXR R4LL...
Страница 60: ......


