4 - 10
Chapter 4. Maintenance
Corrective Maintenance
Incident Recovery
If routine cleaning is neglected, ink buildup will eventually coat the knife-
edge of the catchpan and create ‘spikes’ on the eyelid. These conditions
will cause severe print quality problems. These problems can still be
corrected by cleaning, but it may need to be more extensive and thorough
than routine cleaning. Incident recovery involves the following 2-part
procedure:
•
Inspection
•
Swabbing
•
Wiping.
Inspection
1.
Complete step 1 through step 5 of the “Routine Cleaning” procedure.
2.
With the eyelid open, check for any of the following conditions:
•
Dried ink accumulated in the opening between the eyelid and the
catchpan.
Ink in this area interferes with the print drops. Interference causes
deflection and splattering (or ‘spitting’). Splatter imitates the
appearance of crooked jets.
•
Dried ink on the eyelid itself.
This occurs during the normal movement of the eyelid, but if the
ink is left on the eyelid, it may start to stick and collect more ink,
usually at the start of a job.
•
Strands or strings between the catcher and eyelid.
Eventually, ink buildup will cause the entire print array to become
ragged.
Shorting on Startup
3.
If the printhead is repeatedly shorting during a startup, do a printhead
clean, then a startup. The printhead clean is a shorter version of the
cleaning down during a shutdown that uses less replenisher.
4.
Repeat the cleaning procedure.
5.
If cleaning does not remove the buildup and produce a straight, clean
impact line, clean the knife edge seal and eyelid lip.
Ragged Print Quality
6.
If the problem is gradually worsening print quality (“raggedness”), do
a printhead clean.
7.
If cleaning does not restore print quality, put the printhead in the
down state and go to State 12 to bring the system up in a crossflush
state.
8.
With the system in crossflush state 12, remove the front cover.
9.
Connect the grounded catchpan.
Caution: Do not operate the system with the cover off without the grounded
catchpan installed.
10. Remove the eyelid and check for dripping. No ink should be dripping
from the printhead.
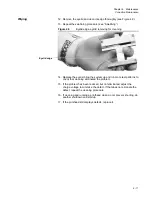
11. If the printhead is dripping, continue with “Remove the eyelid and
clean its edge thoroughly (see Figure 4.9).”.
Содержание VERSAMARK DP7122
Страница 1: ...Kodak Versamark Inc KODAK VERSAMARK DP7122Printer Operator s Guide ...
Страница 2: ......
Страница 3: ...KODAK VERSAMARK DP7122 Printer Operator s Guide Block 3 Mod 11 ...
Страница 8: ......
Страница 24: ......
Страница 37: ...3 7 Chapter 3 Troubleshooting Identifying Print Defects Figure 3 4 continued ...
Страница 44: ......
Страница 56: ......
Страница 61: ......
Страница 62: ...0114130 602 0114130 603 Kodak Versamark Inc ...

