


16-10-200716-10-2007
MKIV OPERATOR’S MANUAL
11
2.1.1
Mechanical Construction
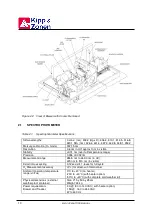
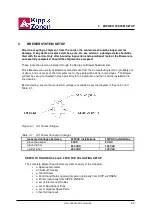
Refer to Figure 2.1 and Figure 2.2.
The Brewer Spectrophotometer is housed in a weatherproof enclosure constructed from two pieces
- a base, to which all optical and electronic assemblies are installed, and a removable cover. When
the cover is fastened in place, a weatherproof seal is formed between the top edge of the base and
the bottom of the cover. The dimensions of the assembled enclosure are 71 x 50 x 28 cm.
The Brewer instrument control panel can be viewed through a plexiglass window in the top of the
cover. Viewing ports for both the iris and the spectrometer entrance slit are visible through this
window.
In one corner of the cover is an inclined surface. A hole has been cut from this surface to provide
an opening which is properly positioned to pass direct sunlight or zenith skylight to the
spectrophotometer. This opening is covered by a quartz window [QW 1], which is secured by a
weatherproof seal. ( Items enclosed by square brackets, [ ], are references to the Selected Parts
List, Table 2-2, and Figure 2-4).
Three circular weatherproof connectors are mounted on the side of the Brewer base below the
weatherproof seal. A six-pin male connector marked AC POWER connects to the 120V (or 240 V)
AC power supply. A ten-pin female connector marked COMPUTER carries the RS-422 data
communication signals. A ten pin male connector marked AZIMUTH carries motor control and
monitor signals for the azimuth tracker.
All exposed surfaces of the spectrophotometer enclosure and mechanical linkages are painted with
an enamel for durability and to minimize radiative heating. All machined aluminum parts in the
spectrophotometer system are black-anodized to minimize scattered light and provide a protective
finish.
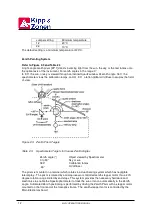
Mounted inside the Spectrophotometer is a cannister of desiccant which is designed to remove
moisture from the air as the Brewer ‘breathes’ with changes in temperature from night to day. The
desiccant is a ‘self indicating’ type, and can be conveniently removed, without tools, through the
base of the instrument.
This cannister will NOT remove moisture from within the spectrophotometer, and bags or trays of
loose desiccant are usually used for this purpose.
Moisture Sensor Option
As an optional feature, the spectrometer may be fitted with a Moisture Sensor. This option outputs
the moisture content of the spectrophotometer housing in gm/m
3
and RH%, and can be used as an
indication of moisture leakage problems, or when internal desiccant requires changing. Two
humidity indicators are available on the Computer Monitor: the absolute humidity in grams/m
3
and a
temperature weighted moisture index. The moisture index is a relative number that indicates
whether the desicant requires changing. Consistent moisture index values of greater then 10
means that the desicant should be changed.
Heater / Fan Option
A heater / circulating fan assembly may also be included as an option for cold or humid climates, or
in cases where it is desired to maintain constant temperature or good air mixing within the
instrument. The air mixing feature is especially useful in moist climates, and it enables the internal
desiccant to be exposed to the total air volume. In addition, the mixed air will give a more
representitive value of moisture content if the Brewer is fitted with the moisture sensor option.
The heater will attempt to hold the Brewer’s internal temperature at or above a set minimum
temperature. The minimun temperature can be set at 10
°
C or 20
°
C. The minimum temperature is
selected by moving the jumper (J1) on the porportional heater controller (bolted to the Brewer
foreoptics supports near the zenith prism):
2. SYSTEM DESCRIPTION
Содержание BREWER MK IV
Страница 1: ...INSTRUCTION MANUAL OM BA C230 B Mk IV...
Страница 2: ...REVISION HISTORY REV DESCRIPTION DCN DATE APPD B Update 99 16 12 C Update 07 16 10...
Страница 3: ...ii...
Страница 5: ...2...
Страница 7: ...4...
Страница 25: ...MKIV OPERATOR S MANUAL 22...
Страница 27: ...MKIV OPERATOR S MANUAL 24 Figure 3 2 Brewer Equipment Setup Figure 3 3 Brewer Spectrophotometer Tracker Tripod...
Страница 57: ...MKIV OPERATOR S MANUAL 54...
Страница 61: ...MKIV OPERATOR S MANUAL 58...
Страница 81: ...MKIV OPERATOR S MANUAL 78...
Страница 91: ...MKIV OPERATOR S MANUAL 88...
Страница 93: ...MKIV OPERATOR S MANUAL 90...
Страница 127: ...MKIV OPERATOR S MANUAL 124...
Страница 133: ...MKIV OPERATOR S MANUAL 130...
Страница 135: ...MKIV OPERATOR S MANUAL 132...


