7.6
Connect PV generator to device
7.6.1
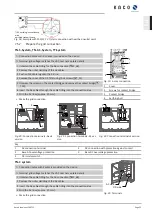
Configuring the DC plug connector
d
c
a
b
1
2
5
6
Fig. 25:
Insert wires
3
4
Fig. 26:
Slide insert into sleeve
7
Fig. 27:
Check fastening
Key
1
Wire for DC connection
5
Cable fitting
2
Spring
6
Contact plug
3
Insert
7
Coupling
4
Sleeve
↻
Connection area opened.
↻
NOTE: Before proceeding with the isolation ensure that you do not cut any individual wires.
1 Insert isolated wires with twisted ends carefully up to the connection.
NOTE: Wire ends must be visible in the spring.
2 Close the spring so that the spring latches.
3 Slide insert into sleeve.
4 Secure and tighten the cover on the cable fitting [ W_15
/
1.8 Nm]
5 Join insert with contact plug.
6 Check latch by lightly pulling on the coupling.
»
Make the electrical connections.
NOTE
The permissible bending radius of at least 4x the cable diameter should be observed during installation.
Excessive bending force may negatively impact the protection rating.
›
All mechanical loads must be absorbed in front of the plug connection.
›
Rigid adaptations are not permitted on DC plug connectors.
7.6.2
Inserting the DC string fuse
CAUTION
Damage to PV generator in case of faulty design of string fuses.
If the string fuses are too large, the PV generator can be damaged by excessive current.
›
Select suitable string fuses depending on possible short-circuit currents and the cable cross-sections
used. Refer to this when using the string fuses supplied.
Model
Recommended fuses
Quantity
PV- Fuse
10
Kaco blueplanet 29.0TL3
Page 25
EN


