15
English
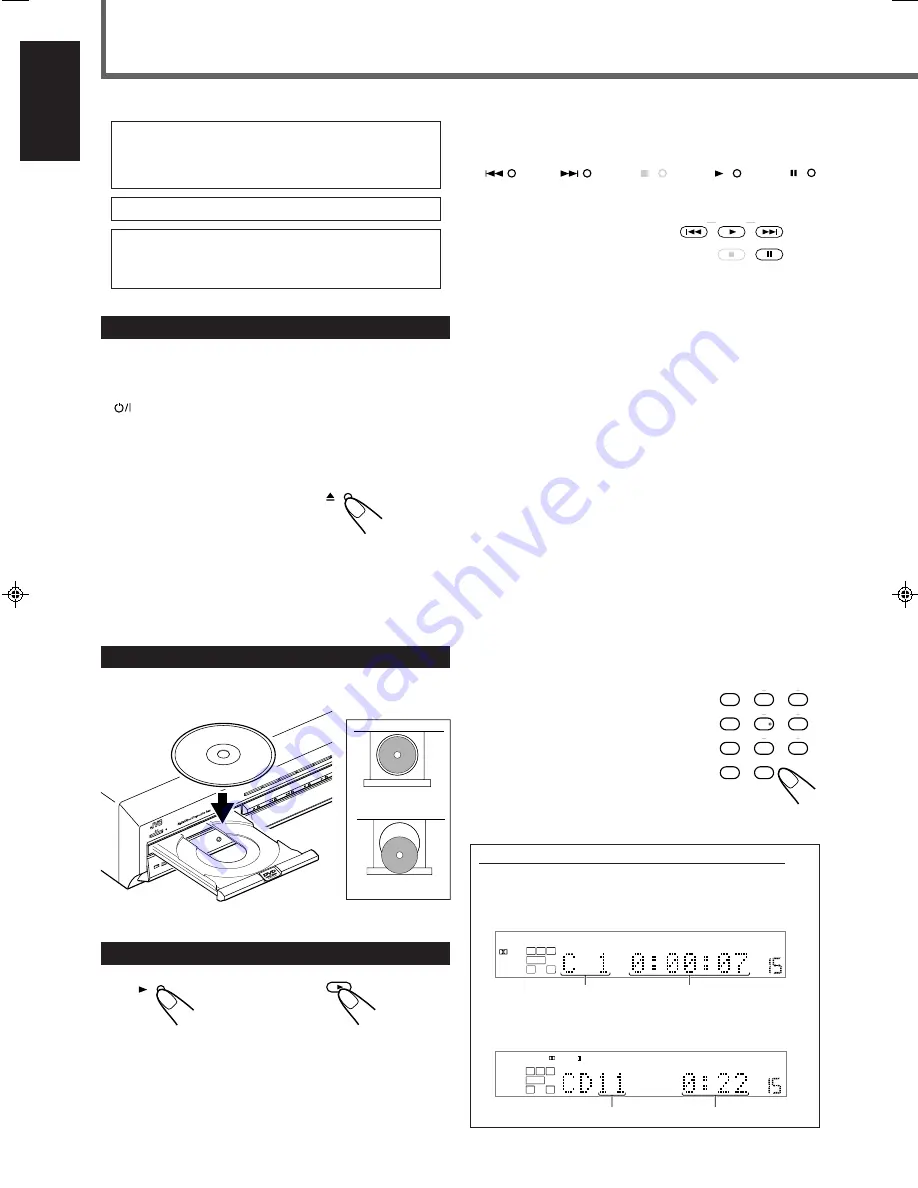
By pressing the following buttons, you can pause, advance, or reverse
playback, and locate the beginning of the title, chapter, or track.
To stop playback temporarily
Press
8
.
• Pressing
3
starts playback again.
To move back the playback position by 10 seconds
(for DVD VIDEO only)
Press
3
during DVD VIDEO playback.
The unit moves the playback position about 10 seconds before the
current position, then resumes playback.
To advance or reverse playback quickly
Press and hold
¢
or
4
.
While you are pressing and holding
¢
(or
4
), the unit advances
(or reverses: for DVD VIDEO and audio CD) playback 5 times as
fast as the normal speed. When you press and hold
¢
(or
4
)
further, the playback speed changes up to 20 times as fast as the
normal speed.
• Releasing the button resumes the normal playback.
To locate the beginning of the chapter or track
Press
¢
or
4
.
Press
¢
(or
4
) to locate the beginning of the next (current or
previous) chapter or track.
To locate the chapter or track using the number buttons
Press the number buttons (1–10, +10) to select the number of the
desired chapter or track.
Ex. : To select 3, press 3.
To select 11, press +10, then 1.
To select 20, press +10, then 10.
Basic DVD Player Operations
For details about DVD player operations, see pages 29 to
42.
• You can also play back MP3 and JPEG files. See pages 43
to 46.
REW/
(
TUNING
9
/FF
FM MODE
STROBE
– TV/DBS CH +
About indication on the display while playing back a disc
While you are playing back a disc, the playback information
appears on the display as follows:
Ex. : When DVD VIDEO is loaded
Ex. : When audio CD is loaded
Track number
Elapsed playing time
SPK.
DIGITAL AUTO
VOLUME
PRO LOGIC
L
R
SUBWFR
From the remote control ONLY
2
3
1
5
6
4
8
9
7
10
/0
+10
100+
EFFECT
TEST
SURR ON/OFF
SURR MODE
–
SUBWOOFER
+
CENTER
REAR·L
REAR·R
DIGITAL AUTO
VOLUME
DIGITAL
AUTO SURROUND
SPK.
LFE
LS
RS
L
C
R
SUBWFR
Chapter number
Elapsed playing time
On the front panel
From the remote control
•
To change the color system of this unit, see page 7.
•
When using remote control, press DVD to change the
remote control operation mode to the DVD player
operation.
1
Open the Disc Tray
Before turning on the unit, turn on your TV and select the correct
video input (see the manual supplied with your TV).
• When you use a JVC’s TV, you can turn on your TV by pressing
STANDBY/ON TV on the remote control and select the
video input by pressing TV/VIDEO. (If your TV is not a JVC’s,
see “Operating Other Manufacturers’ Equipment” on page 61.)
•
For changing the OSD messages—the information on the TV
—into the desired language, see pages 47 and 49.
Press
0
.
The unit is turned on and the disc tray opens.
The STANDBY lamp goes off and the illumination lamp lights up.
• When a disc is already loaded, pressing
3
turns on the unit and
starts playing back the loaded disc.
2
Load a Disc
Place a disc correctly with its label side up.
On the front panel ONLY
RX-DV3 HOME CINEMA DVD/CD CONTROL CENTER
TAPE/CDR
SOURCE NAME
TV
VCR
DBS
DVD
STA
ND
BY
STAN
DBY
/ON
INPUT
AT
T.
INPUT
ANALO
G/D
IGIT
AL
D I
G
I T
A L
S U
R R
O U
N D
ON/OFF
SU
RROU
ND
MODE
CORRECT
INCORRECT
3
Start Playback
Press
3
.
The disc tray closes and the unit starts playing back the loaded disc.
• You can also close the disc tray by pressing
0
on the front panel.
TUNING
On the front panel
From the remote control
EN15-18RX-DV3SL[UG]2.pm5
02.8.8, 2:21 PM
15


