


39
INSTRUCTIONS FOR USE
●
The open burners are thermoelectrically secured in
a way that the feed of gas will automatically be shut
off when the flame goes out.
●
Lay the burner caps always exactly on the burner
chalice.
●
The slots of the burner chalice must not be obstructed.
●
The burner caps are enamelled
●
Operate the open burners with items to be cooked
put on, only!
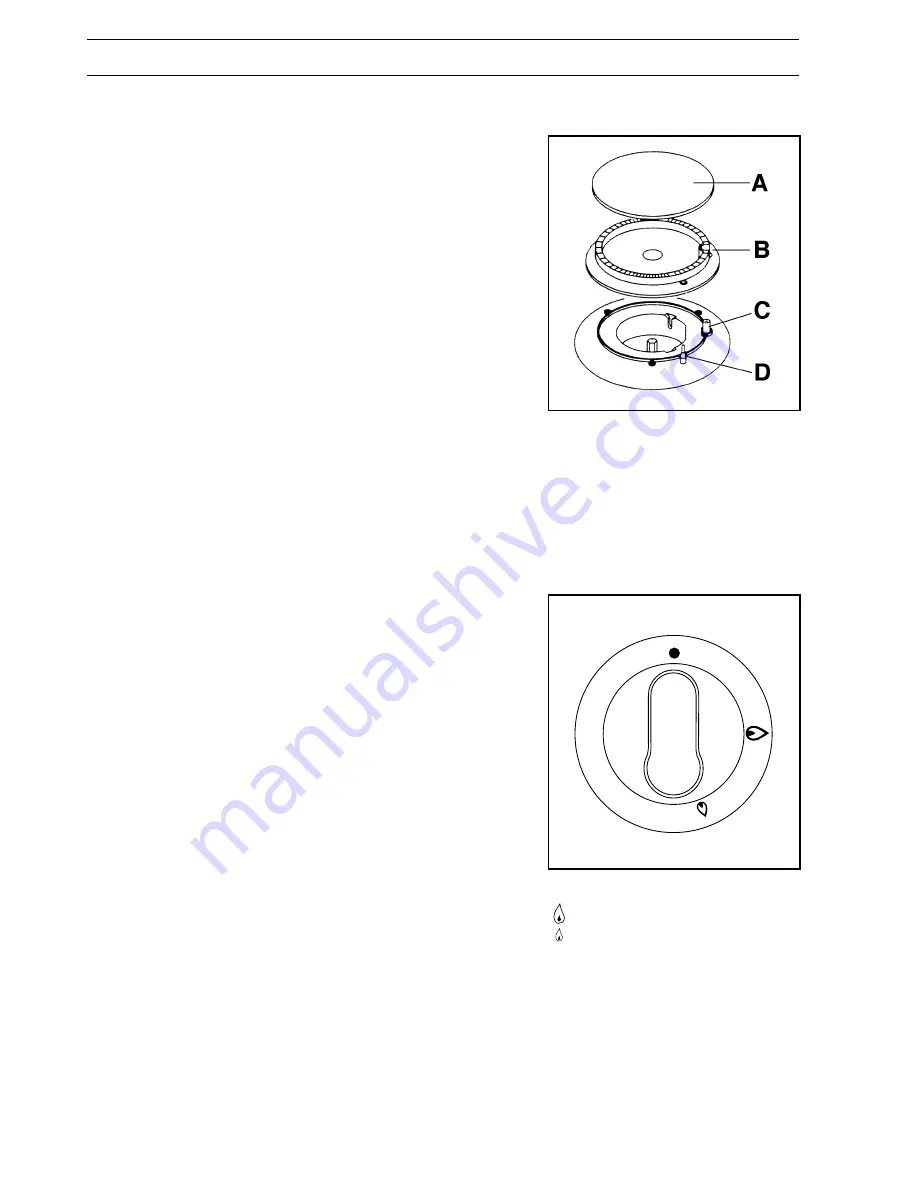
Fig. 5
Open burner
A Burner cap
B Flame distributor crown
C Spark plug
D Temperature sensor
PUTTING INTO OPERATION
OF THE OPEN BURNERS
To ignite the gas burner bring a flame (matchstick,
lighter or igniter) to the desired burner, with that push
the corresponding rotary knob quite in and turn it
counterclockwise up to the position for maximum tem-
perature. As soon as the burner is ignited, set the gas
flame as required.
In case of models with integrated automatic ignition
push the ignition button, which is marked by a small
spark symbol, at the same time quite push in the
corresponding rotary knob and turn it counterclockwise
up to the position for maximum temperature.
Because of pushing the ignition knob an ignition spark
will jump over to the burner and ignite it. After ignition of
the flame keep the rotary knob pushed in for about 5
seconds; this time is required to heat up the „tempera-
ture sensor“ (fig. 5, letter D) and to switch off the safety
valve, that otherwise would interrupt the feed of
gas. Afterwards check whether the flame is uniform and
turn the rotary knob to the desired strength.
In case the burner will in spite of several trials not ignite,
make sure that the flame distributor crown (fig. 5, letter
B) and the burner cap (fig. 5, letter A) are correctly laid
on.
To interrupt the gas feed turn turn the rotary knob in
clockwise direction up to position „
●
„.
When using fat or oil you must not leave it out of
visual control during the cooking procedure, as it
may flare up when being heated.
Fig. 6
●
Gas feed closed
High-burner
Low-burner
FO 0204
OPEN BURNERS