


CHAPTER 5: Connecting the Gateway
36
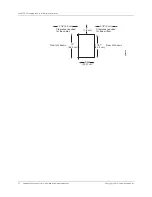
Cabling the Gateway to Management and Alarm Devices
Copyright © 2010, Juniper Networks, Inc.
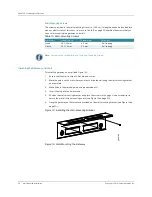
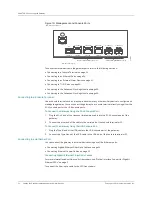
Connecting to T1/E1 Ports
The gateway has 16 T1/E1 ports. These ports are connected to a switch or a router in the network.
Each T1/E1 port has an RJ-45 receptacle. Use the RJ-45-to-RJ-45 interface cable to connect the
port to a networking device.
To connect the RJ-45-to-RJ-45 interface cable to the T1/E1 ports:
1.
Connect one RJ-45 end of the interface cable to the T1/E1 port on the front panel of the
gateway.
2.
Connect the other RJ-45 end of the interface cable to the T1/E1 port of any networking device.
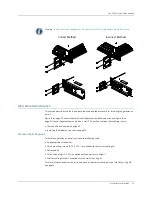
Connecting to the Advanced Clocking Module
You can use either of the two BNC connectors or the BITS interface on the advanced clocking
module.
To connect the BNC co-axial cable to the advanced clocking module:
1.
Connect one end of the BNC co-axial cable to either the 1PPS BNC connector or the 10 MHz
BNC connector on the advanced clocking module.
2.
Connect the other end of the BNC co-axial cable to the 10 MHz or 1PPS source network
equipment.
3.
Please ensure the 10MHz / 1PPS Sources are 50 ohms LVCMOS / LVTTL (3.3v) compatible.
To connect the interface cable to the advanced clocking module:
1.
Connect the RJ-45 end of the interface cable to the BITS interface on the front of the
advanced clocking module.
2.
Connect the other end of the interface cable to the T1/E1 port of any networking device.
Note:
Ensure a cable of 3m or less in length is used for the 10 MHz and 1PPS connectors.
Содержание BX7000
Страница 10: ... x Copyright 2010 Juniper Networks Inc ...
Страница 12: ... xii Copyright 2010 Juniper Networks Inc ...
Страница 18: ...About This Guide xviii Requesting Support Copyright 2010 Juniper Networks Inc ...
Страница 20: ... 2 Copyright 2010 Juniper Networks Inc ...
Страница 36: ...CHAPTER 1 BX7000 Multi Access Gateway Overview 18 Advanced Clocking Module Copyright 2010 Juniper Networks Inc ...
Страница 60: ...CHAPTER 6 Grounding and Powering the Gateway 42 Powering Off the Gateway Copyright 2010 Juniper Networks Inc ...
Страница 64: ...CHAPTER 7 Accessing and Configuring the Gateway 46 Initial Setup Copyright 2010 Juniper Networks Inc ...
Страница 66: ... 48 Copyright 2010 Juniper Networks Inc ...
Страница 76: ...CHAPTER 9 Troubleshooting 58 Troubleshooting the Advanced Clocking Module Copyright 2010 Juniper Networks Inc ...
Страница 90: ... 72 Copyright 2010 Juniper Networks Inc ...
Страница 122: ... 104 Hardware Compliance Copyright 2010 Juniper Networks Inc ...
Страница 131: ...Copyright 2010 Juniper Networks Inc 113 Appendix E Declaration of Conformity ...
Страница 132: ... 114 Copyright 2010 Juniper Networks Inc ...
Страница 133: ...Copyright 2011 Juniper Networks Inc 115 PART 4 Index z Index on page 117 ...
Страница 134: ... 116 Copyright 2010 Juniper Networks Inc ...