


Updated 06-2015
TOUCAN Duo
models
82
REMOVAL - INSTALLATION PROCEDURES
VI-5
VI-5
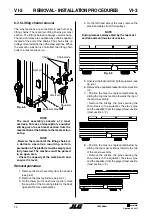
5- Lubricate the rod with new hydraulic oil.
6- Remove the cover from the cylinder barrel.
Ensure the barrel is clean.
7- Lubricate the wear ring with new hydraulic oil
and install the rod assembly in the cylinder
barrel with a slight twisting motion.
Do not use compressed air to test or pressurize
the cylinder.
8. Lubricate and test the cylinder. Check for proper
operation and any leakage.
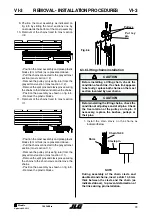
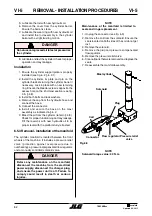
Installation
1- Ensure the cylinder support plate is properly
installed (see fig. 6.2, § 6.3.1).
2- Install the cylinder, its plate and pin on the
cylinder brackets turning the cylinder barrel if
necessary. Lock in place with a new retaining
ring. Ensure the bleeder screw is opposite the
access hole on the 2nd mast section (see fig.
4.5, § 4.8).
3- Install both bolts and lock washers.
4- Remove the cap from the hydraulic hose and
connect the hose.
5- Connect the connector.
6- Install and secure the base on the mast
assembly as indicated in § 6.2.
7- Bleed the air from the cylinder (refer to § 4.8).
Check for proper functionning and any leakage.
Fill the reservoir with new hydraulic oil to its
proper level with the platform fully retracted.
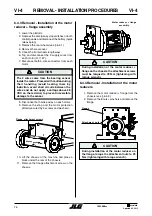
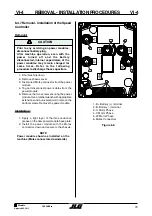
6.5.4 Removal - Installation of the manifold
The cylinder manifold is located between the front
wheels of the machine. It includes a pressure relief
valve (protection against overpressure due to
overheating), a pressure compensated flow regulator,
and a manually controlled solenoid valve.
Before any maintenance on the manifold,
disconnect the machine from the electrical
power supply, disconnect the charger plug,
and ensure the power unit is off. Failure to
comply could result in death or serious
injuries.
DANGER
DANGER
NOTE
Maintenance of the manifold is limited to
seals and rings replacement.
1- Unplug the connector (see fig. 6.9).
2- Remove the coil from the solenoid. Ensure the
seals located on both sides of the coil do not get
lost.
3- Remove the solenoid.
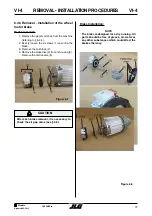
4- Remove the plug and pressure compensated
flow regulator.
5- Remove the pressure relief valve.
6- Clean all parts that were removed and replace the
seals.
7- Reassemble the manifold assembly.
NOTE
Solenoid torque value: 40 N.m.
Mast cylinder
Connector
Coil
Plug
Pressure relief
valve
Flow regulator
Fig 6.9
Solenoid
Содержание TOUCAN DUO
Страница 2: ......
Страница 3: ...3 TOUCAN Duo Updated 06 2015 Models MA0323 05 Models N ________________...
Страница 4: ......
Страница 8: ...Updated 06 2015 TOUCAN Duo models 8 This page has been left blank intentionally...
Страница 9: ...CHAPTER 1 INTRODUCTION...
Страница 14: ...Updated 06 2015 TOUCAN Duo models 14 This page has been left blank intentionally...
Страница 15: ...CHAPTER 2 WORK PLATFORM CHARACTERISTICS...
Страница 19: ...CHAPTER 3 GENERAL...
Страница 34: ...Updated 06 2015 TOUCAN Duo models 34 This page has been intentionnally left blank...
Страница 35: ...CHAPTER 4 ADJUSTMENTS...
Страница 48: ...Updated 06 2015 TOUCAN Duo models 48 This page has been intentionnally left blank...
Страница 49: ...CHAPTER 5 SCHEMATICS...
Страница 50: ...Updated 06 2015 TOUCAN Duo models 50 This page has been intentionnally left blank...
Страница 53: ...53 TOUCAN Duo Updated 06 2015 Models R f ELE258 half right SCHEMATICS V 1 V 1...
Страница 54: ...Updated 06 2015 TOUCAN Duo models 54 Wiring diagramme Power SCHEMATICS V 1 V 1...
Страница 55: ...55 TOUCAN Duo Updated 06 2015 Models Wiring diagramme Controls SCHEMATICS V 1 V 1...
Страница 56: ...Updated 06 2015 TOUCAN Duo models 56 Upper control box SCHEMATICS V 1 V 1...
Страница 57: ...57 TOUCAN Duo Updated 06 2015 Models Shelf box SCHEMATICS V 1 V 1...
Страница 58: ...Updated 06 2015 TOUCAN Duo models 58 Cardbox SCHEMATICS V 1 V 1...
Страница 59: ...59 TOUCAN Duo Updated 06 2015 Models Lower control box SCHEMATICS V 1 V 1...
Страница 61: ...61 TOUCAN Duo Updated 06 2015 Models SCHEMATICS V 2 V 2 5 2 Hydraulic sch matic Ref FL0148_04...
Страница 62: ...Updated 06 2015 TOUCAN Duo models 62 This page has been intentionnally left blank...
Страница 63: ...CHAPTER 6 REMOVAL INSTALLATION PROCEDURES...
Страница 84: ...Updated 06 2015 TOUCAN Duo models 84 NOTES...
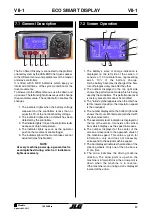
Страница 85: ...85 TOUCAN Duo Updated 06 2015 Models CHAPTER 7 ECO SMART DISPLAY...
Страница 86: ...Updated 06 2015 TOUCAN Duo models 86 This page has been intentionnally left blank...
Страница 89: ...89 TOUCAN Duo Updated 06 2015 Models ECO SMART DISPLAY VII 4 VII 4 7 4 Menus display 7 4 1 Display...
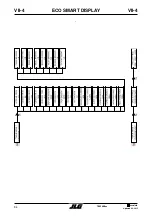
Страница 90: ...Updated 06 2015 TOUCAN Duo models 90 ECO SMART DISPLAY VII 4 VII 4 7 4 2 Slave Controller...
Страница 91: ...91 TOUCAN Duo Updated 06 2015 Models ECO SMART DISPLAY VII 4 VII 4...
Страница 92: ...Updated 06 2015 TOUCAN Duo models 92 ECO SMART DISPLAY VII 4 VII 4...
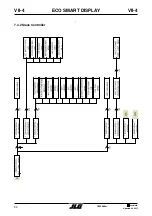
Страница 93: ...93 TOUCAN Duo Updated 06 2015 Models 7 4 3 Master Controller ECO SMART DISPLAY VII 4 VII 4...
Страница 94: ...Updated 06 2015 TOUCAN Duo models 94 ECO SMART DISPLAY VII 4 VII 4...
Страница 95: ...95 TOUCAN Duo Updated 06 2015 Models ECO SMART DISPLAY VII 4 VII 4...
Страница 96: ...Updated 06 2015 TOUCAN Duo models 96 ECO SMART DISPLAY VII 4 VII 4...
Страница 99: ...99 TOUCAN Duo Updated 06 2015 Models CHAPTER 8 ALARMS AND WARNINGS...
Страница 100: ...Updated 06 2015 TOUCAN Duo models 100 This page has been intentionnally left blank...
Страница 102: ...Updated 06 2015 TOUCAN Duo models 102 8 3 Alarms ALARMS AND WARNINGS VIII 3 VIII 3...
Страница 103: ...103 TOUCAN Duo Updated 06 2015 Models ALARMS AND WARNINGS VIII 3 VIII 3...
Страница 104: ...Updated 06 2015 TOUCAN Duo models 104 ALARMS AND WARNINGS VIII 3 VIII 3...
Страница 105: ...105 TOUCAN Duo Updated 06 2015 Models ALARMS AND WARNINGS VIII 4 VIII 4 8 4 Warnings...
Страница 106: ...Updated 06 2015 TOUCAN Duo models 106 ALARMS AND WARNINGS VIII 4 VIII 4...
Страница 107: ...107 TOUCAN Duo Updated 06 2015 Models ALARMS AND WARNINGS VIII 4 VIII 4...
Страница 108: ...Updated 06 2015 TOUCAN Duo models 108 This page has been intentionnaly left blank...