Updated 06-2015
TOUCAN Duo
models
72
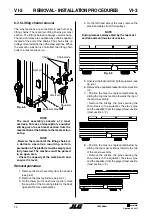
6.3.5 Lifting chains removal
The mast sections are connected to each other by
lifting chains. There are two lifting chains per mast
section. The lifting chains are always under tension.
The tension forces are equalized by a chain equalizer
located at the end of the chains. The chains ride on
pulleys mounted at the top of the mast sections. When
the elevation function is controlled, the lifting chain
pulls the mast sections up.
NOTE
The mast assembly consists of 4 mast
sections. For ease of description, a number
will be given to each mast section from the
mast section at the bottom to the mast section
on top.
NOTE
- Beware: the removal of the lifting chains is
a delicate operation requiring certain
precautions. The platform must be empty and
fully lowered. The machine must be parked
in an open area.
- Check the capacity of the work bench and
ensure it is level.
Removal procedure
1- Remove the mast assembly from the chassis
(see § 6.2)
2- Remove the mast cylinder (see § 6.3.1)
3- On the lower part of each mast section, mark
the position of the mounting plate for the back
up cable. Remove both plates.
REMOVAL - INSTALLATION PROCEDURES
VI-3
VI-3
4- On the left hand side of the mast, remove the
electrical cables from their pulleys.
NOTE
During removal, always start by the top mast
section and continue in succession.
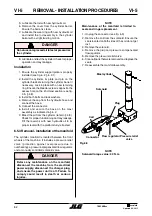
5- Unscrew the locknuts from both equalizers (see
fig. 6.4).
6- Remove the equalizer bracket from mast section
n°4.
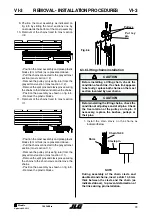
7- • Position the mast as represented below by
sliding the top mast section towards the top of
the mast assembly.
• Remove the circlips, the pins securing the
chain clevis to the equalizer, the clevis pins
and the equalizer from the greyed mast section
(mast section n°3).
8- • Position the mast as represented below by
sliding the top mast sections towards the top
of the mast assembly.
• Remove the circlips, the pins securing the
chain clevis to the equalizer, the clevis pins
and the equalizer from the greyed mast section
(mast section n°2).
Fig. 6.5
Chain clevis
Chain
Clevis pin
Split pin
Equalizer bracket
Fig. 6.4
Equalizer
Содержание TOUCAN DUO
Страница 2: ......
Страница 3: ...3 TOUCAN Duo Updated 06 2015 Models MA0323 05 Models N ________________...
Страница 4: ......
Страница 8: ...Updated 06 2015 TOUCAN Duo models 8 This page has been left blank intentionally...
Страница 9: ...CHAPTER 1 INTRODUCTION...
Страница 14: ...Updated 06 2015 TOUCAN Duo models 14 This page has been left blank intentionally...
Страница 15: ...CHAPTER 2 WORK PLATFORM CHARACTERISTICS...
Страница 19: ...CHAPTER 3 GENERAL...
Страница 34: ...Updated 06 2015 TOUCAN Duo models 34 This page has been intentionnally left blank...
Страница 35: ...CHAPTER 4 ADJUSTMENTS...
Страница 48: ...Updated 06 2015 TOUCAN Duo models 48 This page has been intentionnally left blank...
Страница 49: ...CHAPTER 5 SCHEMATICS...
Страница 50: ...Updated 06 2015 TOUCAN Duo models 50 This page has been intentionnally left blank...
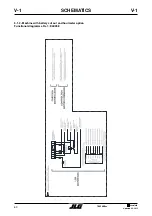
Страница 53: ...53 TOUCAN Duo Updated 06 2015 Models R f ELE258 half right SCHEMATICS V 1 V 1...
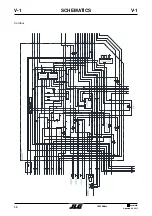
Страница 54: ...Updated 06 2015 TOUCAN Duo models 54 Wiring diagramme Power SCHEMATICS V 1 V 1...
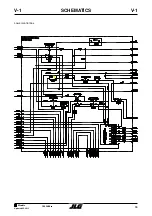
Страница 55: ...55 TOUCAN Duo Updated 06 2015 Models Wiring diagramme Controls SCHEMATICS V 1 V 1...
Страница 56: ...Updated 06 2015 TOUCAN Duo models 56 Upper control box SCHEMATICS V 1 V 1...
Страница 57: ...57 TOUCAN Duo Updated 06 2015 Models Shelf box SCHEMATICS V 1 V 1...
Страница 58: ...Updated 06 2015 TOUCAN Duo models 58 Cardbox SCHEMATICS V 1 V 1...
Страница 59: ...59 TOUCAN Duo Updated 06 2015 Models Lower control box SCHEMATICS V 1 V 1...
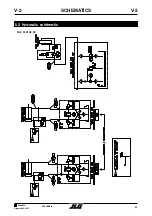
Страница 61: ...61 TOUCAN Duo Updated 06 2015 Models SCHEMATICS V 2 V 2 5 2 Hydraulic sch matic Ref FL0148_04...
Страница 62: ...Updated 06 2015 TOUCAN Duo models 62 This page has been intentionnally left blank...
Страница 63: ...CHAPTER 6 REMOVAL INSTALLATION PROCEDURES...
Страница 84: ...Updated 06 2015 TOUCAN Duo models 84 NOTES...
Страница 85: ...85 TOUCAN Duo Updated 06 2015 Models CHAPTER 7 ECO SMART DISPLAY...
Страница 86: ...Updated 06 2015 TOUCAN Duo models 86 This page has been intentionnally left blank...
Страница 89: ...89 TOUCAN Duo Updated 06 2015 Models ECO SMART DISPLAY VII 4 VII 4 7 4 Menus display 7 4 1 Display...
Страница 90: ...Updated 06 2015 TOUCAN Duo models 90 ECO SMART DISPLAY VII 4 VII 4 7 4 2 Slave Controller...
Страница 91: ...91 TOUCAN Duo Updated 06 2015 Models ECO SMART DISPLAY VII 4 VII 4...
Страница 92: ...Updated 06 2015 TOUCAN Duo models 92 ECO SMART DISPLAY VII 4 VII 4...
Страница 93: ...93 TOUCAN Duo Updated 06 2015 Models 7 4 3 Master Controller ECO SMART DISPLAY VII 4 VII 4...
Страница 94: ...Updated 06 2015 TOUCAN Duo models 94 ECO SMART DISPLAY VII 4 VII 4...
Страница 95: ...95 TOUCAN Duo Updated 06 2015 Models ECO SMART DISPLAY VII 4 VII 4...
Страница 96: ...Updated 06 2015 TOUCAN Duo models 96 ECO SMART DISPLAY VII 4 VII 4...
Страница 99: ...99 TOUCAN Duo Updated 06 2015 Models CHAPTER 8 ALARMS AND WARNINGS...
Страница 100: ...Updated 06 2015 TOUCAN Duo models 100 This page has been intentionnally left blank...
Страница 102: ...Updated 06 2015 TOUCAN Duo models 102 8 3 Alarms ALARMS AND WARNINGS VIII 3 VIII 3...
Страница 103: ...103 TOUCAN Duo Updated 06 2015 Models ALARMS AND WARNINGS VIII 3 VIII 3...
Страница 104: ...Updated 06 2015 TOUCAN Duo models 104 ALARMS AND WARNINGS VIII 3 VIII 3...
Страница 105: ...105 TOUCAN Duo Updated 06 2015 Models ALARMS AND WARNINGS VIII 4 VIII 4 8 4 Warnings...
Страница 106: ...Updated 06 2015 TOUCAN Duo models 106 ALARMS AND WARNINGS VIII 4 VIII 4...
Страница 107: ...107 TOUCAN Duo Updated 06 2015 Models ALARMS AND WARNINGS VIII 4 VIII 4...
Страница 108: ...Updated 06 2015 TOUCAN Duo models 108 This page has been intentionnaly left blank...

